The increasing sophistication of camera phones like the iPhone 16 can feel like a mixed blessing. While getting more photographic power is always nice, this can also bring head-scratching complexity.
Composition: Grid and Level on
Formats: HEIF (High Efficiency), ProRaw Max (48MP)
ProRaw format: JPEG-XL Lossy
Photographic Styles: Reduce 'Tone' by -40 to -70
Camera Control: launch with double-click
Camera Control default tool: Exposure
Other apps: Lightroom, Halide, Photopills, Windy, Clear Outside
As TechRadar’s former cameras editor, I’ve spent many hours setting up cameras to behave the way I want them to. And as the new owner of an iPhone 16 Pro, I’ve just spent a few days doing the same with Apple’s new flagship phone – which is the most camera-like phone I’ve used so far.
When I say ‘camera-like,’ I don’t just mean performance (although the 16 Pro is currently the best camera phone you can buy). It's more that the shooting experience can now be tweaked to feel more like the best compact cameras than ever before.
Not all of these settings are immediately obvious or turned on by default. So, if you've felt like you've been missing a user manual for the iPhone 16 and 16 Pro's camera, consider this a handy starting point for taking some of your best photos in 2025.
1. The basics: composition tools
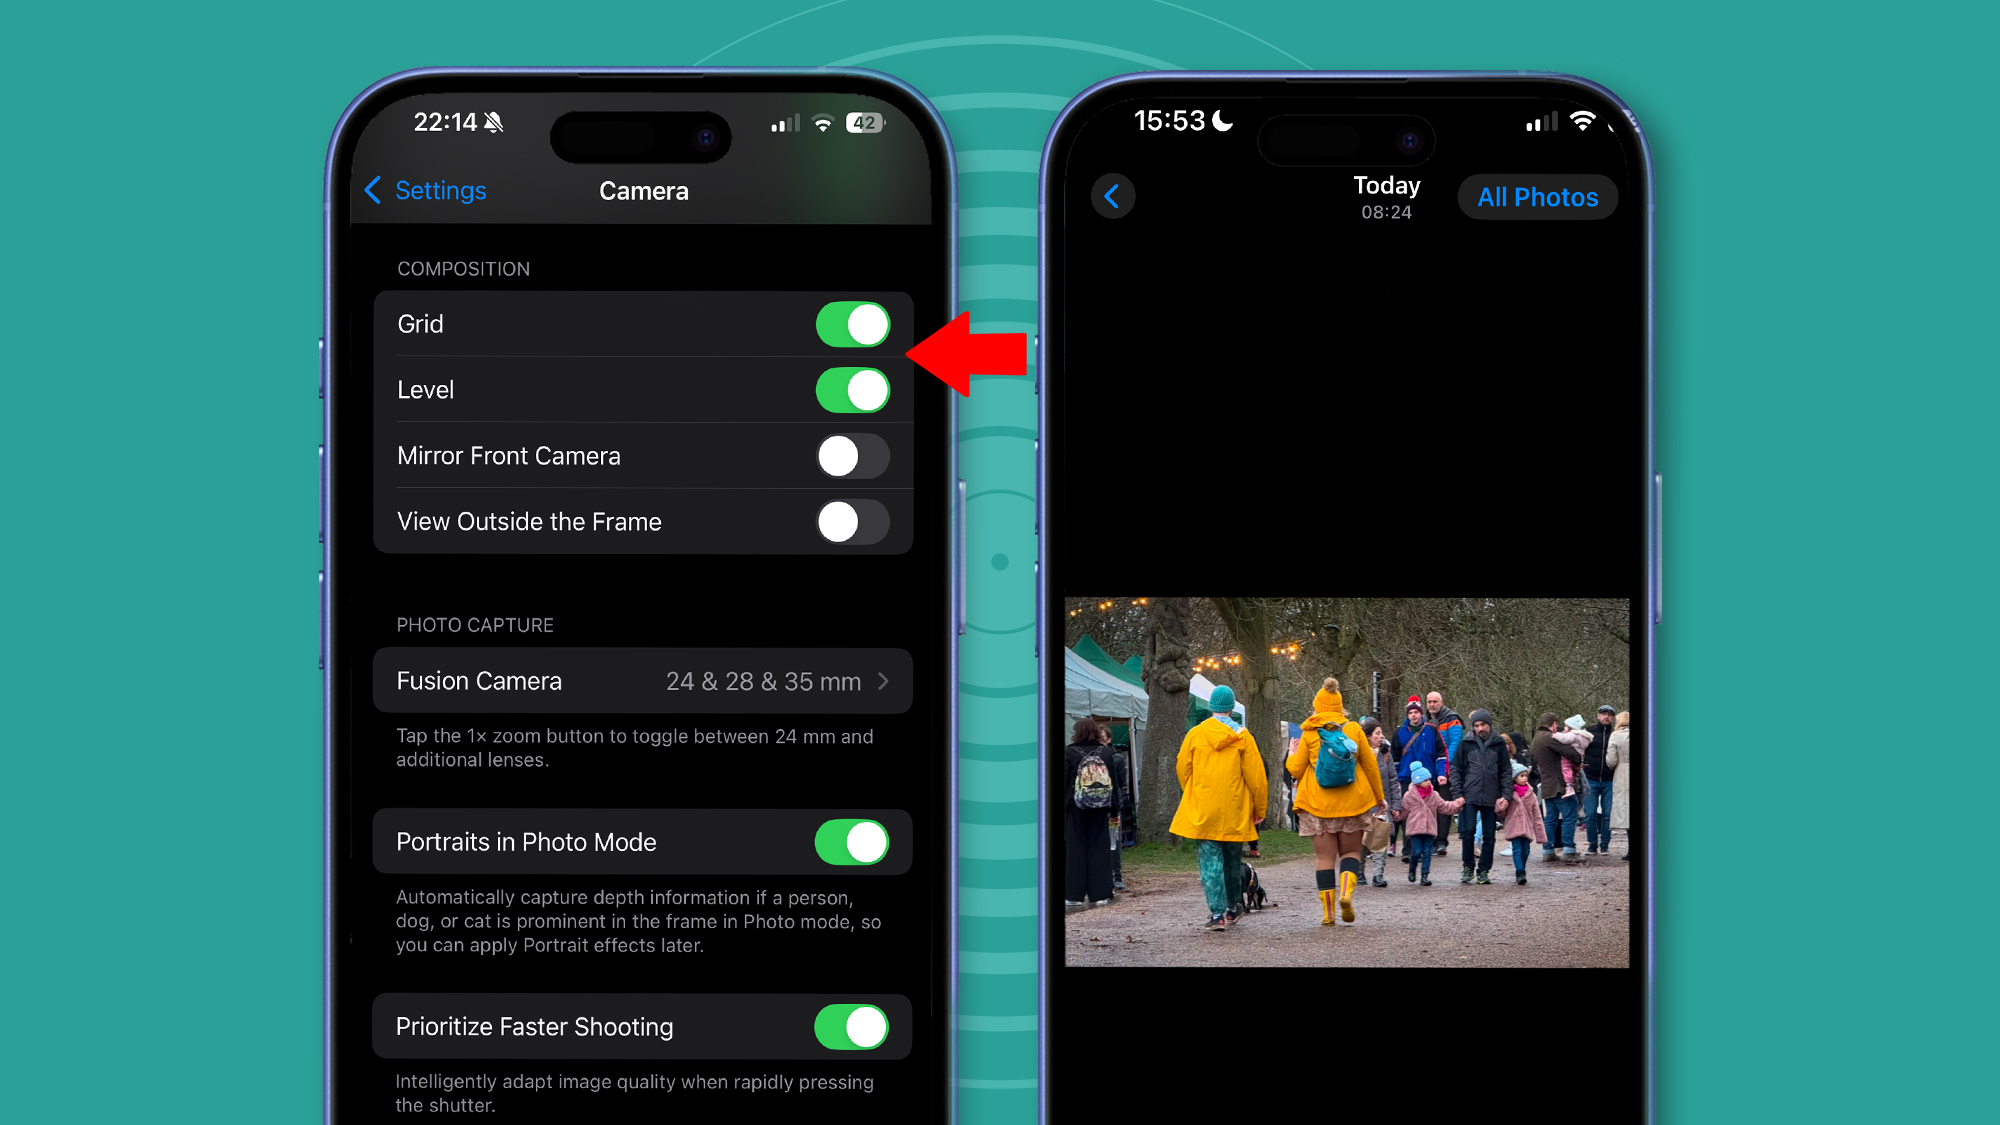
If you want your iPhone 16 or 16 Pro to behave more like a mirrorless camera, there are a few things you should toggle on in the settings.
Firstly, go to Settings > Camera and scroll down to Composition. Make sure both Grid and Level are turned on. The Grid is a great way to improve your composition by following classic photographic guidelines like the Rule of Thirds.
The next time you frame a shot, place interesting subjects or focal points where those four lines meet. It will give your photos a natural tension, particularly when combined with other techniques like leading lines.
Similarly, the Level is effectively a spirit level to make sure your horizons are straight. Don't feel wedded to seeing that line turn yellow every time for a perfectly straight shot – sometimes, you'll want to do the opposite to create some added drama. But it'll help add some polish to your landscape shots.
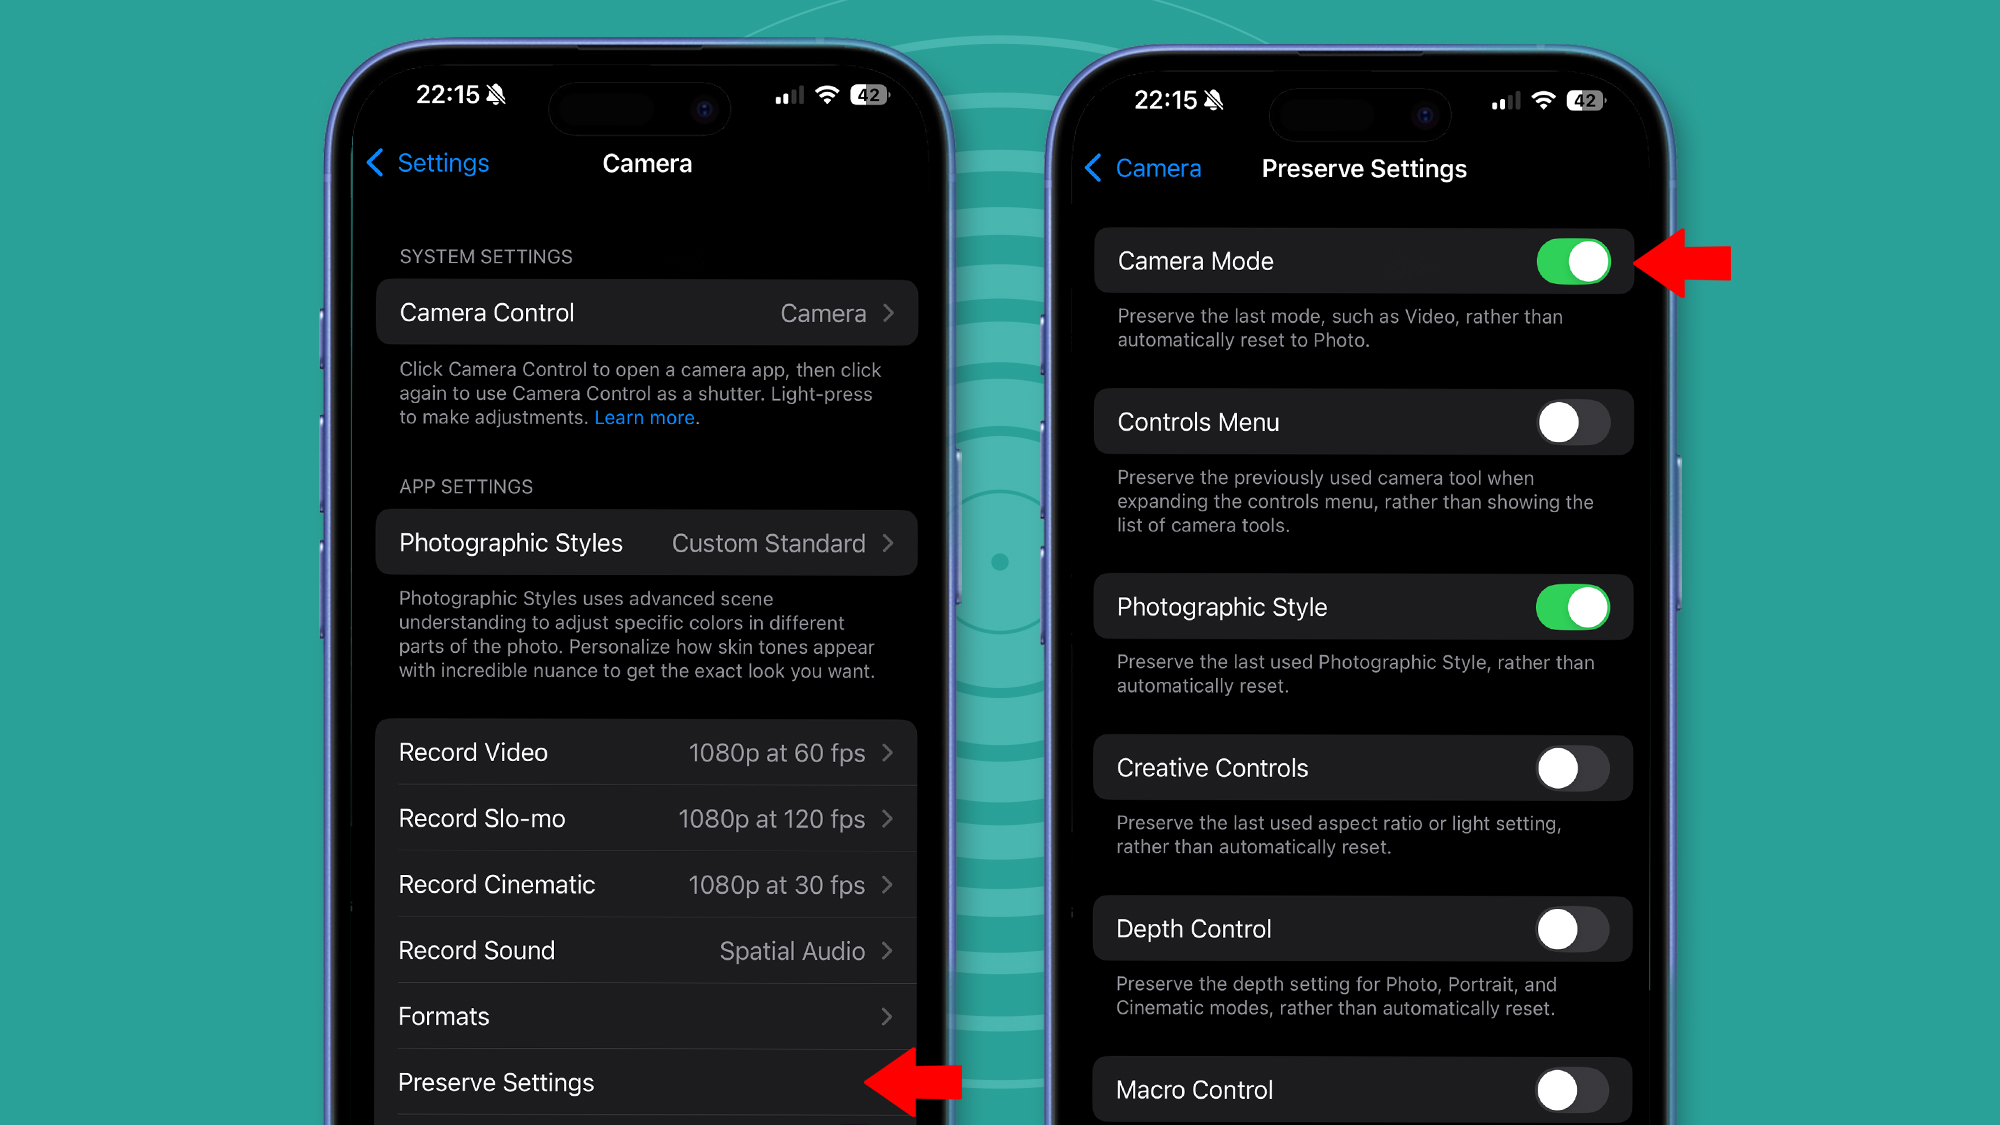
Lastly, go to Settings > Camera > Preserve Settings and turn on some of your favorite camera modes. Real cameras don't reset to their default settings every time you turn them off because photographers tend to dial in a particular starting point for every shoot.
For example, I've toggled on the Camera Mode, Photographic Style, and Exposure Adjustment settings because I'd prefer these to stay the same based on what I've chosen rather than Apple's preference. That way, whenever I open the Camera app I know exactly where I'll be tweaking from.
2. Next steps: file format fun
Want to make your iPhone 16 or 16 Pro feel and perform even more like a camera? There are a few more things you can do.
Firstly, there's the dull but necessary task of choosing the best photo file formats. There are two broad kinds to decide on – compressed formats (like HEIF and JPEG) which have photo edits baked in, and raw (or at least, more malleable) formats like ProRaw, which give you more flexibility when editing.
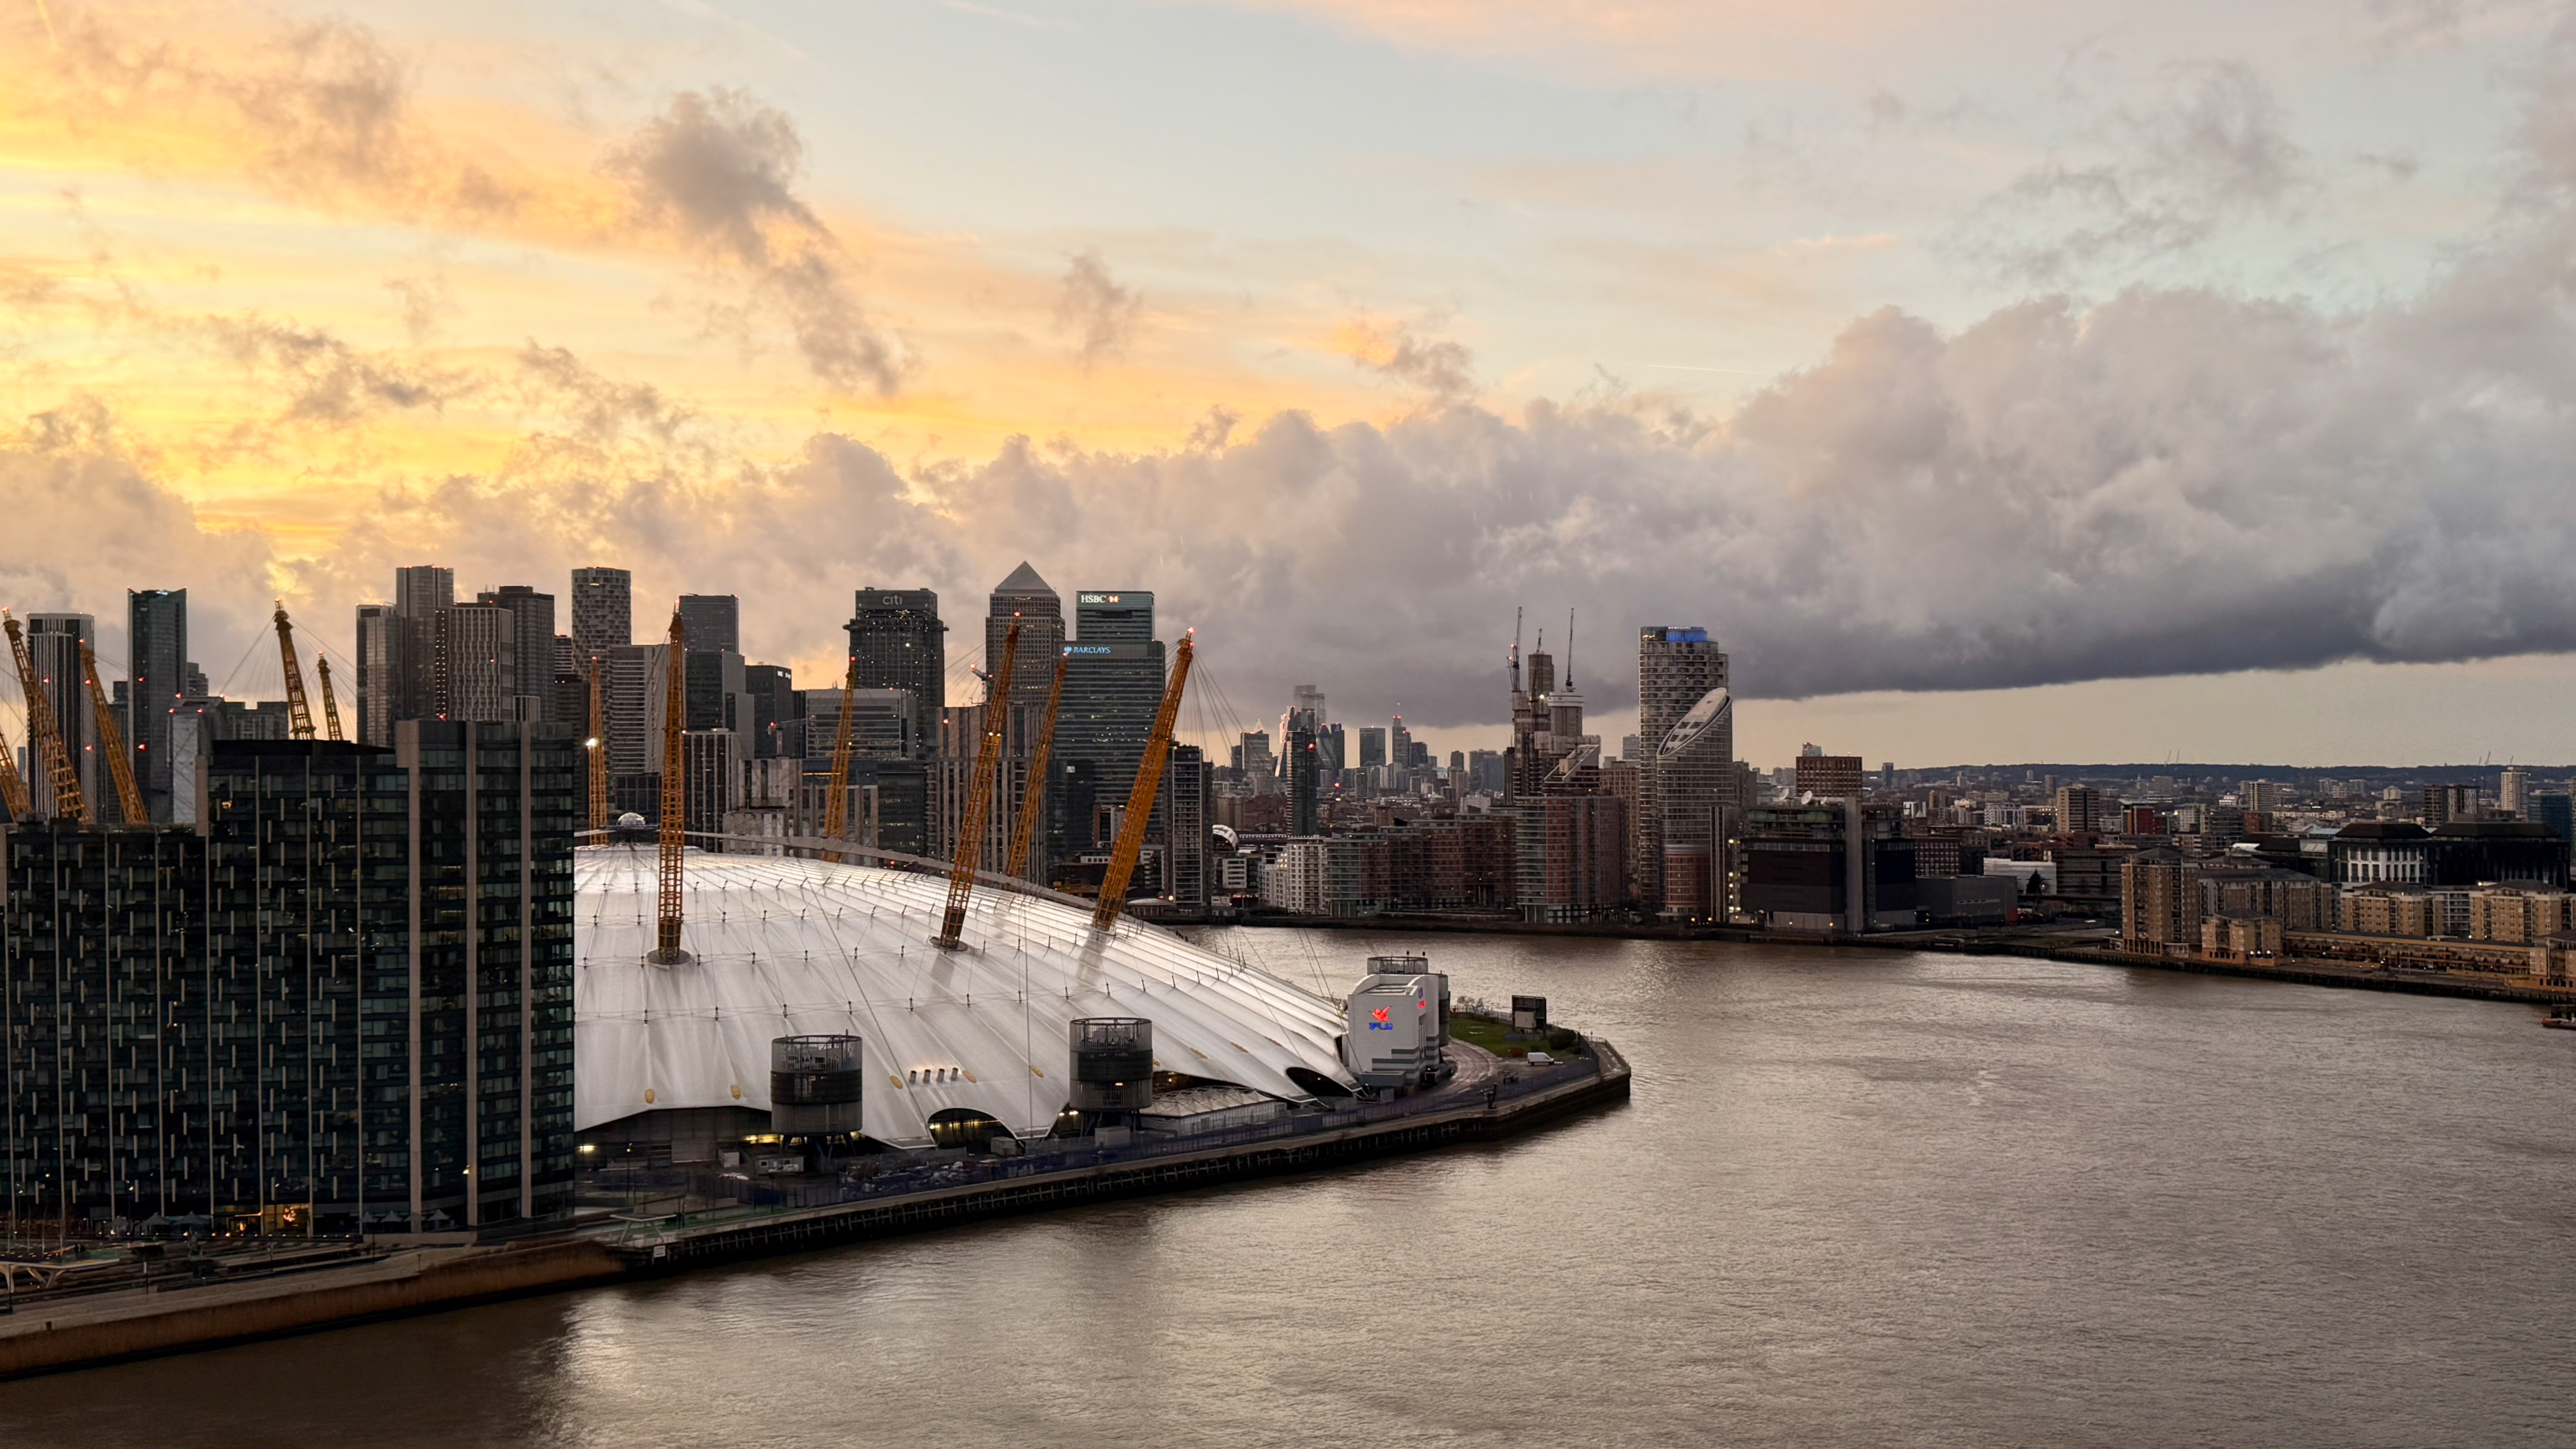
I use both depending on the situation. The photo below shows an unprocessed iPhone DNG file (left) next to one that's been edited in Lightroom (right). Editing apps let you make 'local' adjustments that are more precise than 'global' ones that affect the whole photo.
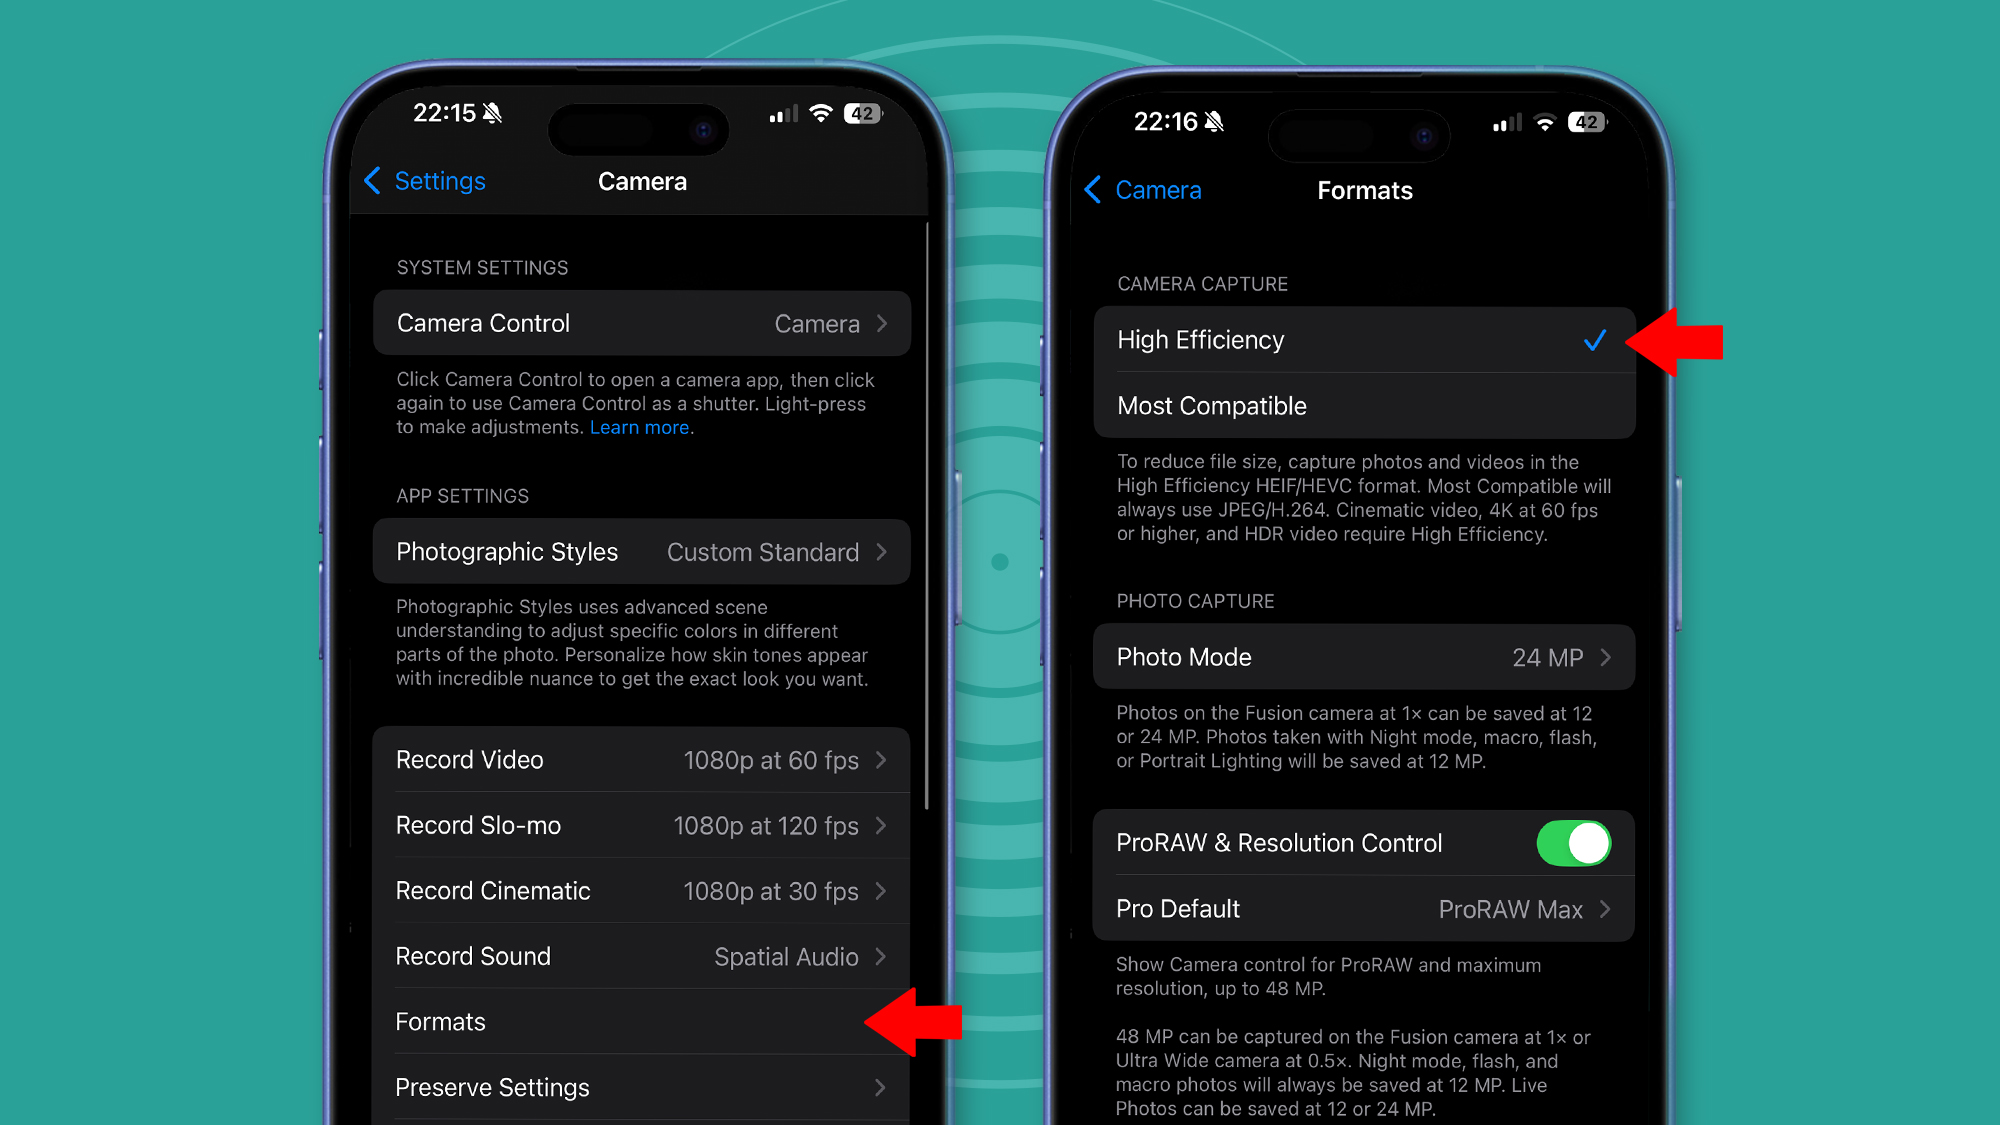
For the first type, go to Settings > Camera > Formats, and at the top, choose 'High Efficiency' (which means your shots will be in the HEIF format). The benefit of this is that you'll be able to tweak and apply Apple's Photographic Styles (more on those below) after you've taken your photo. That isn't possible with the 'Most Compatible' JPEG option.
Next it's time to specify your iPhone 16 or 16 Pro's raw format by toggling on 'ProRaw & Resolution Control.' What you choose here depends on how much editing you like to do. If the answer is 'not much,' then 'HEIF Max (up to 48MP)' should be fine. But if, like me, you use the likes of Lightroom to pull back shadow or highlight detail and more, then go for 'ProRaw Max (up to 48MP)'.
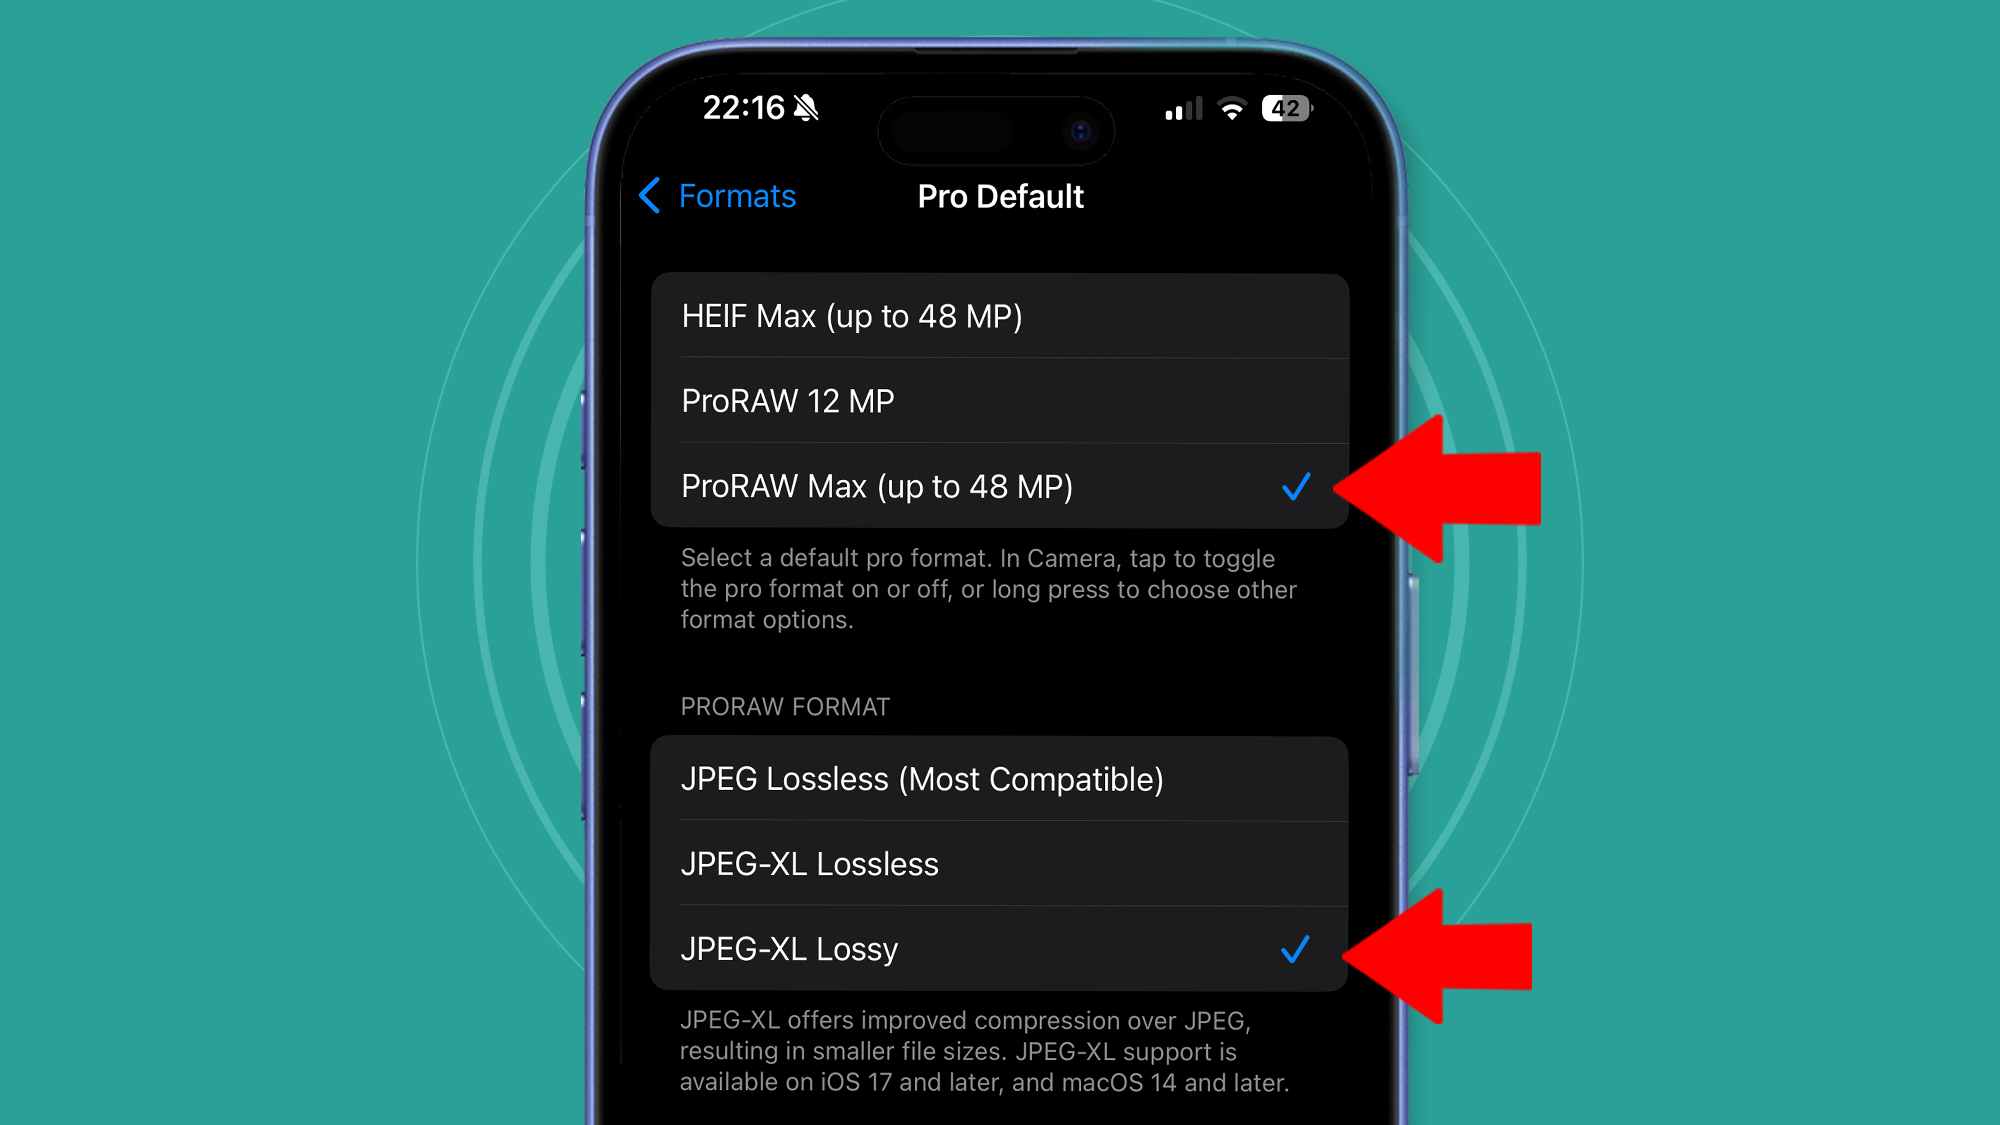
I'm less worried about the latter taking up too much storage because below that, in 'ProRaw format,' I've chosen the confusingly named 'JPEG-XL Lossy' option. This reduces file sizes by about 75-80% without a noticeable loss of image quality or resolution.
How does this all work when you're shooting? You can now quickly switch between HEIF and raw by tapping the 'Raw Max' option in the top-right corner of the Camera app. I'll keep that option turned off for casual snaps, but for photos I want to edit (particularly those in challenging light), I'll tap the 'Raw Max' option.
3. Tweak your Photographic Styles
Apple's Photographic Styles are a useful mid-point between standard JPEGs and more time-consuming raw editing.
They're a bit like Fujifilm's popular film simulations, but they're applied more intelligently to different aspects of your photos when you hit the shutter (making them more than just basic filters).
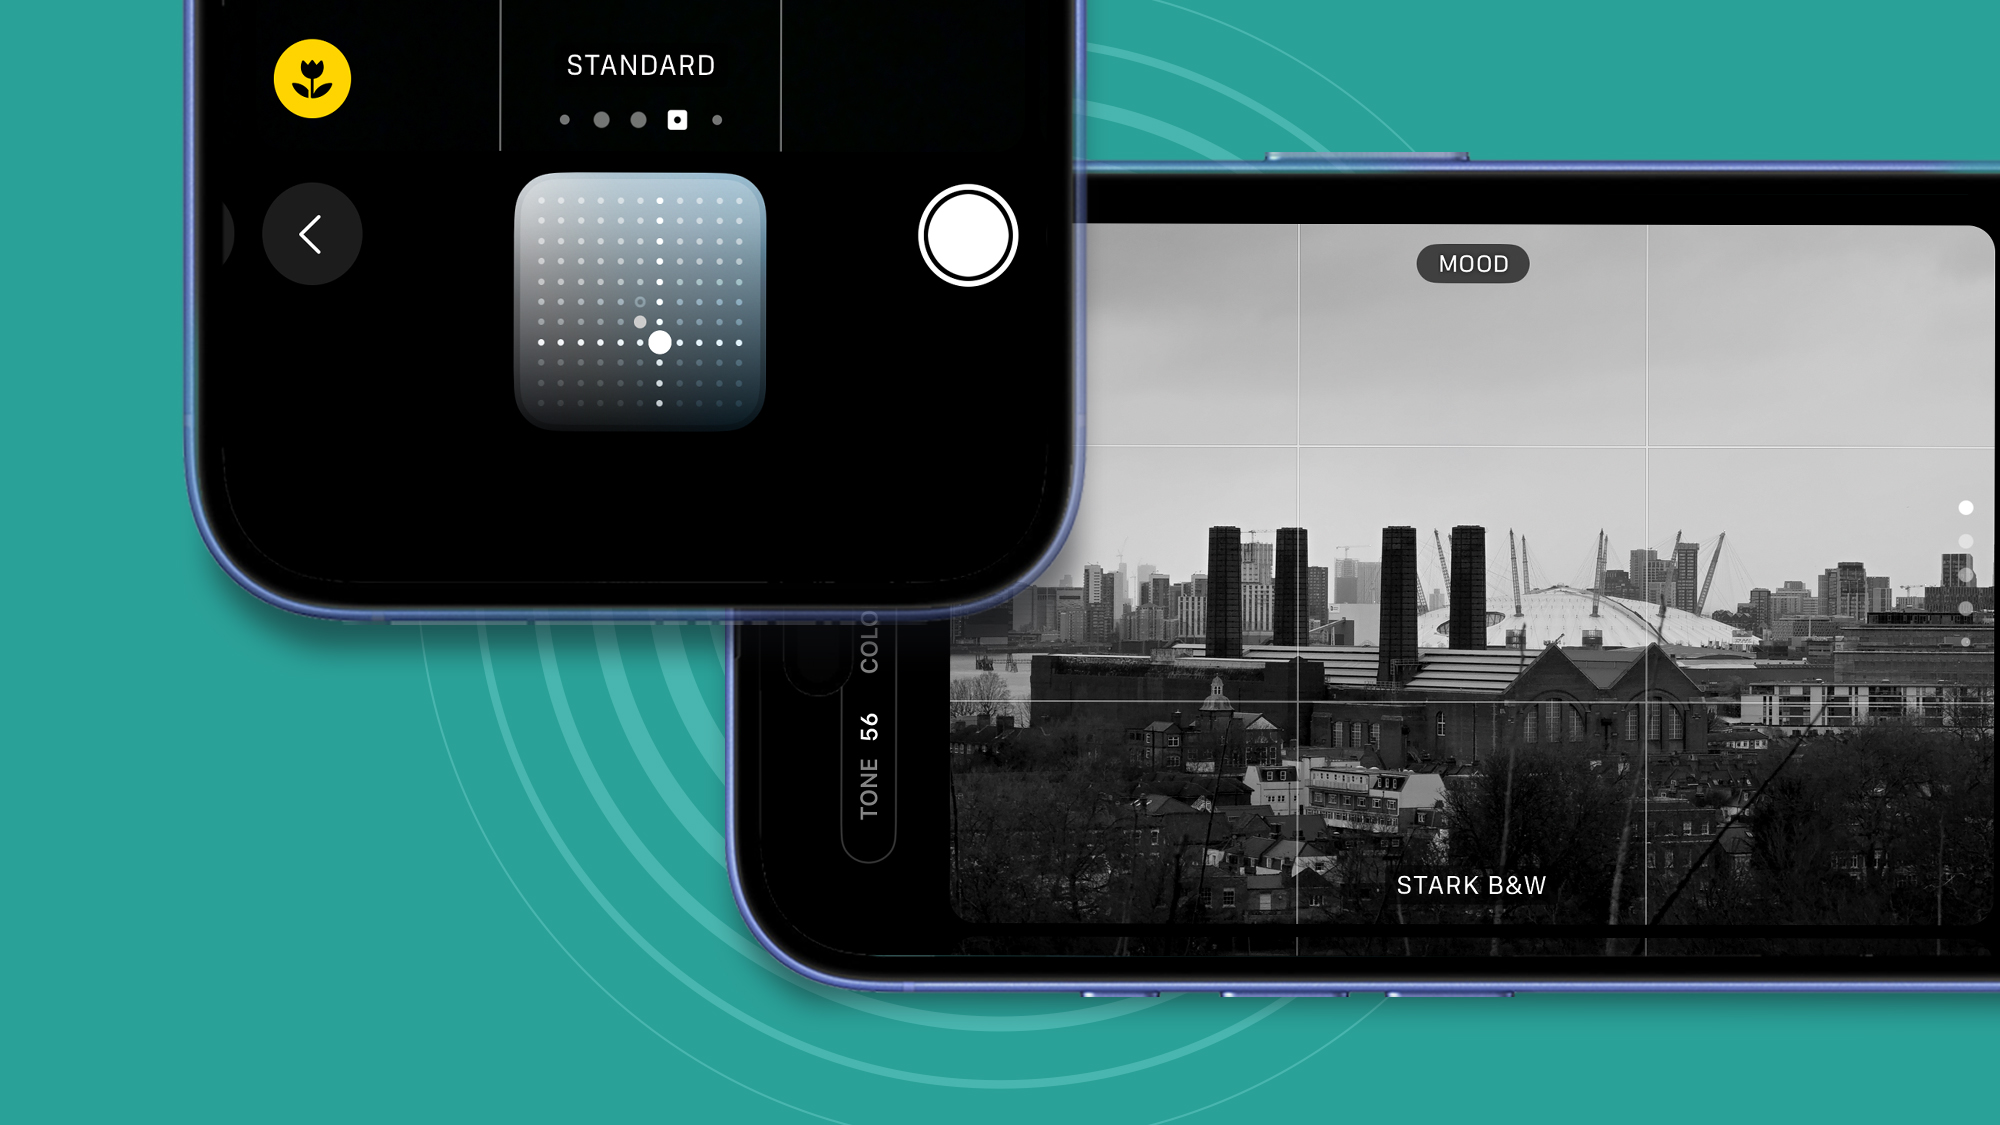
What's particularly useful is that you can tweak them to reduce some of Apple's over-zealous processing and make your photos look a bit more like those from an old-school digital camera.
Choosing a Photographic Style is very much down to both personal taste and the scene. But one thing I tend to do with most of them is reduce the 'tone' by somewhere between -40 to -70. What this does is reduce the iPhone's default tendency towards a more HDR or 'flat' look, where shadows are artificially lifted. That's handy if you're going for less of a 'phone-like' look.
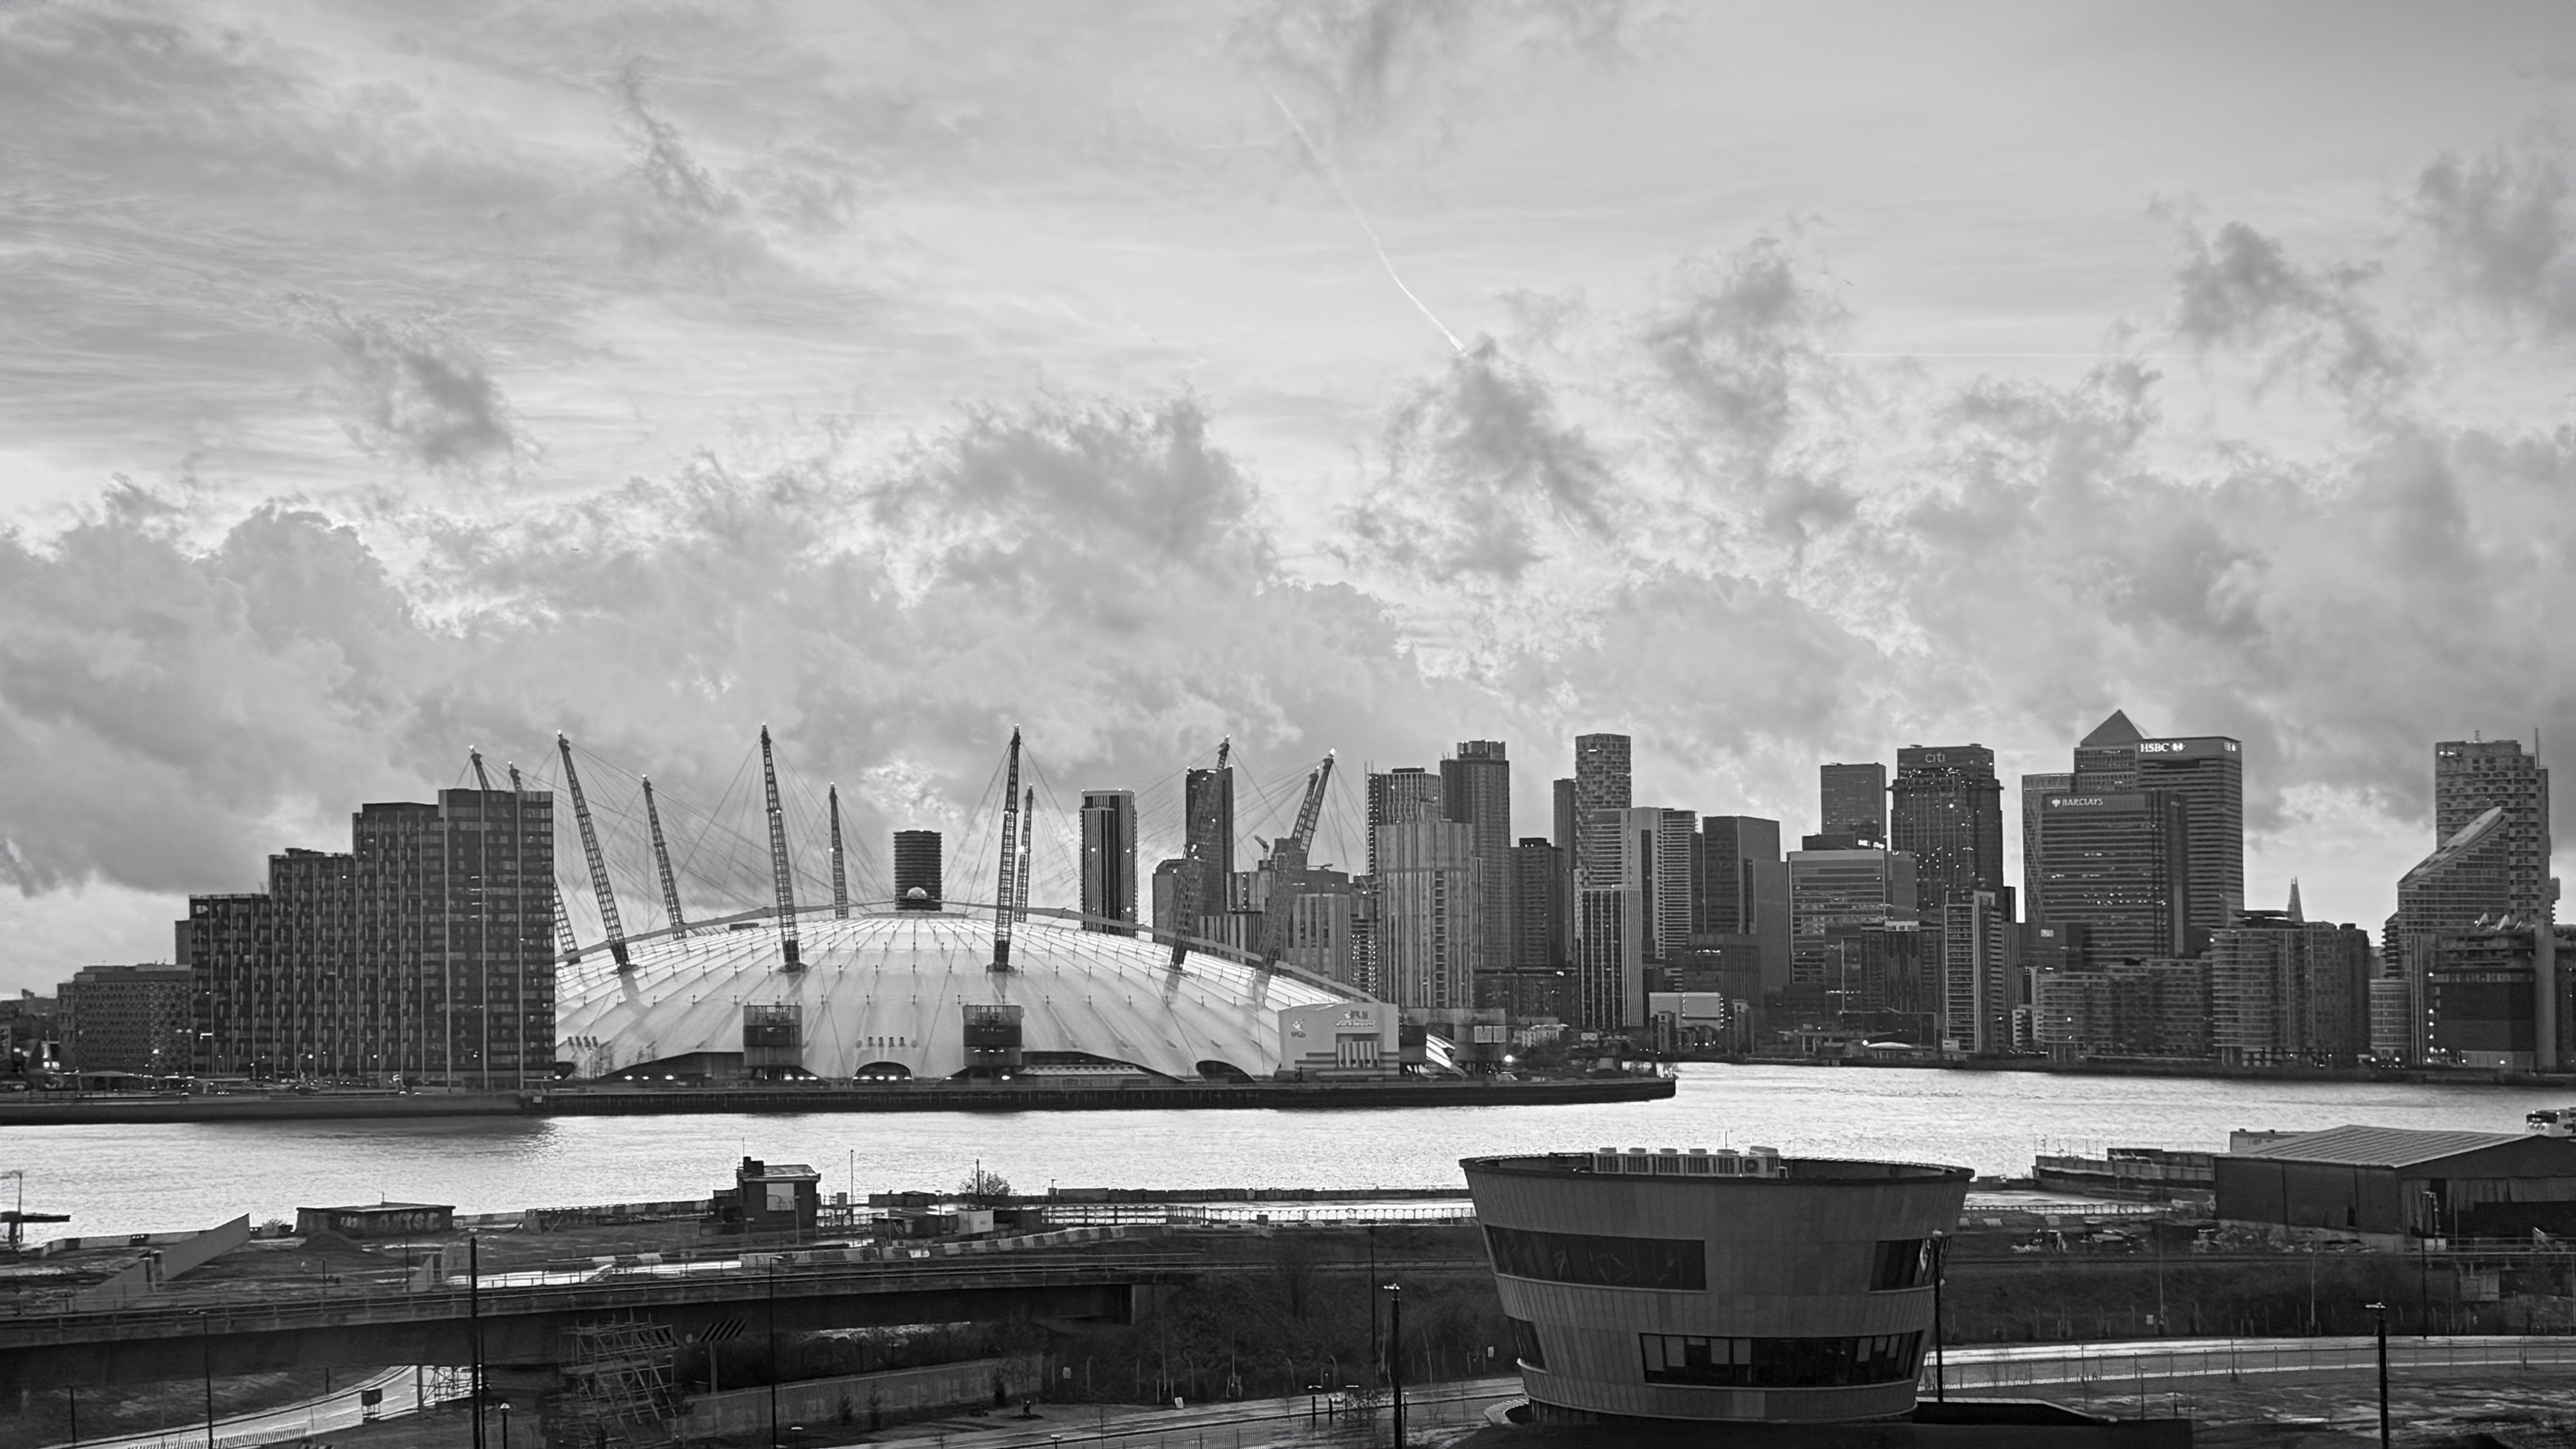
You might like that style, in which case, by all means, leave your Photographic Style's tone alone. But to tweak it, tap the Photographic Styles option in the top-right of the Camera app (the small grid with a dot in the middle), swipe left or right to choose the Photographic Style, then drag the white dot in the grid down to reduce the tone figure. It's fiddly but gets easier with practice.
If you want your iPhone 16 or 16 Pro to remember your preferred Photographic Style, go to Settings > Camera > Preserve Settings (as mentioned earlier) and toggle Photographic Style to 'on.'
4. Setting up Camera Control
While many of the settings above will apply to older iPhones running iOS 18, one new feature on the iPhone 16 and 16 Pro is the Camera Control button.
This is part of a series of features about new year tech projects and challenges for 2025. Read all of our Tech Resolutions articles here.
As a fan of traditional cameras' physical controls, I love this new button's potential – if not quite its execution. Fortunately, there are ways to tweak it to make it work better for you.
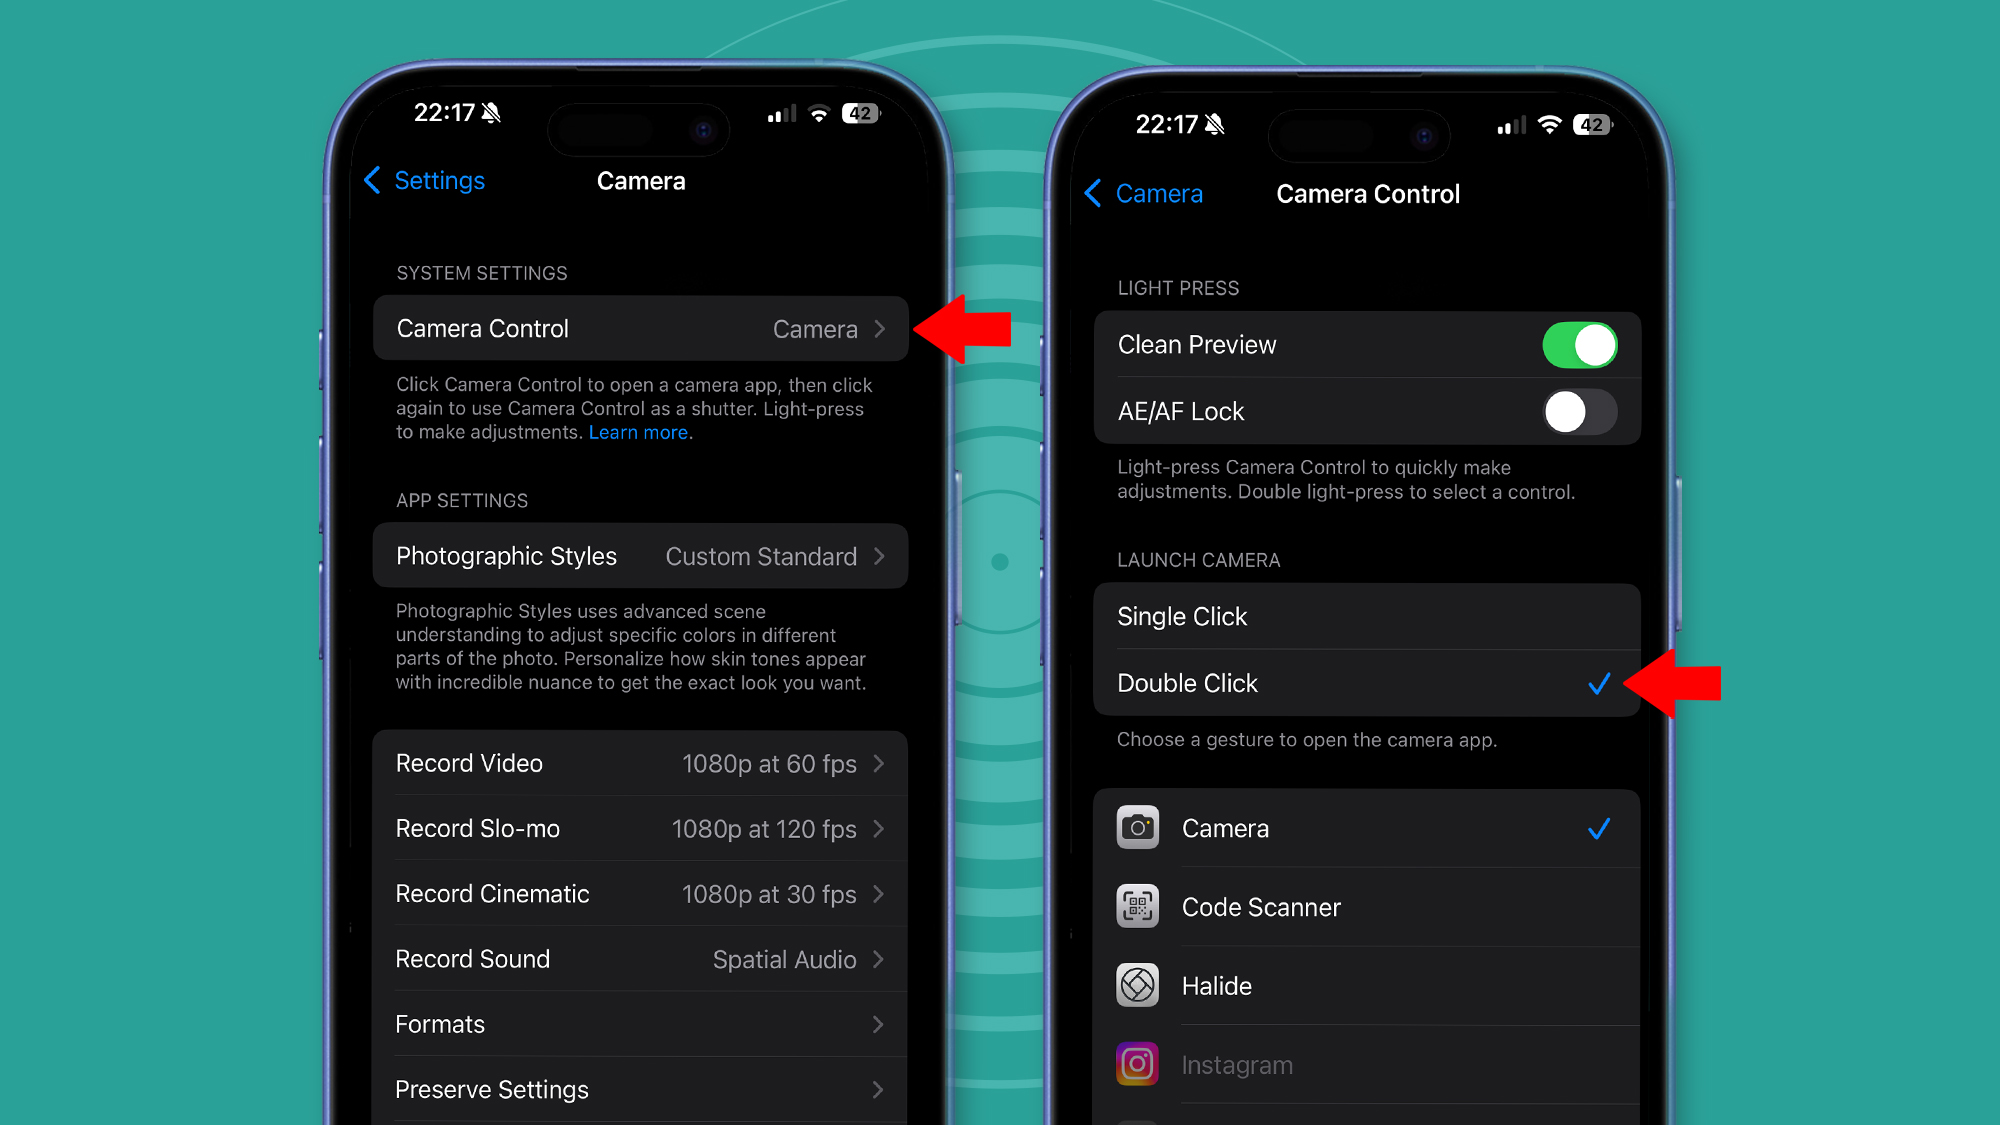
For starters, go to Settings > Camera > Control Control. If, like me, you found yourself constantly pressing the button accidentally and opening the Camera app, go to the 'Launch Camera' section and choose 'Double Click.' A wave of relief will wash over you.
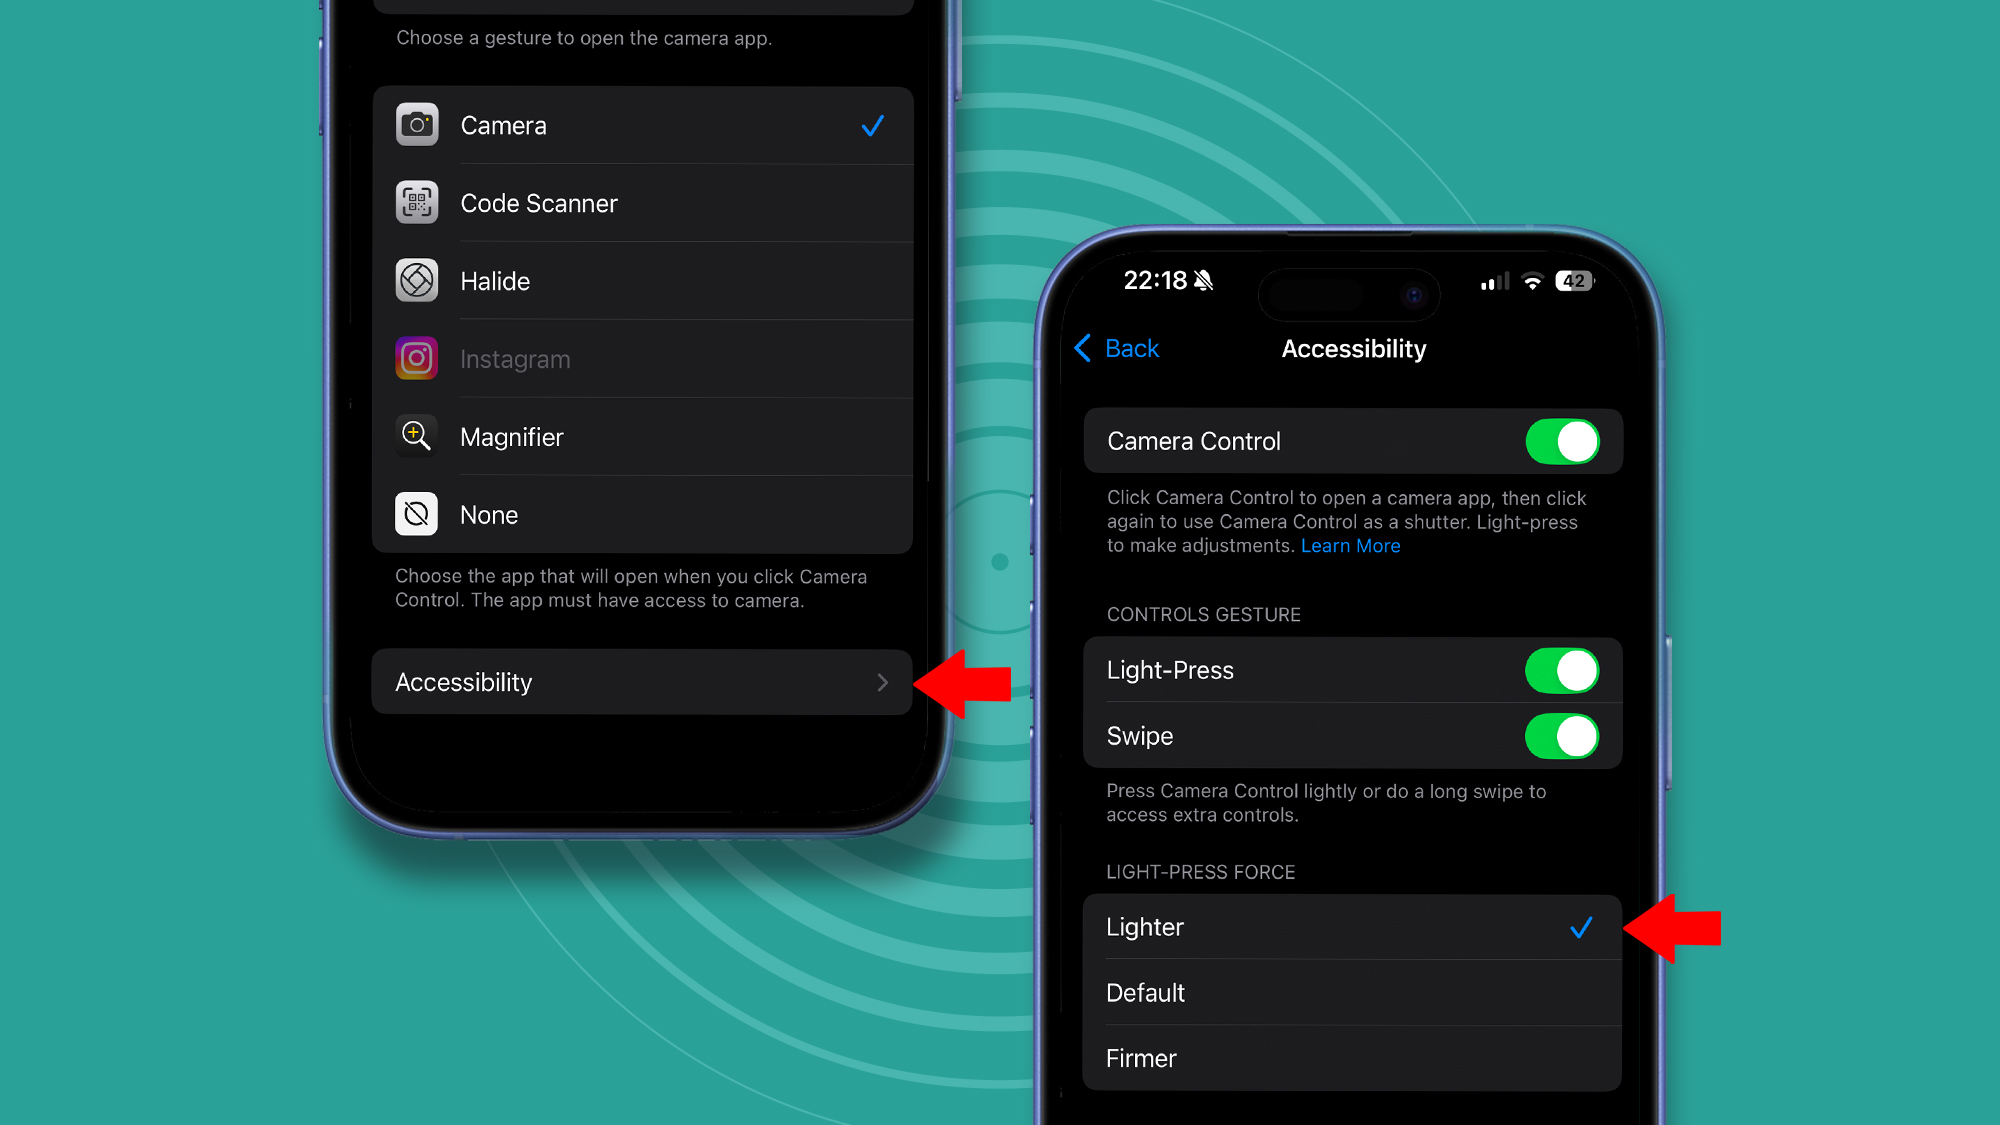
Now scroll down to the Accessibility menu at the bottom (see below). Here, you can make further tweaks to how it works – I've found switching to 'Lighter' in the 'Light-Press force' menu is a better balance for me.
Next, it's time to decide what the Camera Control button actually does beyond acting as a shutter. Your options are Exposure, Depth, Zoom, Cameras, Styles and Tone. To cycle through these, perform a long press on the Camera Control button, followed by a quick tap.
For me, the most camera-like of these is the Exposure option, which lets you nudge the exposure up or down by small increments (for example, '0.3EV' is a third of a stop of light). I do this all the time on my Fujifilm X-T5, most commonly to reduce compensation to preserve highlights and bring more mood to a scene. It's great to have something similar on a phone – and that's my default choice for Camera Control.
As tempting as Depth and Zoom are, they're both slightly artificial effects (using either computational bokeh or cropping), which I tried to avoid. If you find yourself switching Photographic Styles a lot, you might get more mileage from using Camera Control for Styles.
Lastly, from iOS 18.2, it's been possible to use the Camera Control button to lock your autofocus and auto-exposure with a half-press of the button. In practice, I've found this too fiddly to use, and I'll usually be tapping the screen to choose my point and focus anyway – so I've kept this option (found in Camera > Camera Control > AE/AF lock) turned off.
5. Fill the gaps with apps
As fully-featured as Apple's Camera app now is, there are lots of things it can't do – and for those, I turn to third-party apps.
The big one is raw photo editing. The Photos app is fine for editing with Apple's Photographic Styles (just go to the photo and tap the editing button at the bottom, which is the icon with the three horizontal lines). But for editing raw DNG files I still use Lightroom (see below). A good free alternative is Snapseed.
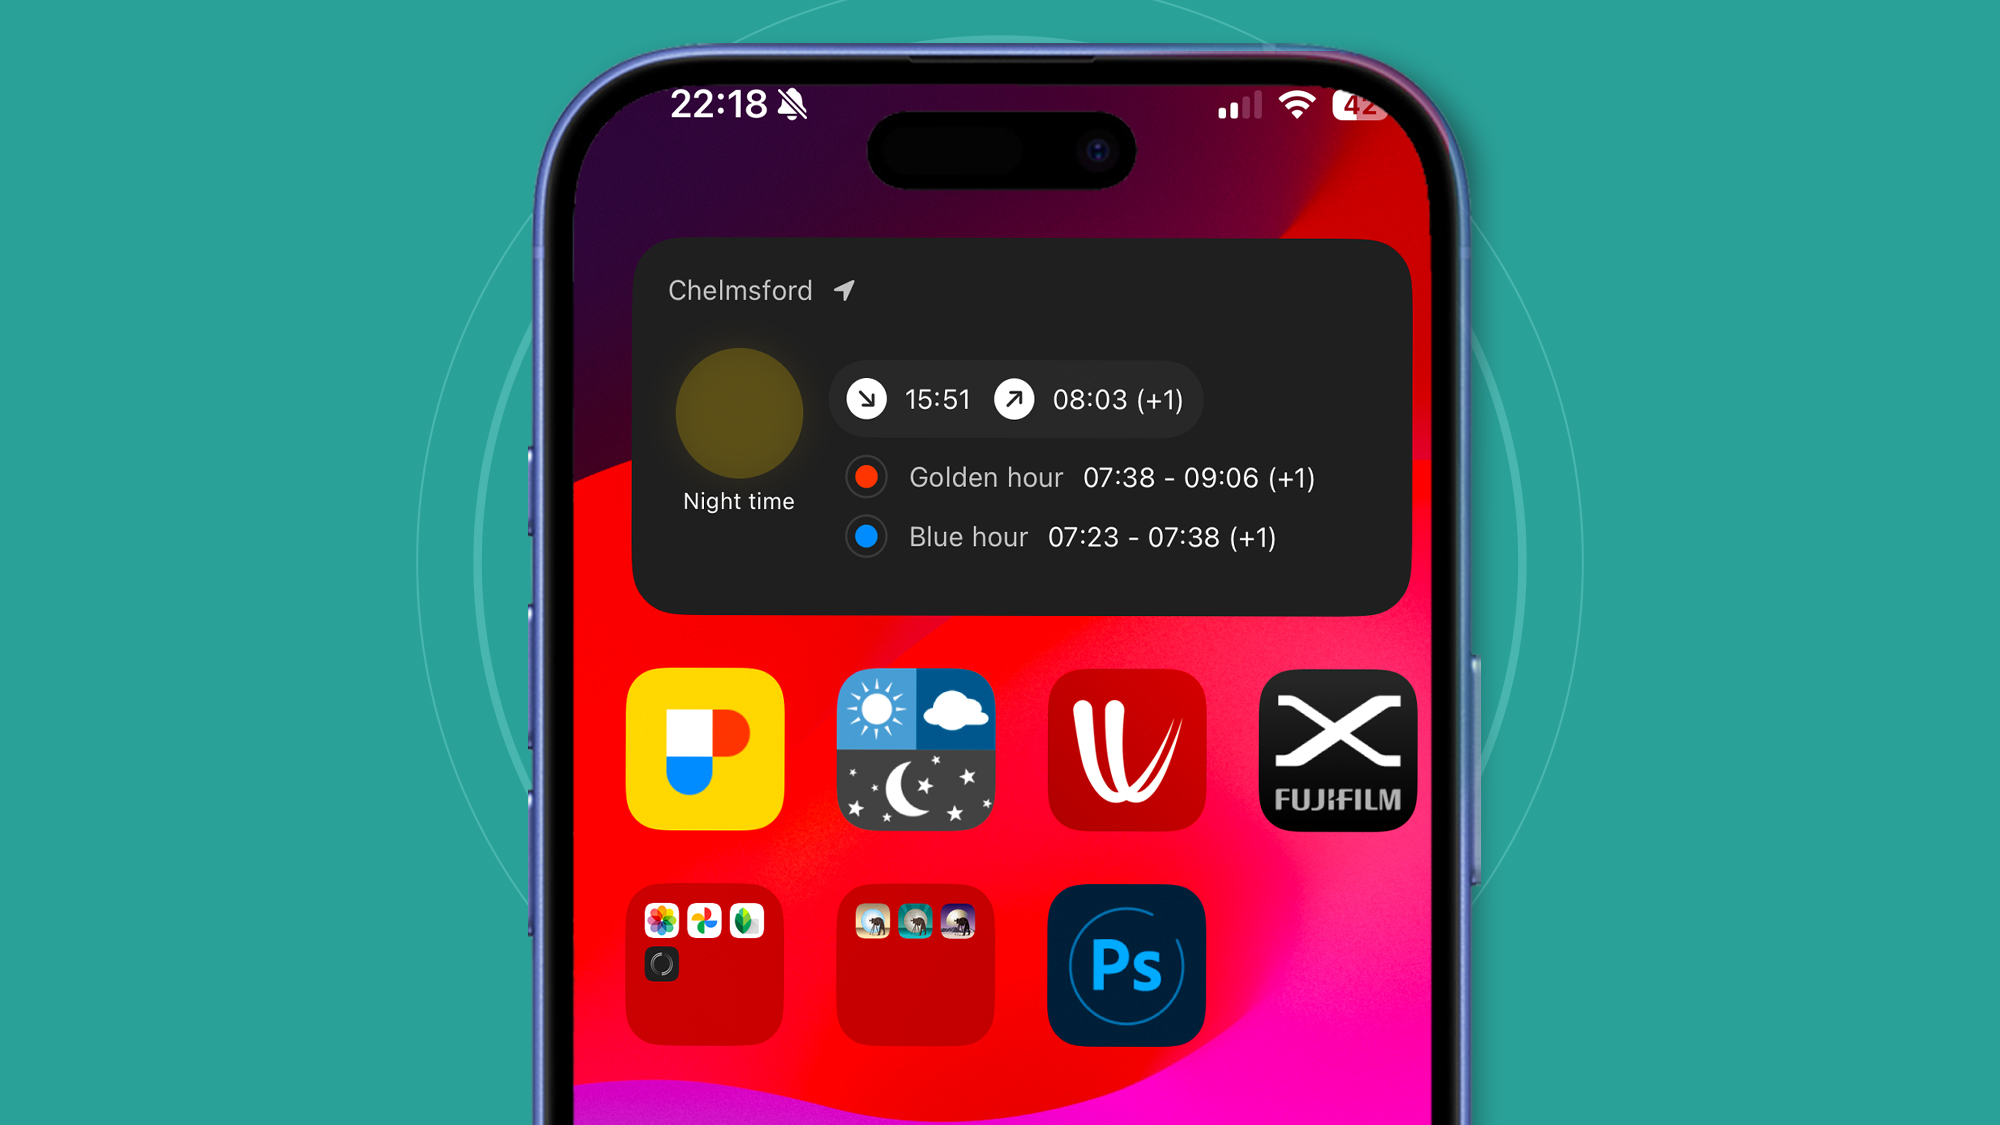
Lightroom lives on my homepage alongside Halide, which has handy tools like manual focusing (though I'm using it less as Apple's Camera app has become more powerful). But I've also made a second screen of apps just for photography-related apps, which are incredibly useful when it comes to planning photos.
The main one is Photopills, whose widget gives you a quick glance of when golden hour and blue hour will be at your location. These are typically great times to take photos when light is softer, more atmospheric, and less harsh away from the midday sun.
I also use Windy and Clear Outside to keep an eye on clouds, rain, and the potential for mist and fog. One of my own tech resolutions is to give Viewfindr, which gives you handy weather alerts, a spin.
But for now, I hope this guide has given you some ideas on how to set up your iPhone 16 or 16 Pro to take some of your best snaps in 2025.


