Choosing a video editor to rely on can be quite troublesome since the market is flooded with different video editors. With the advancement of technology, options are growing in number.
However, only a few are truly remarkable, like Wondershare Filmora. This tool is widely regarded as a great beginner-friendly tool with professional tools that can take you to the next level once you’re ready. If you want to learn more about this tool and why it’s amazing, read this article.
Part 1. Meet Filmora: Your Gateway to Effortless Video Editing
Easy enough for beginners yet packed with pro-level features—Wondershare Filmora can guide your editing journey to a pro level. It’s a program with an intuitive and easy-to-navigate interface with all the basic and advanced editing tools you might need as an up-and-coming video editor. Recently, it’s been equipped with AI tools, making it one of the best video editors for PC.
Part 2: Key Features That Make Filmora Shine as a Video Editor
There are several of Filmora’s features that you’re sure to love. Ranging from basic to advanced video to audio editing tools, something here would surely answer your needs. But, to give you an overview of what you should expect, here are some of the key features:
AI-Powered Tools
Filmora integrates advanced AI functionalities to streamline the editing process. Key AI features include:
- AI Subtitle Generator: Instantly generates subtitles or captions based on a video’s audio or your text input.
- AI Text to Video: Automatically transforms written scripts or text prompts into engaging video content, complete with visuals, transitions, and music—perfect for effortless content creation.
- AI Thumbnail Creator: Generates attention-grabbing thumbnails optimized to increase viewer engagement.
- AI Smart Cutout: Enables precise removal of unwanted objects or backgrounds from your footage with minimal effort
- AI Music Generator: Instantly creates royalty-free music tailored to the mood and style of your video.
2 Million+ Assets
Filmora offers an extensive library of effects, transitions, and royalty-free music, enabling users to enhance their videos creatively without needing external resources.
Cloud Storage Integration
With seamless cloud syncing, users can access and edit their projects across multiple devices like Windows, Mac, and mobile. For example, you can start from a desktop and later with a tablet or mobile phone.
Part 3: Why Filmora Might Be Your Perfect Editing Partner
Filmora offers more to the table than basic and straightforward video editing. Here are several advantages that may suit your needs.
Budget-Friendly
Filmora is known as one of the best free editors. You can always try or use the free trial before committing. Its premium version starts at a low price, and you can enjoy AI features (with free 1000 AI credits per month), 2.3 million+ creative Filmora assets, 10GB of cloud storage, and 100+ more video editing features.
This is a great deal that you’ll enjoy in the long run. For a more detailed price list, make sure to check out its pricing website: https://filmora.wondershare.com/shop/buy/buy-video-editor.html.
Newbies’ Best Friend
Unlike complex editing software that requires extensive learning, Filmora is designed for ease of use. With simple drag-and-drop functionality and pre-set templates, even first-time users can create professional-looking videos without a steep learning curve. This is why it is often recommended as one of PC's best free video editors.
Editing Without Limits
Lastly, what sets Filmora apart is its versatility in editing. As previously mentioned, it’s a highly accessible tool. This is why even if you plan to make a short slideshow video for your loved ones or are preparing a vlog or short film, you can rely on Filmora with its wide range of tools. Its flexibility allows users to work on different types of content while maintaining high-quality output.
Part 4: Start Your Editing Journey With Filmora on Any Device
After learning all about Filmora, it’s time to get your hands on the tool. In this section, you’ll be shown around the tool across the different platforms it supports: Windows, Mac, and Mobile (Android or iOS). For now, you can download them for free or use them through the free trial as you begin to understand the tool.
How To Use Filmora Video Editor on Windows
First, begin with the Windows version.
Step 1: Download, install, and launch Wondershare Filmora. Log in or sign up with a Wondershare, Facebook, Google, X, or Apple account.
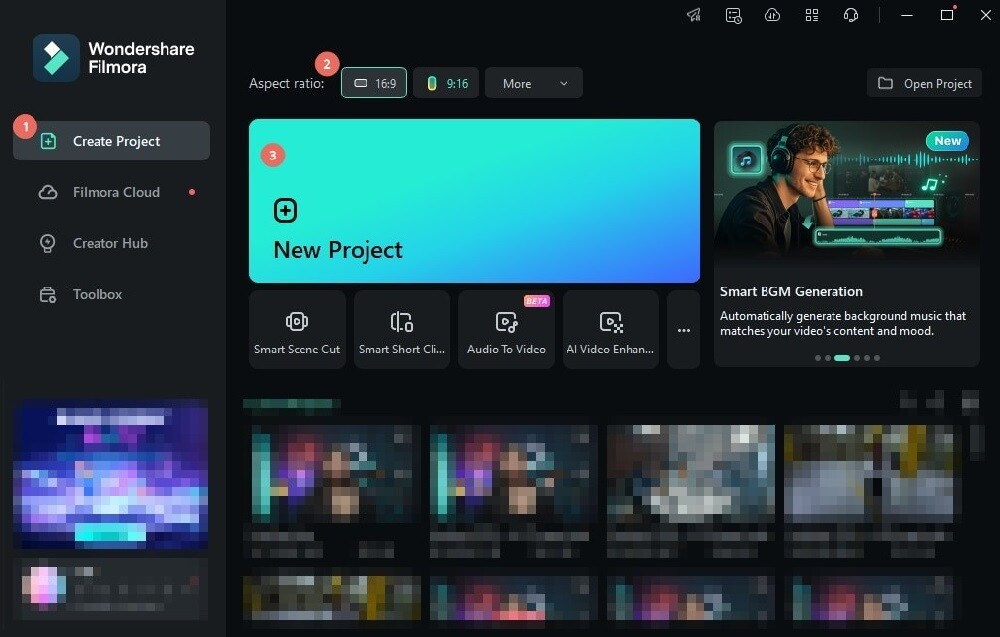
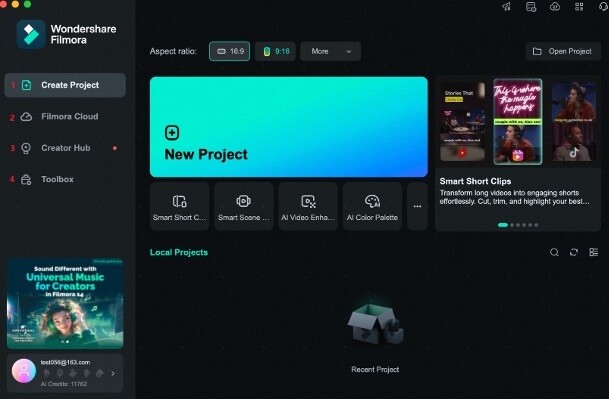
Step 2: Start a project by going to the Create Project tab, where you can choose the appropriate Aspect ratio for your project. Then, select New Project.
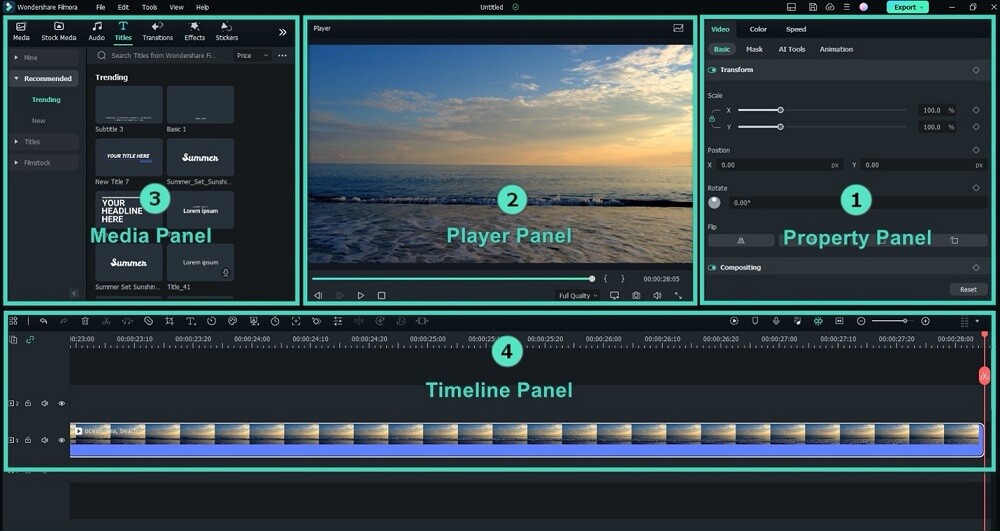
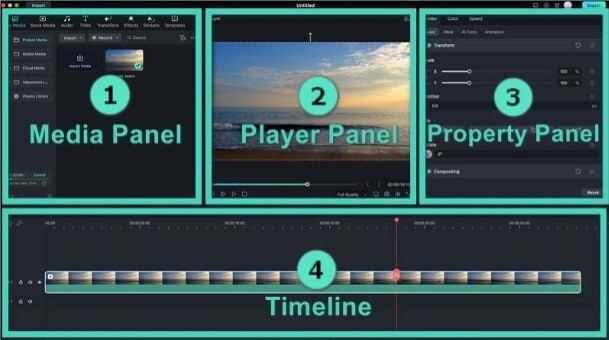
Step 3: Now, it’s time to explore the panels/layout of Wondershare Filmora. As you can see, there are four of them:
- Property Panel. By default, this panel shows you information about your project, such as duration, time, file type, etc. When you select an element, say a text or image, it shows you what actions you can take with the same.
- Player Panel. In this panel, you can see the part of the video marked by the playhead in the timeline in real-time. You can also watch or preview the video from here.
- Media Panel. This is where you’ll be taking your content. You can upload and import video, photo, and audio files and explore Filmora’s free assets under Stock Media, Audio, Titles, Transitions, Effects, etc.
- Timeline Panel. Here’s where you’ll be working the most. You can drag and drop content, effects, filters, and more through this panel. You can even split, trim, and edit different elements. Here’s where you can also access the quick toolbar, which you can customize depending on which tools you primarily use.
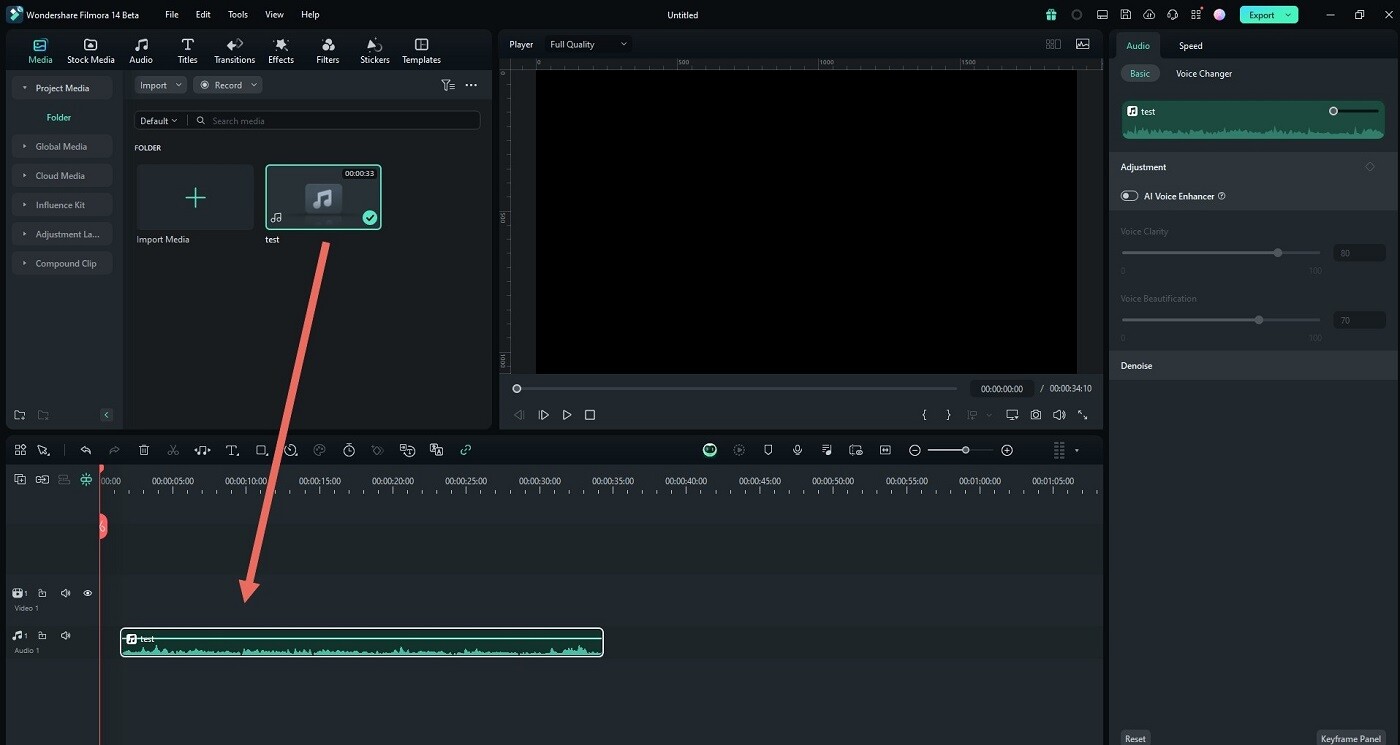
Step 4: Now that you understand the layout, drag and drop your video, photo, and audio files from the Media Panel to the Timeline Panel.
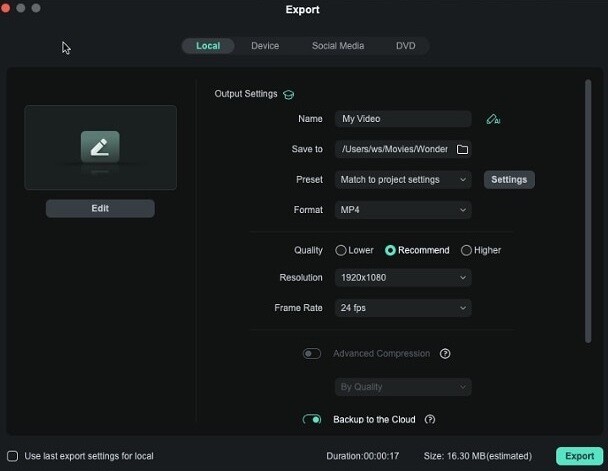
Step 5: Once you’ve done editing, Export your content.

How To Use Filmora Video Editor on Mac
If you use a Mac, here’s how to start using it. It has a layout or appearance similar to the Windows version.
Step 1: Download, install, and launch Wondershare Filmora. Then, log in with your dedicated account.
Step 2: Go to Create Project, set the Aspect ratio, and create a New Project.
Step 3: Mac’s panel layout will be the same as the Windows version. You can access media through the Media Panel, see the video preview through the Player Panel, contextual editing tools through the Property Panel, and work with the Timeline.
Step 5: After editing, access the Export button on the top-right panel.
How To Use Filmora Video Editor on Mobile
Lastly, here’s how you can use Filmora’s mobile version. Take note that the operation is similar on both Android and iOS.
Step 1: Download and install Filmora from the App Store or Play Store, depending on your device.
Step 2: Make a New Project from the homepage, then browse your photo album for the video you want to start with.
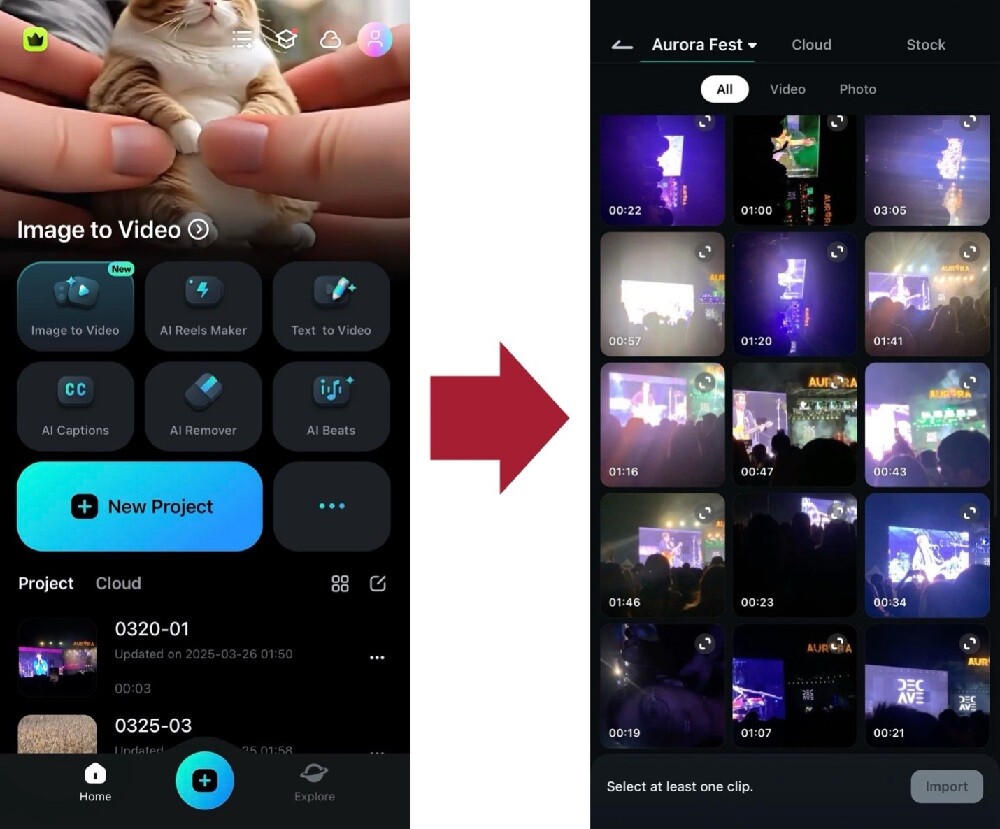
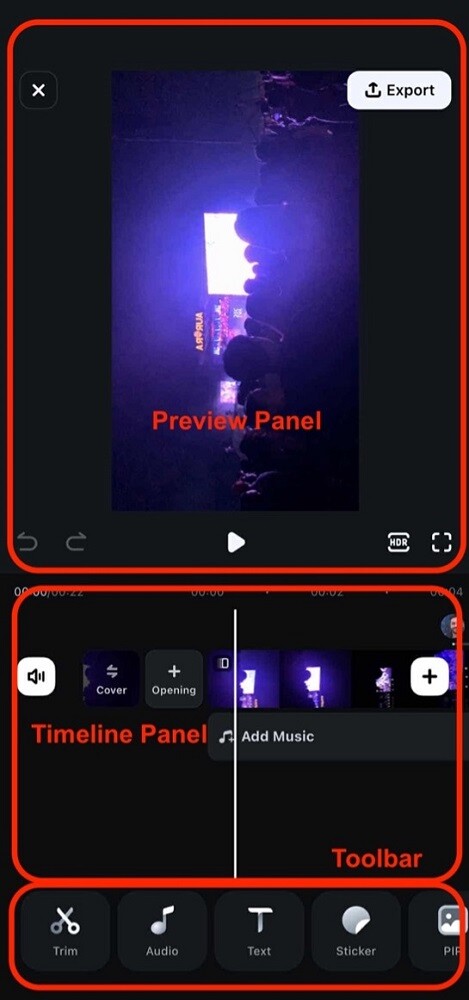
Step 3: Compared to the Windows and Mac versions, the mobile version only has three basic panels:
- Preview Panel. Essentially, it is the same as the preview panel of the desktop versions. You can resize, drag, and view the video using your phone’s gestures.
- Timeline Panel. Like the desktop versions, you can apply effects and split, trim, and cut videos here.
- Toolbar. Here’s where the mobile version differs in terms of operation. You can find almost all the tools in the toolbar. When you select an element, it will also bring up which actions or tools you can use.
Conclusion
Filmora is one of the best video editors because it’s a reliable and accessible tool for video editing. Its affordability, ease of use, and versatility make it a go-to choice for beginners and professionals. Whether you are editing on Windows, Mac, or mobile, Filmora ensures a smooth and efficient editing experience. Enjoy features like AI text to video, chroma key, and more with Filmora.
FAQs
1. Is Filmora free to use?
Filmora offers a free version with basic features, but videos will have a watermark. The premium version unlocks advanced features without watermarks.
2. Can I use Filmora on multiple devices?
Filmora supports cross-platform use on Windows, Mac, and mobile devices, allowing seamless project transfers.
3. What file formats does Filmora support?
Filmora supports various video, audio, and image formats, including MP4, MOV, AVI, MP3, JPEG and so on.
4. Is Filmora suitable for professional video editing?
Yes, Filmora offers advanced editing tools such as motion tracking, keyframing, and AI-powered enhancements, making it suitable for professional editing.
5. Does Filmora offer cloud storage?
Filmora has cloud integration, allowing users to save and access their projects across multiple devices.