Making DIY cat toys can be a rewarding and fun experience for the whole family – and it can save you a lot of money in the long run. If you’re a feline parent, you’ll know how quickly cats get bored of their toys, so making your own is a good way to avoid splashing out on hundreds of options.
Cats need an hour of play every day, which can be broken up into smaller sessions of 15 to 20 minutes. So, in order to ensure your kitty stays happy and healthy, you’ll need plenty of the best cat toys to keep them occupied – whether they’re handmade or store-bought.
Below, we’ve shared four DIY cat toy ideas that are perfect for mental and physical stimulation, including a toy tower for climbing and a mouse for chasing. Vet Dr. Rebecca MacMillan has also explained her top tips for making sure they’re safe to play with. Have fun!
DIY cat toys
1. Felt emoji cat toys
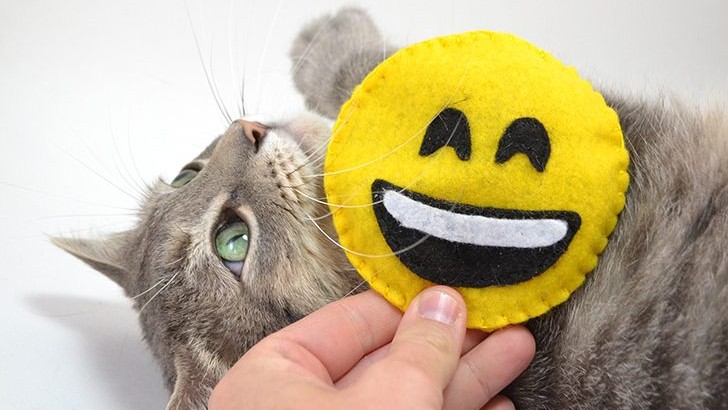
These emoji felt cat toys are just so darn cute! And your kitty will love them, not just because they're super soft, but they're also filled with catnip, so playtime is sure to be extra fun with these toys in the house.
What you'll need:
- Free printable patterns Smiley Emoji and/or Heart Emojis
- Yellow, black, white, pink and red felt
- Matching embroidery floss
- Needle and scissors
- Catnip
- Freezer paper and hot iron (optional)
Instructions:
- Print your free patterns on office paper or freezer paper.
- Cut the copy paper patterns out and trace or apply the freezer paper patterns with a hot iron.
- Stitch the pieces onto the felt large, yellow felt circles with matching floss. Use your patterns to help guide you with placement of each piece. You can always use a smidge of glue if you’re having a difficult time keep your felt pieces in place while you stitch. Just add a dab of glue to the center and it will stay perfectly in place!
- When a face is complete, using yellow embroidery floss, stitch the top circle to another yellow felt circle using the blanket stitch. Leave a gap of about 1-1.5 inches open.
- Using a piece of paper and tape or staples, create a funnel and transfer catnip into the inside of your emoji through the gap you left open.
- These are fairly large cat toys so each will take about 0.25 ounce to get a nice, even fill.
- Finish the blanket stitch to close up your gap and these guys are done!
2. DIY soda box cat toy
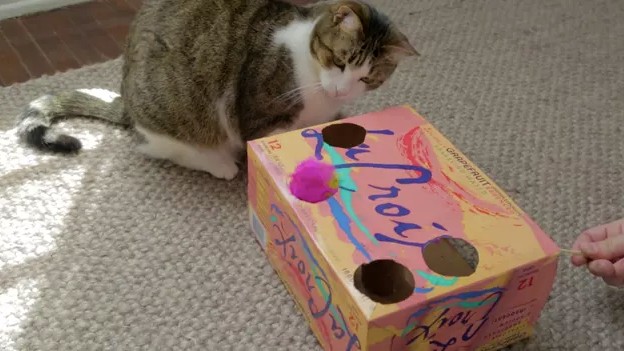
This is such a great cheap and cheerful fun that will cost you peanuts to make but will provide your cat with hours of entertainment.
What you'll need:
- 12-pack cardboard soda carton
- Scissors
- X-acto knife
- Glue (or hot glue gun)
- Bamboo skewers
- Crafting feathers
- Decorative or duct tape
- 2 pipe cleaners
- Paper towel tube
Instructions:
- Remove soda cans from the shorter side panel. Once empty, re-glue the panel back together.
- Using an X-acto knife or scissors, cut out one of the longer side panels.
- Make a support post by cutting a cardboard paper towel tube to the height of the box. Apply glue to both ends and place in the center of the box.
- Using your X-acto knife, cut out circles from the top of the box, avoiding the support post.
- Time to make your toys! Tape both ends of the bamboo skewer to make sure there are no sharp ends.
- Take both of your pipe cleaners and fold them in half. Bend to create about an inch-long tip that points upward, perpendicular to the skewer.
- Wrap the pipe cleaners around the skewer, and secure the loose ends with tape.
- Glue features to the part of the pipe cleaners that sticks up (so that your feathers end up sitting perpendicular to the skewer).
- Play! Maneuver the skewer up through the holes of the box to entice kitty!
3. Easy toy mouse
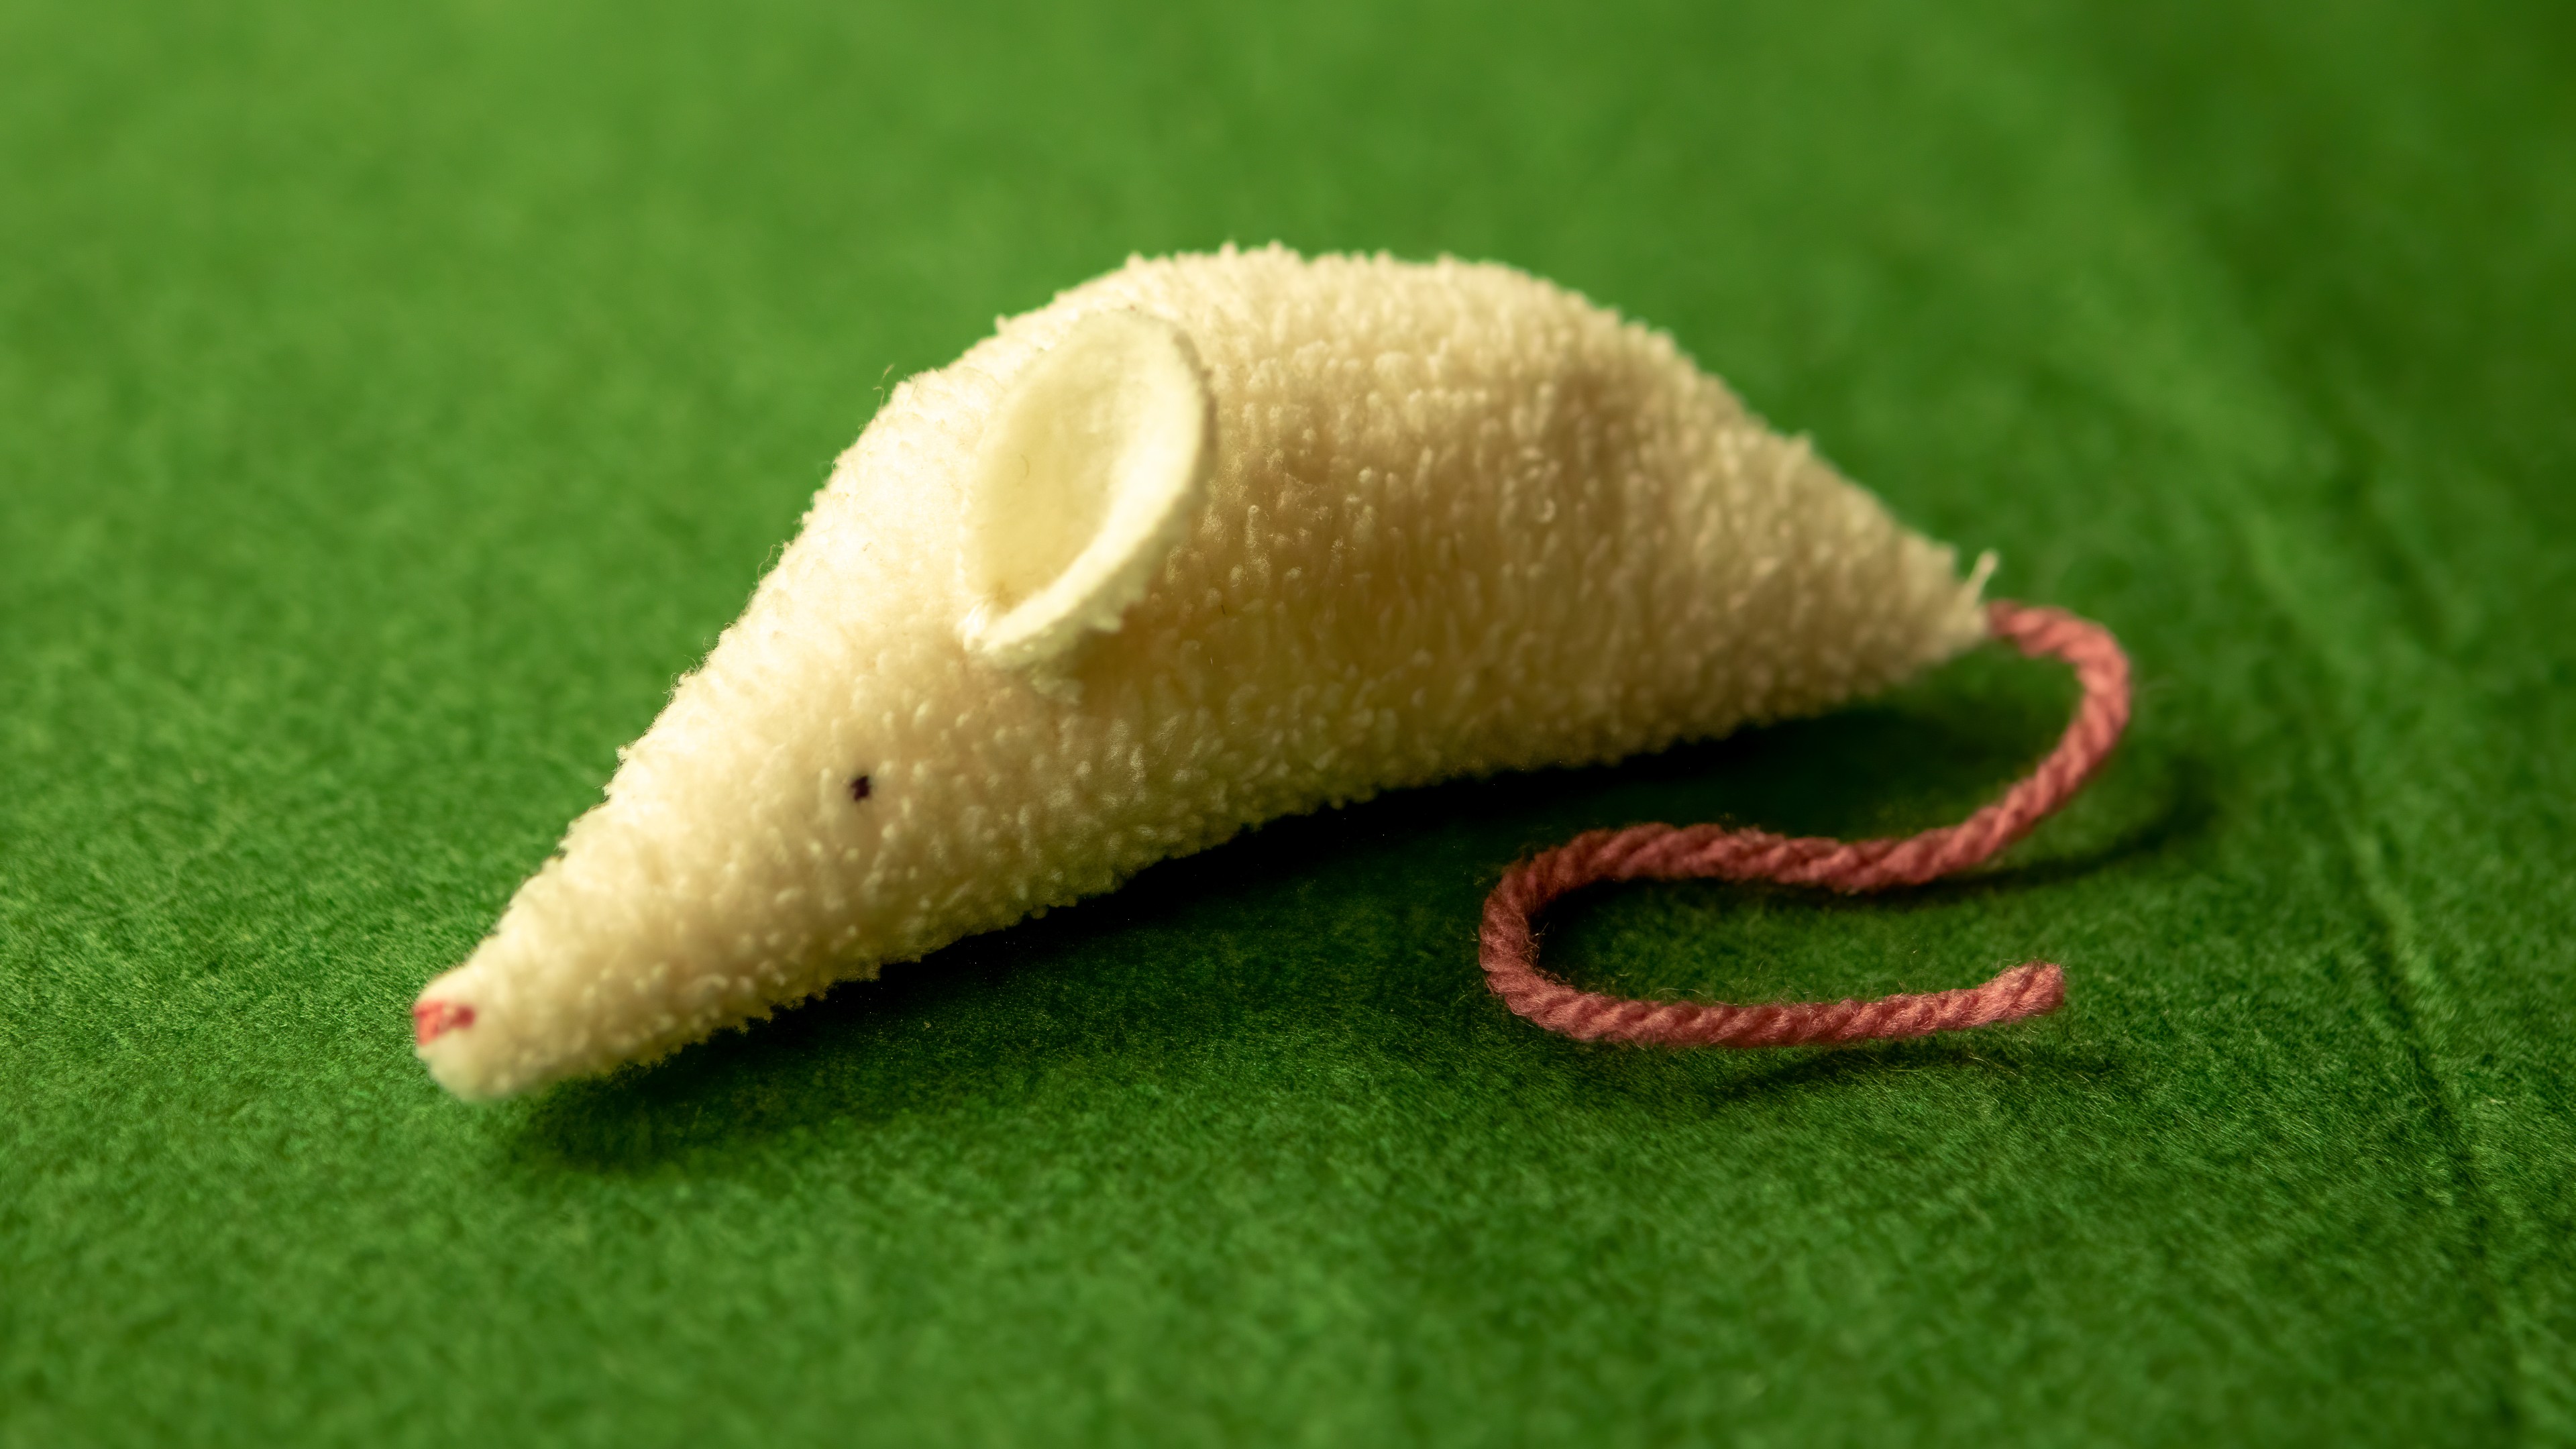
There are lots of patterns available for toy mice, but they can often be a bit daunting if you don’t have much experience with sewing. If you’re looking for a simple mouse that you can put together in well under an hour, this is the one for you.
You will need:
- Piece of fabric at least the size of your hand – felt, fleece and cotton (including old t-shirts and shirts) all work well
- Scissors
- Sewing needle
- Thread – black, pink and the color of your fabric
- Stuffing – soft toy filling, cotton wool, fabric scraps
Instructions:
- Cut out a squat teardrop shape from your fabric – the size is up to you, just make sure it’s big enough that the finished mouse won’t be a choking hazard.
- Cut out a much smaller teardrop for the first ear, then use it as a template to cut out a second ear. Snip the pointy end off of both.
- Using black thread, sew a few small stitches on each side of the large teardrop to create a pair of eyes.
- Fold the large teardrop in half and sew along the edge from the nose, leaving a gap at the back for stuffing. You have two options – either fold the fabric so the eyes are on the inside, then sew along the edge and turn the mouse inside out (giving you a neater finish as the stitches will end up on the inside); or just fold the teardrop with the eyes on the outside and sew it up.
- Push your chosen stuffing through the gap at the back, packing it in until the mouse is a good shape.
- Position your pink ribbon or yarn so that at least half an inch is tucked into the body of the mouse. Sew up the gap at the back, making sure your needle goes through the tail several times before tying off the thread. Give the tail a tug to make sure it’s securely attached.
- Using pink thread, sew a few stitches across the point of the body to create the mouse’s nose.
- Fold the blunt end of one of the small teardrops so that the corners meet, then sew onto the body. Repeat on the other side with the second ear. Tug both ears and add extra stitches if needed.
4. Toy tower
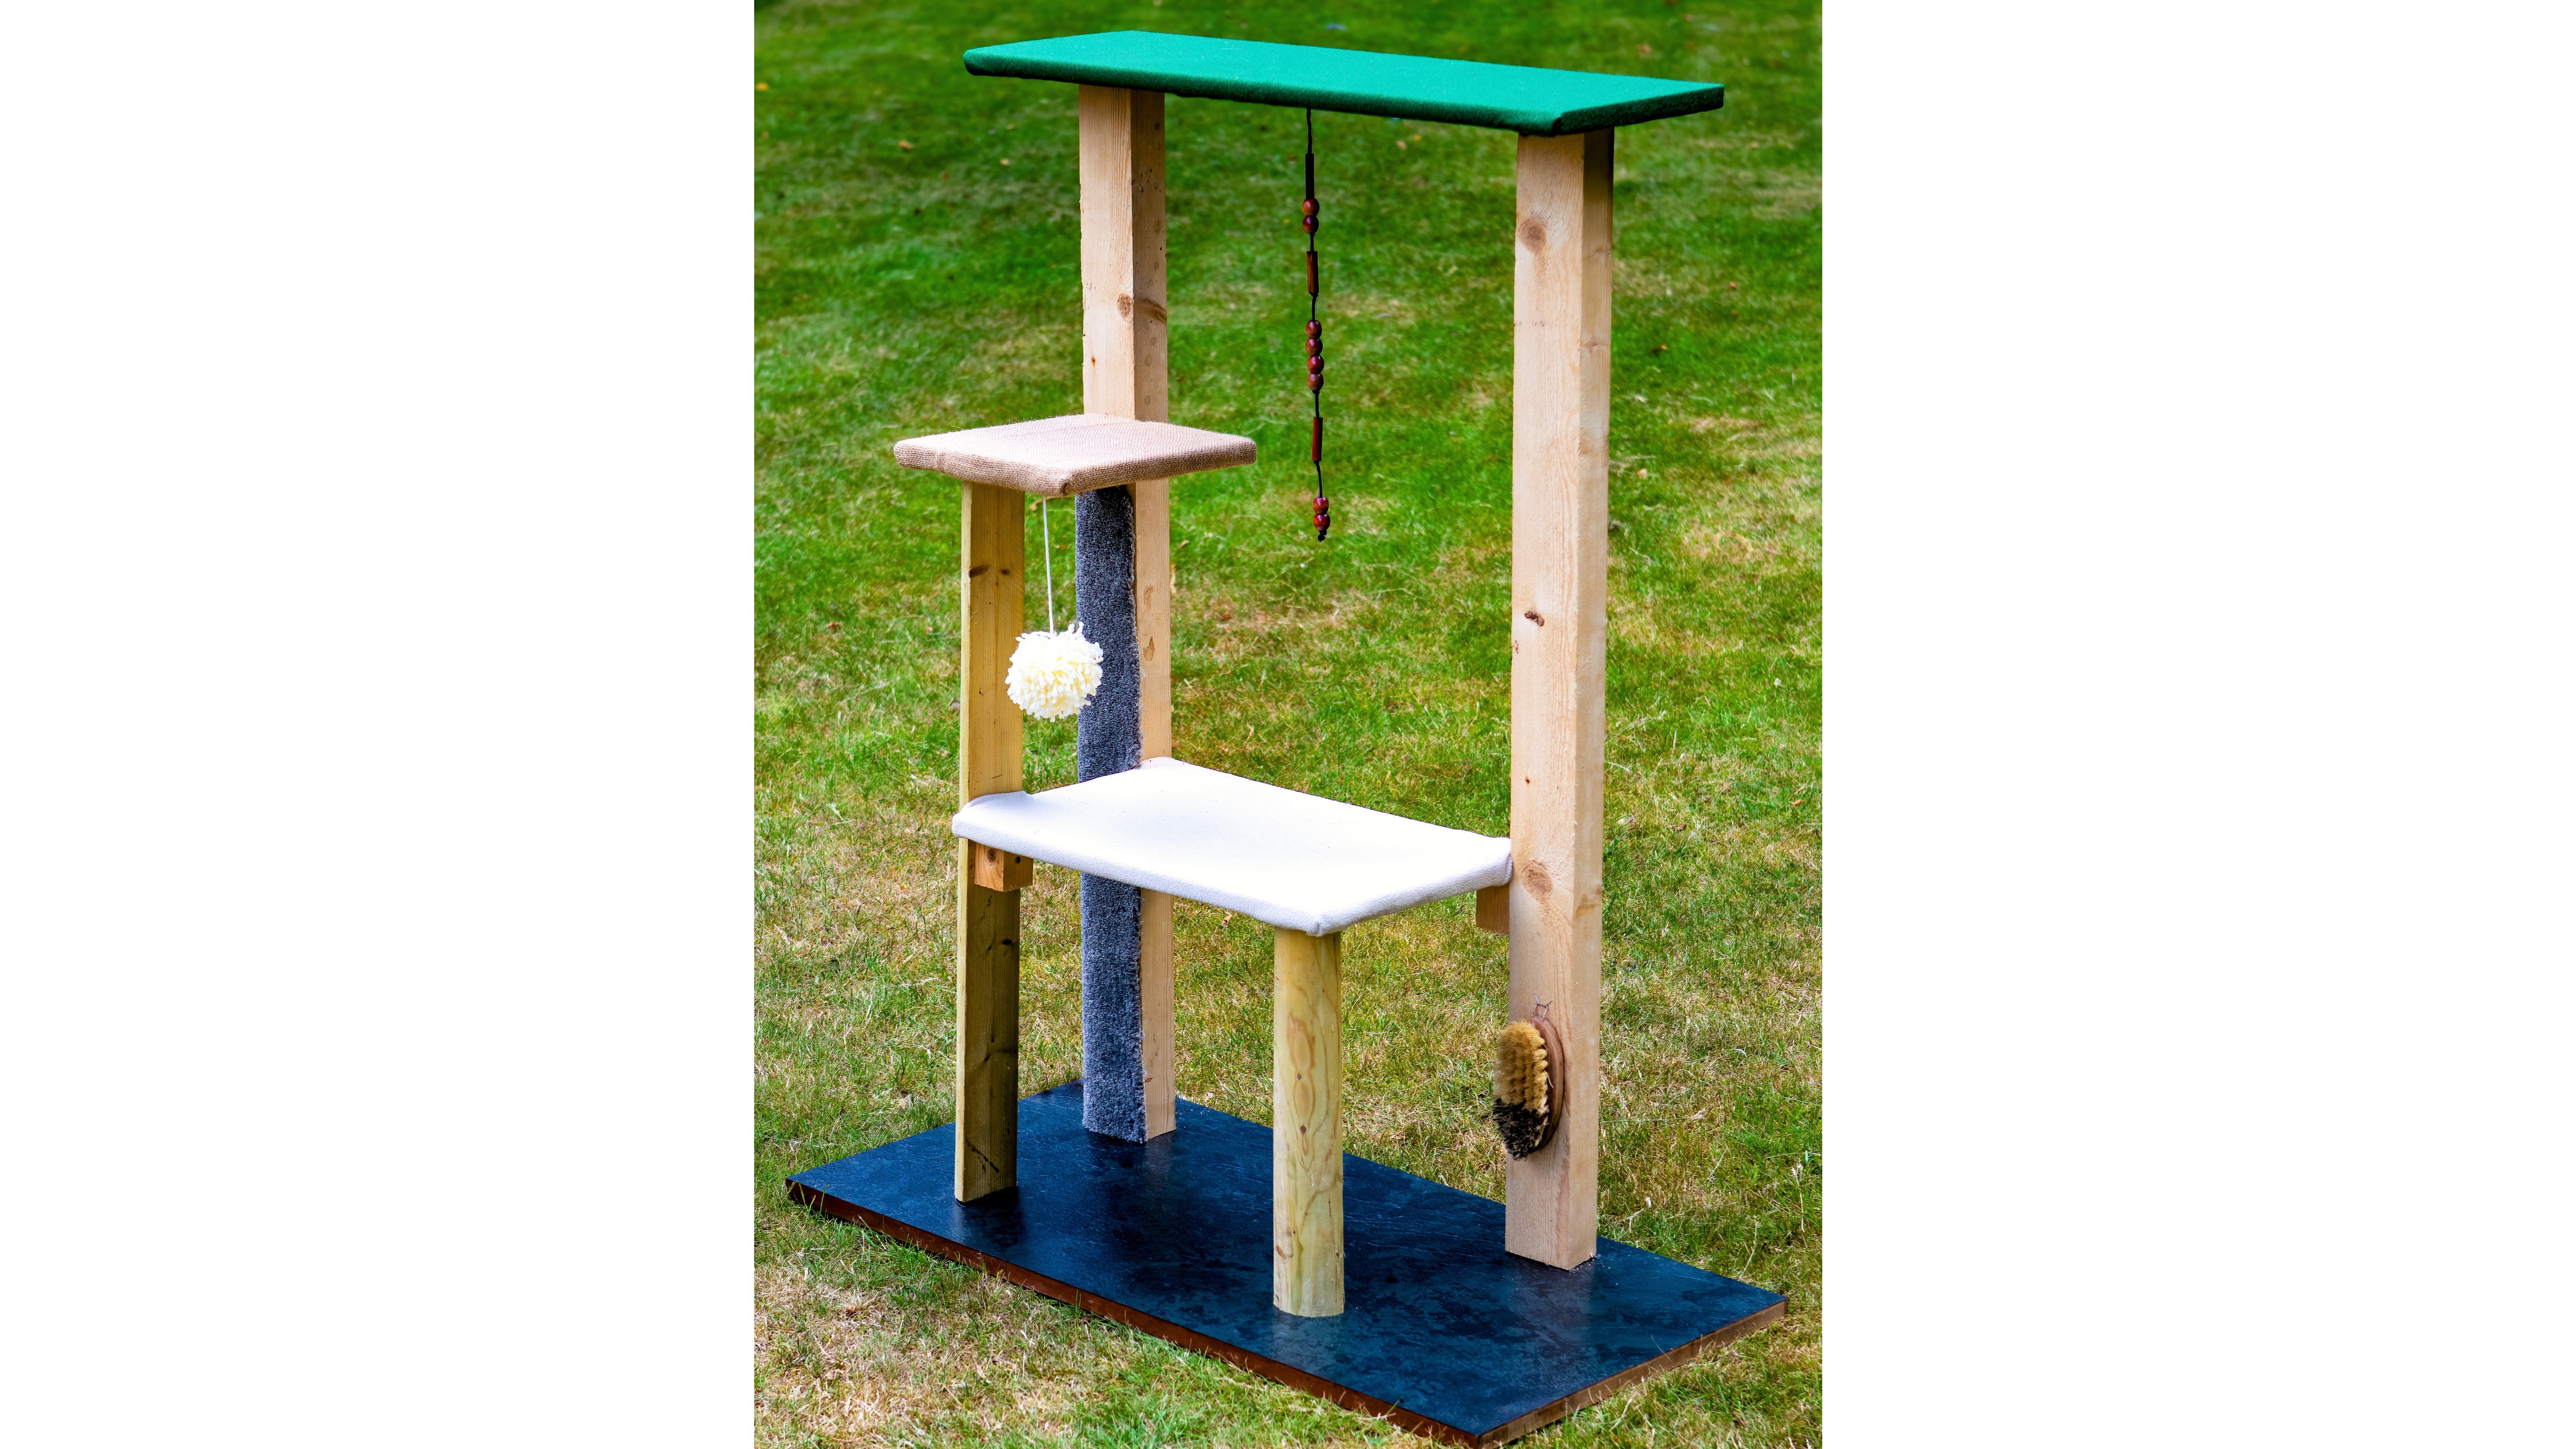

Up for a bigger challenge? This tower is simpler than it looks, and can be customized to suit your cat’s favorite ways of playing and the materials you have to hand
You will need:
- Wood – pieces for the uprights, and pieces for the base and platforms
- Saw nails or screws
- Hammer and/or drill
- Soft fabric – carpet, felt, or fleece
- Staples and staple gun
- Carpet offcut or sisal
- Cord wooden beads
- Pet brush
Instructions:
- Decide how many levels you want, how tall you’d like the tower to be and how large you want each of the platforms. As an example, the dimensions of our tower are below
- Choose or cut a piece of wood for the base – it should be large and heavy enough to keep the tower stable.
- Cut two identical pieces to form the support for the highest platform, and screw or nail them to the base, towards the back but not right on the edge. Attach the top platform.
- Cut a support for the middle platform and attach to the base. Nail a wooden block to the side of the taller support (level with the top of the new piece) then attach the middle platform.
- Cut a final piece to support the lowest level. Nail wooden blocks to the three other supports, and attach the platform.
- Cover each platform with soft fabric, wrap it over the edges, and staple it to the underside.
- Add toys – we’ve attached a brush for self-grooming, carpet for scratching, and a pom-pom and string of beads for batting.
- Check all the staples and nails/screws are secure and flush with the wood before letting your cat climb its new tower.
Work around your materials with this one – there are endless ways you can set out a cat tower. You can use thick cardboard tubes instead of wood for the upright pieces, or make platforms from old drawers. Why not add a box, a hammock, or a ladder?
Do vets recommend DIY cat toys?
Dr. MacMillan says: "Vets definitely do recommend DIY cats, as long as a few basic precautions are taken. You must only ever use materials that are non-toxic to cats. Cardboard is a great choice, with tubes, boxes and egg cartons all making fun toys when used in the right way."
Here's what you need to keep in mind:
- Regularly check the toys for signs of wear and tear
- Remove or repair broken items
- Avoid dangerous materials, like long pieces of string that could become detached and accidentally digested
- Supervise your cat when they're using them
Fun for you and your cat
There are endless ways to keep your cat entertained without buying anything new. Get creative and work with what you have – just remember to check that all the parts of your homemade toys are attached securely, and supervise your cat while it plays.
If you’re keen to find more ways to inject plenty of physical and mental stimulation into your cat’s day, here are nine reasons to use a cat puzzle feeder toy. Or if you've got a younger feline, learn how to make DIY kitten toys. Alternatively, check out our guide to the best toys for indoor cats.
Edited by Georgia Guerin.


.jpg?w=600)