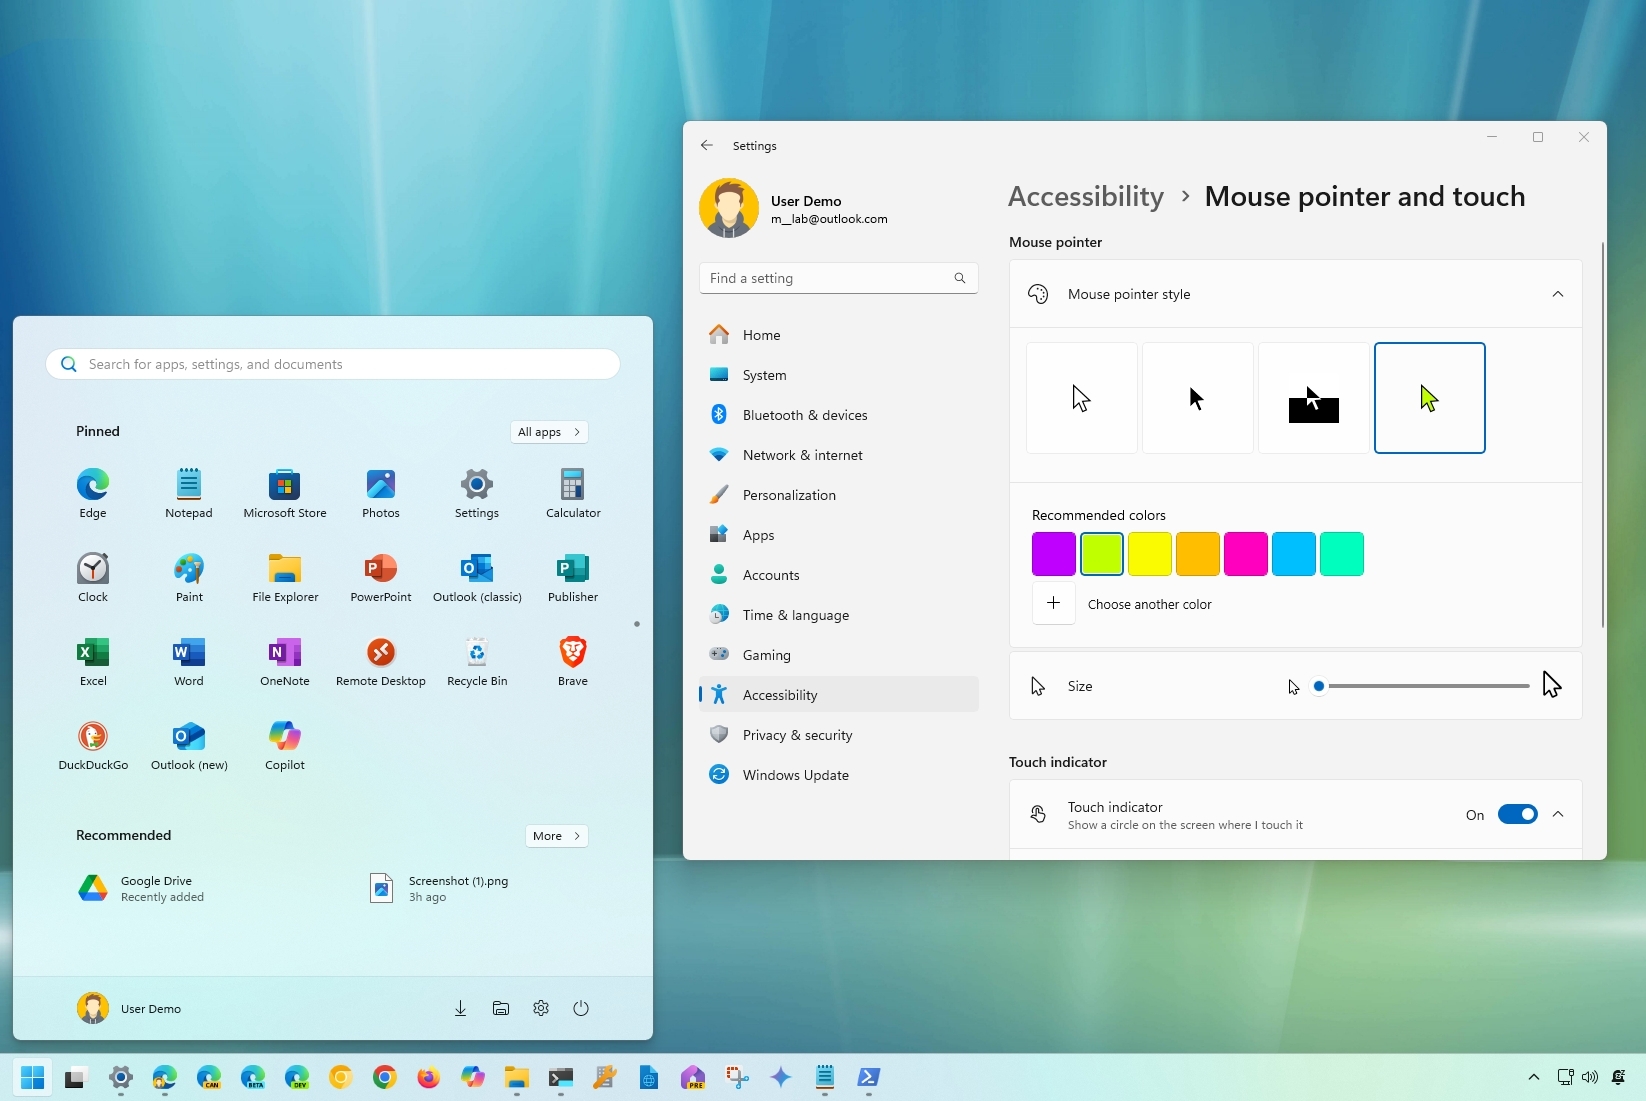
One of the best parts of Windows 11 is the ability to configure virtually (almost) every aspect of the experience in more than one way. I say "almost " because the company has changed and made some elements (such as the Taskbar) more restrictive.
Since the operating system offers a plethora of settings that can be tailored to meet your specific needs, from adjusting system preferences to personalizing your desktop, I will share with you some of the configurations I usually apply on new installations.
Some of these include customizing the Start menu pins and shortcuts and changing some Taskbar settings to make it more usable while removing some clutter. I will show you some alternative ways to configure widgets and notifications and explain why you should change the time and date settings to allow the system to configure these features automatically.
Also, I drill down on some apps and display configurations, as well as the privacy settings and the customizations I use for File Explorer, the mouse and cursor, and mobile devices.
In this how-to guide, I will show you some of the settings I typically configure on my devices running Windows 11.
Windows 11 settings to change on new setups
On every installation, I usually find myself customizing several areas of the operating system, such as the Start menu, Taskbar, Widgets, Notifications, Clock, Apps, Display, Privacy, mobile devices, mouse, and File Explorer.
Start menu
In the Start menu, I prefer to show more pins than recommendations, add extra shortcuts next to the power button, and deactivate some of the notifications.
Show more pins
To show more pins rather than more recommendations, use these steps:
- Open Settings.
- Click on Personalization.
- Click the Start page on the right side.
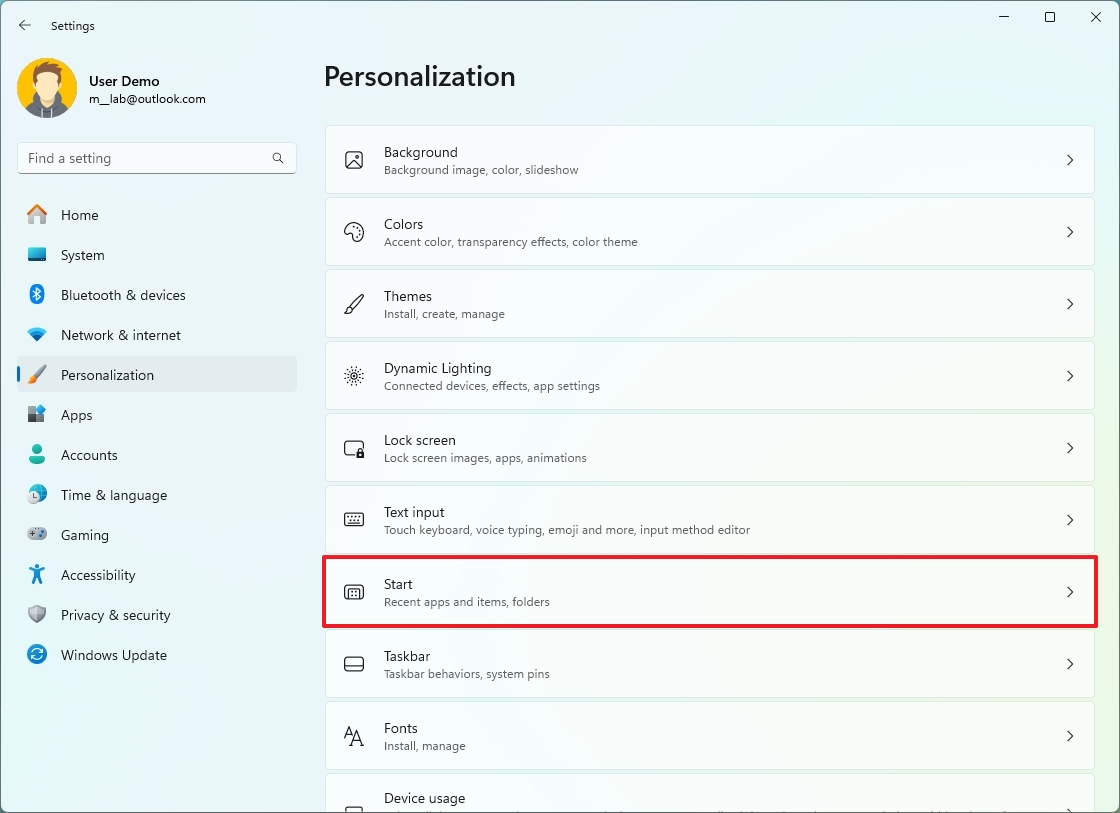
- Select the More pins option.
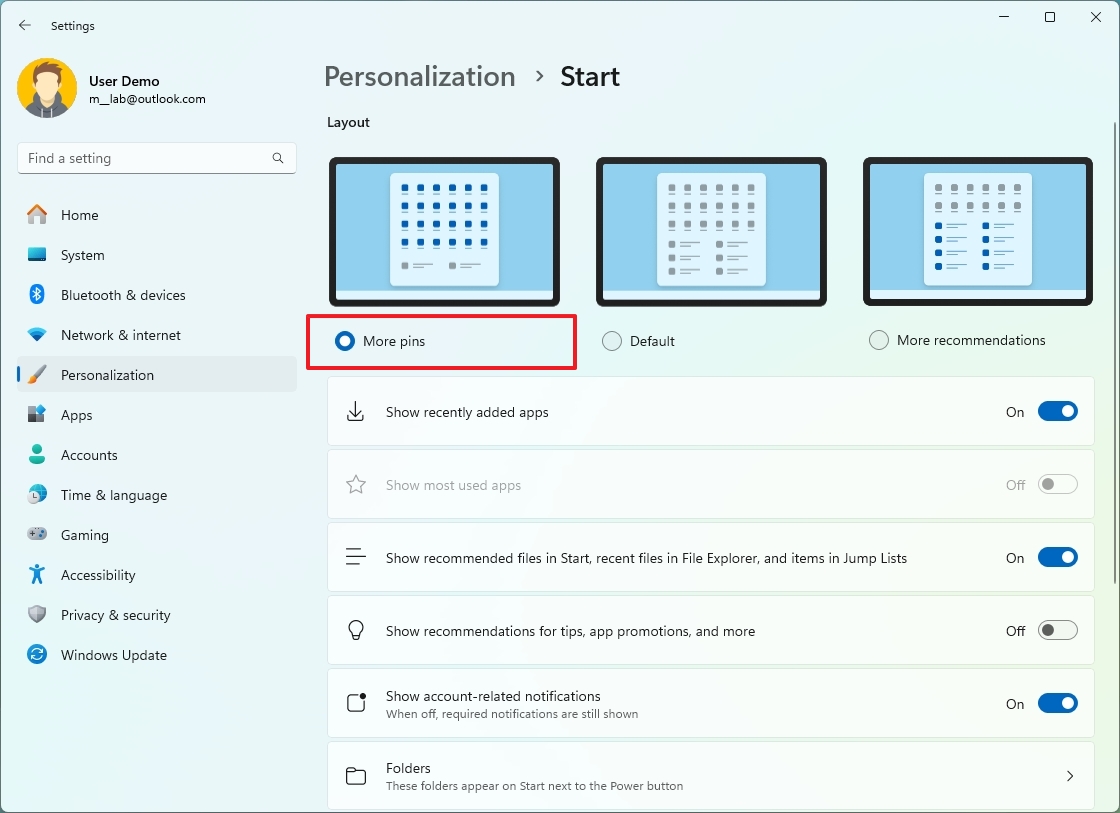
Once you complete the steps, the Start menu home will now show more pins than recommendations.
Show folders
To show folders (app shortcuts) in the Start menu, use these steps:
- Open Settings.
- Click on Personalization.
- Click the Start page on the right side.

- Click the Folders setting.
- Choose the shortcuts to appear in the menu next to the power button. For example, Settings, File Explorer, and Downloads.
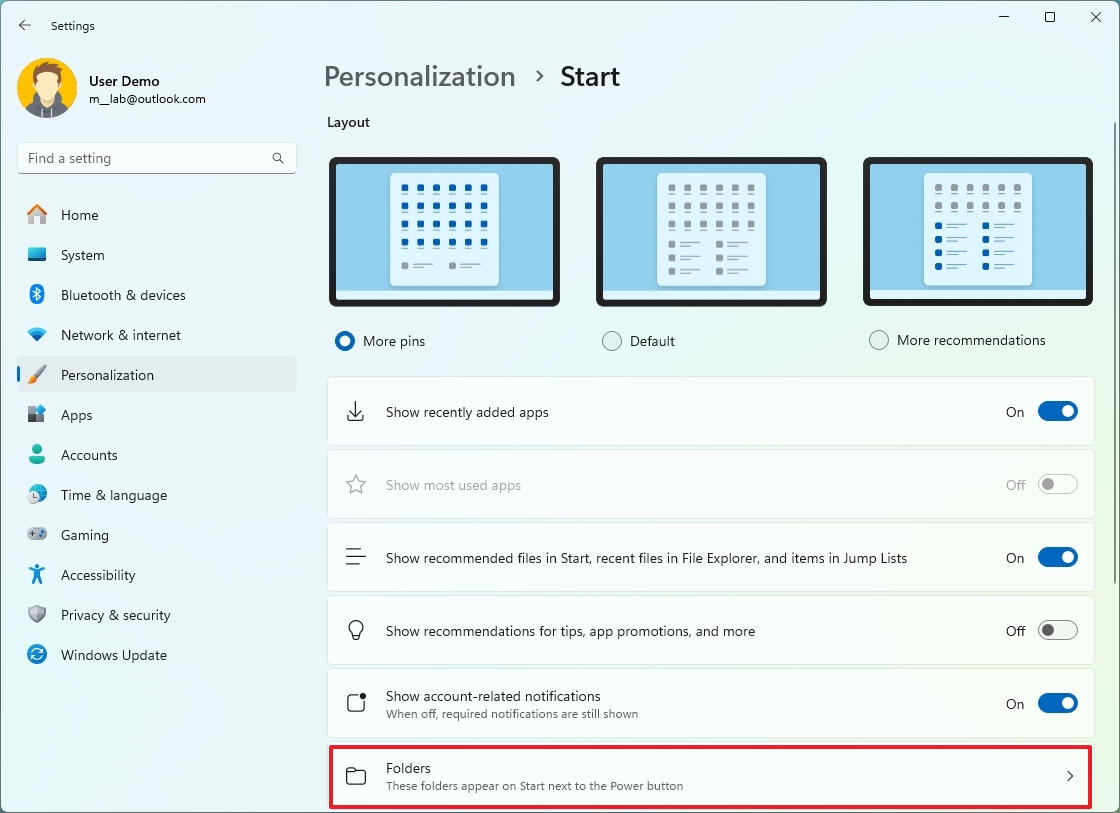
After you complete the steps, the shortcuts will appear next to the power button.
Disable account notifications
To prevent the Start menu from showing unwanted notifications, use these steps:
- Open Settings.
- Click on Personalization.
- Click the Start page on the right side.

- Turn off the "Show account-related notifications" toggle switch.
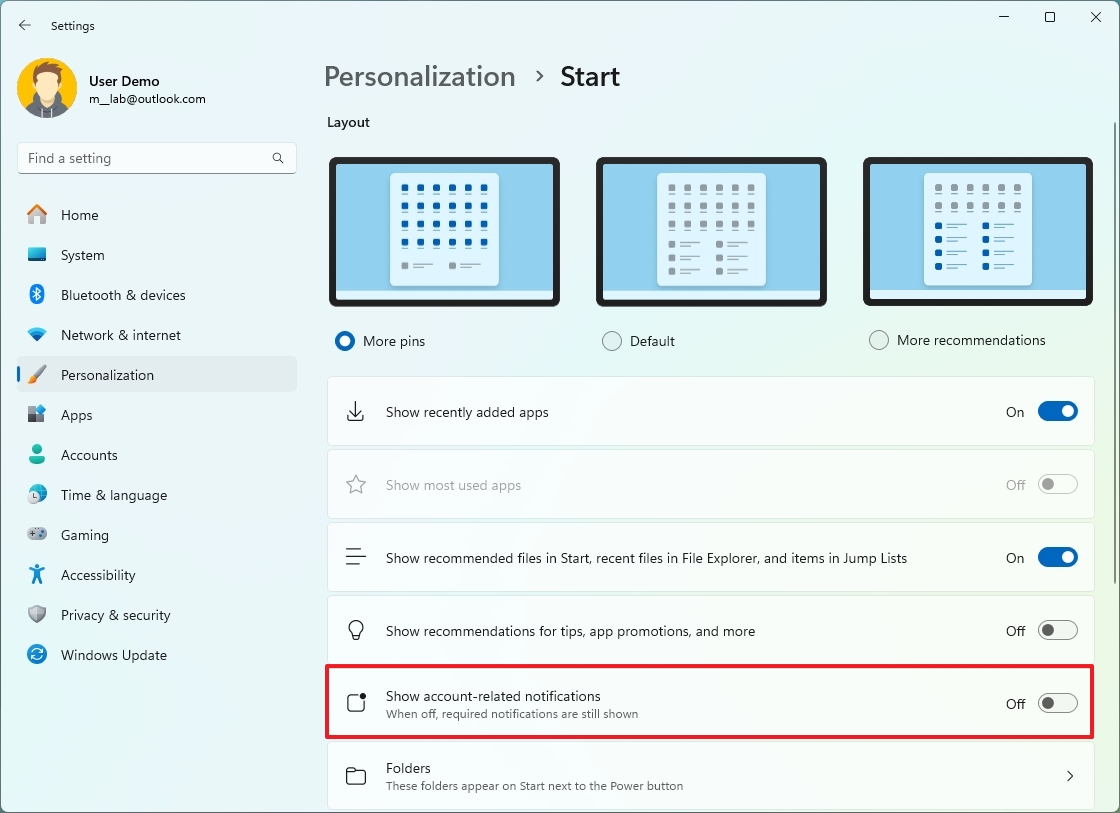
Once you complete the steps, the account manager menu will no longer show intrusive notifications about your account or promotions.
Disable app recommendations
To turn off app recommendations from the Microsoft Store in the "Recommended" section, use these steps:
- Open Settings.
- Click on Personalization.
- Click the Start page on the right side.

- Turn off the "Show recommendations for tips, app promotions, and more" toggle switch.
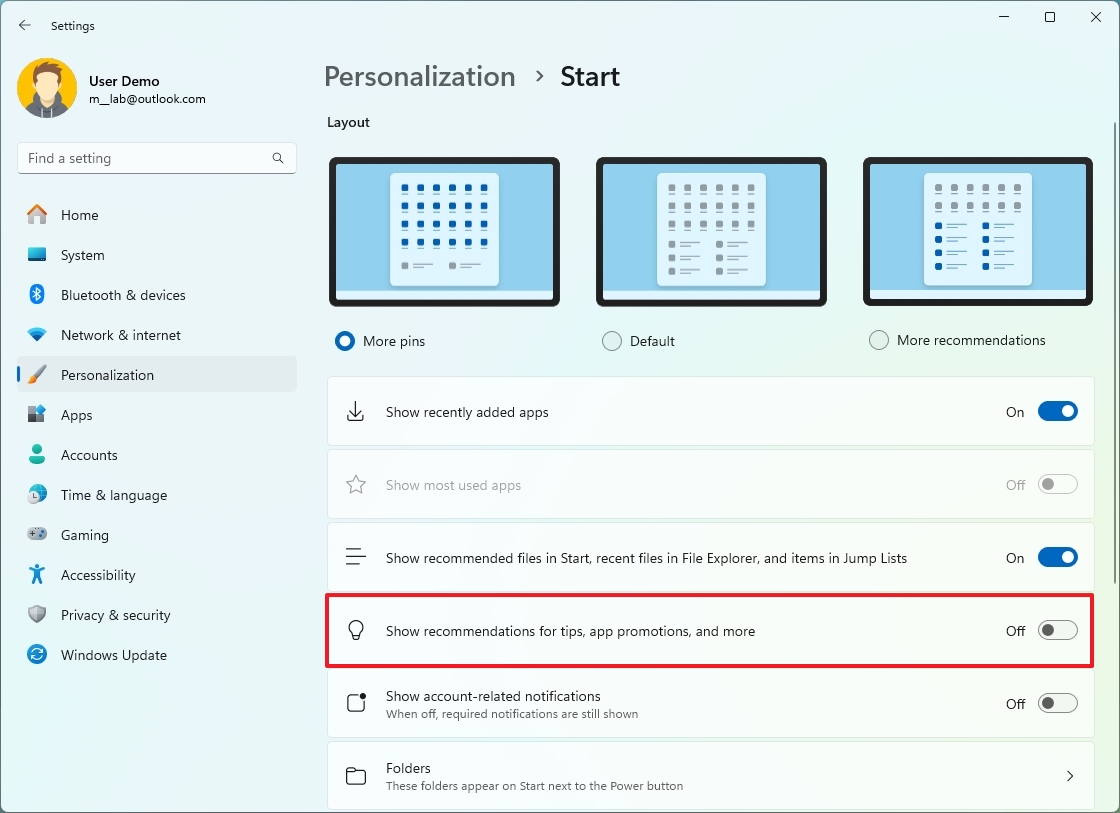
After you complete the steps, the Start menu will no longer promote apps from the Microsoft Store.
Taskbar
On the Taskbar, I prefer to align the icons to the left side, remove Widgets and Search, and, to minimize distractions, I typically disable badge notifications.
Change icon alignment
To align apps and the Start button to the left side, use these steps:
- Open Settings.
- Click on Personalization.
- Click the Taskbar page on the right side.
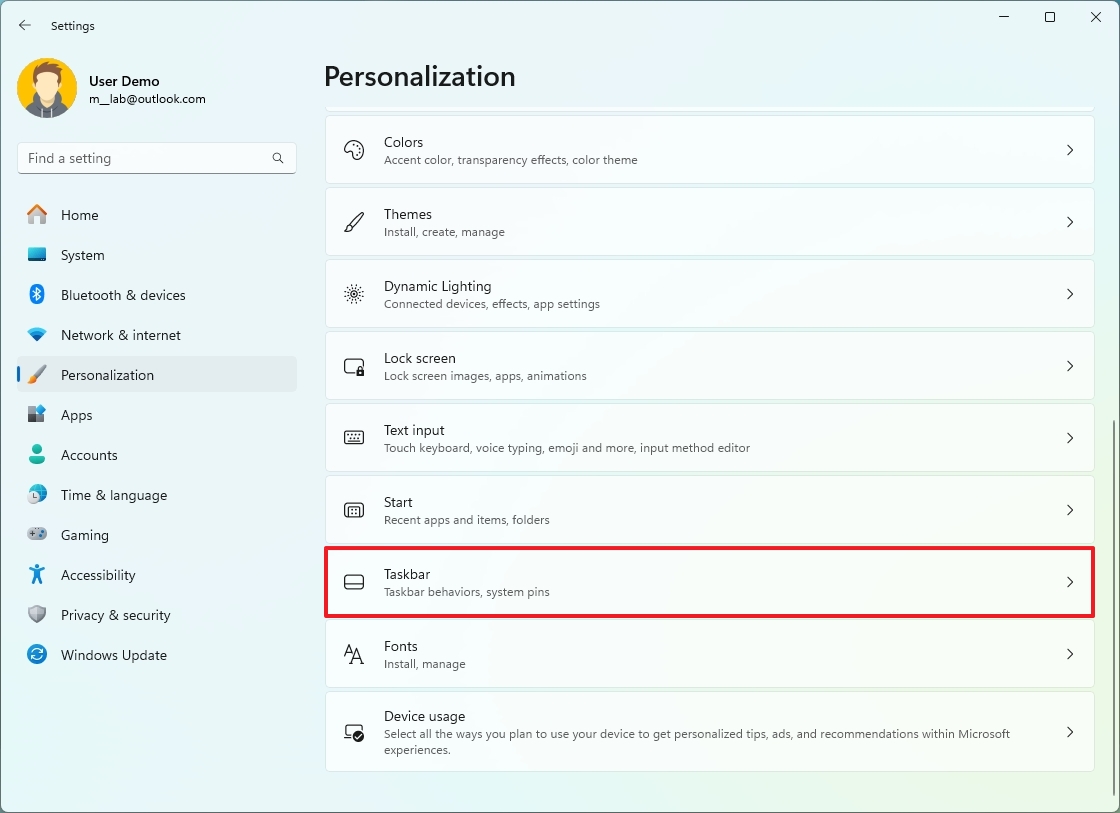
- Click the Taskbar behaviors setting.
- Choose the Left option for the "Taskbar alignment" setting.
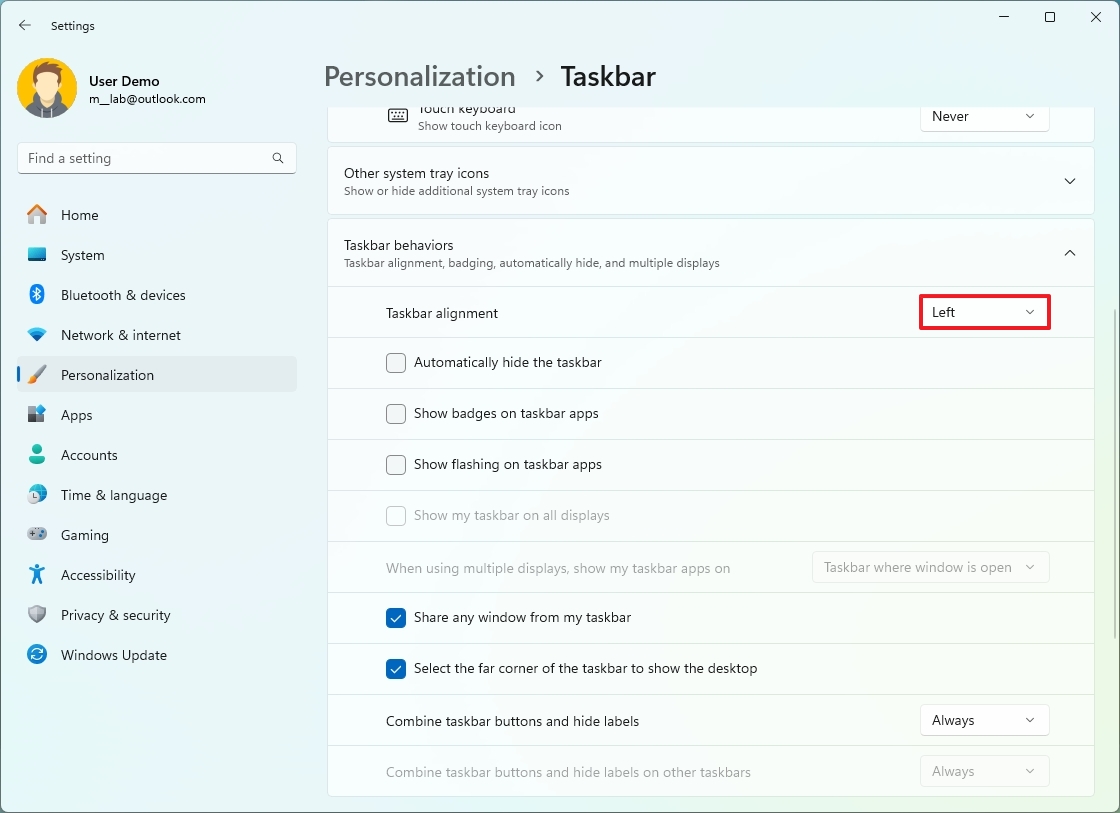
Once you complete the steps, the Start button and app icons will now align to the left, like in previous versions of the operating system.
Remove Widgets and Search icons
To remove the Widgets and Search icons from the Taskbar, use these steps:
- Open Settings.
- Click on Personalization.
- Click the Taskbar page on the right side.

- Choose the Hide option for the Search feature.
- Turn off the Widgets toggle switch.
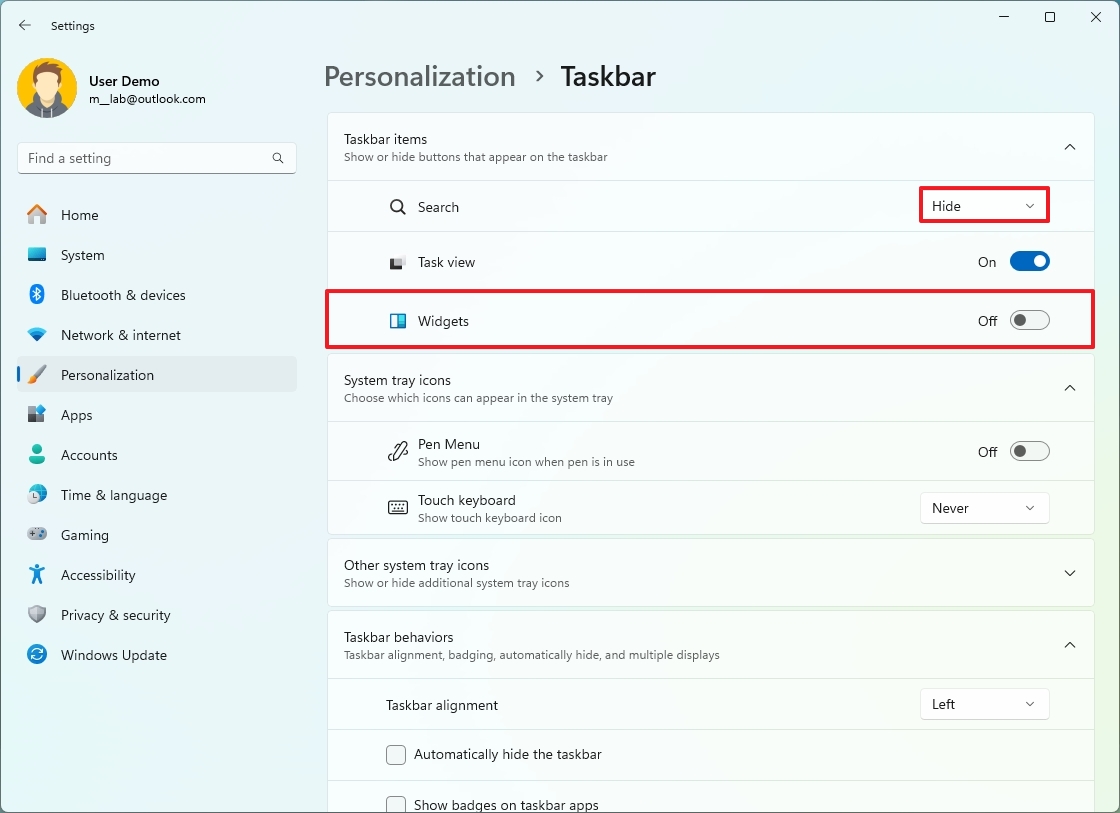
After you complete the steps, you will have access to search from the Start menu or using the "Windows key + S" keyboard shortcut. Also, you can continue to access the Widgets board with the "Windows key + W" keyboard shortcut.
Disable badge notifications
To disable badge notifications in the Taskbar, use these steps:
- Open Settings.
- Click on Personalization.
- Click the Taskbar page on the right side.

- Click the Taskbar behaviors setting.
- Clear the "Show badges on taskbar apps" option.
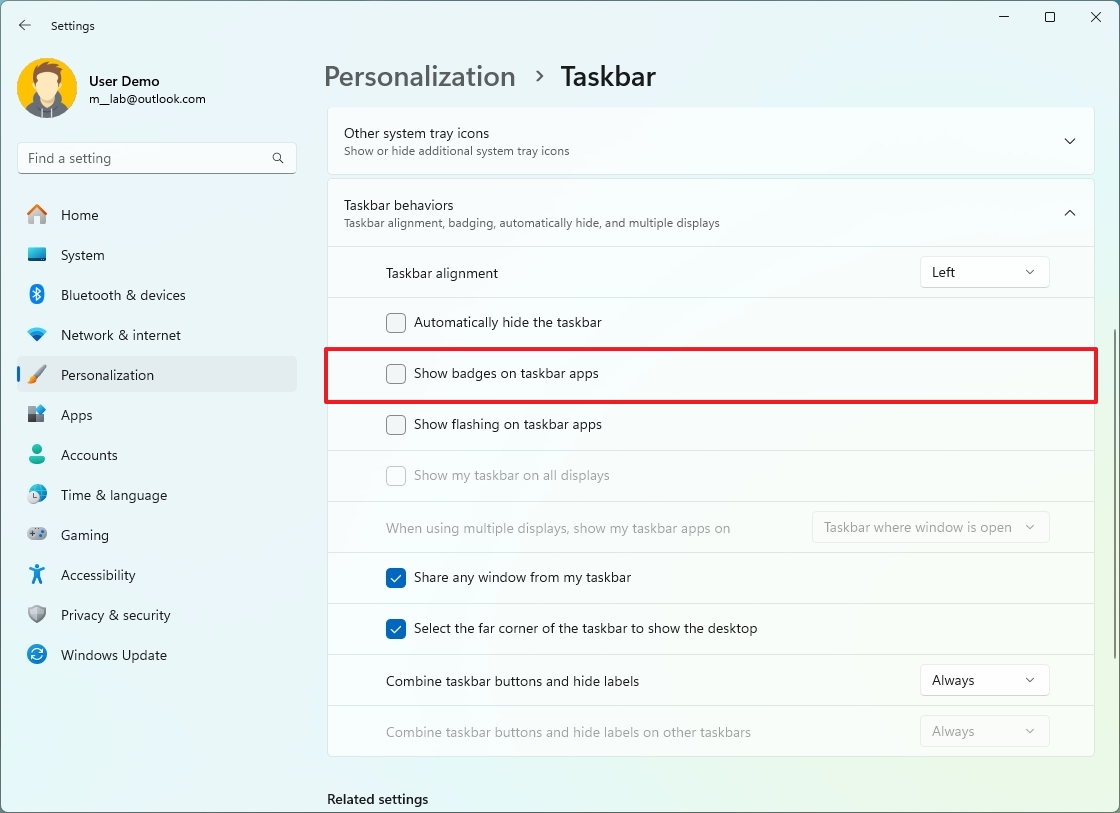
Once you complete the steps, apps in the Taskbar will no longer show badges with the number of unseen messages.
Widgets
In addition to removing the Widgets entry point from the Taskbar, I turn off the news feed to allow a complete view of the widgets.
Disable news feed
To turn off the Widgets news feed, use these steps:
- Open Widgets (Windows key + W).
- Click on the Settings (gear) button.
- Click the "Show or hide feeds" setting.
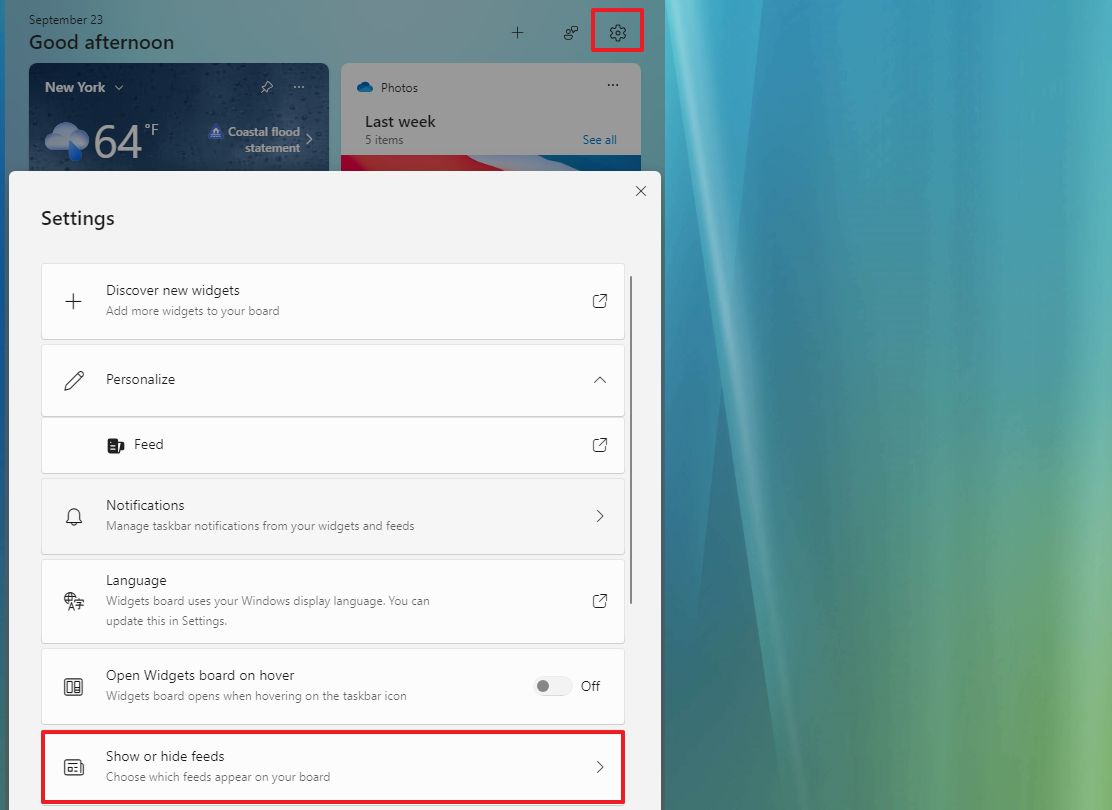
- Turn off the Feed toggle switch.
- Click the Turn off button.
After you complete the steps, the Widgets board will only show widgets.
Notifications
While I don't completely disable the notification system for my setups, I activate the "Do not disturb" option to mitigate distractions by suppressing toast notifications while maintaining access to system and app notifications.
Enable Do not disturb
To enable "Do not disturb" on Windows 11, use these steps:
- Open Settings.
- Click on System.
- Click the Notifications page on the right side.
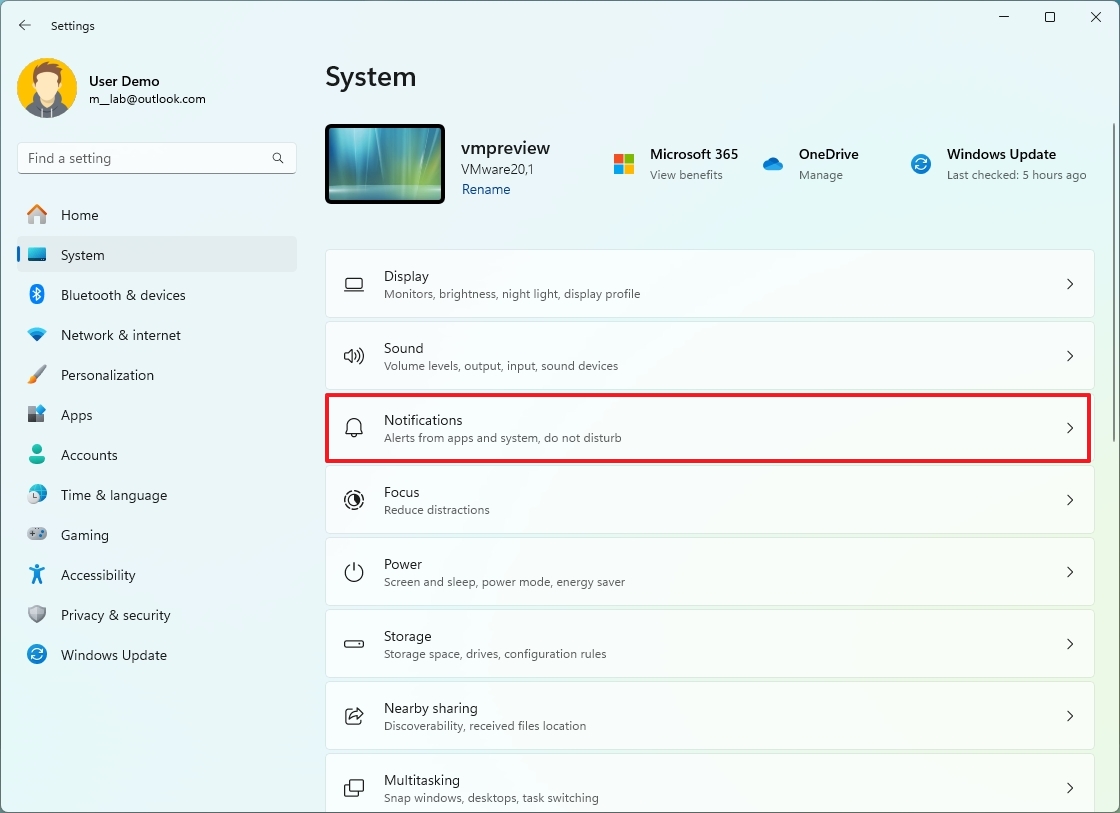
- Turn on the "Do not disturb" toggle switch.
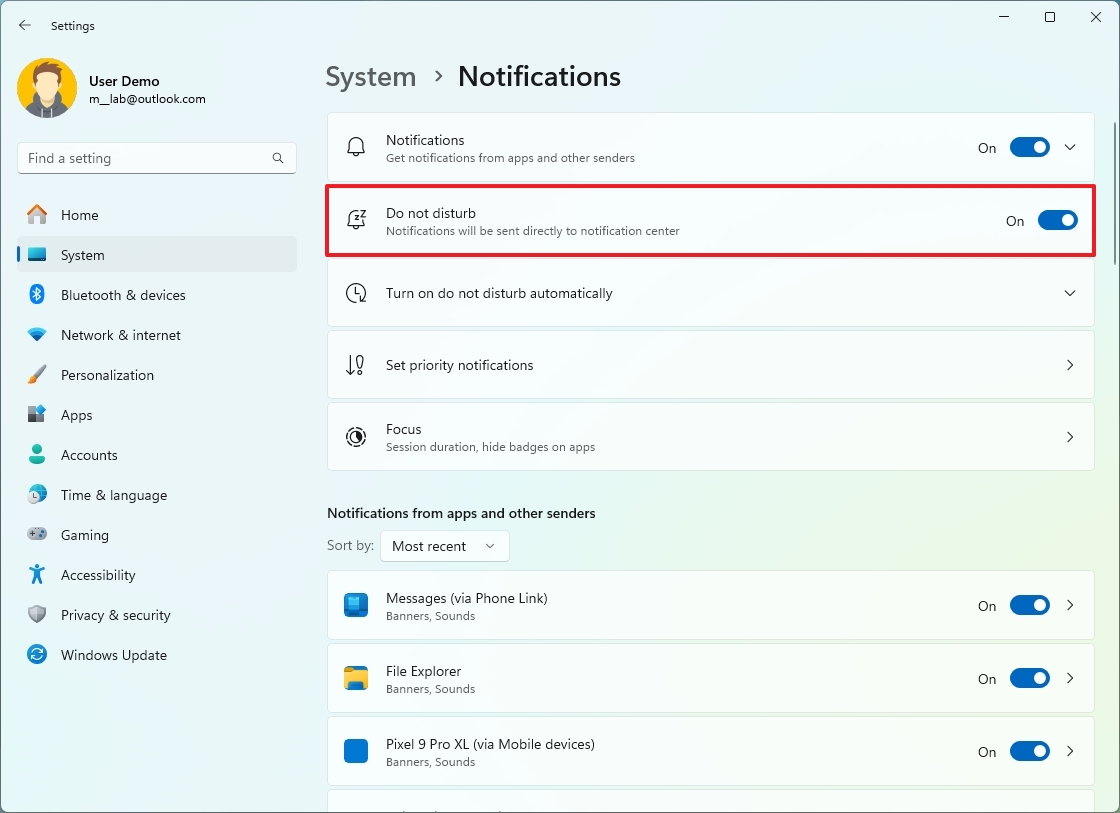
Once you complete the steps, the notifications system will continue to work, but you will no longer see toast and sound popping up every time you receive a notification.
You can always click the time and date area in the Taskbar to access your notifications.
Clock
Although the system sets the time zone as well as the clock and date automatically, sometimes, you may have to configure this information manually because it may go out of sync, especially if you travel to a different time zone. However, you can adjust the settings to allow the operating system to monitor and automatically adjust the time zone, clock, and date.
Enable automatic time and zone
To allow Windows 11 to adjust the time zone, clock, and date automatically, use these steps:
- Open Settings.
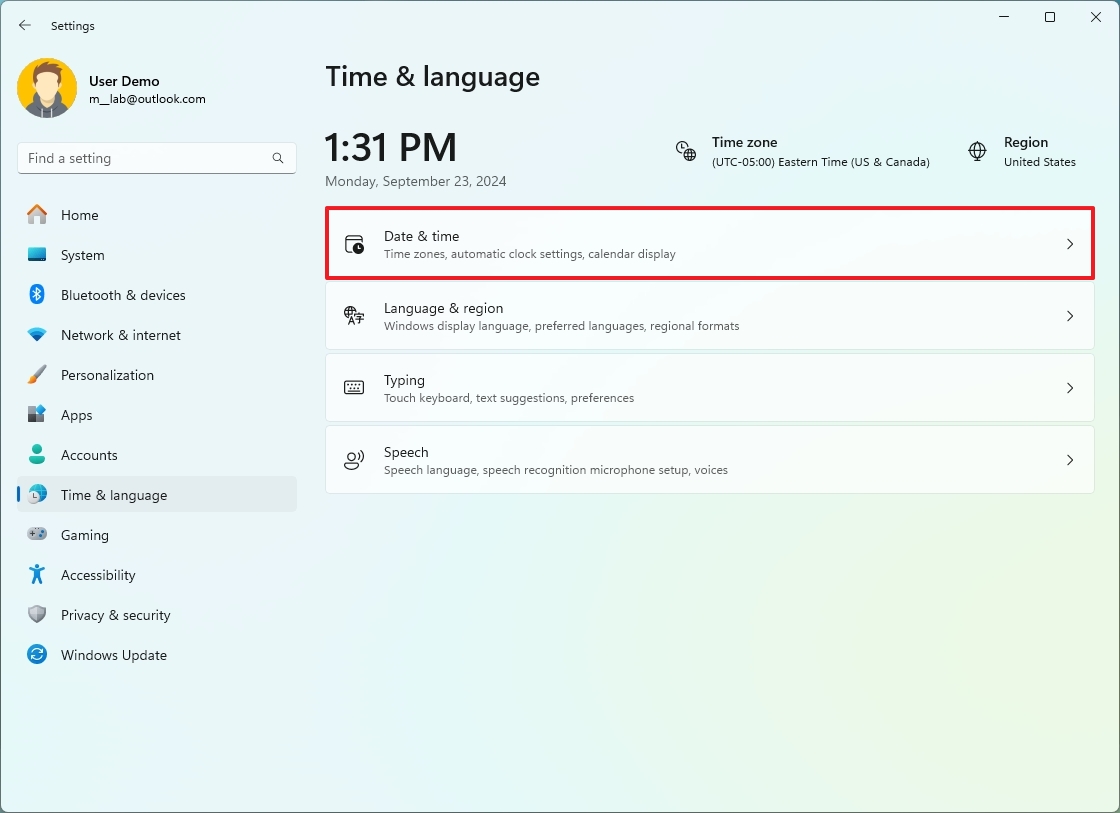
- Click on Time & language.
- Click the Date & time page from the right side.
- Turn on the "Set time zone automatically" toggle switch.
- Turn on the "Set time automatically" toggle switch.
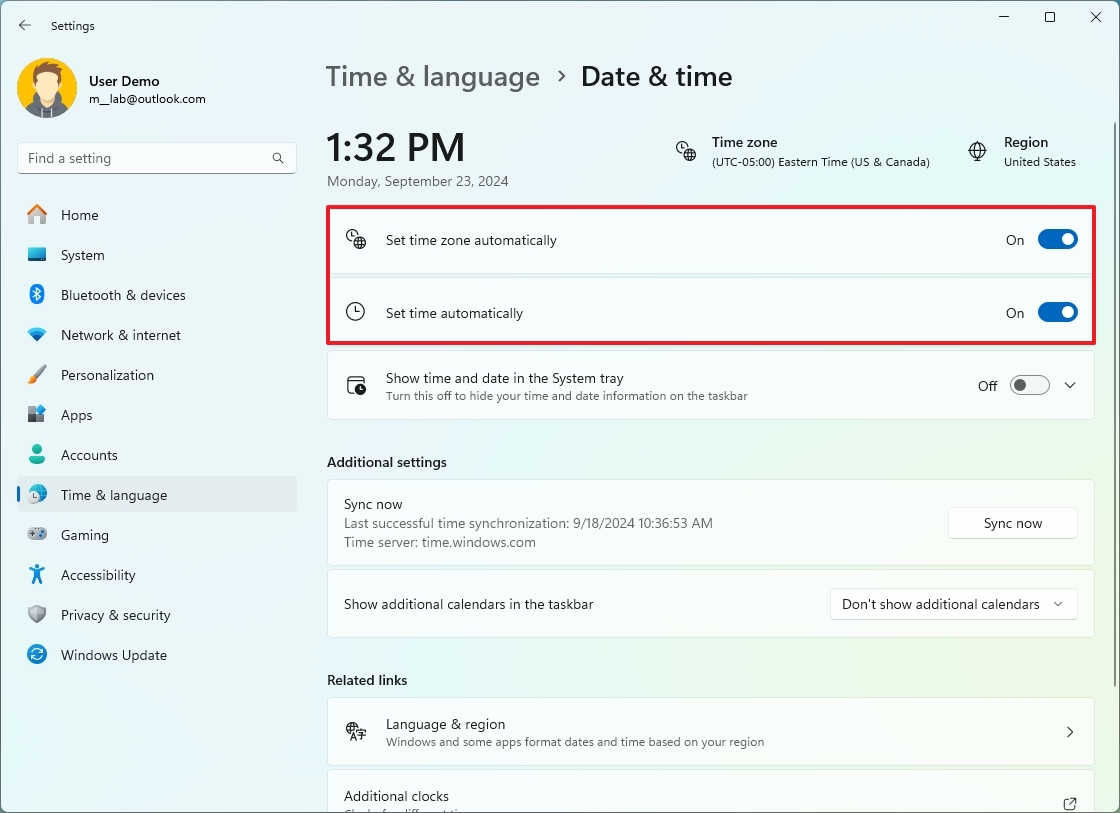
- (Optional) Click the Sync now button if the current time is out of sync.
After you complete the steps, the time zone and clock will sync automatically.
Apps
When it comes to apps, I only change my default apps and disable unnecessary programs from running at startup.
Set apps as default
To set an app as the system default on Windows 11, use these steps:
- Open Settings.
- Click on Apps.
- Click the Default apps page from the right side.
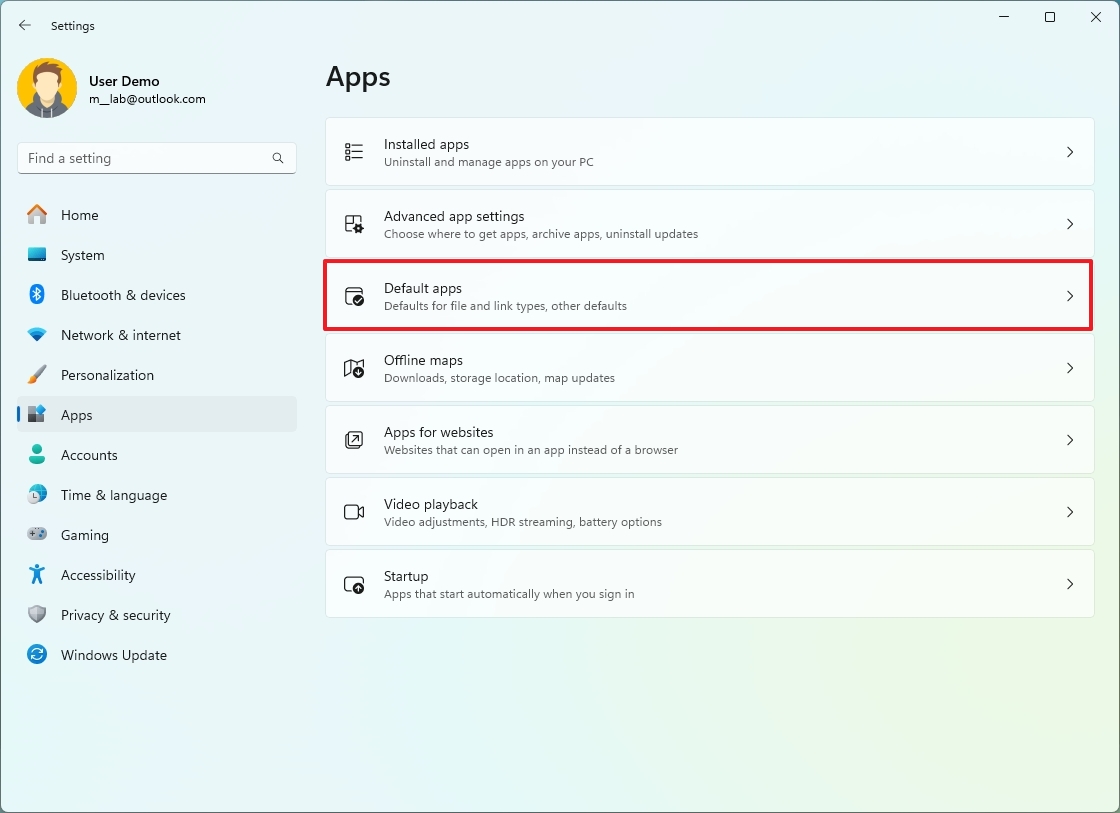
- Click on the app you want to make the default. For example, Google Chrome.
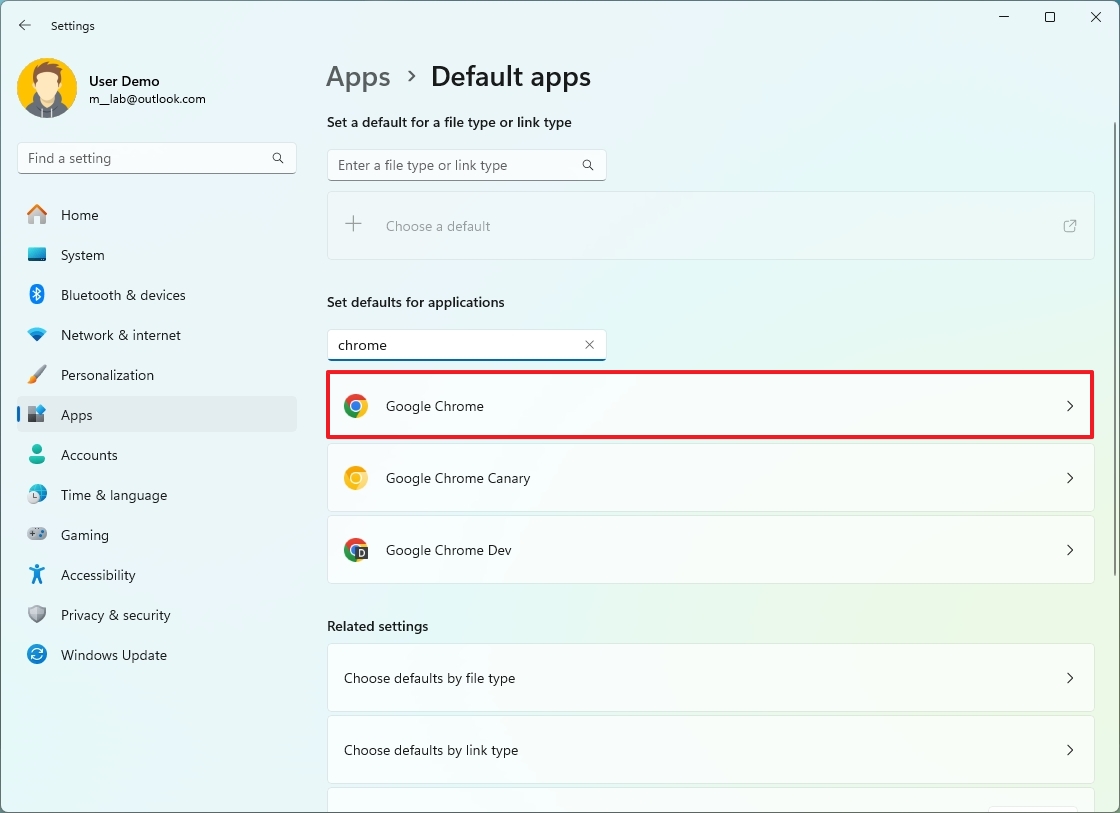
- Click the Set default option.
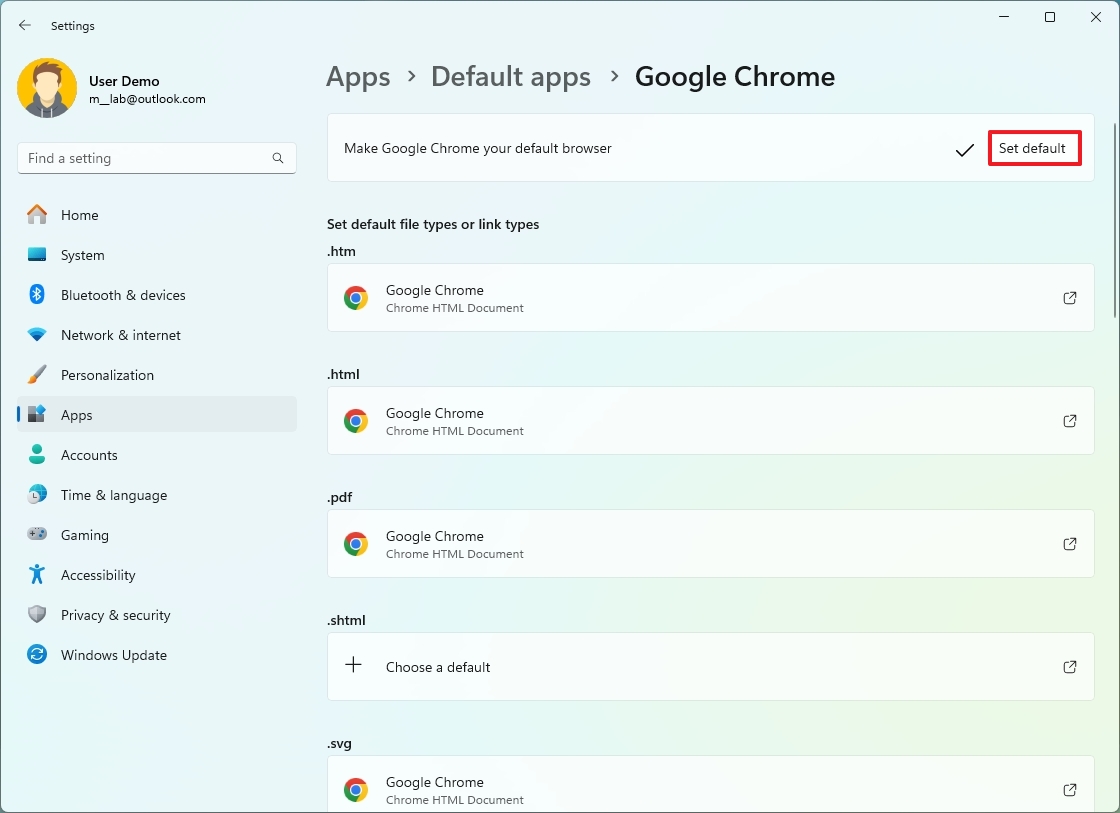
Once you complete the steps, the system will set the app you specified as the new default.
Control startup apps
To control apps at startup on Windows 11, use these steps:
- Open Settings.
- Click on Apps.
- Click the Startup page from the right side.
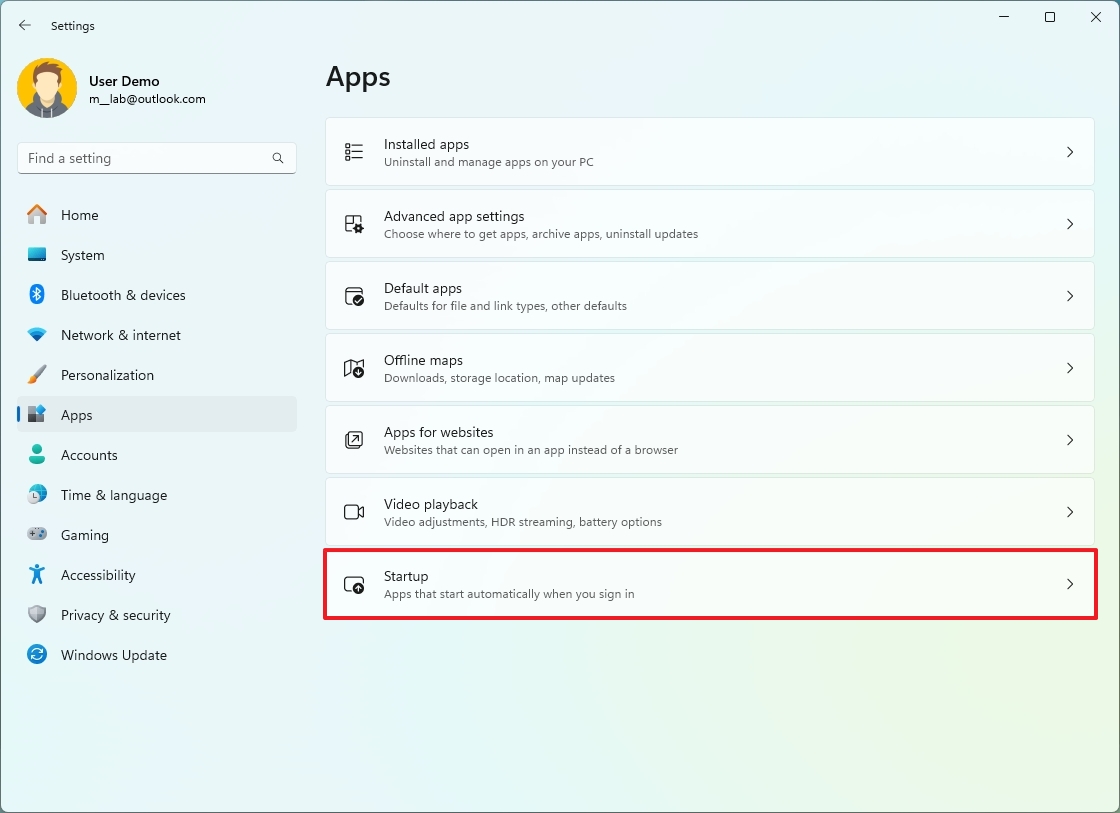
- (Optional) Choose the Startup impact option.
- Turn off the toggle switch for each of the apps you want to disable.
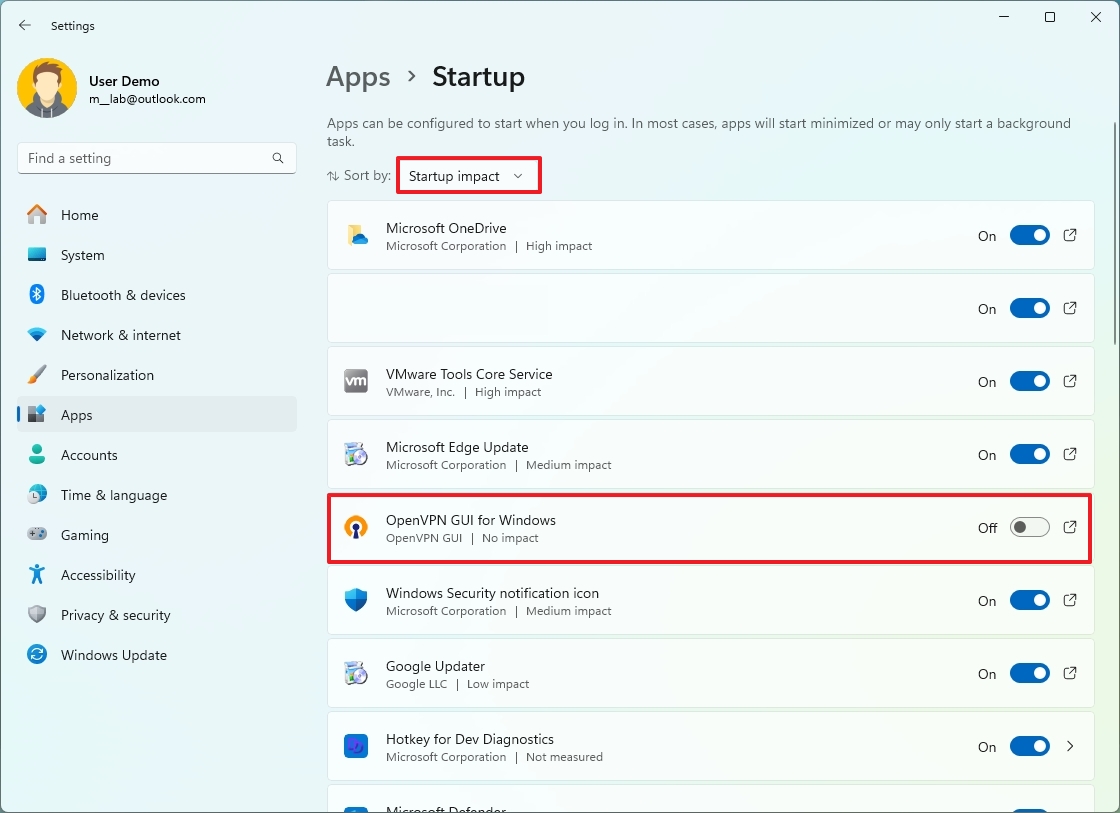
Usually, I don't turn off the system apps or the other programs I use frequently, such as OneDrive, Microsoft Defender, Mobile Devices, etc.
Display
When it comes to graphics, I only check and adjust the scale and the refresh rate settings because, depending on the monitor, the operating system may not set the most optimal configuration. I also like to configure the night light feature to reduce the emission of blue light, which can strain your eyes and disrupt your sleep patterns, especially when using your device in the evening.
I usually notice that Windows sets the scale setting too high and doesn't apply the highest refresh rate. Although you may not have to change these settings, it's always a good idea to check to determine if the correct configuration is set.
Change screen scaling
To change the display scale setting on Windows 11, use these steps:
- Open Settings.
- Click on System.
- Click the Display page from the right side.
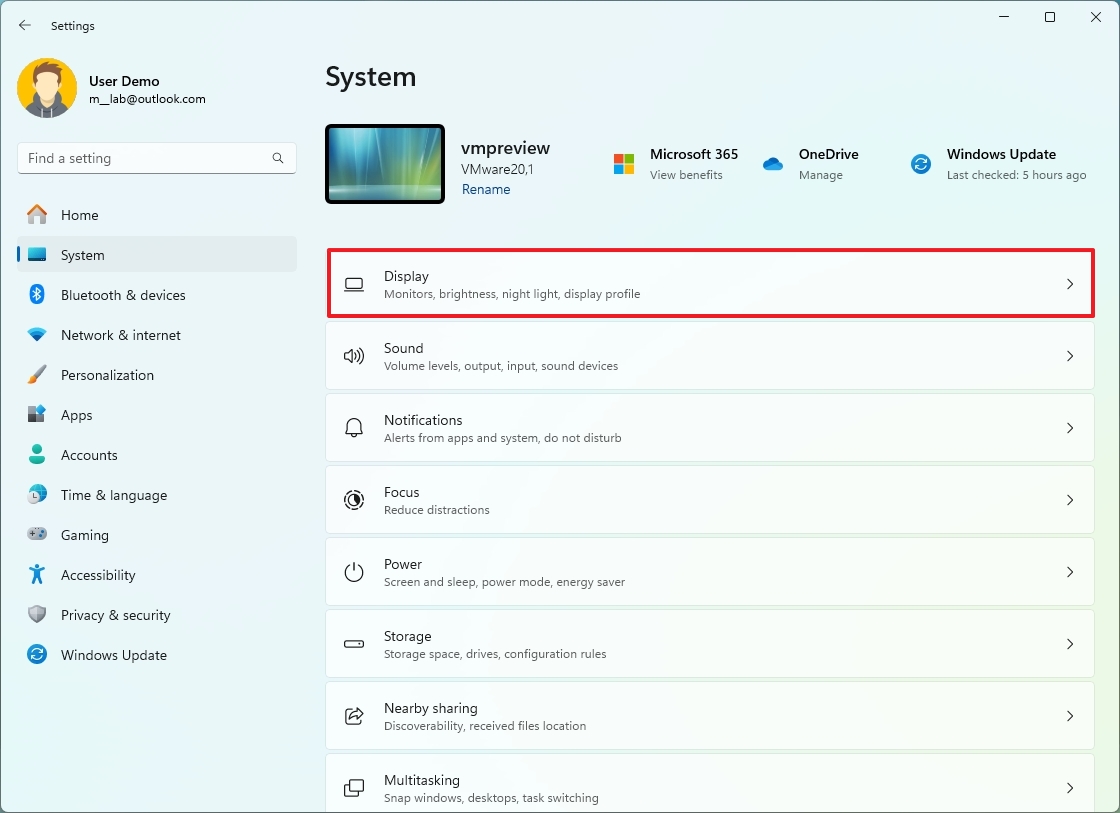
- (Option 1) Choose the desired scaling option in the "Scale & layout" setting.
- (Option 2) Click the Scale setting to specify a custom scaling size.
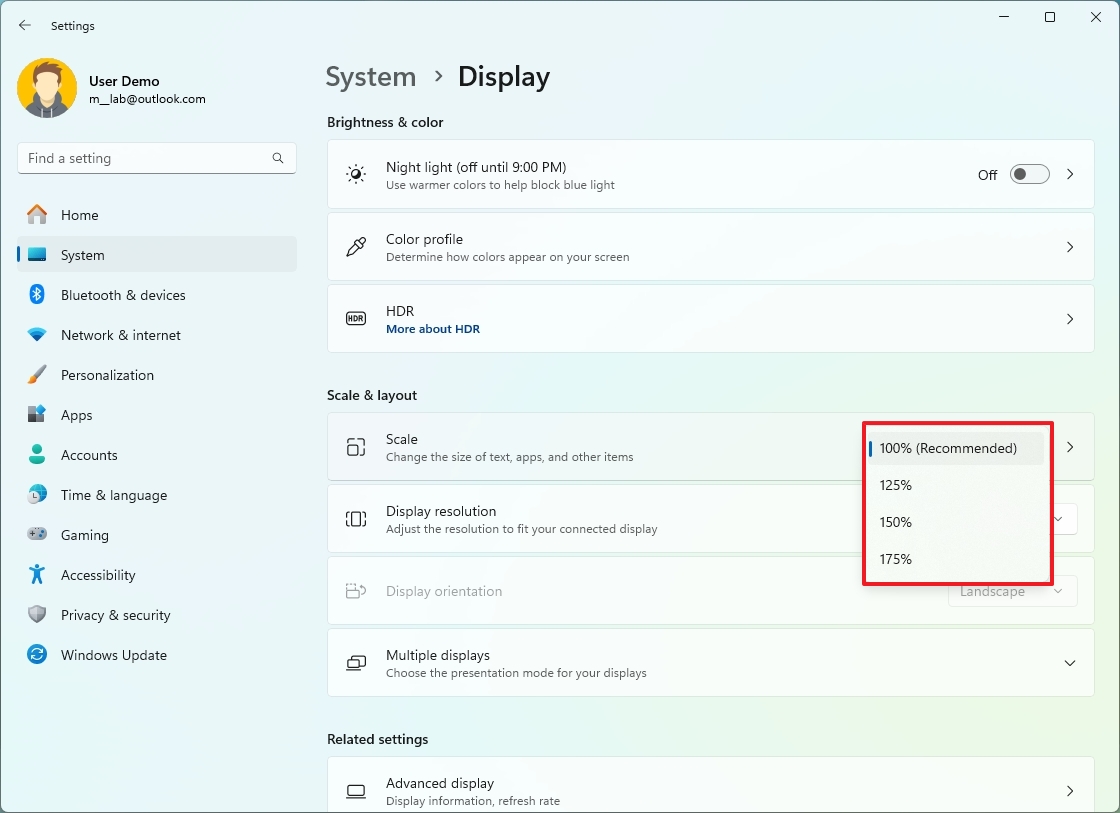
After you complete the steps, the display will use the scaling setting that is best for you.
Change refresh rate
To set the correct refresh rate on Windows 11, use these steps:
- Open Settings.
- Click on System.
- Click the Display page from the right side.

- Click the Advanced display setting.
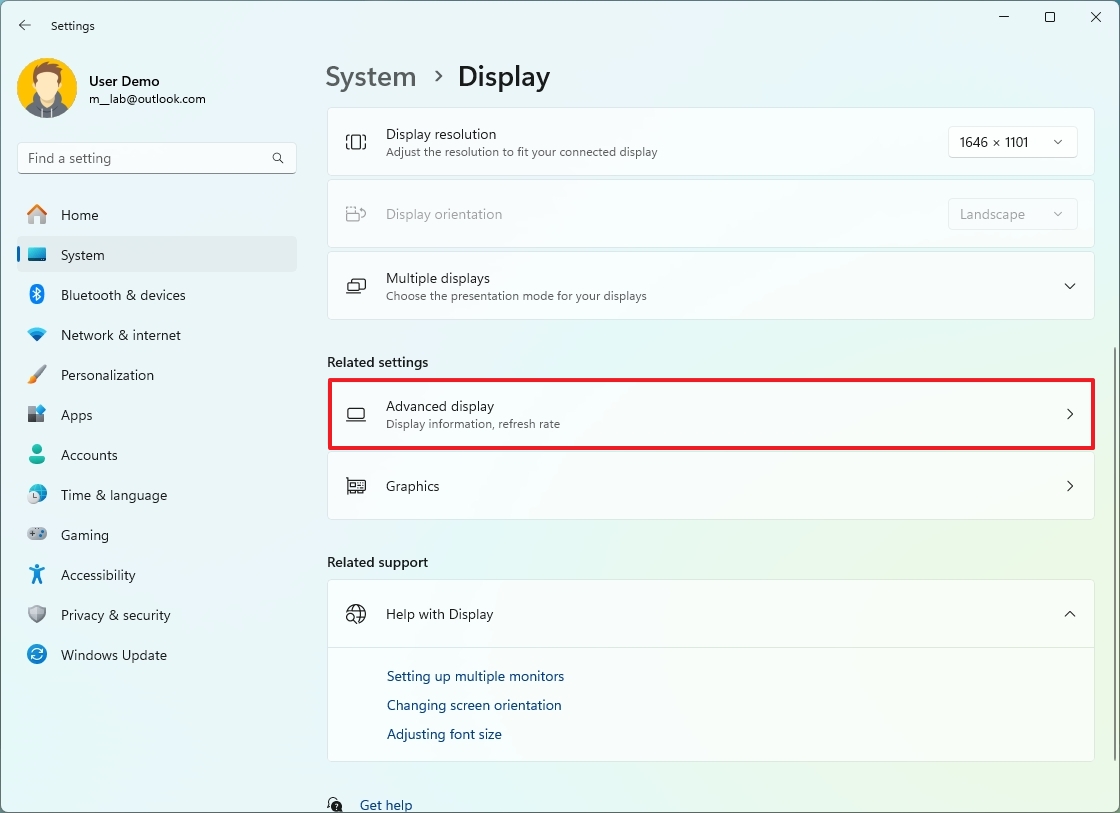
- Select the appropriate refresh rate according to the capabilities of your monitor.
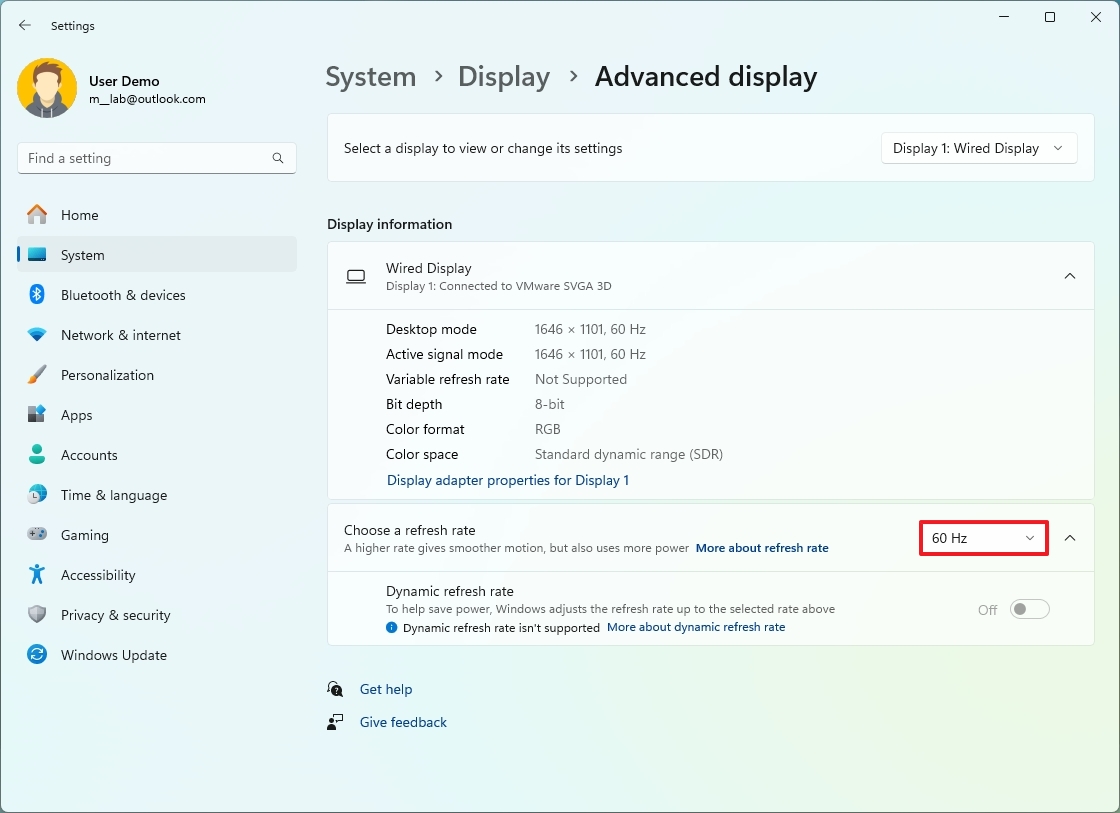
- (Optional) Turn on the "Dynamic refresh rate" feature if you want the system to adjust the refresh rate automatically to save energy.
Once you complete the steps, the monitor should start using the correct refresh rate.
Enable Night light
To enable the Night light feature on Windows 11, use these steps:
- Open Settings.
- Click on System.
- Click the Display page from the right side.

- Click the Night light setting.
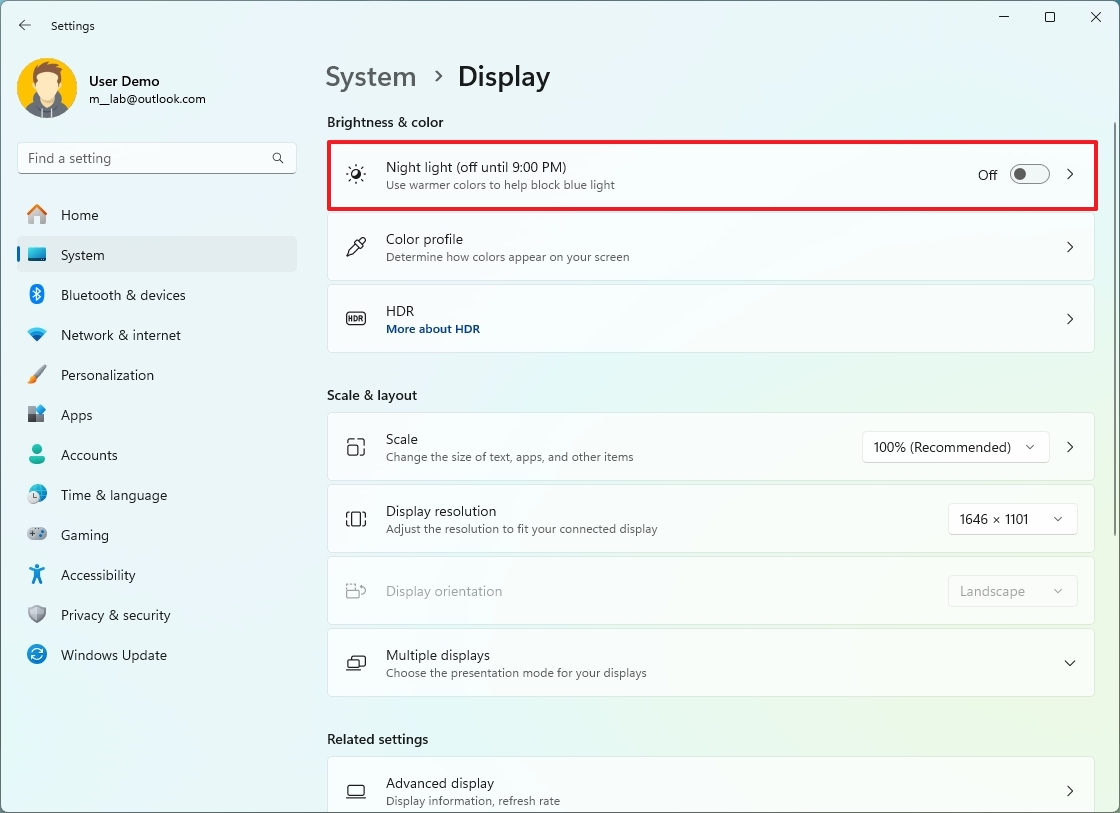
- Choose the blue light filter strength with the slider.
- Select the "Schedule night light" setting.
- Turn on the toggle switch to enable the schedule.
- Choose the "Sunset to sunrise" option.
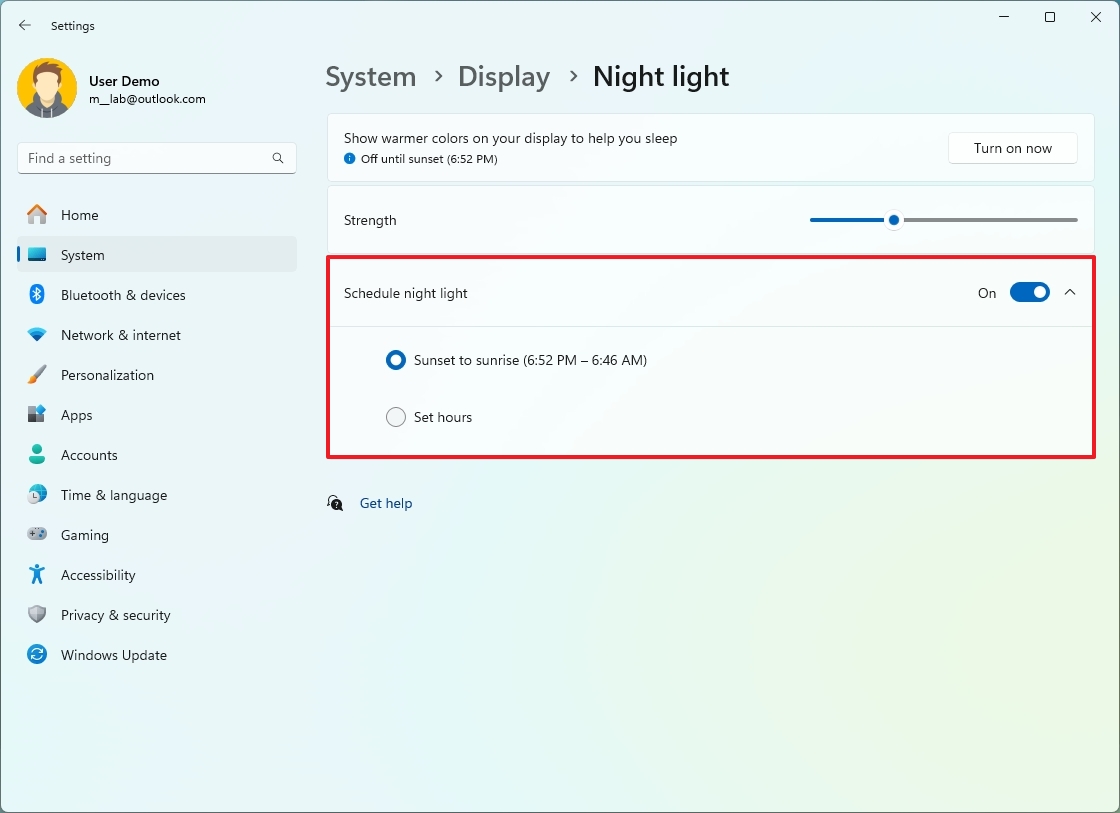
After you complete the steps, the Night light feature will turn on during sunset and turn off at sunrise.
Privacy
Privacy is a complex topic, depending on who you ask. As part of my base configuration, I usually turn off the "Find My Device" feature to prevent storing location data in the Microsoft servers and disable notifications in the Settings app to minimize distractions.
Disable Find My Device
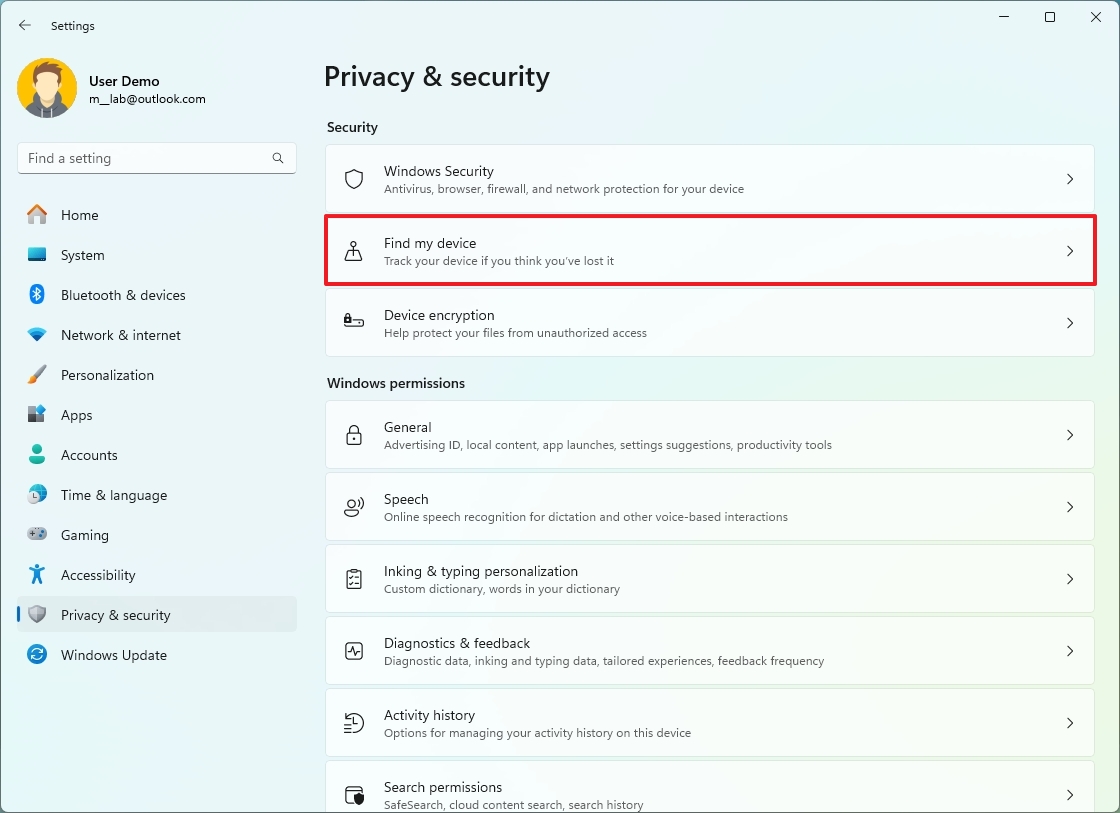
To disable the Find My Device feature on Windows 11, use these steps:
- Open Settings.
- Click on Privacy & security.
- Click the Find my device page from the right side.
- Turn off the "Find my device" toggle switch.
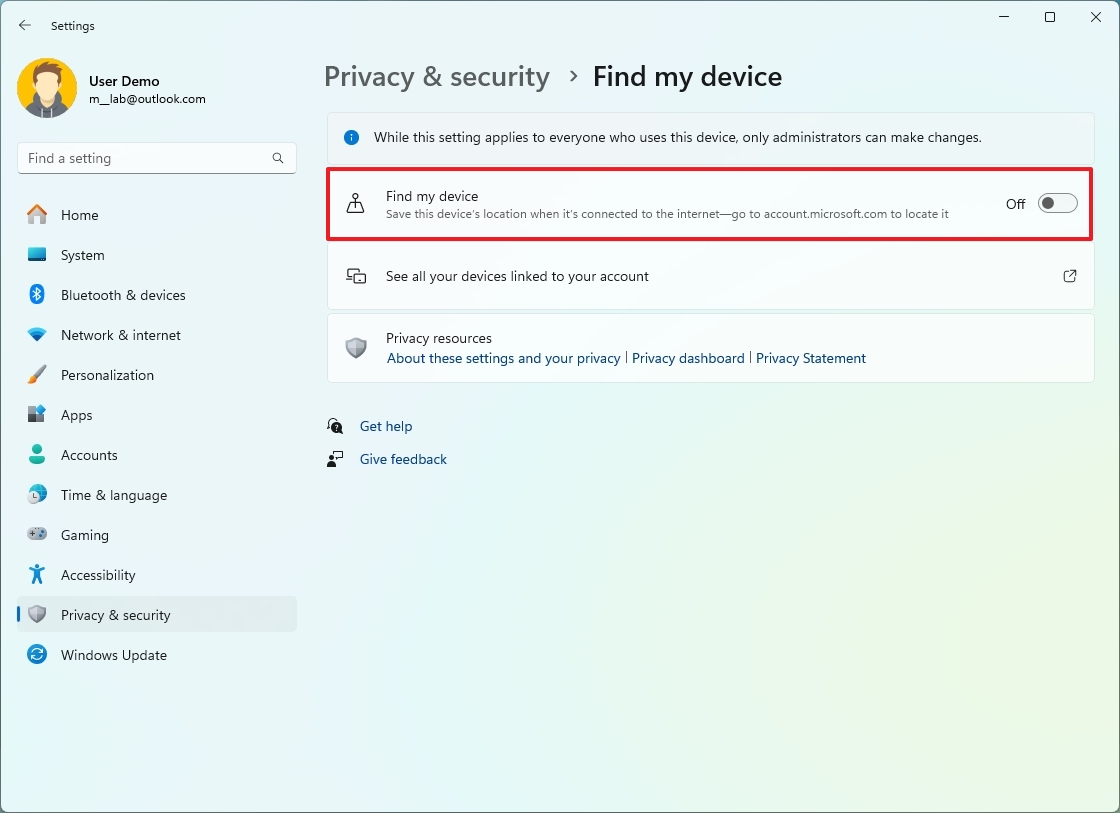
Once you complete the steps, the device will no longer send the location information to Microsoft.
Disable Settings notifications
To disable the Settings app notifications, use these steps:
- Open Settings.
- Click on Privacy & security.
- Click the General page from the right side.
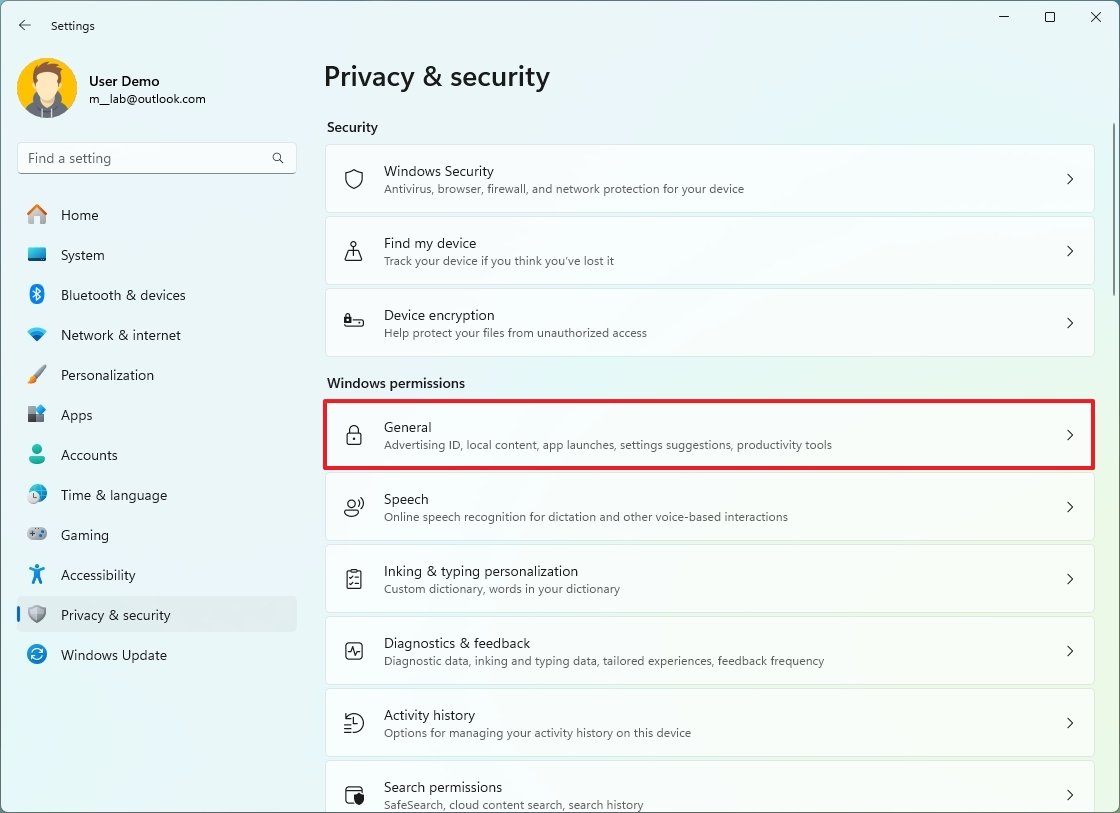
- Turn off the "Show me suggested content in the Settings app" toggle switch.
- Turn off the "Show me notifications in the Settings app" toggle switch.
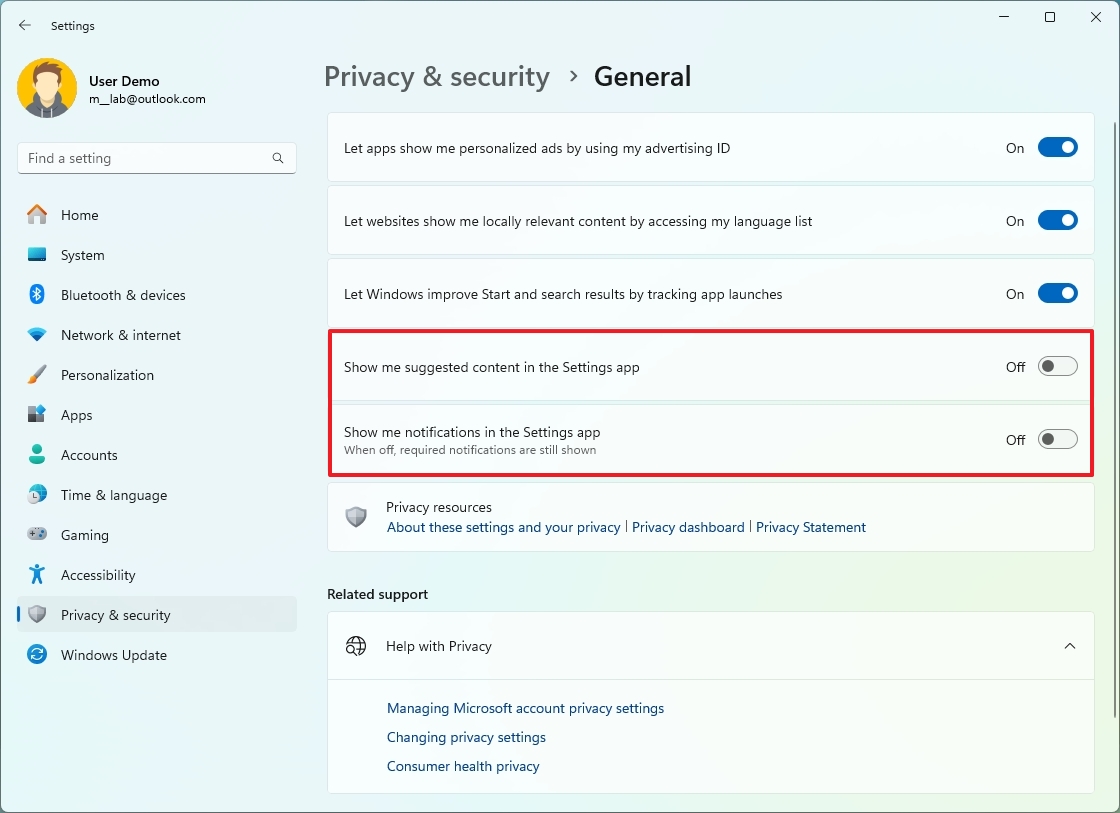
After you complete the steps, you should no longer notice content suggestions and notifications in the Settings app. (This setting won't stop the account notifications.)
Connect phone
On Windows 11, you have to connect your phone to your computer, but you have to do this in two ways to access the different features. For example, if you connect your Android device through the Phone Link app, you can access your photos, messages, notifications, and more.
On the other hand, if you connect your phone using the Mobile devices feature, you can access the phone storage through File Explorer as if the device was connected using a USB cable. Also, you can access your phone camera to use it as a wireless webcam on Windows 11.
Phone Link
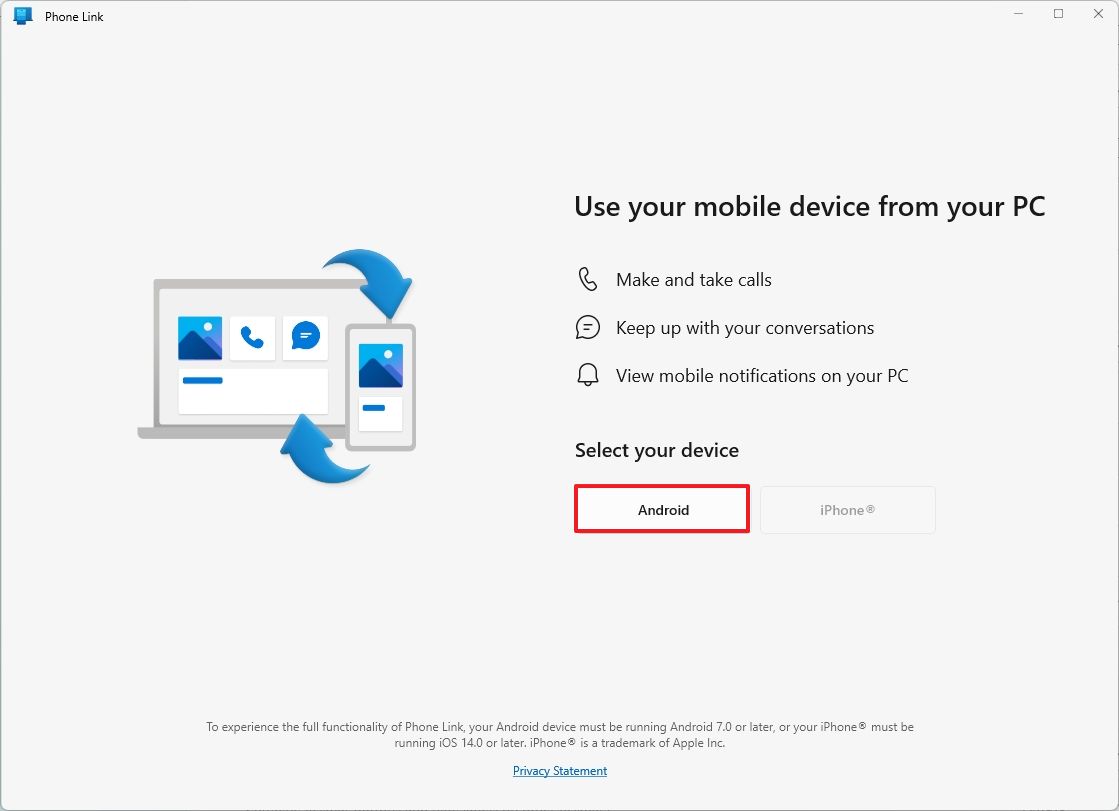
To connect your Android phone to your computer with the Phone Link app, use these steps:
- Open the Phone Link app on your phone.
- Click the Android button.
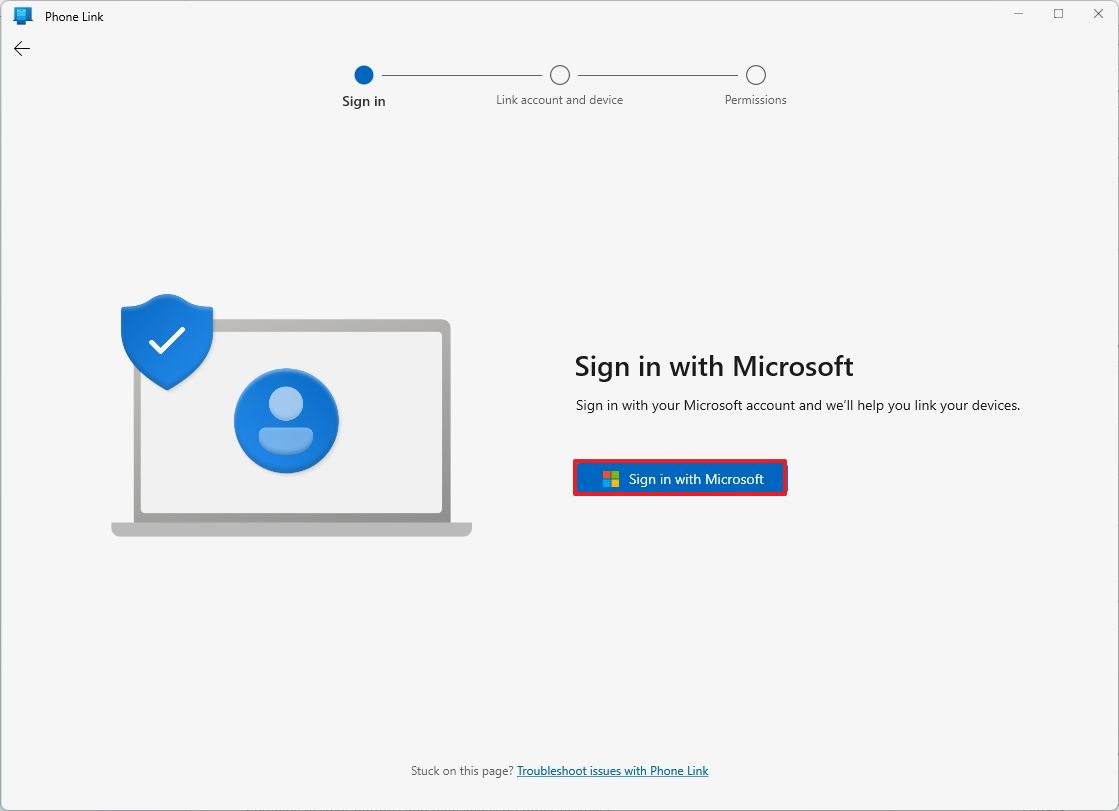
- Sign in with your Microsoft account (if applicable).
- Scan the QR Code with your Android device.
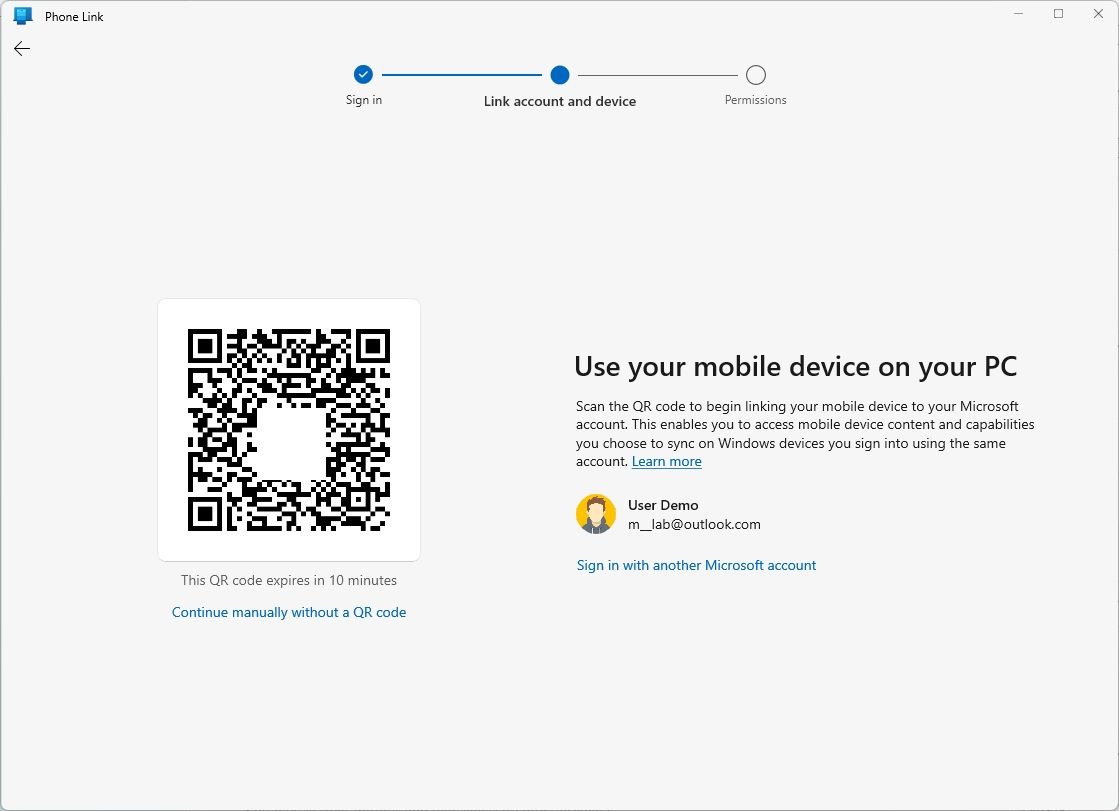
- Continue with the on-screen directions to complete the setup.
Once you complete the steps, you will be able to access your phone photos and other information through the Phone Link app. In addition, you will be able to send and receive texts and calls.
Mobile devices
To connect your Android phone to your computer with the Mobile devices feature, use these steps:
- Open Settings.
- Click on Bluetooth & devices.
- Click the Mobile devices page on the right side.
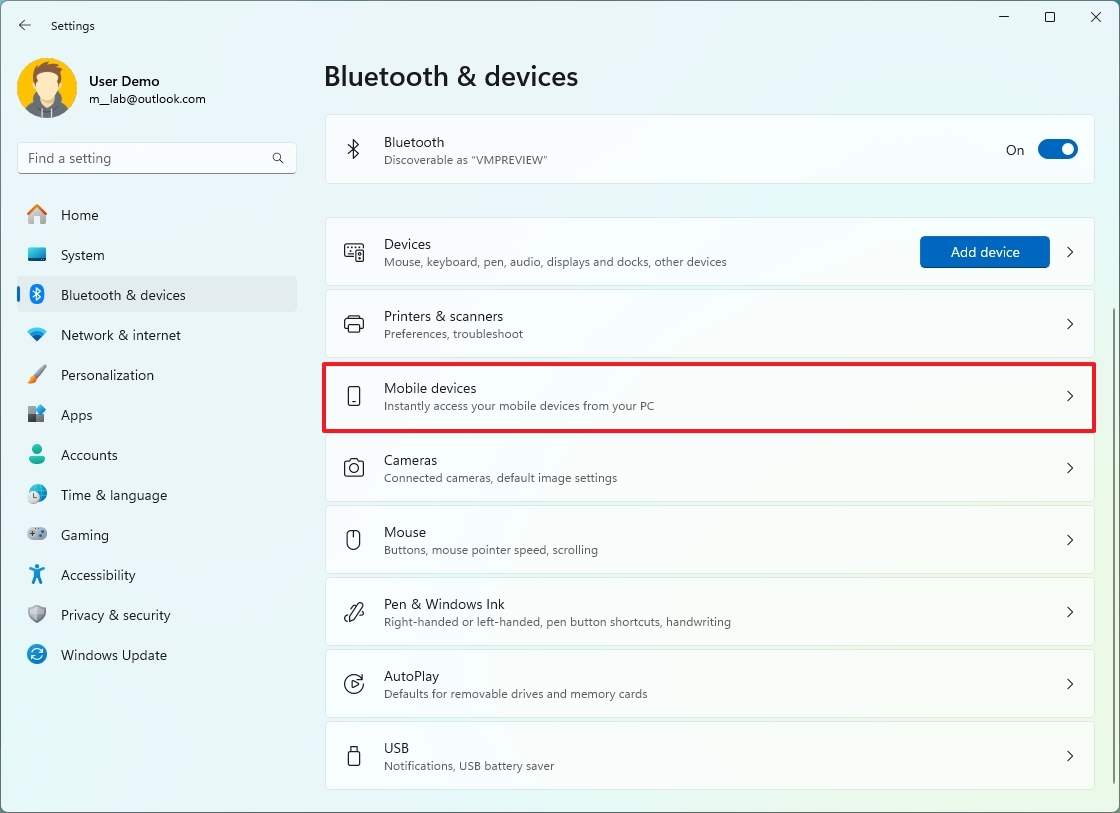
- Turn on the "Allow this PC to access your mobile devices" toggle switch.
- Click the Manage devices button.
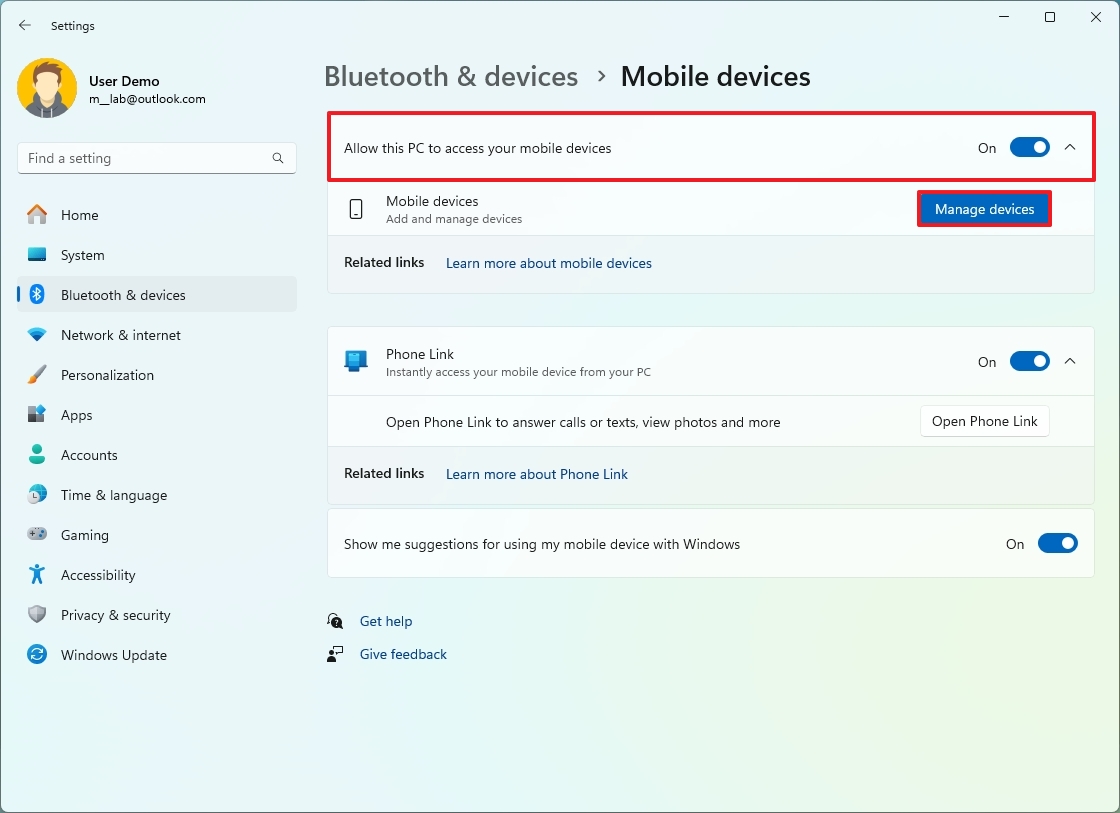
- Sign in with your Microsoft account.
- Turn on the toggle switch to connect your phone.
- Turn on the "Use as a connected camera" toggle switch to use your phone camera as your computer's webcam.
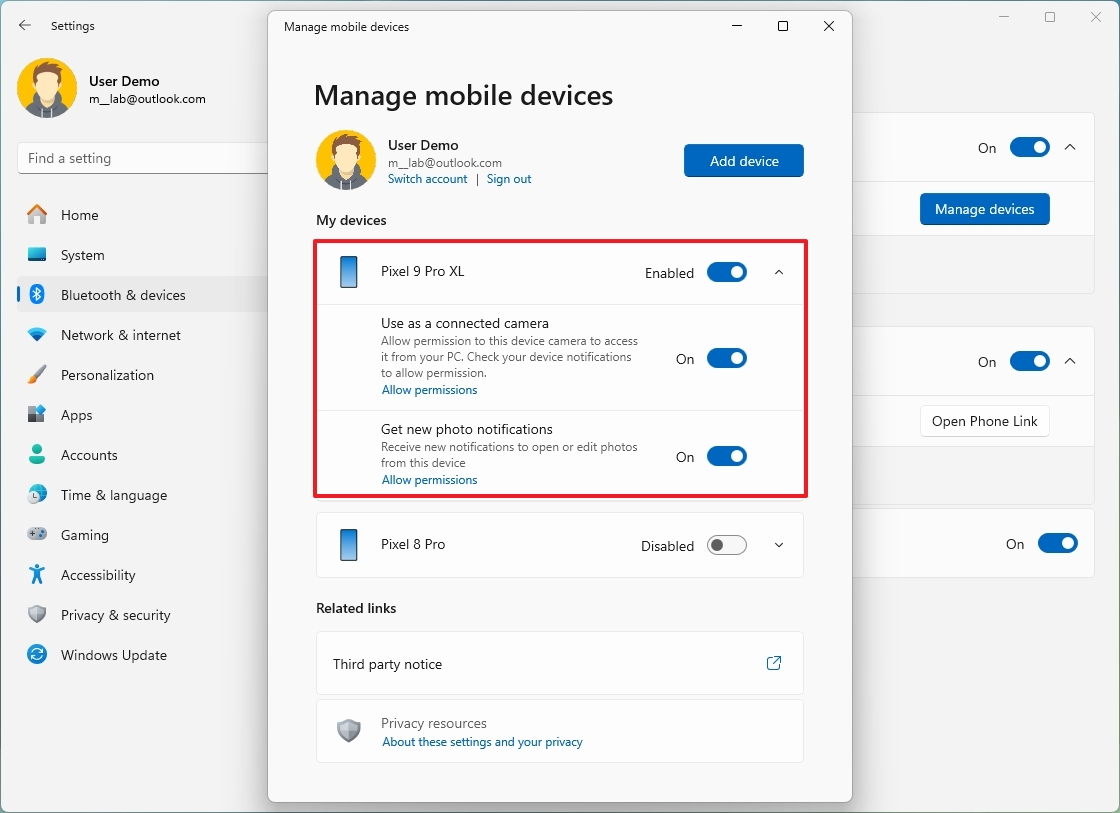
- Turn on the "Show mobile device in File Explorer" toggle switch.
- Quick note: This option may only appear if you have Windows 11 version 24H2 installed on your computer.
Once you complete the steps, your phone's camera will appear in the list of devices to use as a webcam on your computer. You can test this feature using the Camera app on Windows 11.
If you turn on the option to access your Android phone storage from your computer, the phone will appear on File Explorer through the left navigation pane.
File Explorer
Although File Explorer ships with the most optimal settings, I usually switch the startup page to "This PC" and turn on the option to show extensions.
Change startup page
To change the startup page on File Explorer, use these steps:
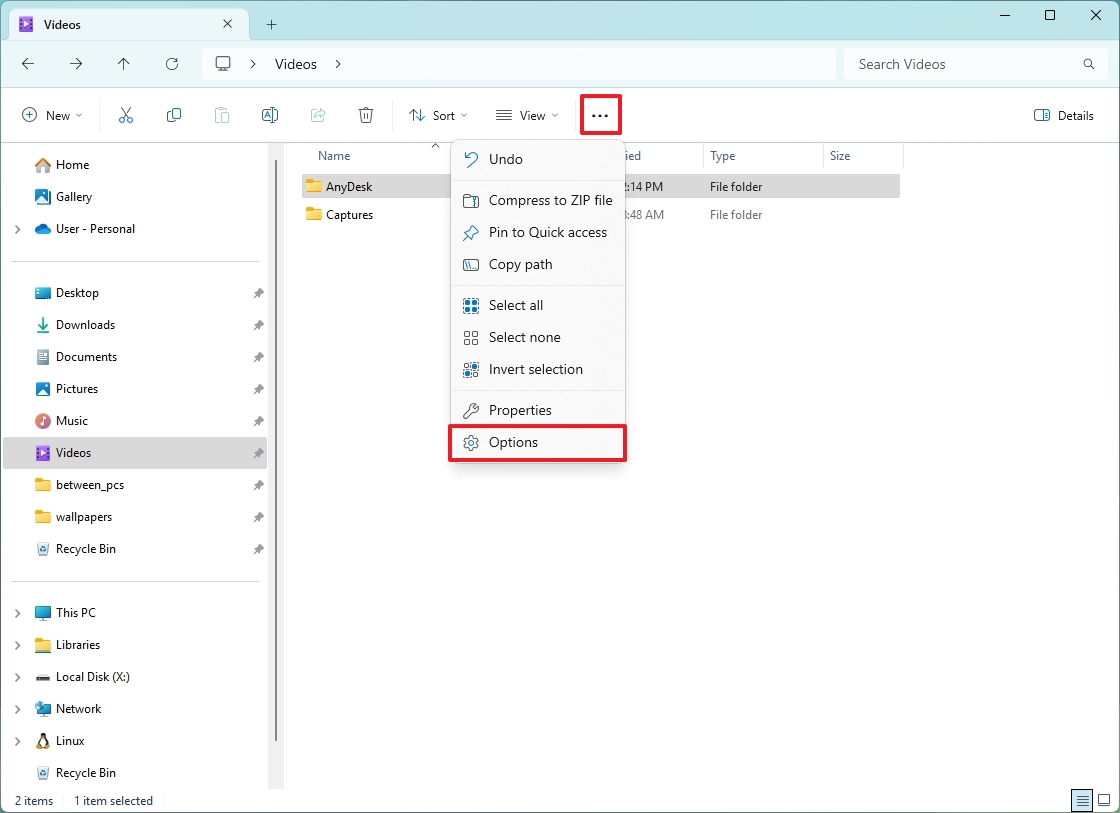
- Open File Explorer.
- Open the main menu (three dots) button from the command bar.
- Click on Options.
- Click the General tab.
- Select the page you want to start. For example, This PC.
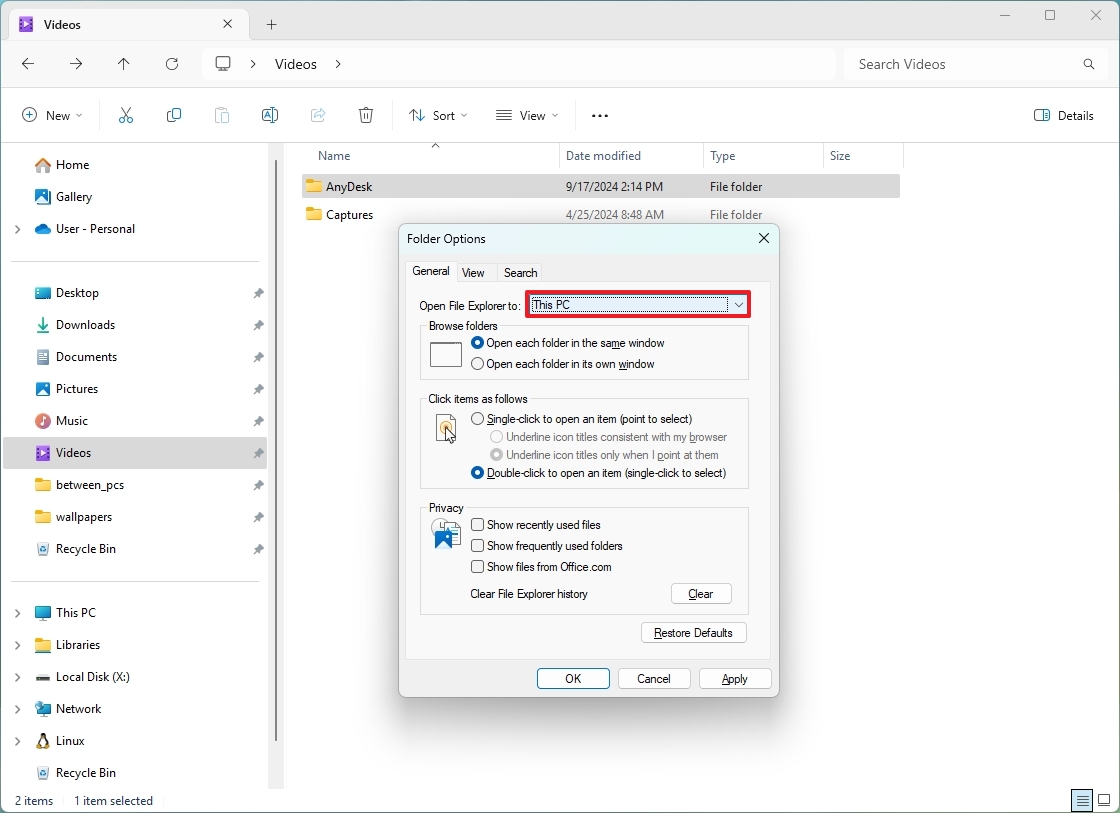
- Click the Apply button.
- Click the OK button.
After you complete the steps, File Explorer will start directly in the "This PC" page.
Show file extensions
To show file extensions on File Explorer, use these steps:
- Open File Explorer.
- Open the View menu button from the command bar.
- Select the Show submenu and choose the "File name extensions" option.
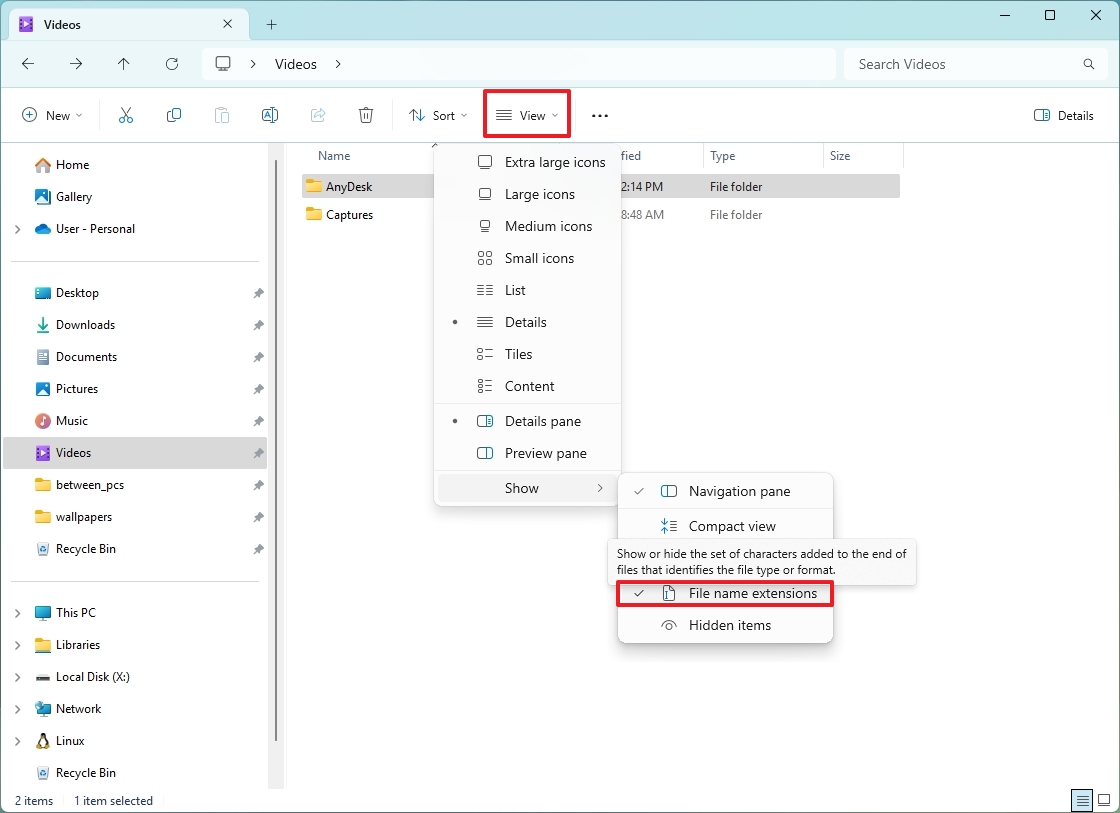
Once you complete the steps, you will be able to see extensions for files on File Explorer.
Mouse
Finally, instead of using the default color scheme for the mouse pointer and cursor, I usually enable and configure the "Mouse pointer style," which has been designed as an accessibility feature, but anyone can use it.
To change the mouse cursor and pointer style, use these steps:
- Open Settings.
- Click on Accessbility.
- Click the "Mouse pointer and touch" page from the right side.
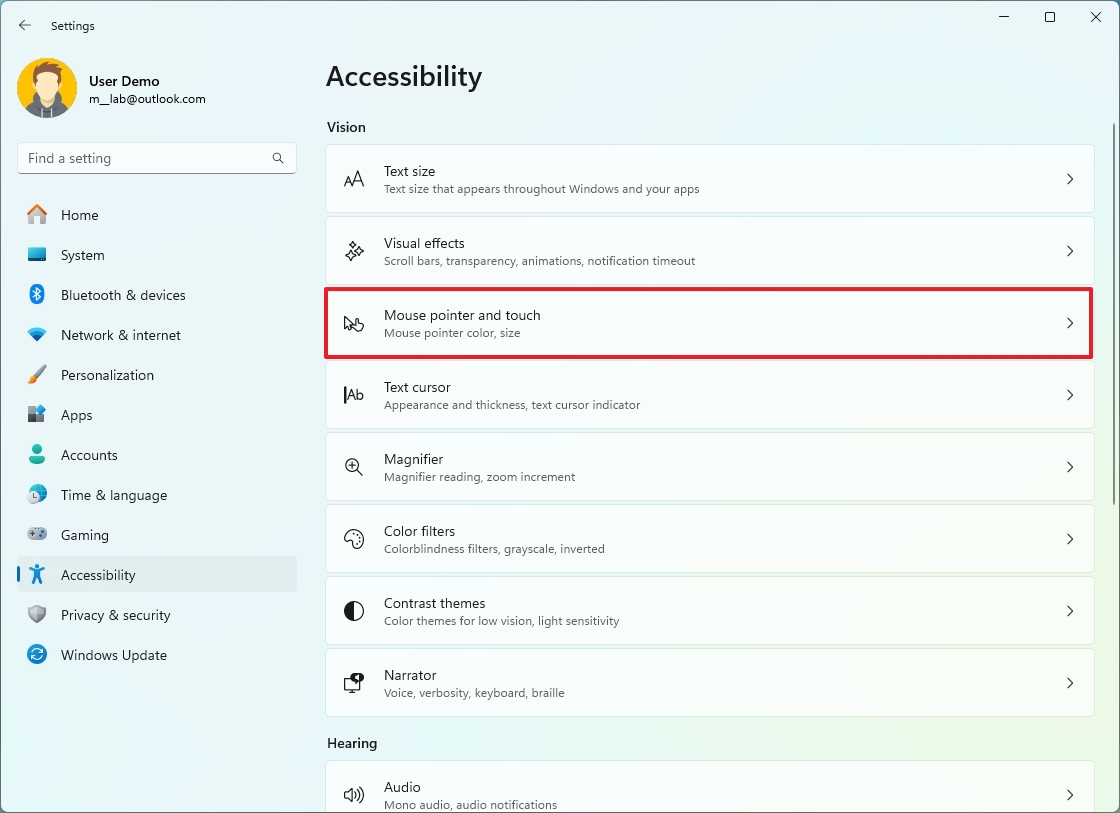
- Click the Custom option in the "Mouse pinter style" setting.
- (Option 1) Select from one of the available colors.
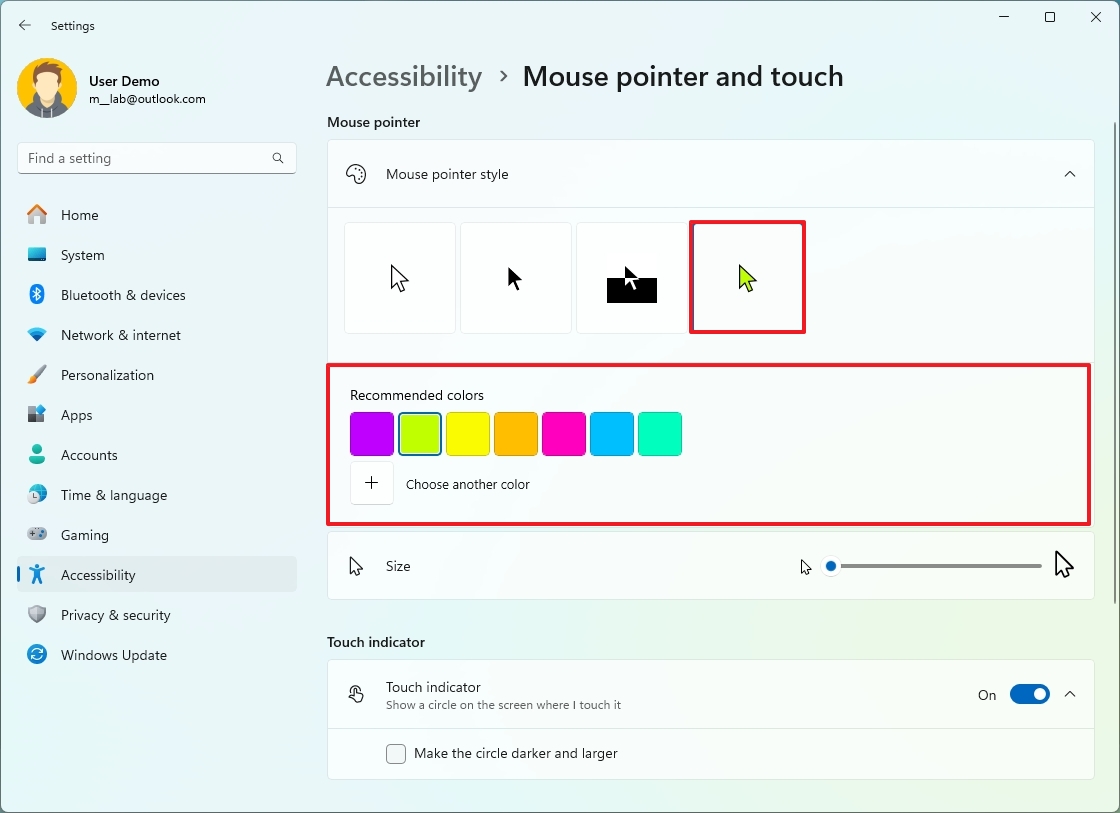
- (Option 2) Click the "Choose another color" option and create a new color.
After you complete the steps, the new color scheme will apply to the pointer and mouse cursor.
This is a personal configuration, and it doesn't represent every setting you must customize for the most optimal experience on your computer. The best configuration would be up to configure since we all have different preferences and requirements.
What are the settings you always configure on your devices? What do you do differently? Let me know in the comments.
More resources
For more helpful articles, coverage, and answers to common questions about Windows 10 and Windows 11, visit the following resources:

.jpg?w=600)


