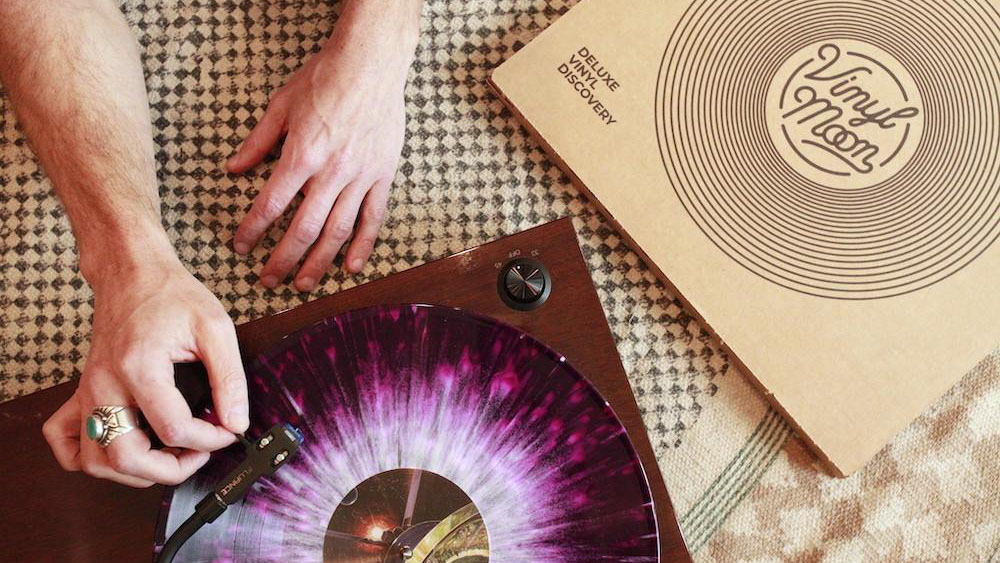

This feature originally appeared in Australian Hi-Fi magazine, an Australian sister publication to What Hi-Fi?. Click here to find more information on Australian Hi-Fi, including digital editions and details on how you can subscribe.
So, you’ve got a bunch of vinyl records, and you probably want more. One thing you’ve probably learned in your time with vinyl is that your records, old or new, will almost certainly provide unwanted clicks, pops and hash in addition to that sweet musical performance you crave. It has always been thus and will be as long as vinyl remains with us.
Two things cause those unwanted noises. One is dirt – and you should read that broadly. It might be literal dirt, or dust ingrained into the grooves over the decades. It might be flecks of paper dust and fibres from the paper sleeves in which too many new records are packaged. It might be surface mildew from records stored in warm, damp environments. For me, an example of the most memorable defects was four small globs of glue, one on each of the opening tracks of the four sides of a brand-new sealed record I purchased five years ago.
The other cause of noise is physical damage to the groove. That also can apply to both old and new vinyl, although more commonly the old stuff. You know, scratches and the like. But even new recordings can be pressed from worn masters and so on. In the case of physical damage, there’s nothing you can do short of digitally recording and then processing the sound to remove the noise. Which kind of wrecks the whole allure of warm analogue sound. But when it comes to dirt, very often you can actually clean records with positive results.
The best thing you can do to ensure pristine record playback is, of course, to keep your records clean. The less dust in their grooves, the less dust will be picked up by your stylus – and your whole system will sound much better. What Hi-Fi? has a guide explaining how to easily clean vinyl records at home (and keep them clean in the first place). But if this advice comes to you too late, or your well-played records simply need some TLC in their life no matter how well you have treated them, I have some good news: when it comes to dirt at least, you can often clean records with positive results.
My testing process
Here I test three commercial vinyl record cleaning solutions, each using an entirely different process from the others. The Spin-Clean Record Washer System MkII dates back to my youth – a simple cleaning solution bath and brush, conveniently designed for effective operation. The Secret Chord Analogue Record Restore Box Set is an Australian development in which a viscous fluid solution is used to encompass the dirt, which is then removed once it has dried. The final solution, the Kirmuss KA-RC-1 Ultrasonic Record Restoration System, is a high-tech device that uses – yep – ultrasound.
I should add that two other approaches exist. One is purely manual: to use your own concoction of cleaning products along with brushes, while another uses a record cleaning machine that allows you to bathe the record and then vacuum out the resulting dirty water. I’ve previously tested one such machine, and it worked well.
A few years ago I started scouring the internet to find other people’s tests of record-cleaning systems, and too often their apparent sole interest was in making the records look clean; rarely was there a mention of actual playback noise. Sure, a clean-looking record is nice, but a clean-sounding one is what interests me.
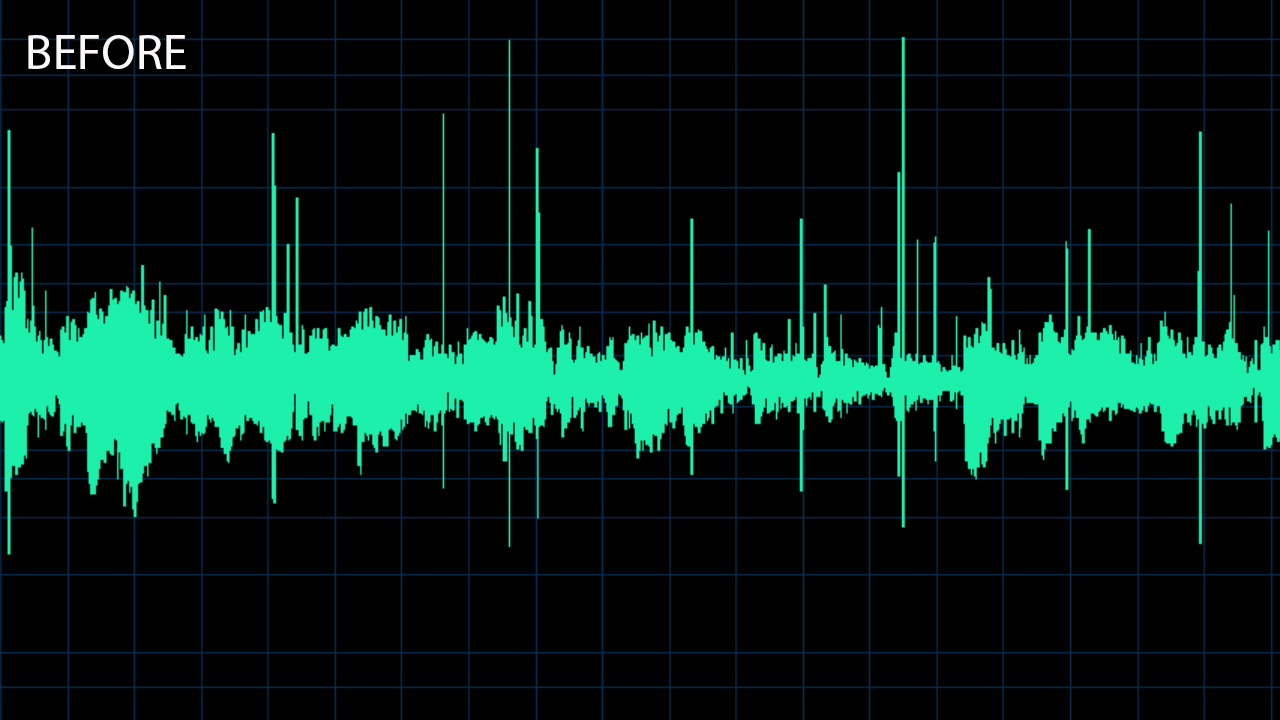
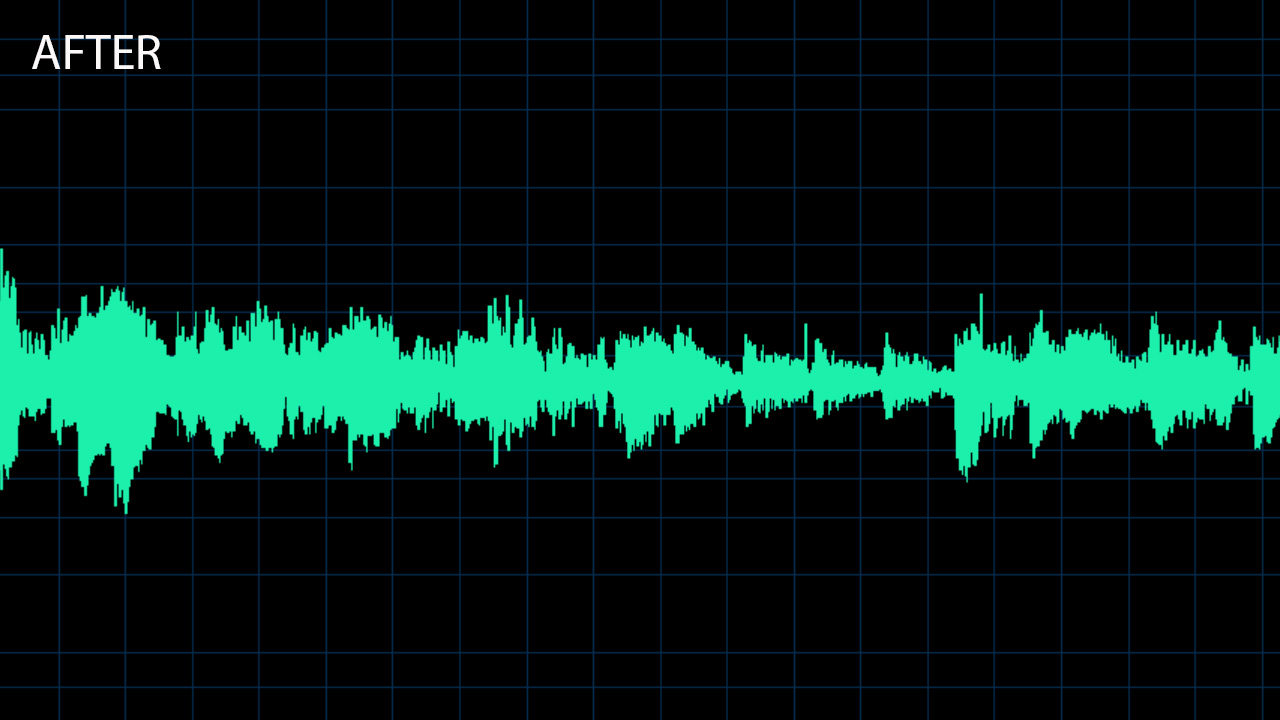
I don’t want readers to merely take my word for the improvements these three methods under scrutiny make, so I’ve recorded a bunch of records digitally, cleaned them, and then recorded them again. That allowed me to do realistic A/B testing and present the results visually in the form of before-and-after digital waveforms (displayed below).
For the Spin-Clean and Kirmuss cleaners, I used Rega’s Planar 3 turntable fitted with its Exact moving-magnet cartridge (not its new Nd ones) alongside the company's Fono Mini A2D phono preamplifier, which has an analogue-to-digital converter (ADC) built-in, fixed at 16-bit/44.1kHz.
For the Secret Chord cleaner, I used a Technics SL-1500C deck fitted with an Audio-Technica AT-VM95 cartridge. I used this with several old records from charity shops with an elliptical stylus, and several new records (previously played just once or twice) with a Shibata stylus. This time for digitisation, I used an RME ADI-2 Pro FS R Black Edition ADC, set to 24-bit/48kHz.
In each case, the only cleaning I did before the first recording was with an old carbon fibre brush, just to remove loose dust. And of course, I cleaned the stylus after each record playing.
Secret Chord Analogue Record Restore Box Set - £77.95 / AU$169.95
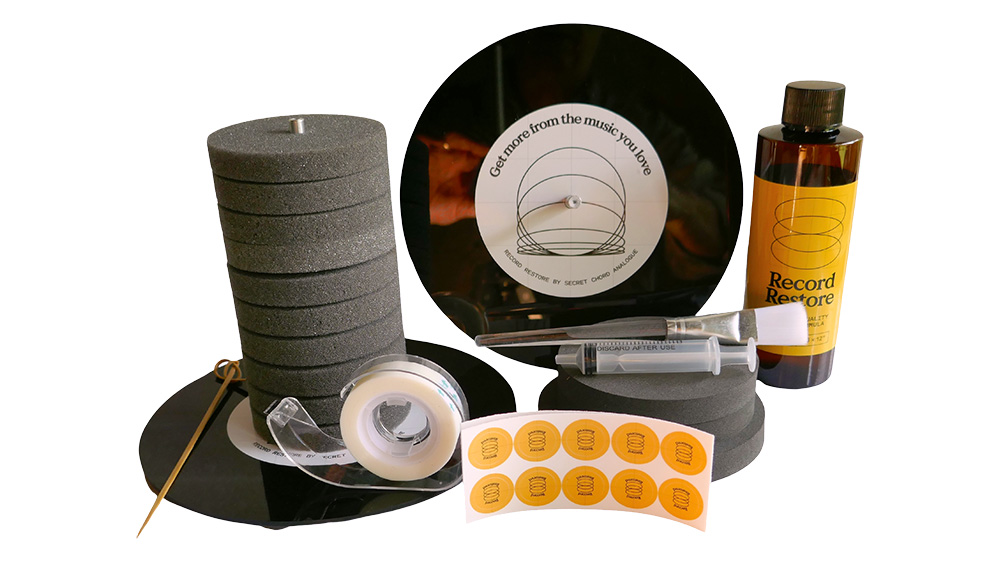
This is an Australian development and a decidedly non-traditional approach. There’s fluid, but no water. You can do a little brushing and ‘working in’ of the fluid if you like, but that isn’t really how to use it. Here’s how it works: you apply an amber fluid – no, not that amber fluid – over the groove area of the album. You then let it dry. It forms a thin film – thinner, I’d hazard, than glad wrap.
Then, once it has dried, you pull it off. The idea is that all of the foreign matter in the groove will be encompassed by the film (or perhaps have even been dissolved by it) and will come off with it. Pretty easy really.
This is a well-considered package. The Record Restore Cleaning Fluid has been designed for purpose, but it’s the other bits in the bundle that make it all work. Firstly, it comes with a turntable that spins on a bearing, making it easy to apply the fluid – just put the LP on it and rotate it with one hand while wielding the application brush with the other. Three supplied spacers (called ‘pucks’) – 90mm and 105mm – hold the record clear of the turntable and clamp it in place. When you’ve done one side, flip it over and do the other.
Also provided is a place to put the albums to dry. This is simply a spindle, roughly 140mm tall, that sticks up from a stand. Ten spacers are provided so you can treat – you guessed it – ten albums at a time, and then let them dry as you would dishes in a dish drainer. Also supplied is a syringe for measuring the fluid, a brush to apply it, and a bamboo pick to help remove the dried fluid. The fluid bottle has a nipple matched to the syringe so that you can easily extract the desired amount of fluid without spillage.
The drying and setting time depends on the temperature and humidity of the room, as well as how thick you put the stuff on. It’s not inexpensive, so you might be tempted to stick to the least amount that works; 3.5-4ml per side is recommended. Once it has dried – it’s visually obvious when it has – put a bit of sticky tape on the film and pull it up. I’d recommend allowing plenty of time for the fluid to set. I simply left the stack of ten records in a modestly warm environment for 24 hours.
I found that with 3.5ml per side, there was a tendency for the film to tear, which meant dabbing the surface with more sticky tape to remove the strands left in the grooves. I used 4ml for the next batch, and the set fluid reliably came up almost fully intact. Doing it slowly, I could easily assist the odd errant strand with the bamboo pick.
If you choose to use that bigger amount, as I recommend you do, the 200ml of fluid provided with the system will cover 25 LPs. If you’re doing a lot – I’m told that one customer has cleaned 900 albums! – you'll need more bottles, with each costing £40.95 / AU$90 (though you can purchase four bottles at a time for a discount). That works out to around £1.60 / AU$3.60 per record (or less if you do buy in bulk and/or you become more practised and use less fluid).
And you know what? It worked! Let me provide two examples. Firstly, a single, which you can do plenty of using a single bottle of Record Restore Fluid. I picked up the original Australian single of Men at Work’s 1981 hit Down Under for a dollar in a charity shop. Seven-inch singles are always, always noisy – even if sparkling clean – and this one was even noisier. Across the track, even in the loudest bits, the crackle was an audible underlay. With one application of the fluid, it was almost entirely gone.
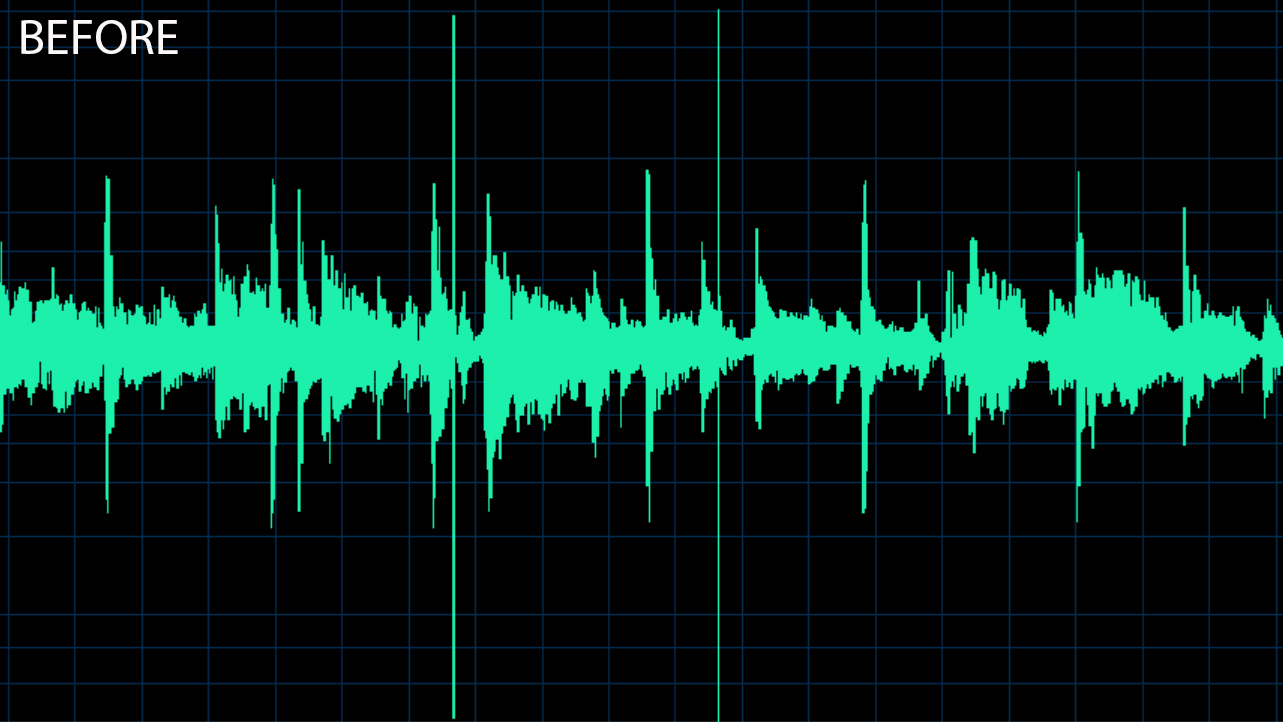
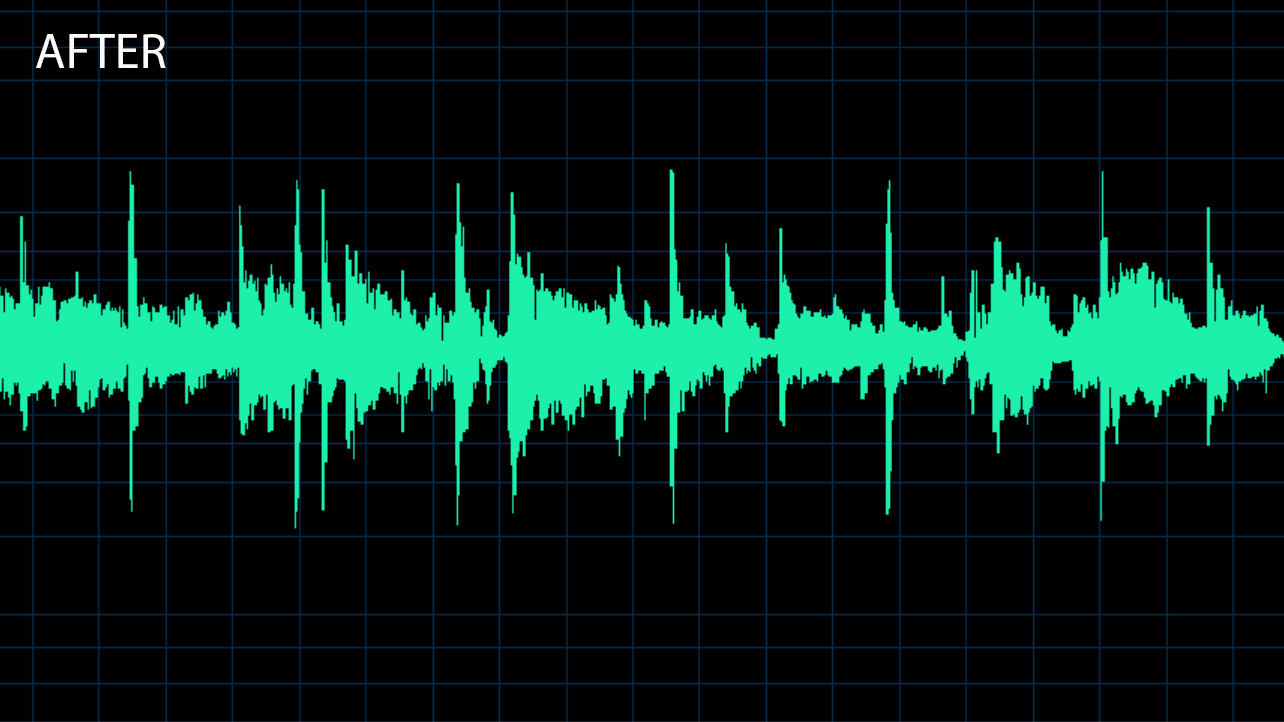
Earlier this year, I bought my wife a new pressing of Dire Straits’ debut album. On the first playback, only a few seconds into the first side, there were multiple extremely loud clicks and even a jump when played on our bedroom’s Audio-Technica Sound Burger. The same jump happened on the Technics turntable. The disappointment of a poor vinyl pressing right out of the shrink wrap! On the graphs below, you can see representative examples of the all-too-common clicks, which hit about 6dB greater than the peaks of the music itself, and more than 20dB higher than its average level.
This record was the first to which I applied the Record Restore Fluid. This entirely eliminated the jump at the start, along with several other clicks. Phew! Some of the others did remain, including some on Side 2. So I repeated the treatment, and those and several others were gone. I’m impressed! What was that invisible gunk anyway?
Spin-Clean Record Washer System MkII - £75 / $80 / AU$134
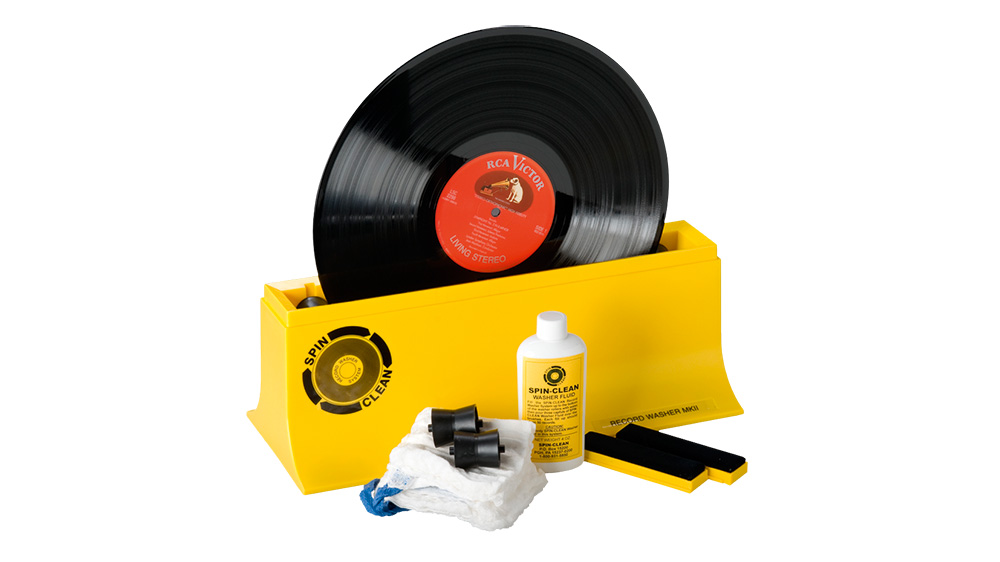
“Proudly manufactured and hand-assembled in Pittsburgh, Pennsylvania since 1975,” reads a note in the manual of this second-generation record cleaner.
Well, that’s clear enough. The Spin-Clean system has been around since the pinnacle of vinyl dominance in home entertainment. Presumably back in the mid-70s, it was a ‘Mk I’ system. Again, this is a well-thought-out cleaning system. The main body is a bright yellow tub – a bit longer than a 12-inch LP is wide – for washing your records. The tub floor is curved, and at each end are slots with rollers, which are indented on their edges in order to keep the record vertical.
You fill the tub to the marked level with distilled water and three capfuls of the provided Spin-Clean fluid. The record label stays clear of the water (but you should be careful of drips, so keep a paper towel handy). Two cleaning pads are held vertically by slots in the middle of the tub. You push your record down between them until it is in place on the two rollers, then rotate it three revolutions one way, three revolutions the other, pull it out and dry it off with the two absorbent cloths included.
The instructions state that the cleaned records are ready to be played or put away once you have completed this process. I was a little leery of that, figuring that the drying cloths wouldn’t really get down to the bottoms of the grooves, so I carefully placed the records in racks so that they could air-dry for a few hours.
There are roller slots for 12-inch 33.33rpm LPs, 45rpm 7-inch singles, and 78rpm 10-inch recordings. The cleaning pads feel like velvet and the fibres, such as they are, did not seem likely to reach the bottoms of the grooves.
I confess that I wasn’t expecting much from this system. The other systems appeared to be primarily designed to remove dirt from the bottom of the grooves, whether through adhesion or blasting with ultrasound. The Spin-Clean’s method did not appear to offer a way to get right in there.
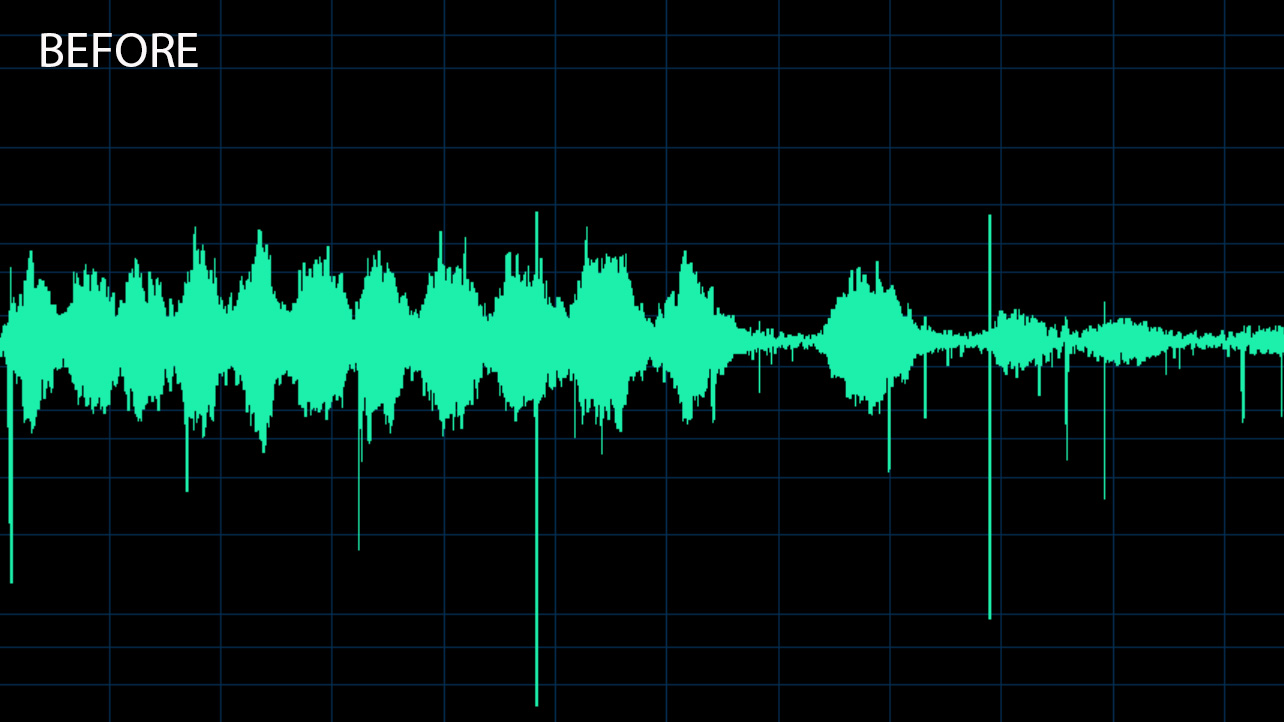
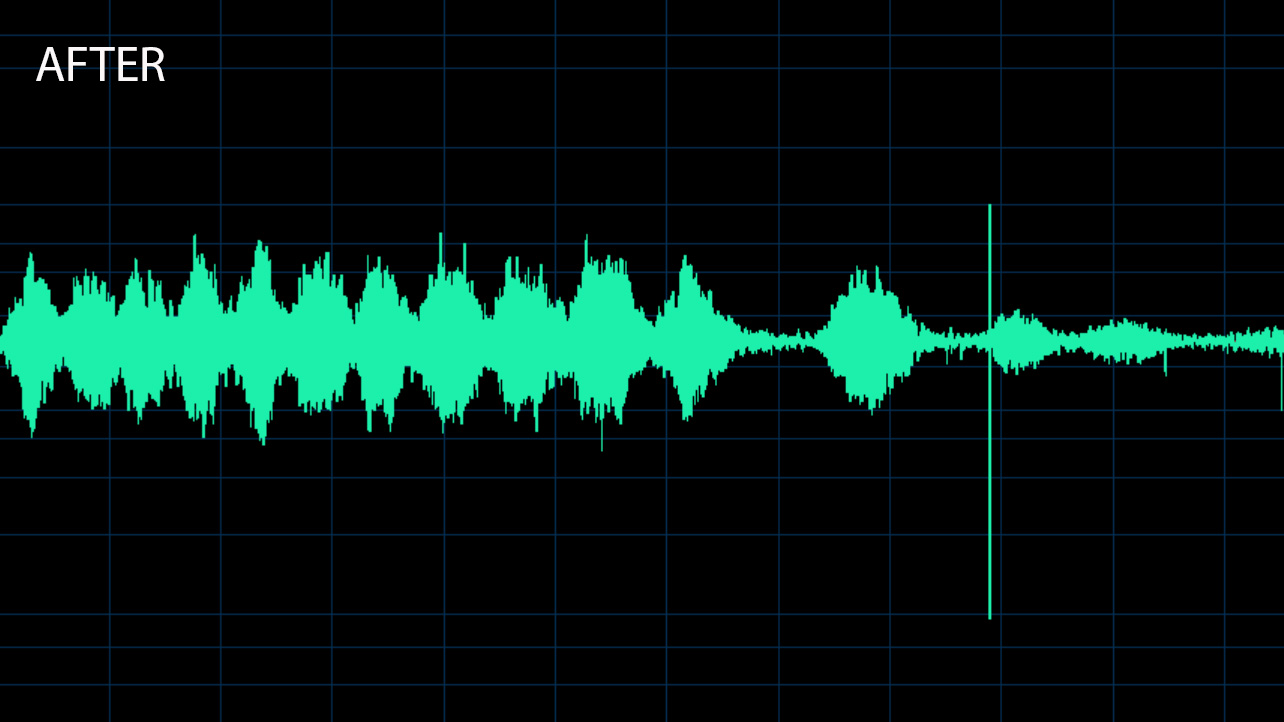
But then, what did I find? The difference to some records was, according to my notes, “bugger all”... maybe a slight improvement on some. And then I came to a Strauss ‘Die Fledermaus’ from a recycling shop and – bang! – those six spins through the Spin-Clean removed most of the major ticks and clicks. Check out the graphic below. A couple do remain, so maybe I should run it through again.
Then there was a Tchaikovsky ‘Masterpieces’ album. Looking at the wave (not pictured), I barely saw a difference, but when I played the before-and-after audio clips I had recorded back, the irritatingly substantial noise over the highly modulated music was almost entirely gone on the cleaned disc. I guess those fibres did reach into the grooves after all!
Kirmuss KA-RC-1 Ultrasonic Record Restoration System - £1799 / $1150 / AU$2880
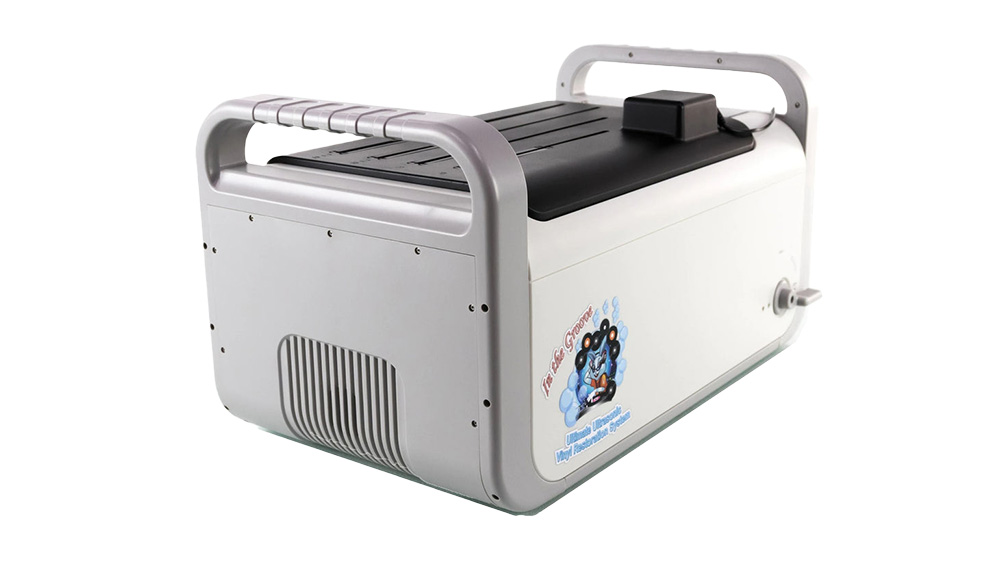
The principle operation of the two other cleaners in this round-up is fairly clear: one is a variation on soap and water while the other uses an adhesive to pick up debris. Both are very simple.
The Kirmuss KA-RC-1, however, employs a different and much less simple principle: high-powered ultrasonic sound. You put the record in a fluid, and sound – 200 watts at 35kHz – is fired into the water, somehow causing the dirt in the record grooves to fall out. How does this work? Indeed, does it work at all?
I should note that this Kirmuss device isn’t the first of its kind, but what makes it so special is its relative affordability as ultrasonic cleaners go. That said, I’ve previously checked out a Chinese ultrasonic cleaner that, while clunky, also worked quite well.
In this discipline, ultrasound technology works primarily by causing cavitations to form between the particles of dirt and the vinyl. These are tiny air bubbles (there is always some air dissolved in water) that are created and then collapse, creating small but intense shock waves in their immediate locality. This is what moves the dirt.
The Kirmuss KA-RC-1’s implementation of this principle is very neat. The unit is a large (51.5cm wide, 28cm both deep and tall) box with a plastic outer case, appearing rather like a piece of lab equipment. As it weighs around 10kg (empty), carry handles have fortunately been built into the design.
On the top are four slots to hold records: two are designed for standard 12-inch LPs while one is for 10-inch records (typically 78rpm) and another is for 7-inch 45rpm EPs or singles. At one end of each slot are two pads to guide an edge of the record to ensure it is loaded parallel to the slot. These also perform a little mild scrubbing.
Underneath the slots are nylon cogs, a motor, and some wheel guides upon which the undersides of the vinyl rest. The motor and cogs turn these slowly so that the whole recording rotates, with the grooves under the fluid but the label held clear. I didn’t think to time the rotation, but it probably took around twenty seconds.
The fluid is in a large stainless-steel tub within the housing. You supply the water, leavened with a touch of ethanol. Filling the tub to the correct level takes roughly six or seven litres of water. Kirmuss recommends distilled water, but that’s hard to get so I used demineralised water, which is available from a supermarket for about a dollar per litre. To that, you should add 40ml (a large shot) of 70 per cent alcohol. I used 64 per cent isopropyl alcohol, adding slightly more than the recommended amount to make up for the weaker mixture. The point of the alcohol, as I understand it, is to help break surface tension so that the water flows smoothly deep into the grooves.
You pop in your records and set the built-in timer for the default of five minutes, after which time you take them out and work into the grooves using the supplied camel hair brush (my wife tells me this is like a high-quality makeup brush) and some of the supplied surfactant solution – 98-99 per cent distilled water with 1-2 per cent of 1,2-propanediol (also known as propylene glycol).
I reckon the 60mm of that fluid that comes with the KA-RC-1 would be good for around 100 records. You then put the records back in, do another five minutes, take them out again and rinse them with more water (again, distilled recommended, demineralised used by me). Dry them off using the included microfibre cloth, clean them up with a soft pad and carbon fibre brush (also included), and they are good to go.
Well, not exactly. Kirmuss recommends an additional treatment with the surfactant – it also supplies some more with a pretty useless brush for cleaning the stylus. But I skipped that step; I like my vinyl to be naked.
As usual with anything wet, you should exercise care and keep paper towels handy to dab off the inevitable splashes on the record labels. Clean-up is easy, thanks to a drainage hole and tap allowing for quick emptying. The bath fluid should be replaced around every 25 uses.
This is a well-done package. All the necessary bits are provided, including a drainage hose and microfibre “bunny rug” to cover your work area. All you need to supply is water and alcohol.
So, does all this ultrasonic stuff work? Absolutely and without a doubt. Again, it had no seeming effect on some records (particularly my own ones), but some of the others were completely transformed. One of the old records I found by Crosby, Stills & Nash was utterly unlistenable, particularly on the second side. Some clicks and pops still lingered post-treatment, but perhaps only five per cent. The album wasn’t restored to out-of-the-factory purity exactly, but it was certainly listenable afterwards.
Another album that benefited enormously was a glorious performance of Beethoven’s Violin Concerto, with the Boston Symphony Orchestra conducted by Charles Munch and the amazing Jascha Heifetz on violin. This mono disc appears to have been released some sixty years ago, and the Kirmuss machine eliminated most of its clicks and pops.
Another little treasure I found in a charity shop, and which the Kirmuss cleaner recovered for me, was an a cappella arrangement of Nicolas Saboly’s Douze Noels Provencaux. Again, the noise was mostly removed, as was one giant spot of something or other, which I helped get rid of by applying the surfactant between blasts of sonic power. Once gone, what had made the stylus jump back continually left no hint of sound.
Record cleaning machines: are they worth it?
To me, this exploration of today’s record-cleaning solutions has been both revelatory and depressing. The latter because it has forced me to accept that much of the noise on my LP collection shall remain there forever more, or perhaps even get worse over time, as it is a result of simple wear and tear; and the former because if a record truly is dirty, it can be effectively cleaned – and by using methods of varying principles and prices, which all seemed to work.
Does one work better than another? I followed up several of the systems with another, and the improvement was minimal to nothing; each of the three was capable of doing the job on its own. As my shiny new Dire Straits album demonstrated, sometimes you might need to put a record through the cleaning process more than once to polish it up properly.
That said, if you have tenderly cared for your records over the years and practised effective vinyl hygiene, none of them may do anything for you! If you are uncertain, give it a try. Some record shops offer cleaning services, so chuck them a few albums to clean to see if it makes a difference. Or send a few to the folks at Record Restore; it costs a few bucks each, but you can see whether you find it worthwhile.
Again, if you do start cleaning your records, invest in new inner sleeves to store them in. Above all else, it makes sense to keep them clean in the first place.
MORE:
Clean records deserve a clean record player: How to clean your turntable
Best turntables 2024: top 9 tested and recommended by our expert reviewers


