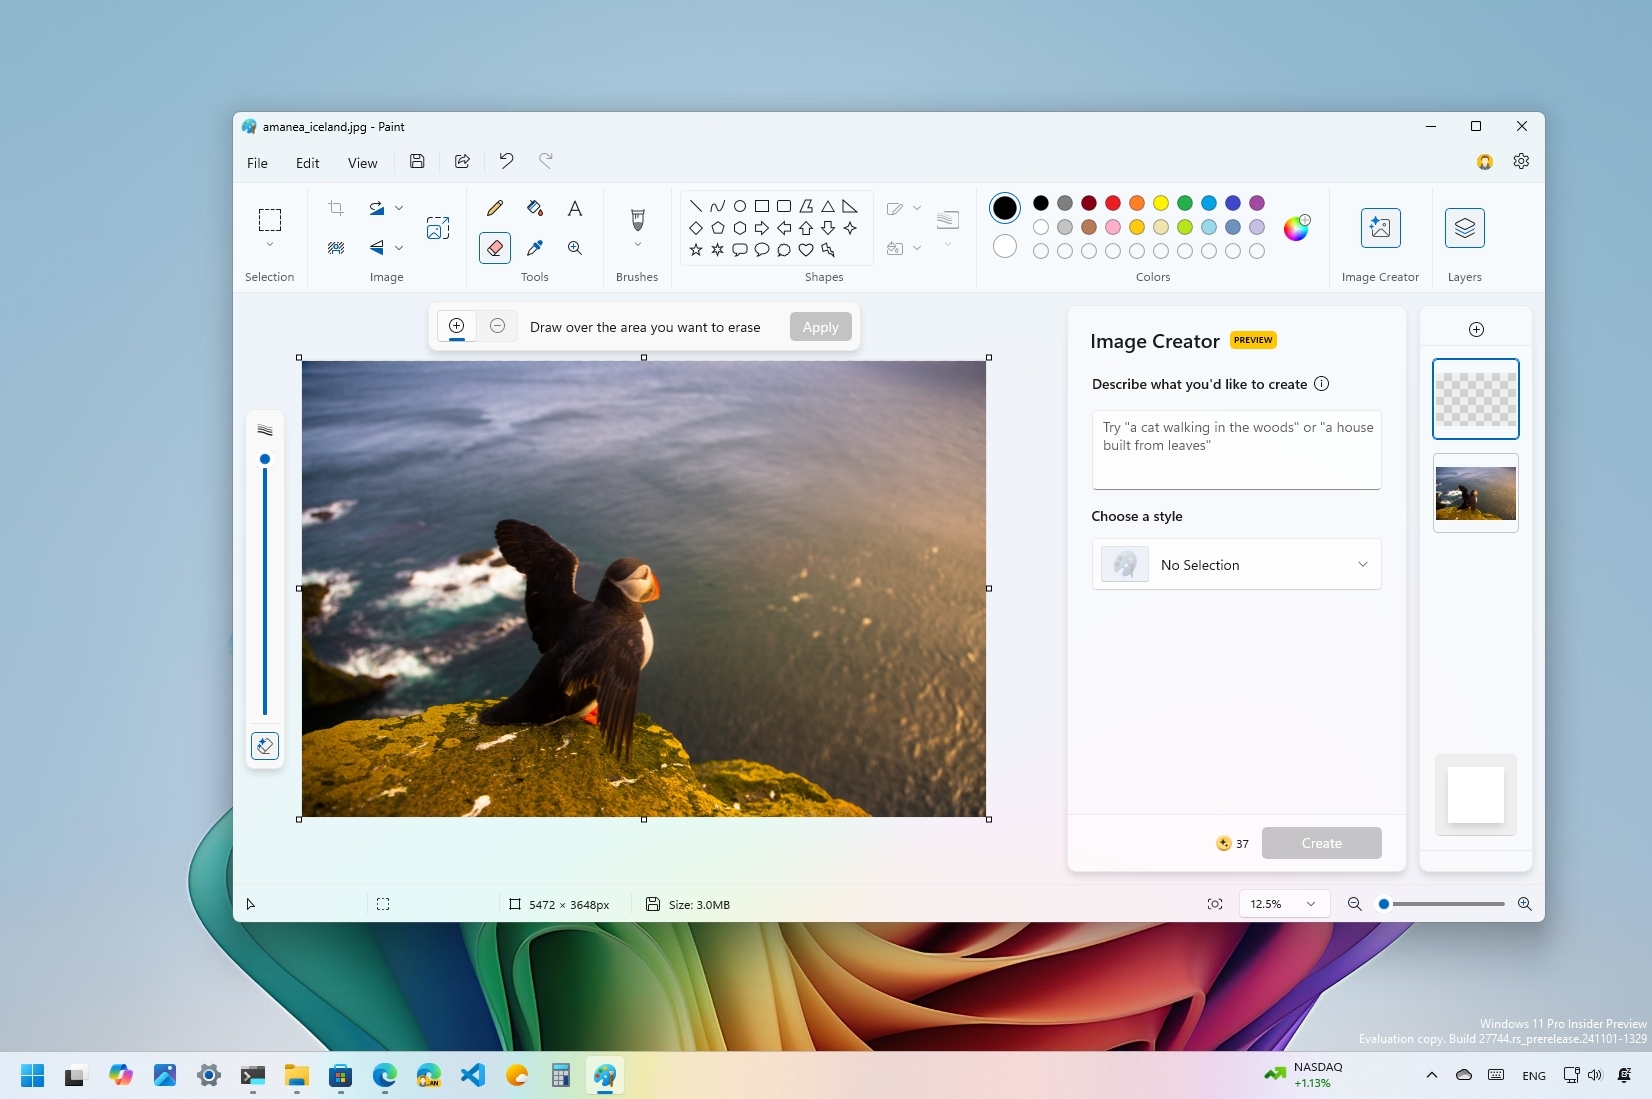
On Windows 11, the Microsoft Paint app has seen a significant transformation in the past few years from being a forgotten app to an experience that can now tackle multiple editing tasks previously only available on advanced programs like Adobe Photoshop, thanks to the integration of AI-powered features.
If you have been using Photoshop or another advanced image editing software for a long time, you probably won't (completely) be switching to the Paint app. However, the image editing app built into Windows 11 includes a few features worth trying, which can be particularly useful for everyday users. These features include working with layers, removing backgrounds or objects from images, and creating new objects or digital art with AI.
The app now also offers an updated version of the brush feature with a slider that makes it easier to customize each stroke. This isn't a feature powered by AI but a welcome addition.
In this how-to guide, I want to share these features with you as they make imaging editing a little easier for some specific tasks that otherwise would require extra steps.
How to use Layers feature on Paint
The Layers feature allows you to work on different elements of an image independently.
To use the Layers feature on Microsoft Paint, use these steps:
- Open Start.
- Search for Paint and click the top result to open the app.
- Click the Layers button from the command bar.
- Click the "Create a new layer" button from the right pane.
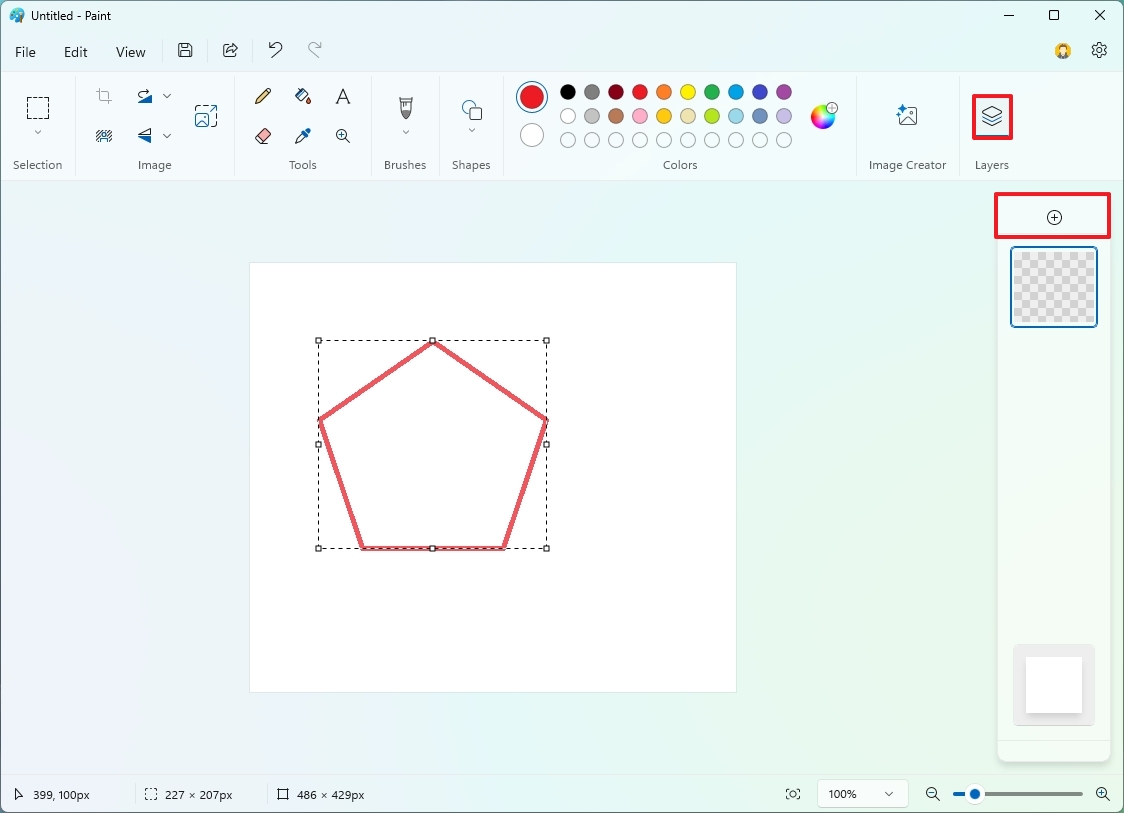
- Create the elements you want to include in the layer.
- (Optional) Click on File, select the "Import to canvas" menu, and choose the "From a file" option to add an image.
- Click the Layers button again to create another layer.
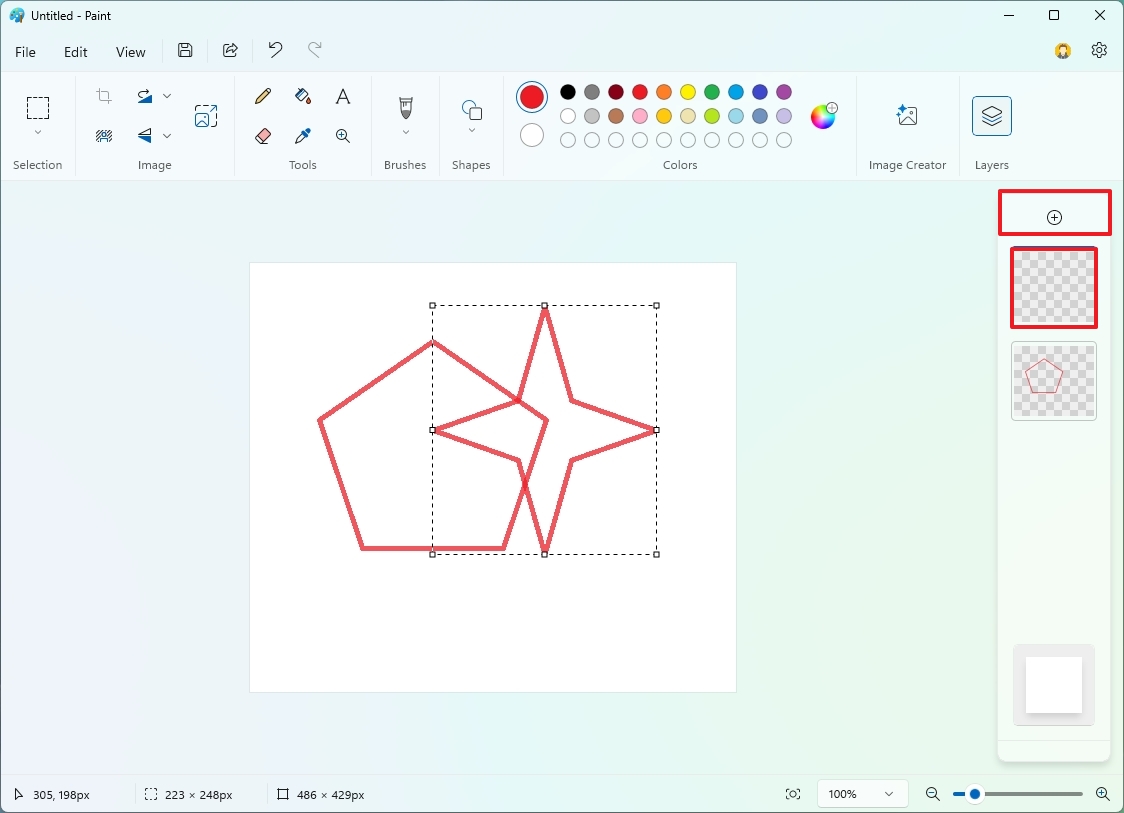
- Create the elements you want to include in the layer.
- Drag the layer up or down from the right pane to bring it forward or backward.
- Click the button on the top right of the layer to hide it as necessary.
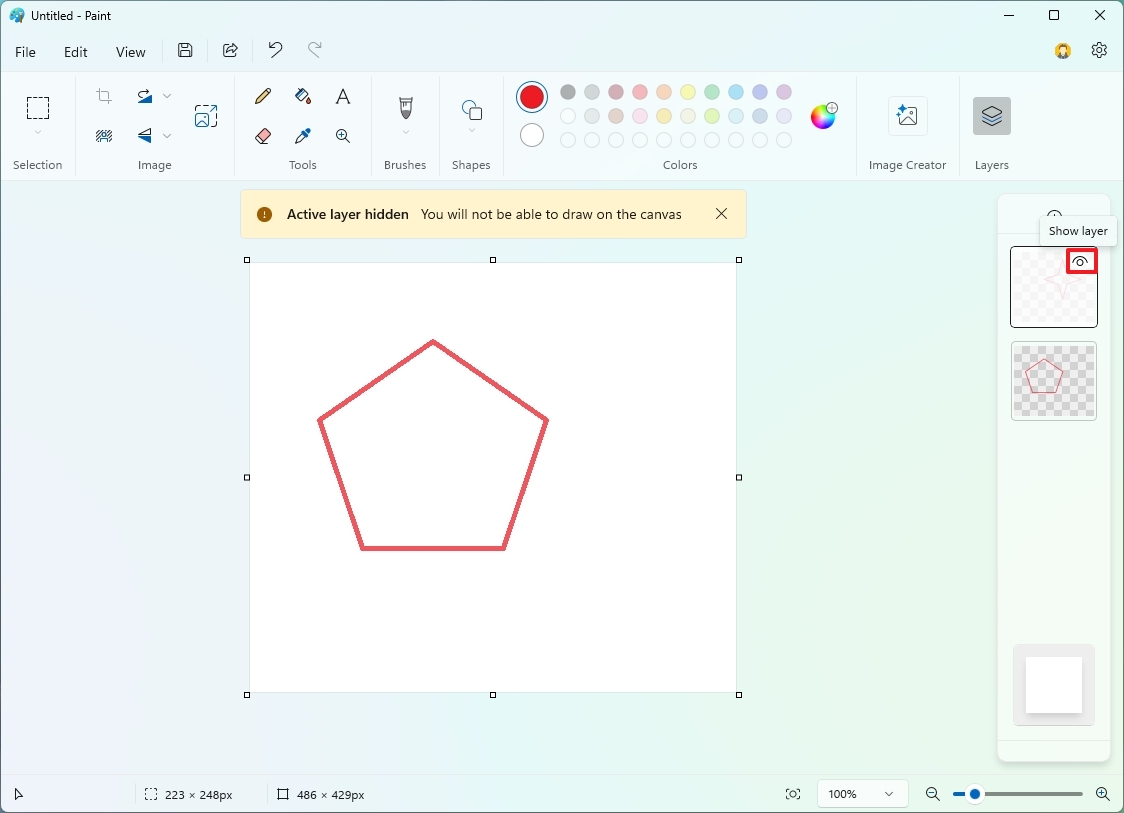
- Quick note: The option to hide a layer can be useful for working on a specific layer without affecting the others.
- Right-click a layer and choose the "Merge down" option to combine two layers.
- Right-click a layer and choose the "Duplicate layer" option to make a copy of the current layer.
- Right-click a layer and choose the "Delete layer" option to remove a layer you no longer need.
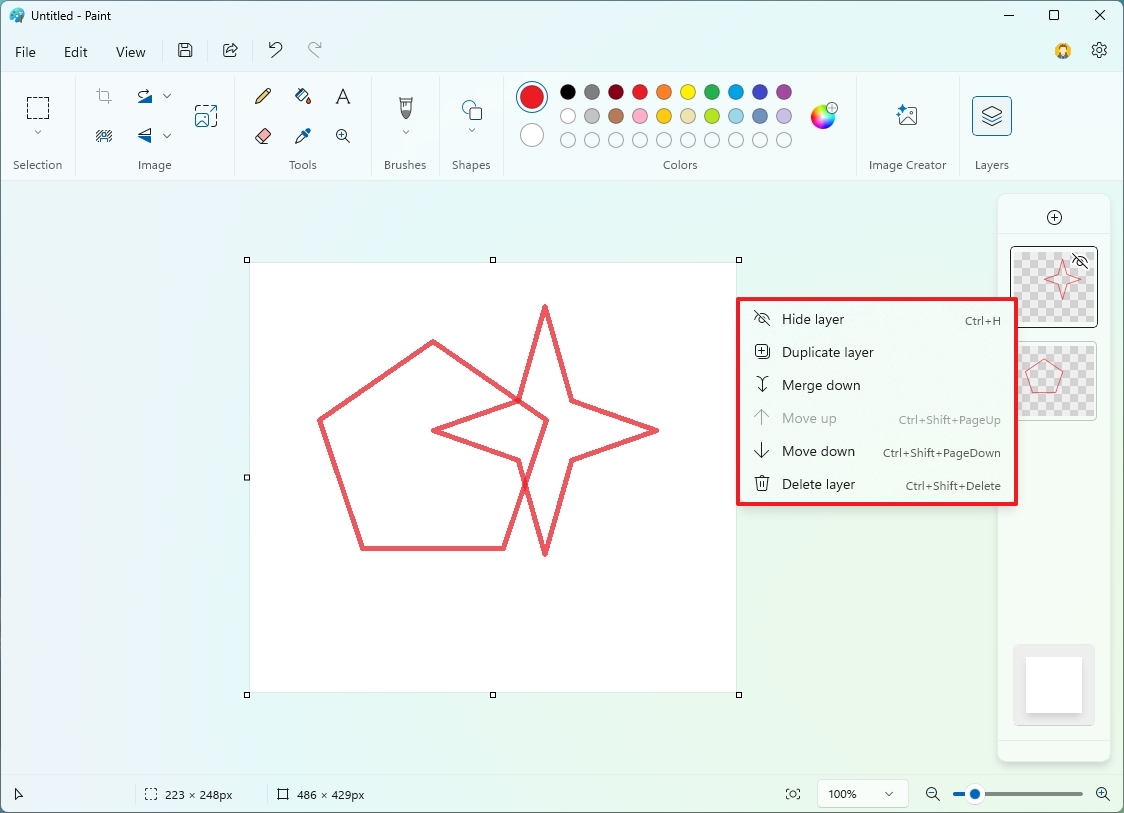
In this experience, you will also find a layer at the bottom of the left pane, which is the primary layer of the image file. You cannot delete it this year, but you can hide it for a transparent background or change its color.
How to use Remove background feature on Paint
The option to remove the background of an image uses on-device AI to scan, detect, and remove the background of virtually any image.
To remove the background from an image on Paint, use these steps:
- Open Start.
- Search for Paint and click the top result to open the app.
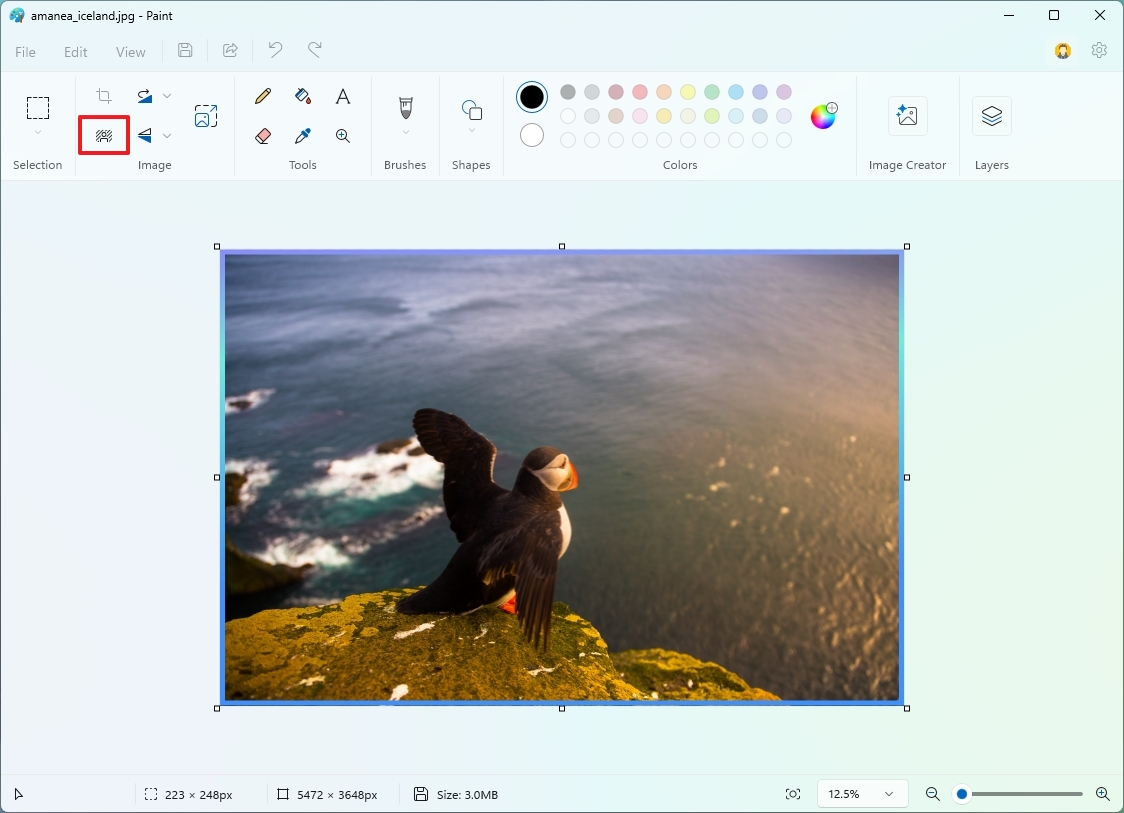
- Click on File, select the "Open" menu, and choose the image you want to edit.
- (Option 1) Click the "Remove background" button in the "Image" section from the ribbon menu.
- (Option 2) Click the Selection tool and select the area of the image to analyze and remove the background.
- Click the "Remove background" button from the ribbon menu.
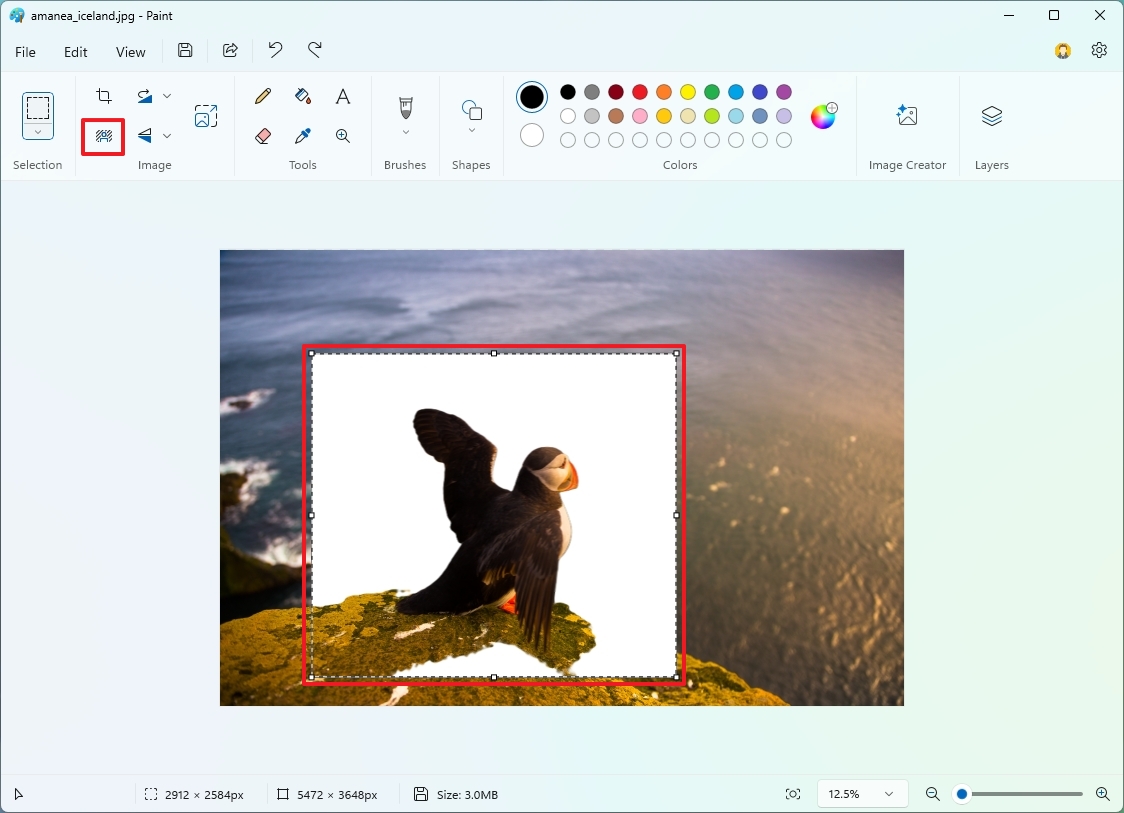
After you complete the steps, the Paint app will remove the background, leaving the main object on the image.
How to use Image Creator feature on Paint
The Image Creator is another AI feature on Microsoft Paint that allows you to generate an image using the DALL-E AI model from OpenAI but using Microsoft cloud services.
To create an image with AI with Microsoft Paint, use these steps:
- Open Start.
- Search for Paint and click the top result to open the app.
- Click the Image Creator button from the command bar.
- Compose a description for the image you want to create with AI.
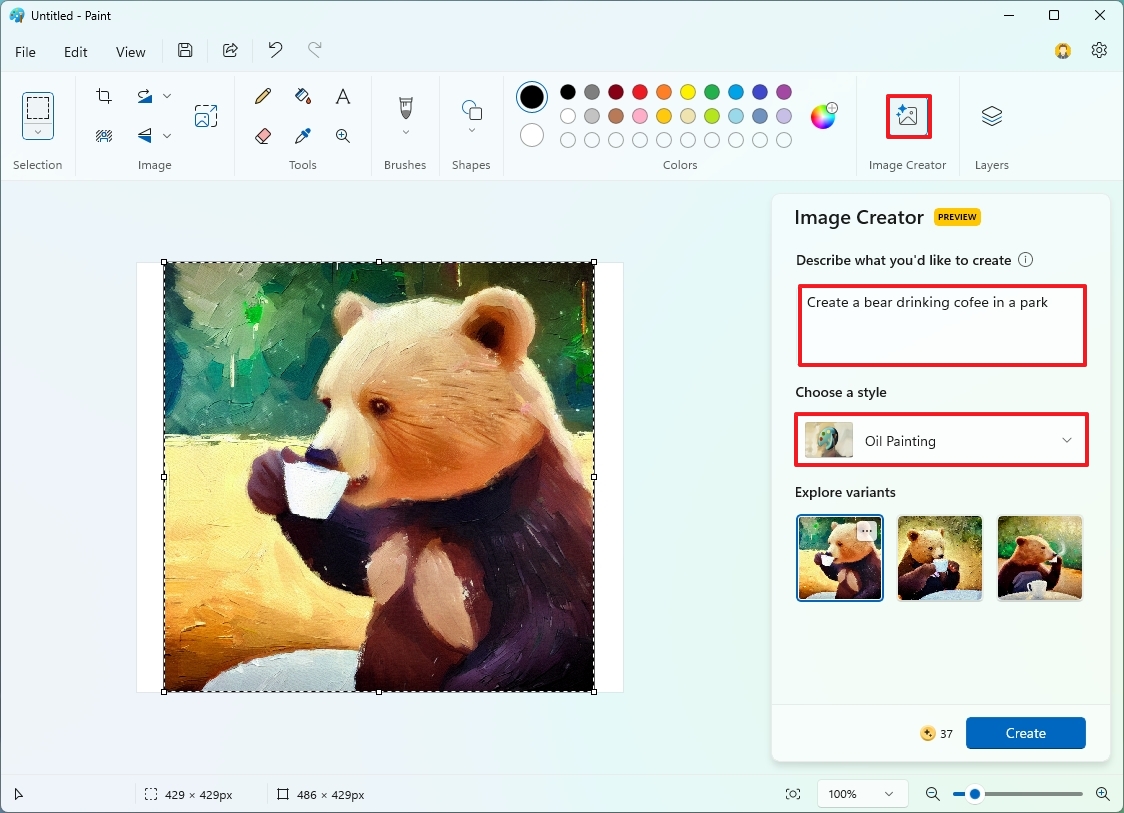
- (Optional) Choose one of the available options (Charcoal, Ink Sketch, Watercolor, Oil Painting, Digital Art, Photorealistic, Anime, or Pixel Art) from the "Choose a style" menu.
- Click the Create button.
Once you complete the steps, the Paint app will connect to the cloud to generate different samples of the image you want. You can then select one of the variants to add to the canvas to continue editing it.
It's important not to confuse "Image Creator" with "Cocreator," which is another feature for Copilot+ PCs that can scan your drawing and help refine and create a "more artistic" version of your drawing.
How to use Brush feature on Paint
Although the Microsoft Paint app had a brush tool for a long time, it was limited to one size. On Windows 11, the app includes a new version of the feature that allows you to choose from different brushes with a tool to adjust the size of the brush tip to create lines of varying thickness.
To use the Brush feature on Microsoft Paint, use these steps:
- Open Start.
- Search for Paint and click the top result to open the app.
- (Optional) Click on File, select the "Import to canvas" menu, and choose the "From a file" option to add an image.
- Click the Brush button from the command bar.
- Quick tip: If you want to change the brush tip, open the brush menu instead and select the tip.
- Select the thickness of the brush with the slider on the left side.
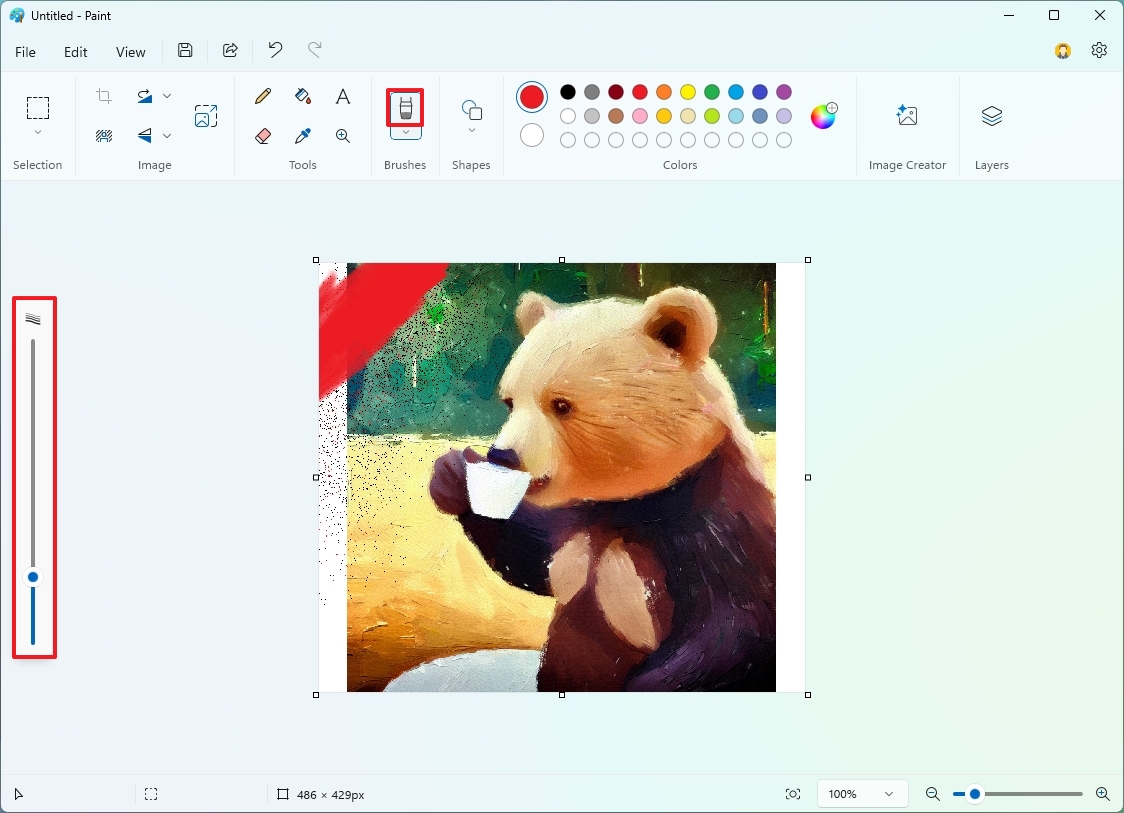
After you complete the steps, click and drag your mouse on the canvas to create strokes. The longer you drag, the longer the line will be.
How to use generative fill feature on Paint
The generative fill feature is actually a tool that uses AI to edit an image with AI-generated content that you can create with a text prompt.
To add AI-generated elements to a canvas in the Paint app, use these steps:
- Open Start.
- Search for Paint and click the top result to open the app.
- Click on File, select the "Import to canvas" menu, and choose the "From a file" option to add an image.
- Click the "Rectangle" button for the "Selection" tools.
- Select the area where you want to use the generative fill feature.
- Click the Generative fill button.
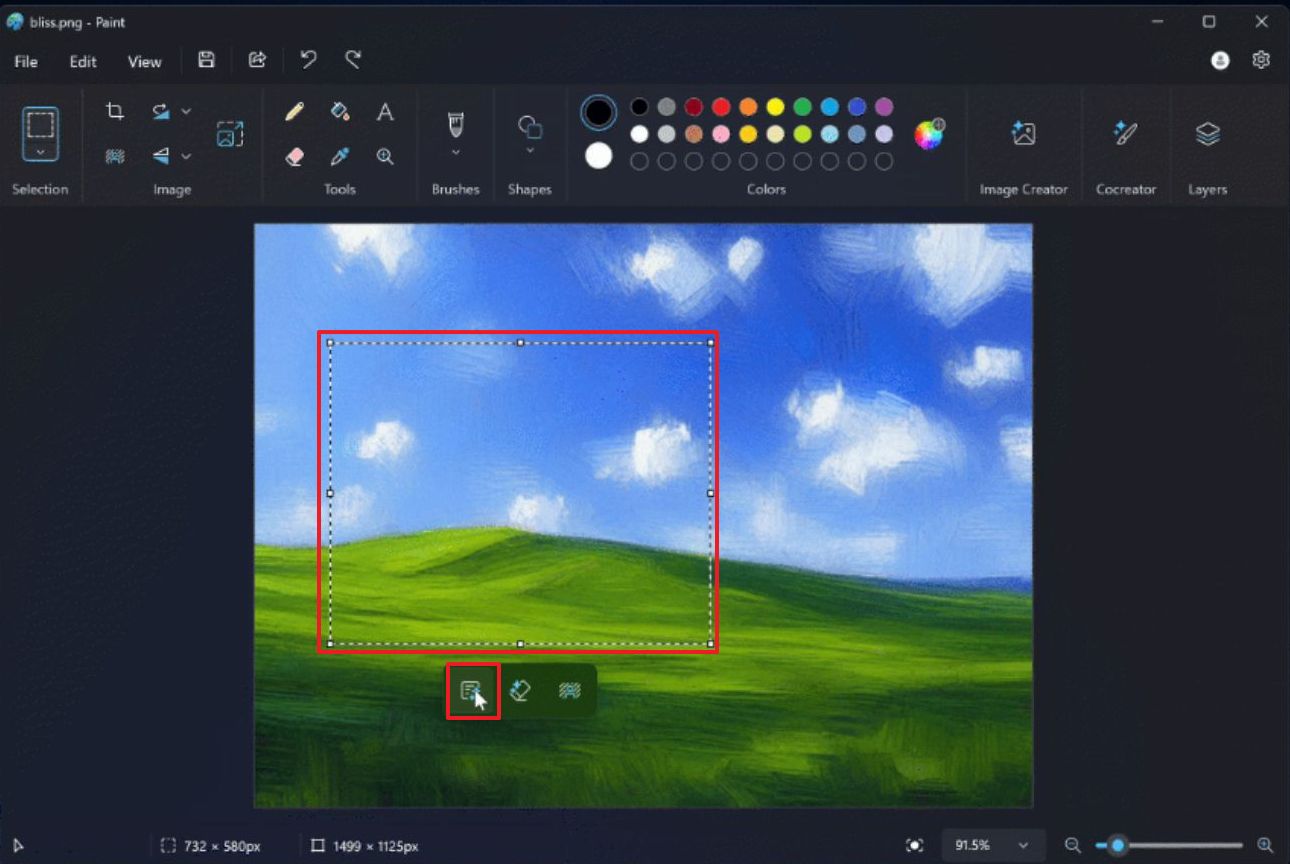
- Compose a prompt with the details of the object you want to create and click the Create button.
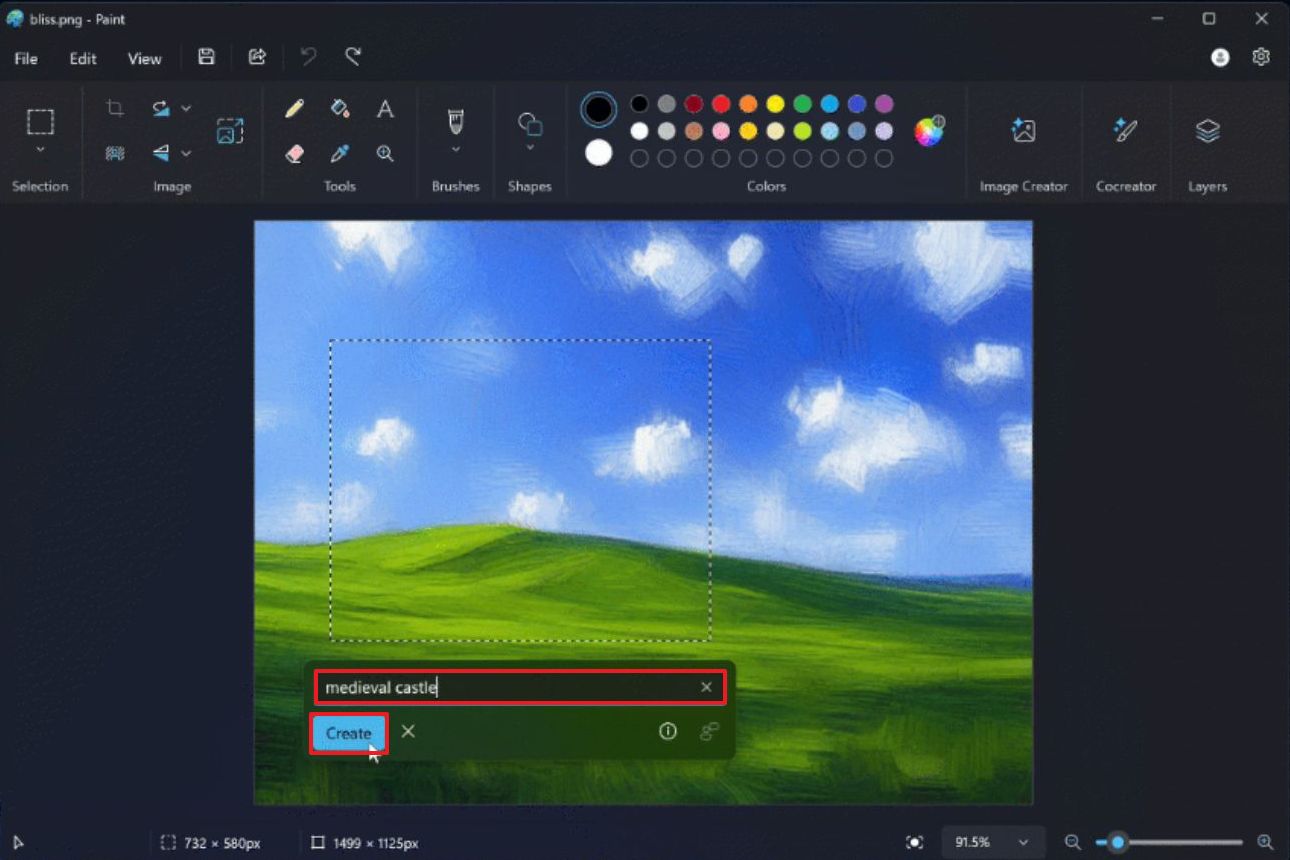
- (Optional)Click the Try again button if you want to generate the image again.
- Click the Keep button to apply the creation.
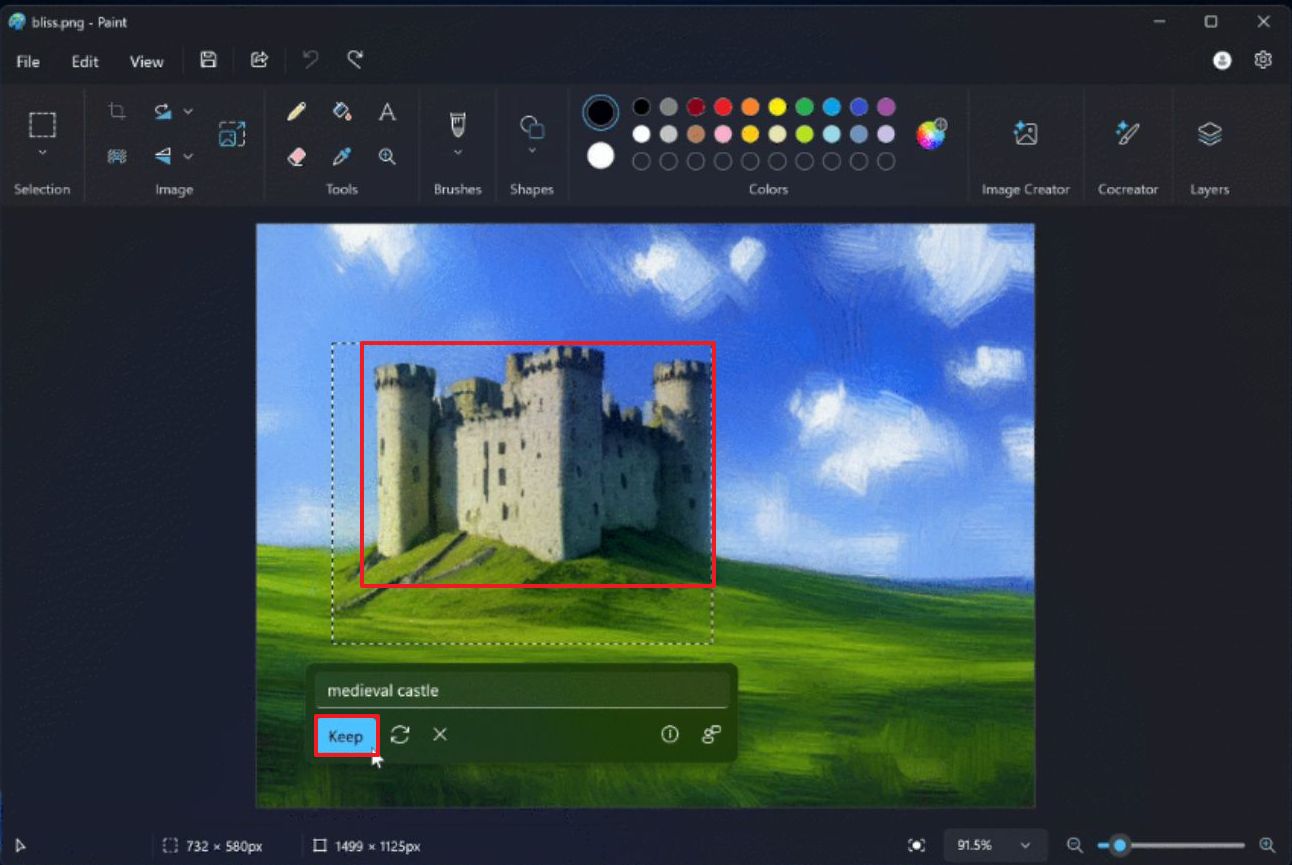
Once you complete the steps, the feature will scan the image section and try to create the object based on your prompt.
How to use generative erase feature on Paint
The cenerative erase feature is a feature that uses AI to remove parts of an image and then fill up the empty space to make it seem like the object was never part of the image.
To use the Generative erase feature
- Open Start.
- Search for Paint and click the top result to open the app.
- Click on File, select the "Import to canvas" menu, and choose the "From a file" option to add an image.
- Click the "Erease" button in the command bar.
- (Optional) Choose the thickness of the eraser tool.
- Click the Generative erase button.
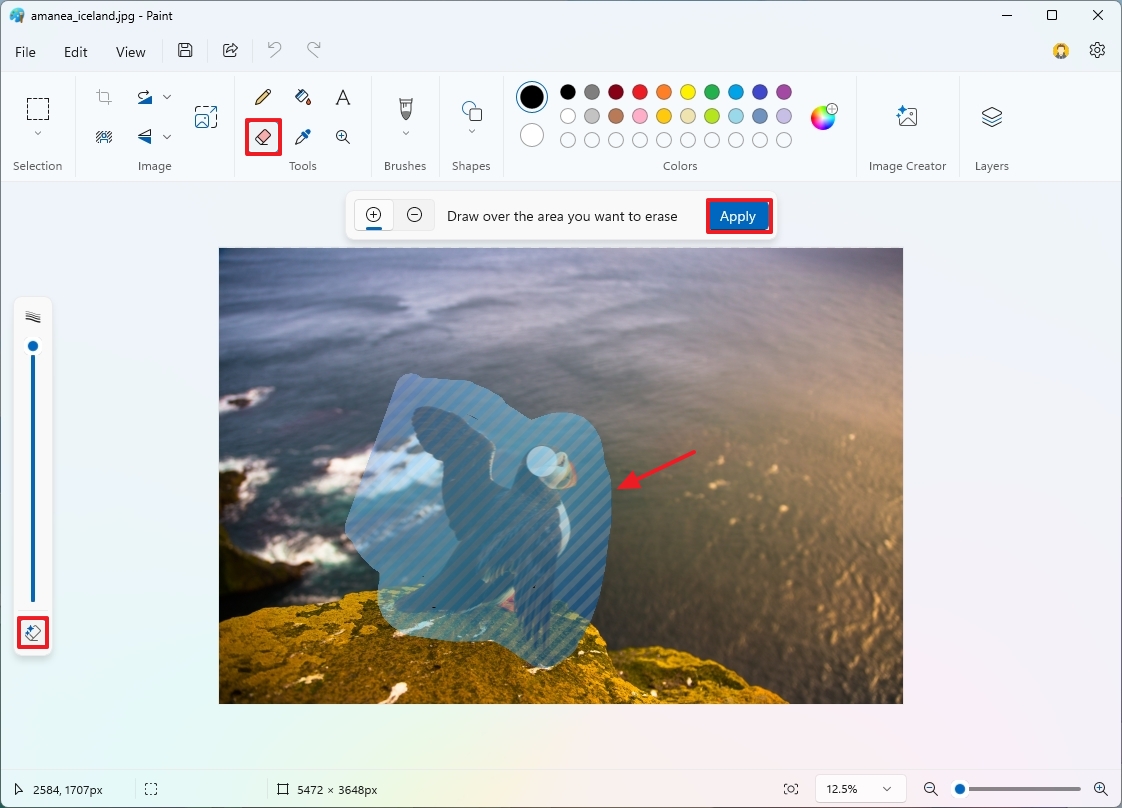
- Select the part of the image to remove.
- Click the Apply button.
After you complete the steps, the feature will scan the image, remove the object, and fill up the empty space with similar background using other parts of the image.
It's important to note that the feature isn't perfect, and you will notice that the image has been modified since the feature has to create a part of the image that never existed.
Although I'm including the steps to use the generative fill and erase features, they are currently only available for some users through the Windows Insider Program in the Canary and Dev Channels at this time.
More resources
For more helpful articles, coverage, and answers to common questions about Windows 10 and Windows 11, visit the following resources:


