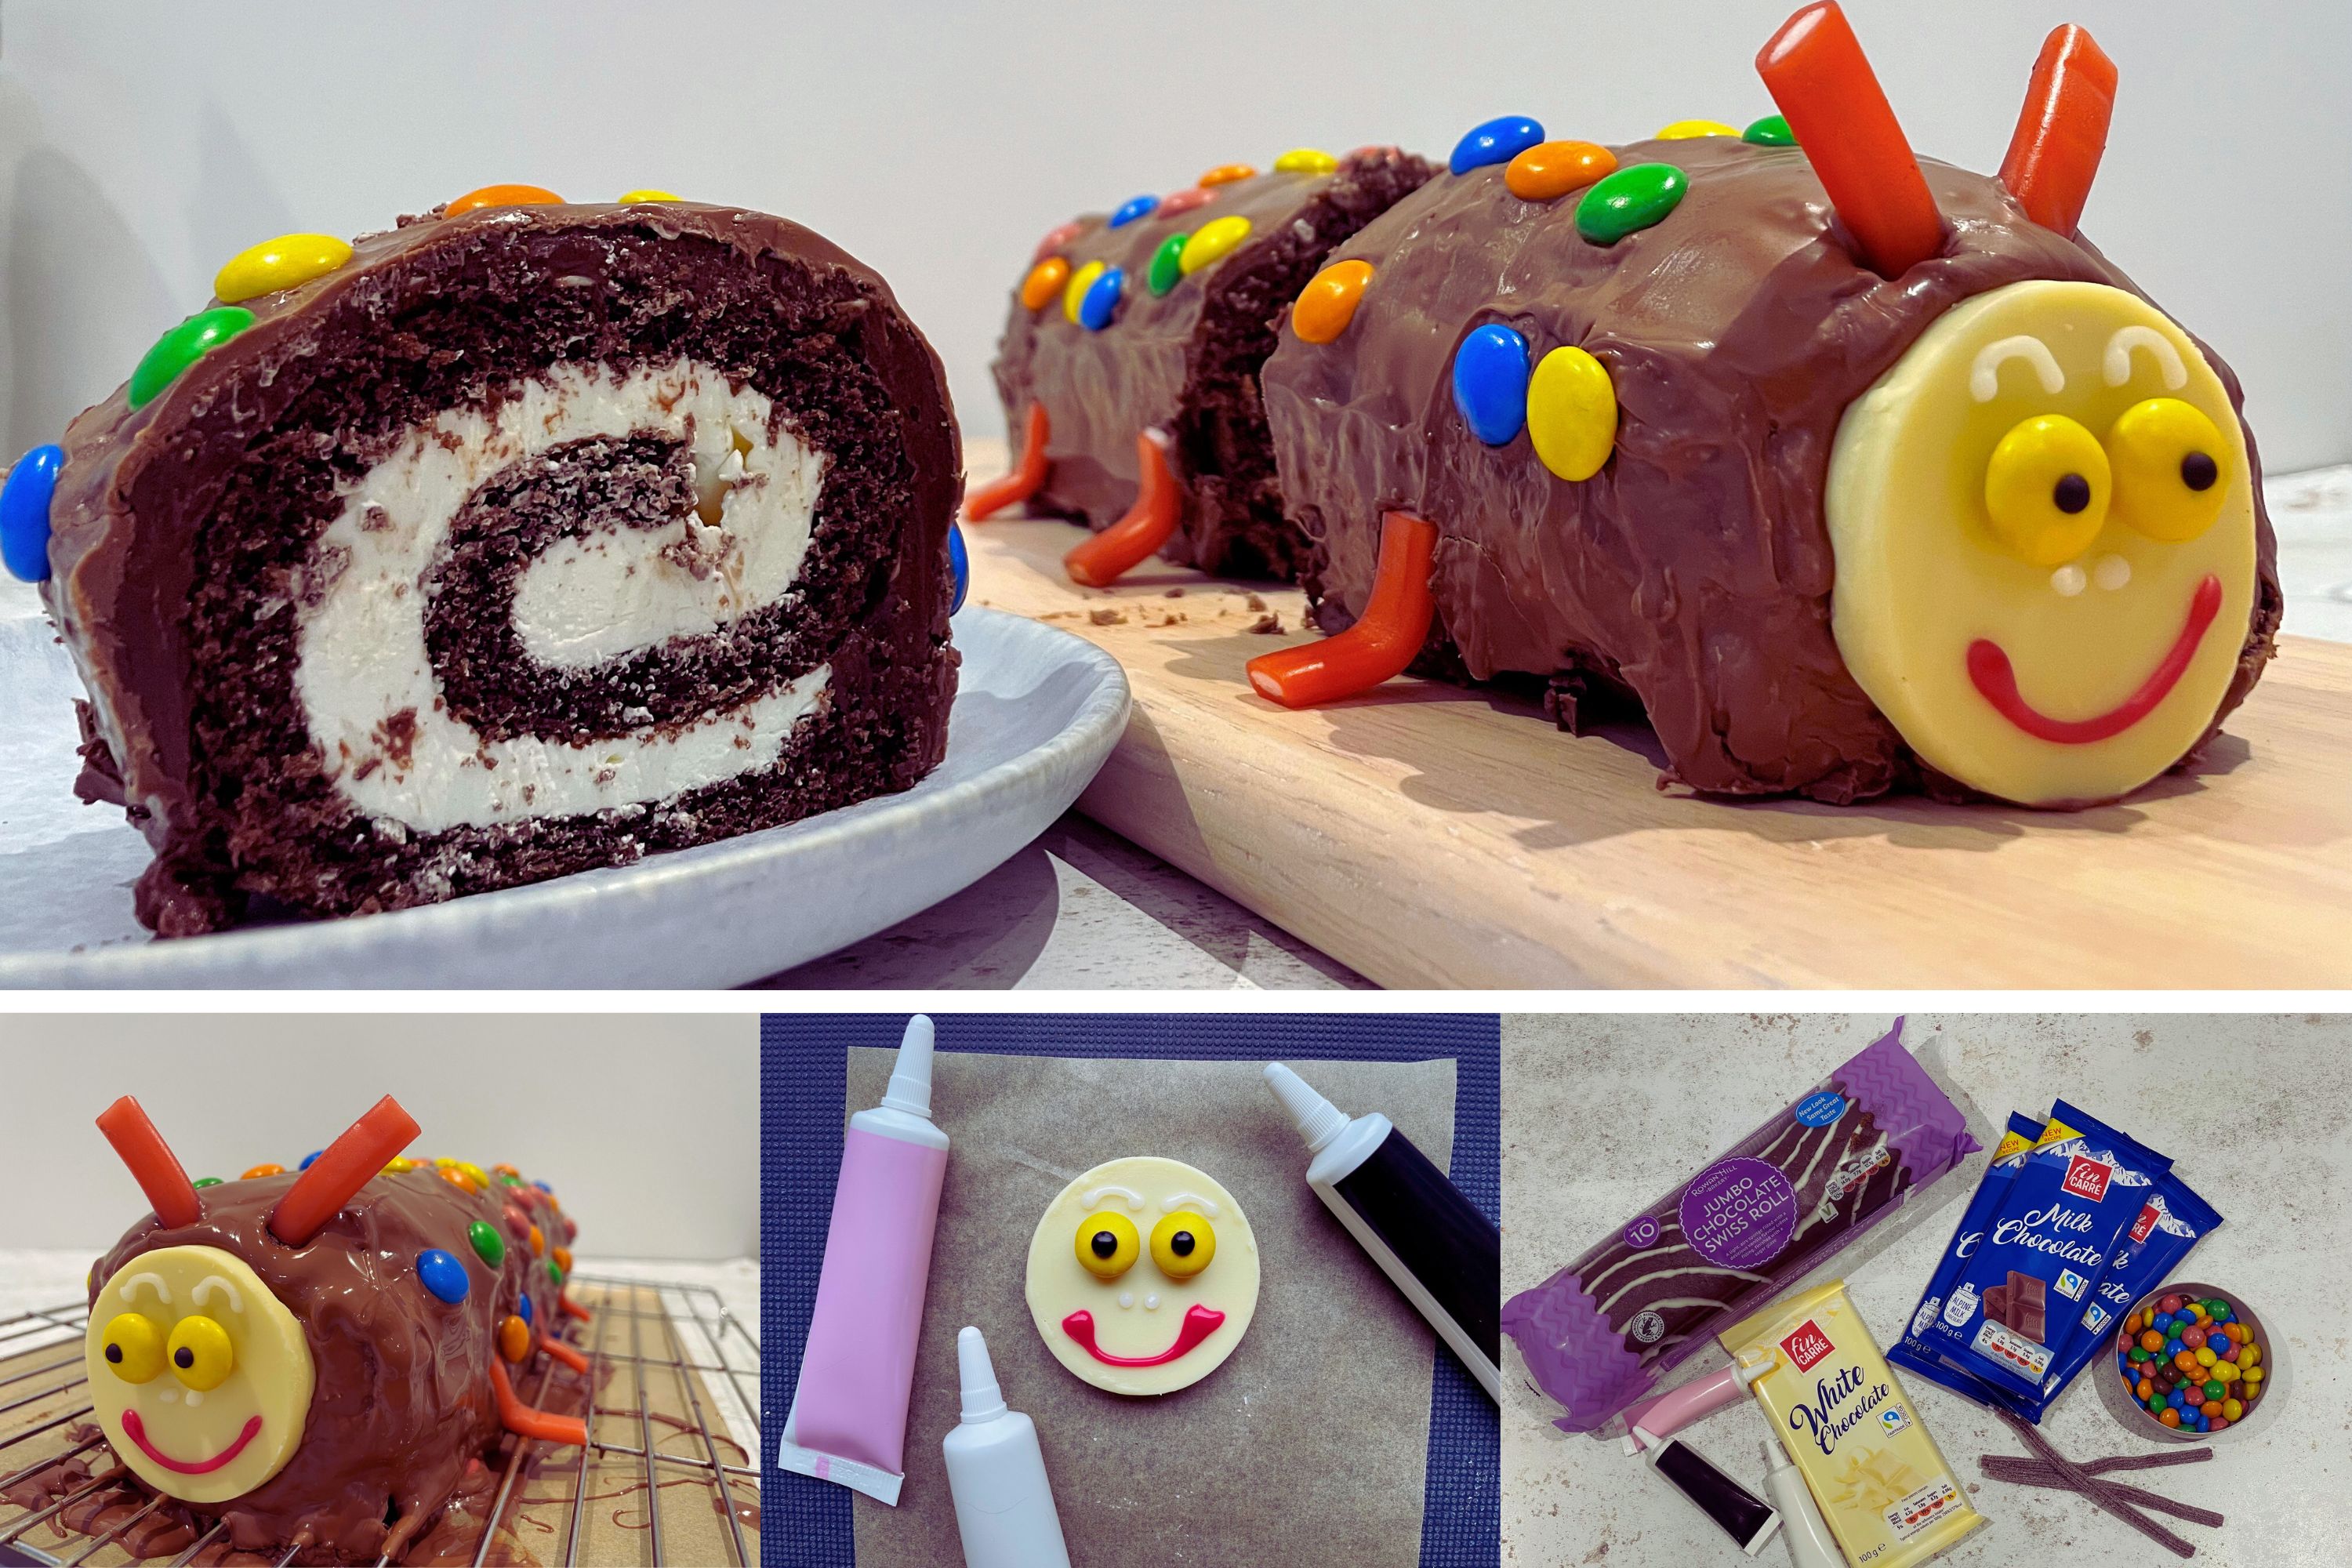
Give your kids a chance to make their very own birthday cake this year using my easy six-step guide to making that famous caterpillar cake at home. Think shop-bought Swiss roll, M&Ms, and plenty of melted chocolate.
If you’ve been searching for birthday cake ideas for kids because your little one has requested a homemade cake this year, then why not give a chocolate caterpillar cake a go? You won’t find a chocolate Swiss roll recipe in my summary because I use only shop-bought ingredients - meaning it's much quicker, simpler, and dare I say cheaper, to make than you may think.
No birthday party is complete without a birthday cake (not to mention kids' party food too of course) and although you can buy a caterpillar cake from all the major supermarkets, making your own is pretty easy. It will also look more impressive and can be customised or personalised depending on your kid's favourite colours or sweets for example. Plus, I've got tips on how to make it cheaper than buying the original Colin the Caterpillar cake too - great if you're on a tight party budget.
I’m confident that once you’ve read this guide, you’ll be writing a shopping list and heading out of the door to pick up the ingredients. You might have some of them already in the cupboard. And even if you don’t have an upcoming birthday, it would make a great afternoon activity to make with kids, as there are plenty of steps they can help with too.
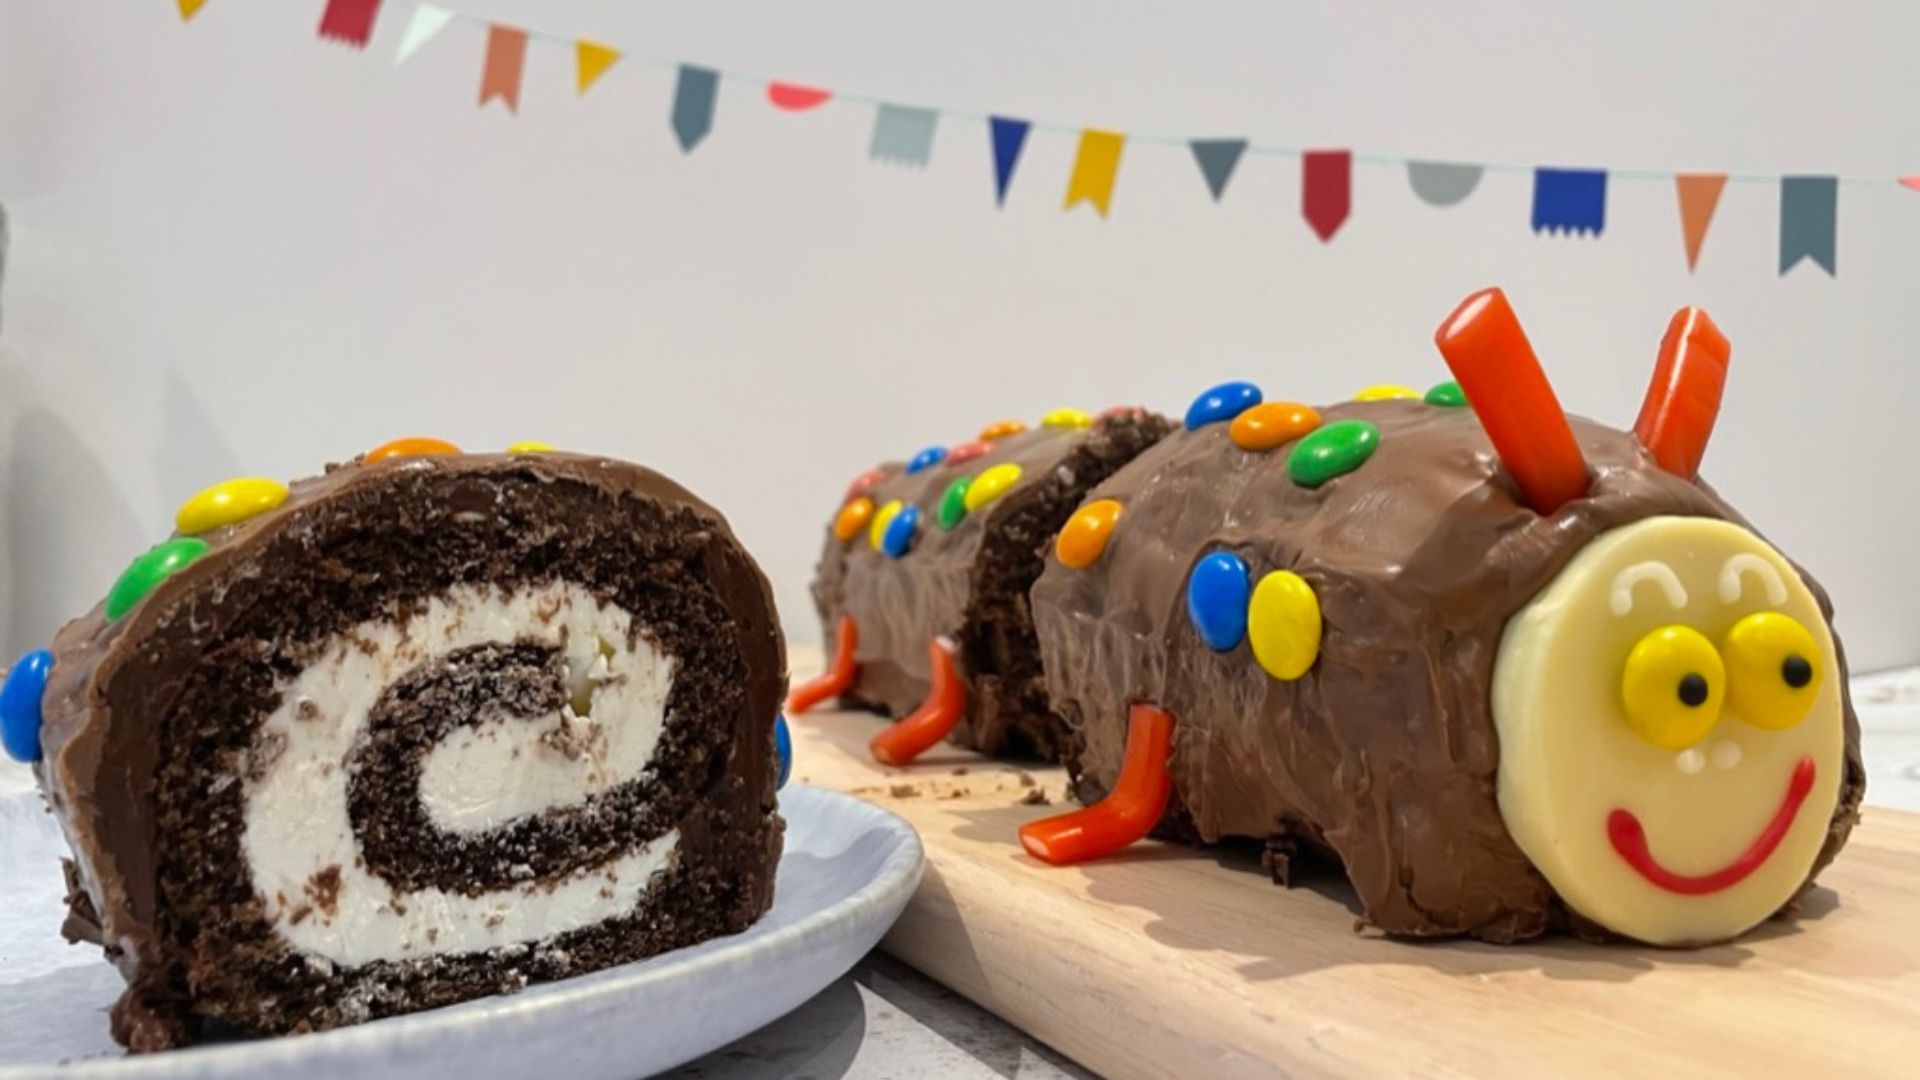
How to make a caterpillar cake
This guide has a full list of ingredients and six easy steps to show you how easy it is to make a caterpillar cake.
I made my cake using a shop-bought chocolate Swiss roll which I then covered in chocolate icing, a layer of melted milk chocolate, and lots of M&Ms. You can skip the icing step and go straight to step four if you want to make the cake even quicker and cheaper using just melted chocolate - but I added the chocolate icing layer to make it even more indulgent.
You will need a 2-inch round metal cookie cutter but I have tips for if you only have plastic ones. Other than that, there’s no fancy equipment required. A couple of palette knives will make it easier to move the cake around but they are not essential.
If you’re a frequent baker, there's a good chance you already have some icing pens in your cupboards. Or if you have piping bags, you could use some leftover milk chocolate to draw the face instead. This method is a little more fiddly and I prefer the effect you get by using different coloured icing.
From the step-by-step images, you will see that I line my chopping board with baking paper but this is optional. It makes the clean-up easier. I then use a cooling rack set over the lined chopping board for when I pour over the melted chocolate.
The cake will set at room temperature in around an hour but if it's a hot day, or you want quicker results you could put it in the fridge to set. To do this, make sure the board or plate you are presenting the finished cake on fits in your fridge.
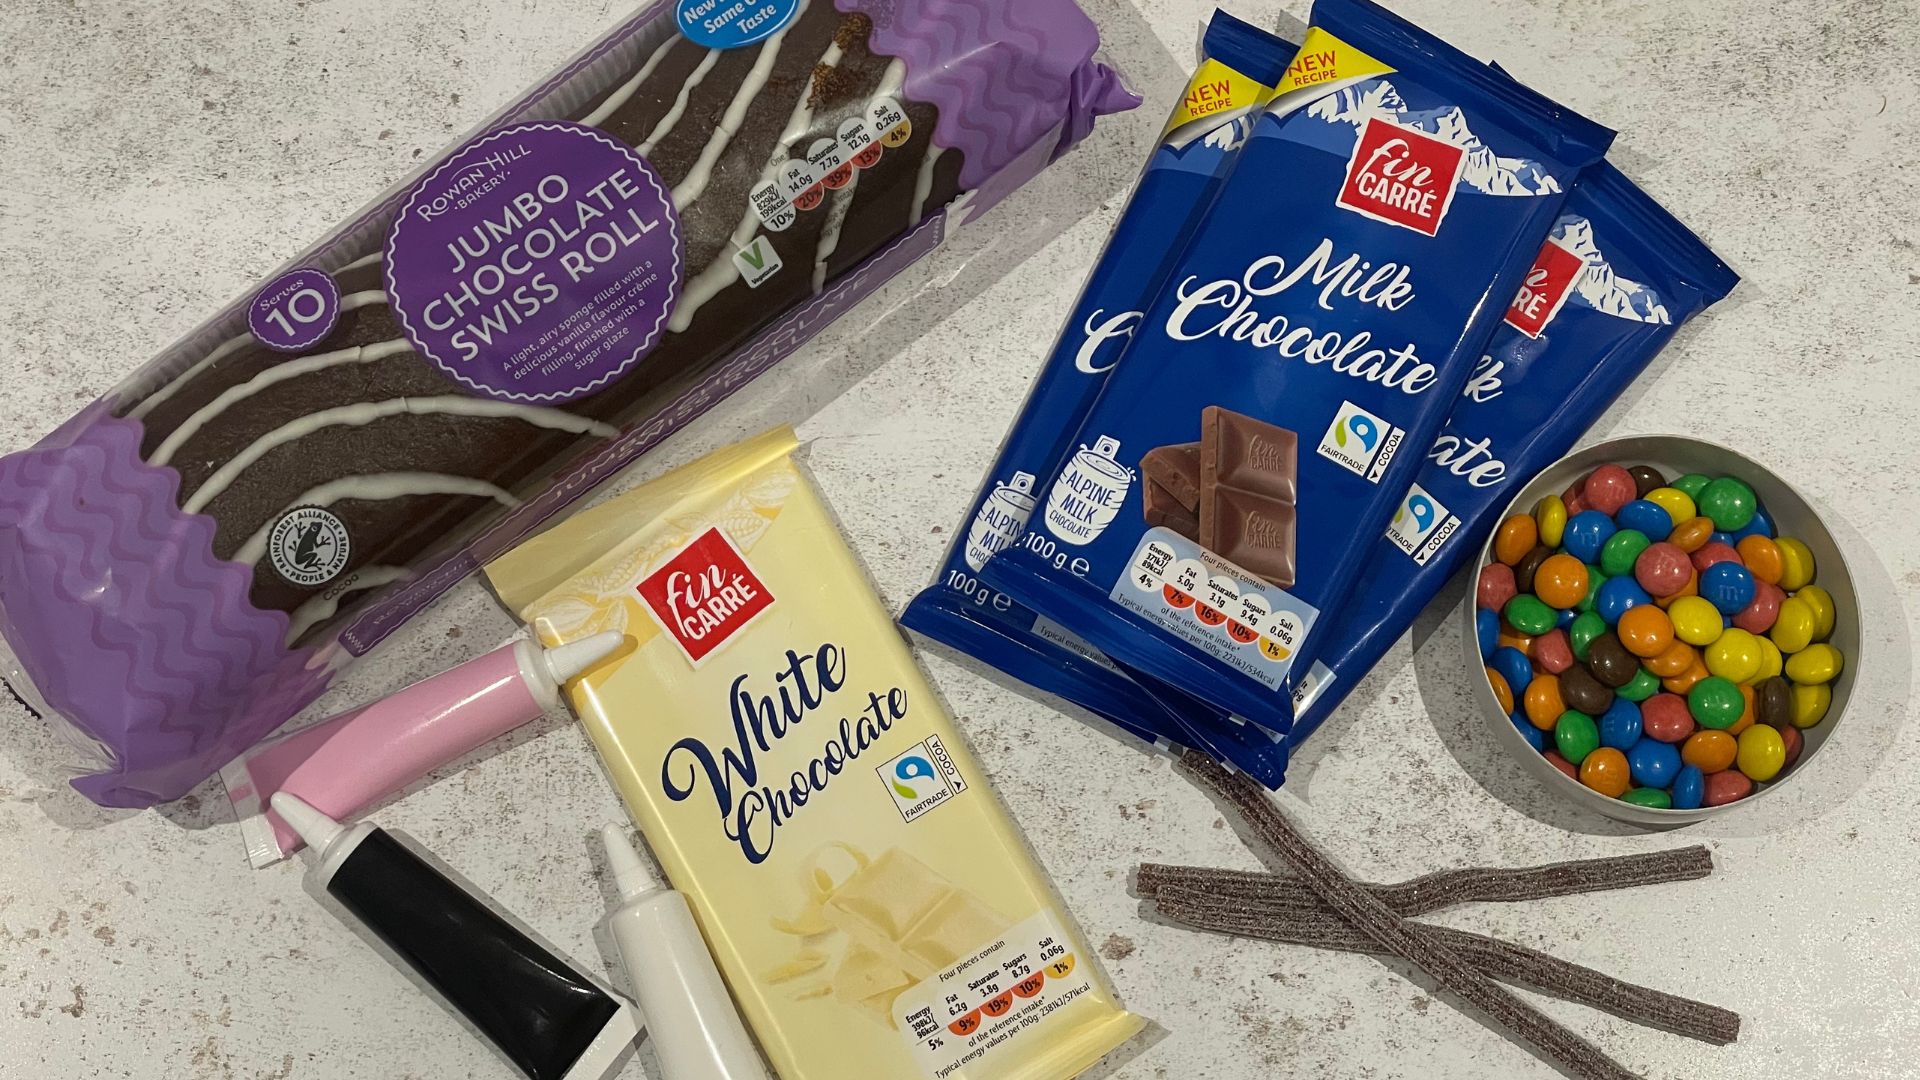
You will need:
- 50g white chocolate as a whole block/bar
- Icing pens, I used white, black and pink
- 1 jumbo chocolate Swiss roll
- 400g tub chocolate icing
- 200g milk chocolate (if you are not covering the cake in chocolate icing, I recommend 300g milk chocolate)
- Chocolate M&Ms (approximately 1/3 of a bag)
- 3 Fizzy Cola Lances or Strawberry Pencils (approximately 1/3 pack)
Step 1
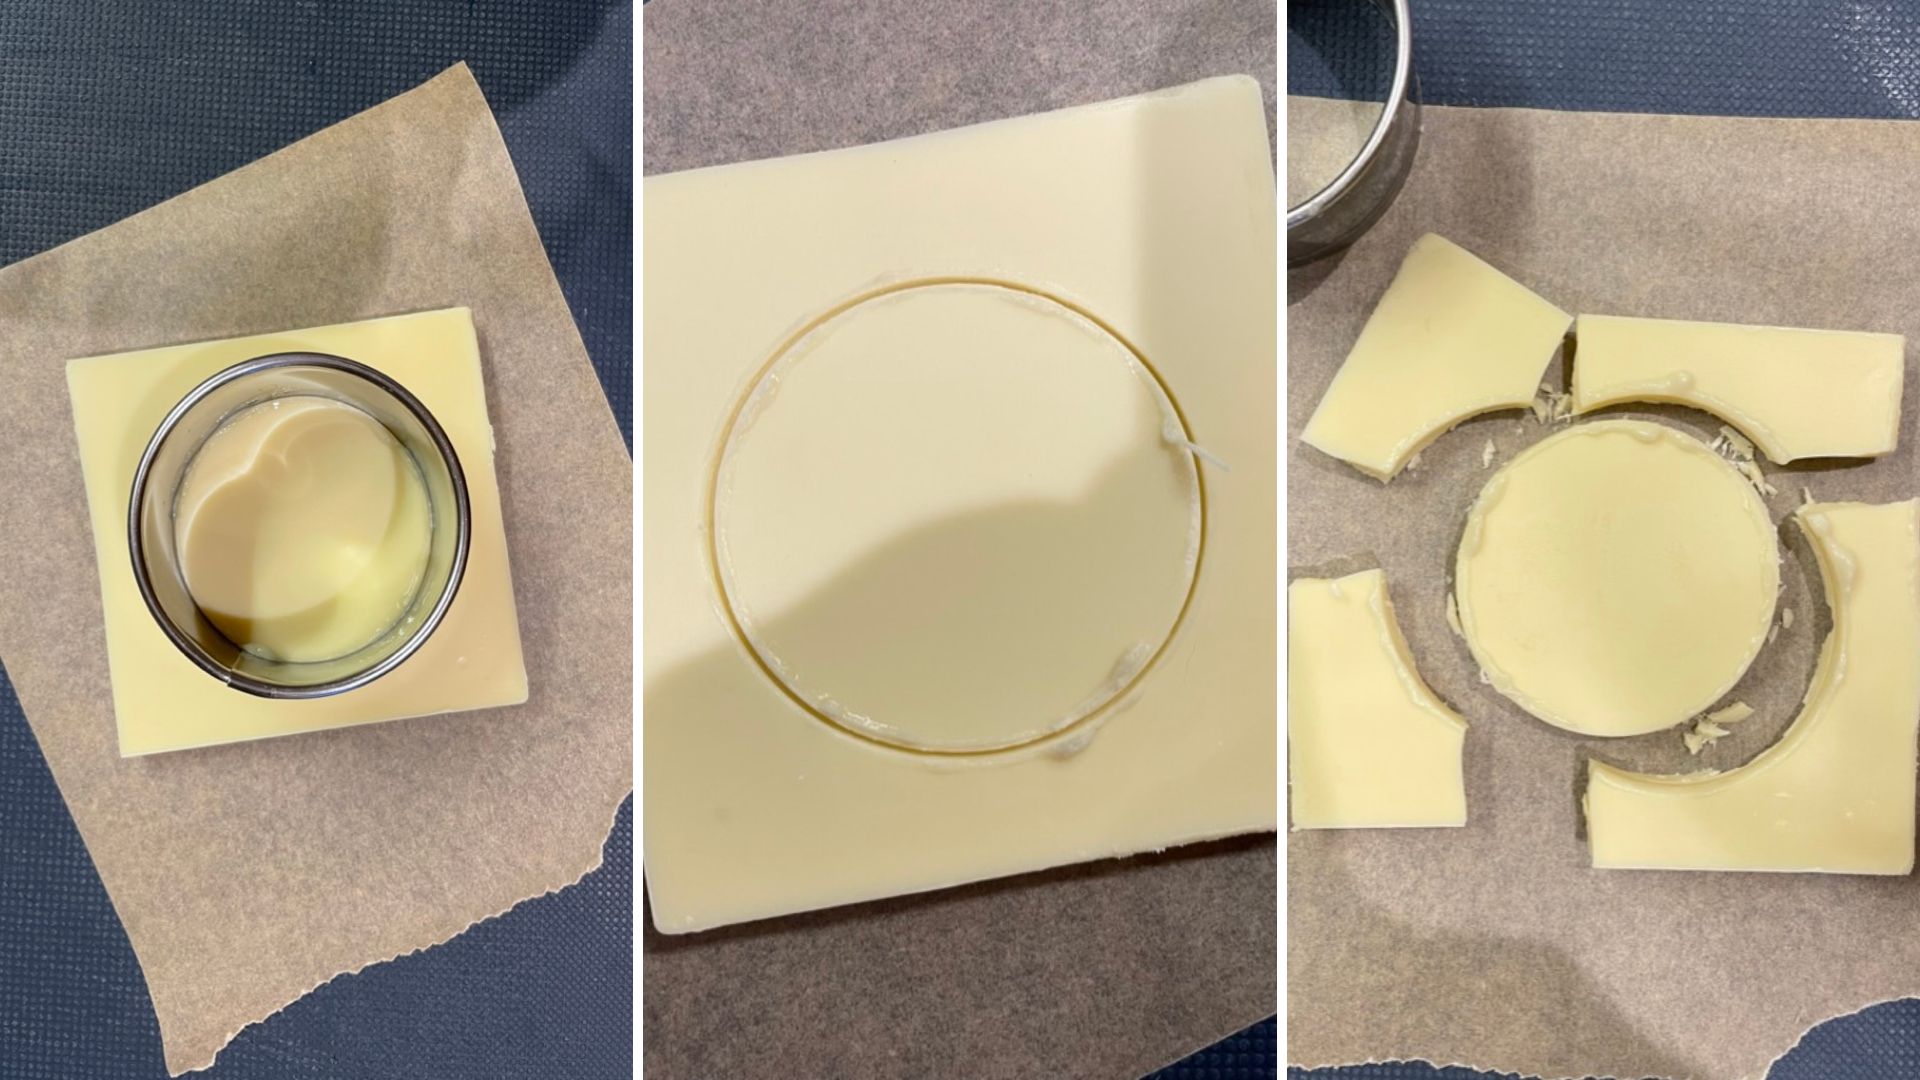
Cut a small piece of baking paper and place it on a chopping board. Put your bar of white chocolate on top with the smooth side facing up.
Carefully dip a 2-inch round cutter into a small bowl of hot water and shake off the excess water. Place onto the chocolate and firmly, but carefully, twist to score the chocolate. You may need to dip the cutter back in the hot water. Twist until you have a clean round of chocolate. If the edges have melted a little, lightly brush with your finger to smooth the edges.
If you don’t have a metal cutter, put a 2-inch round plastic cutter on some baking paper on a plate. Melt the white chocolate in a microwave in short bursts then pour into the cutter, holding it down to ensure nothing leaks out the sides. Leave in the fridge to set until solid.
Step 2
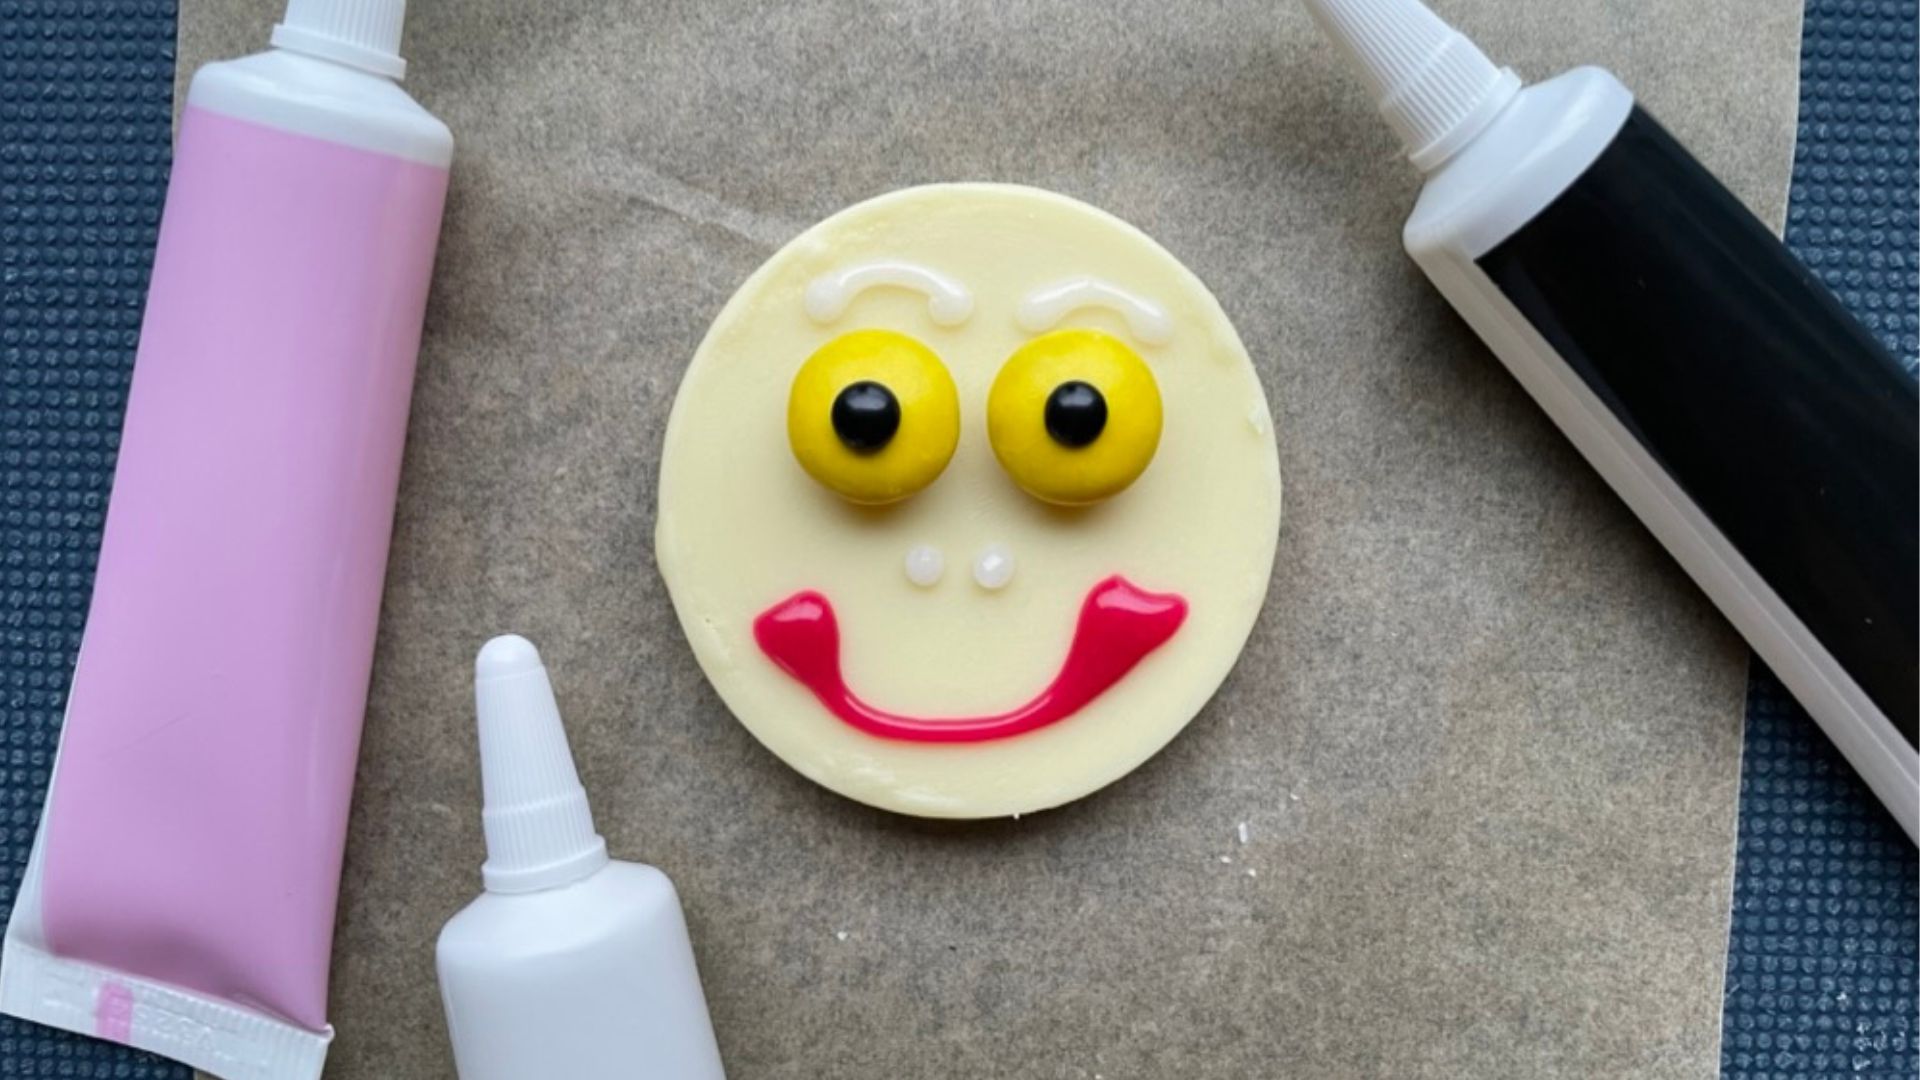
To draw the features for the caterpillar face I used a little of the icing to secure two M&Ms as eyes. I used the black icing pen to draw on the pupils. I then used the white icing to draw eyebrows and nostrils and the pink icing to draw a smile.
You could melt some milk chocolate and place it in a piping bag to draw on the features instead if you prefer.
Step 3
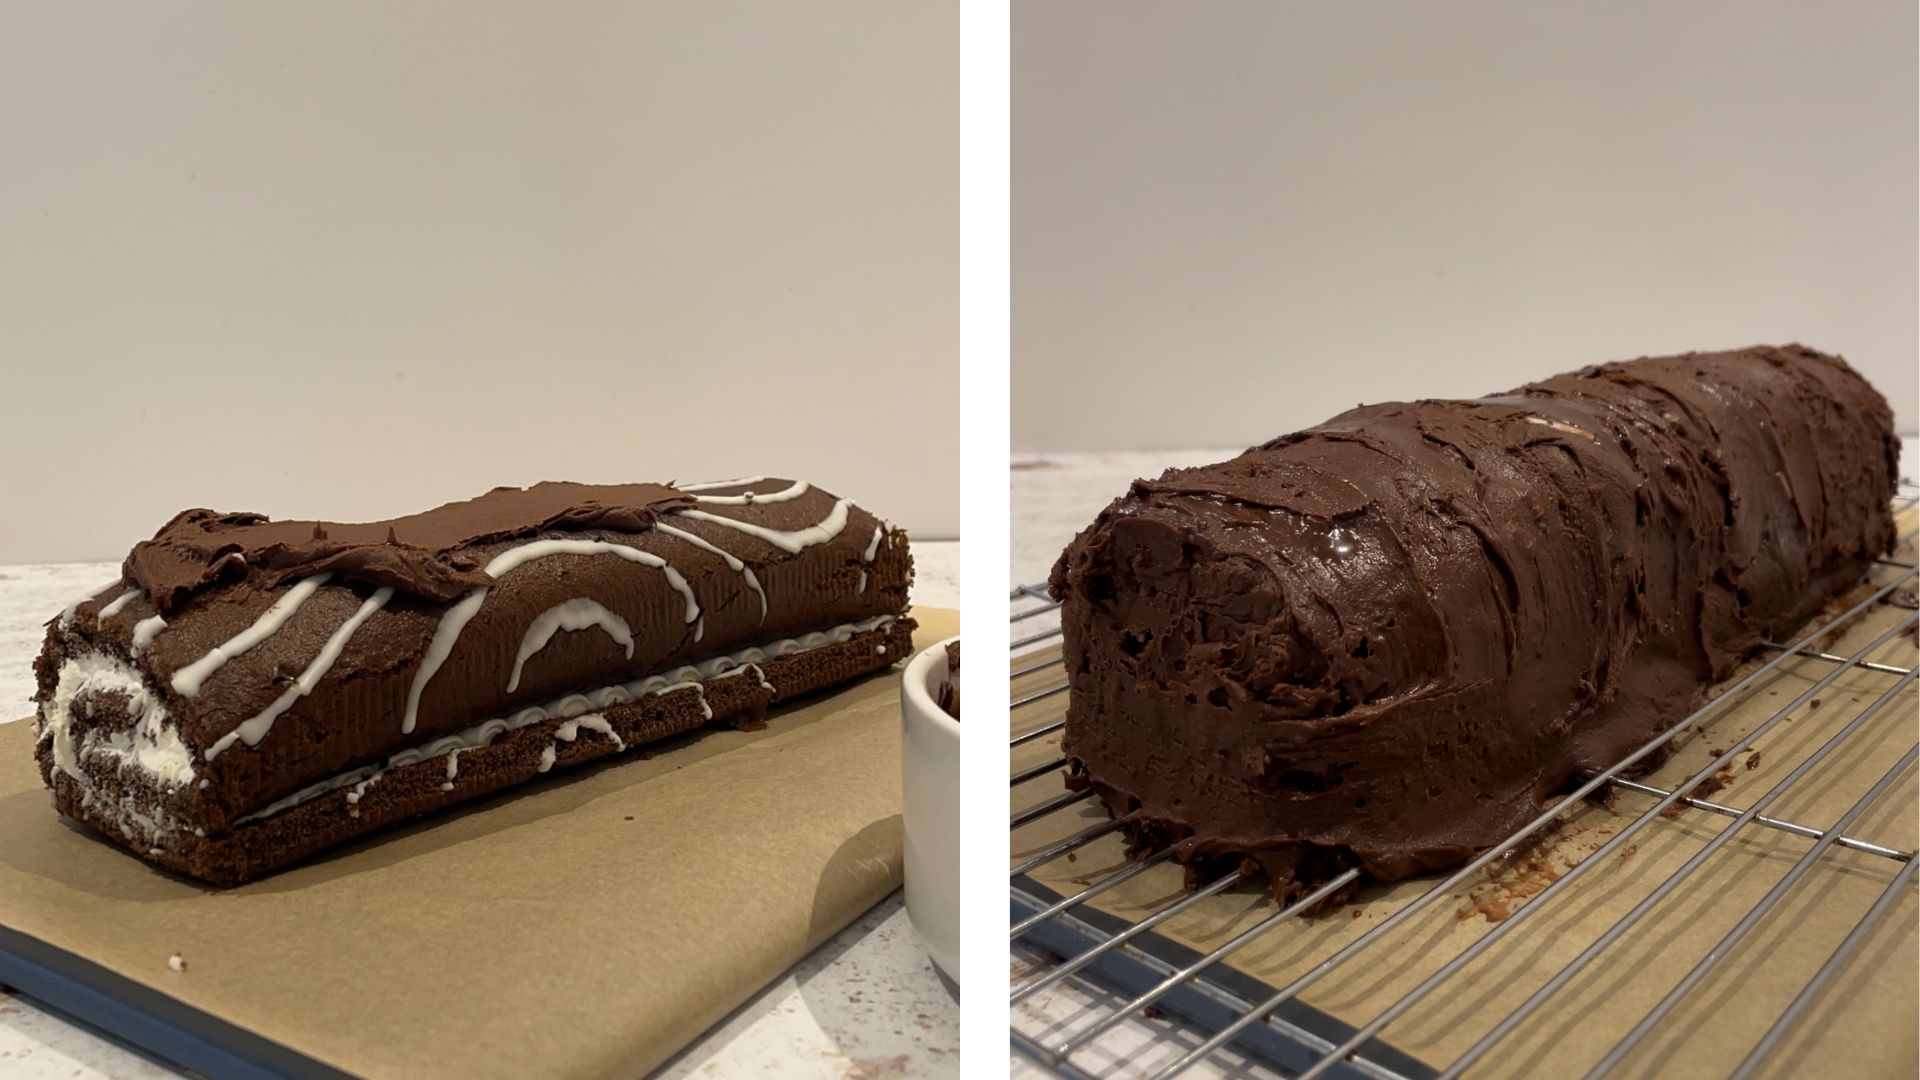
Put the chocolate Swiss roll on a board and use a palette knife or the back of a spoon to spread over the chocolate icing. It’s a good idea to beat the icing a little in a bowl beforehand to loosen it up.
Once the cake is completely covered, carefully transfer it to a wire rack set over a tray or lined chopping board.
Step 4
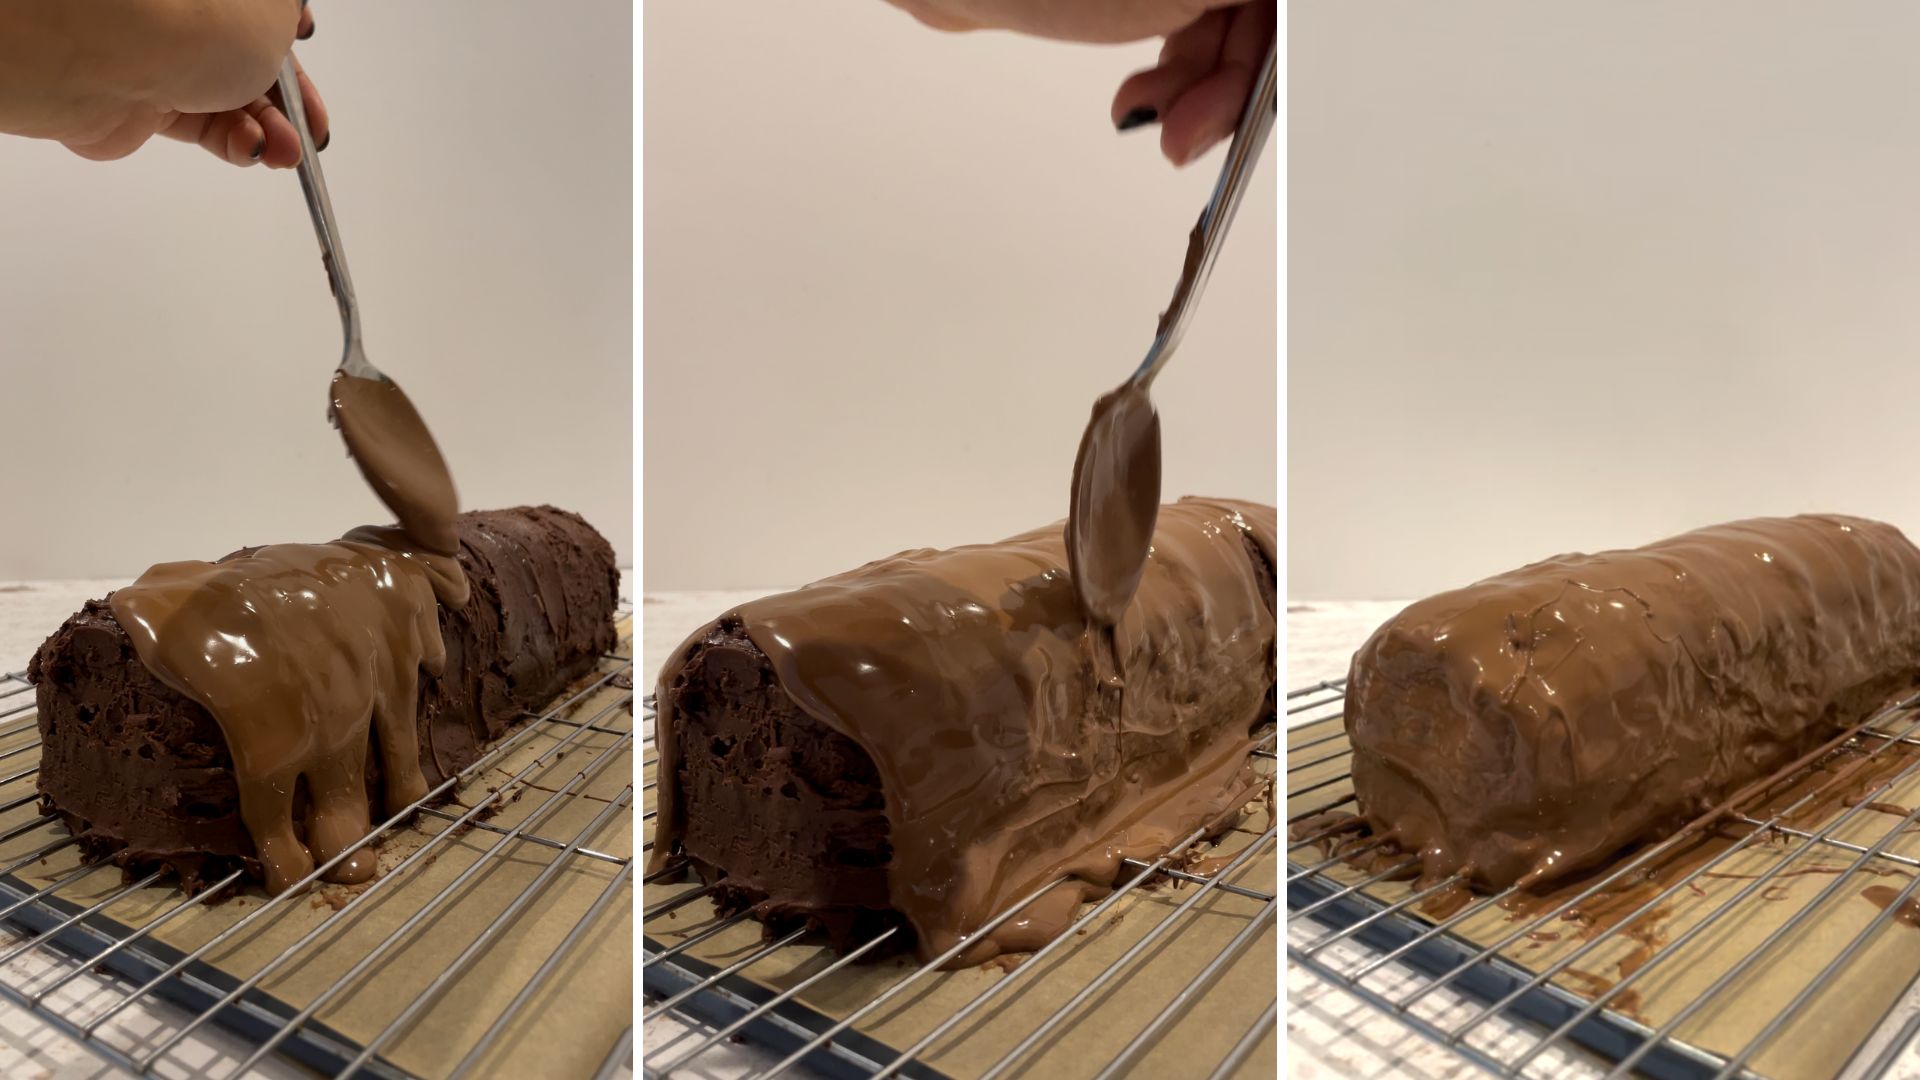
Melt your milk chocolate in short bursts in the microwave. Allow to cool slightly, it should be warm but not hot.
Pour or spoon over the melted chocolate until the icing is completely covered. You can use the back of a spoon or palette knife to carefully cover any gaps and smooth the sides.
Step 5
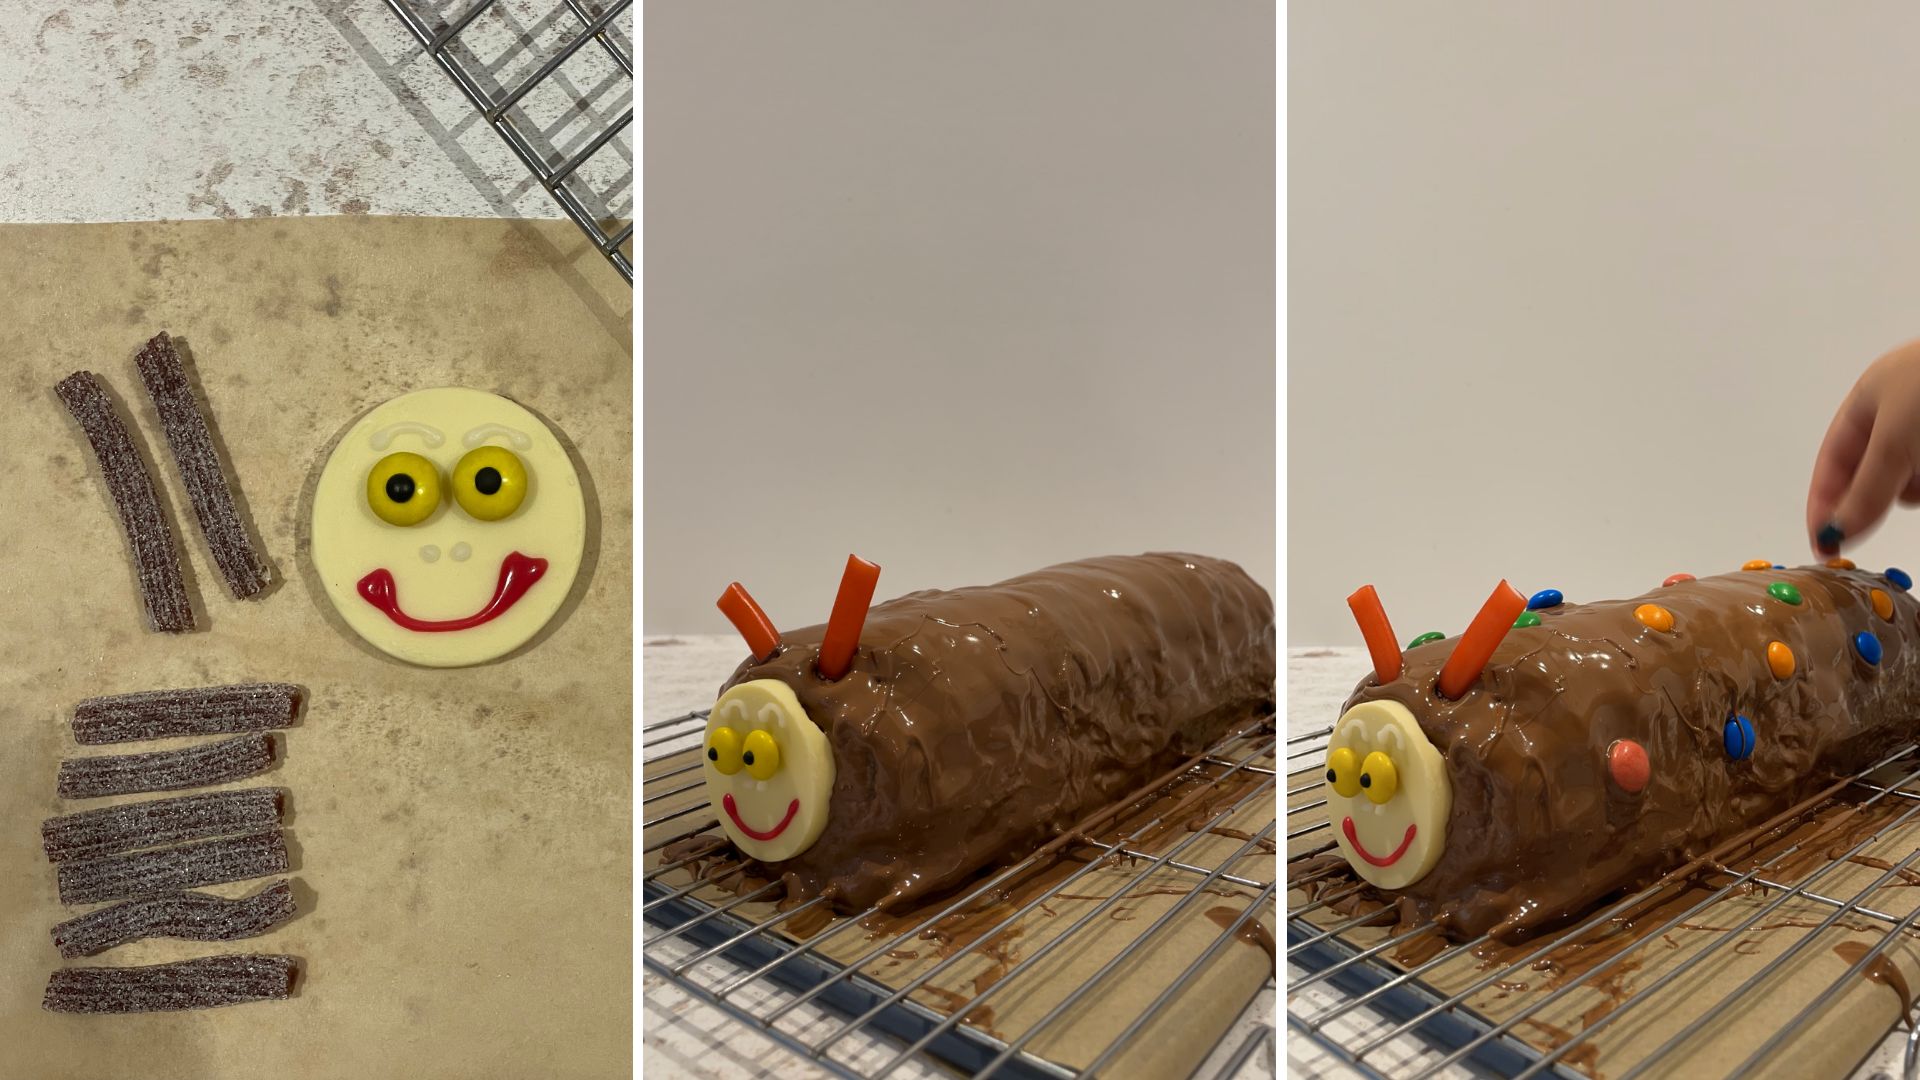
Working quickly, cut the three fizzy cola lances or strawberry pencils into six small pieces for the legs and two longer pieces for the antennas. You can eat any offcuts as a chef’s perk!
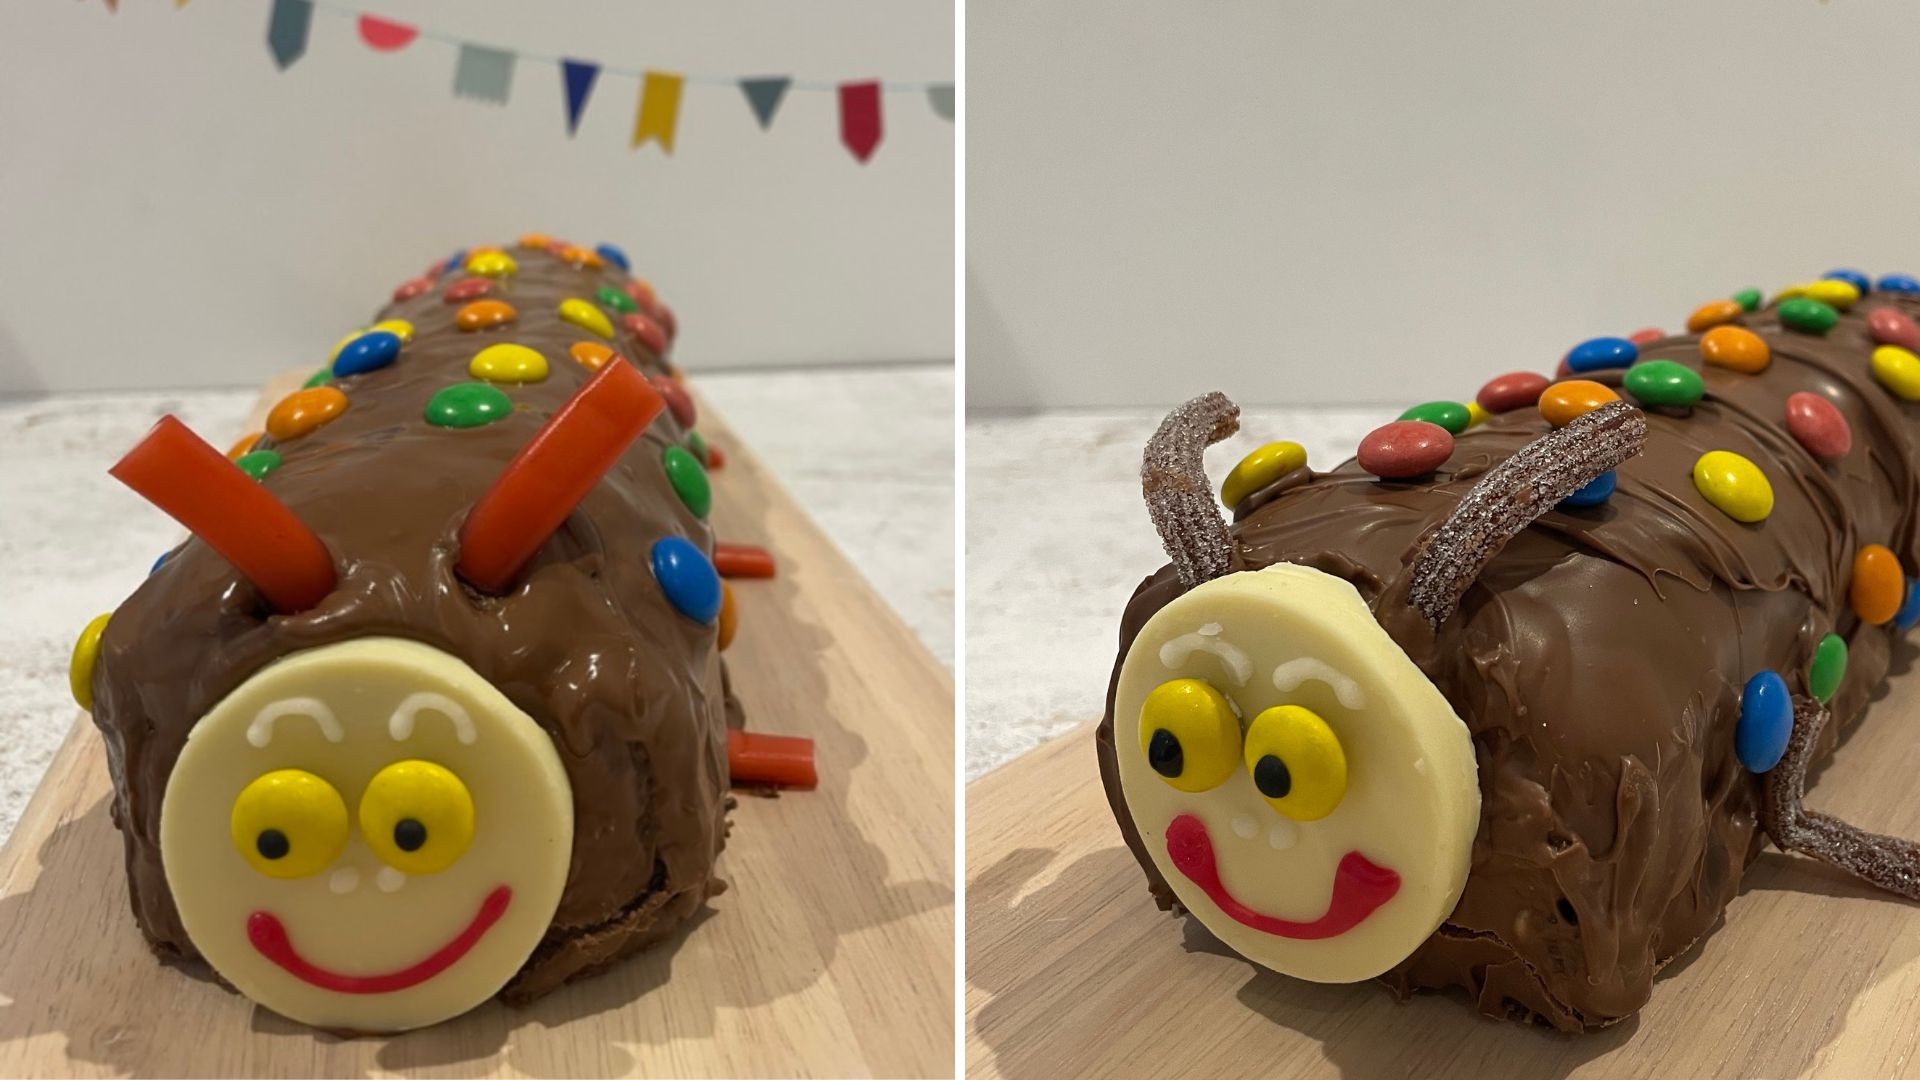
Stick the antennas into the chocolate and press on the face. Add as many M&Ms as you like to the body of the caterpillar. Work swiftly so that the chocolate is still wet enough to stick it on.
Step 6
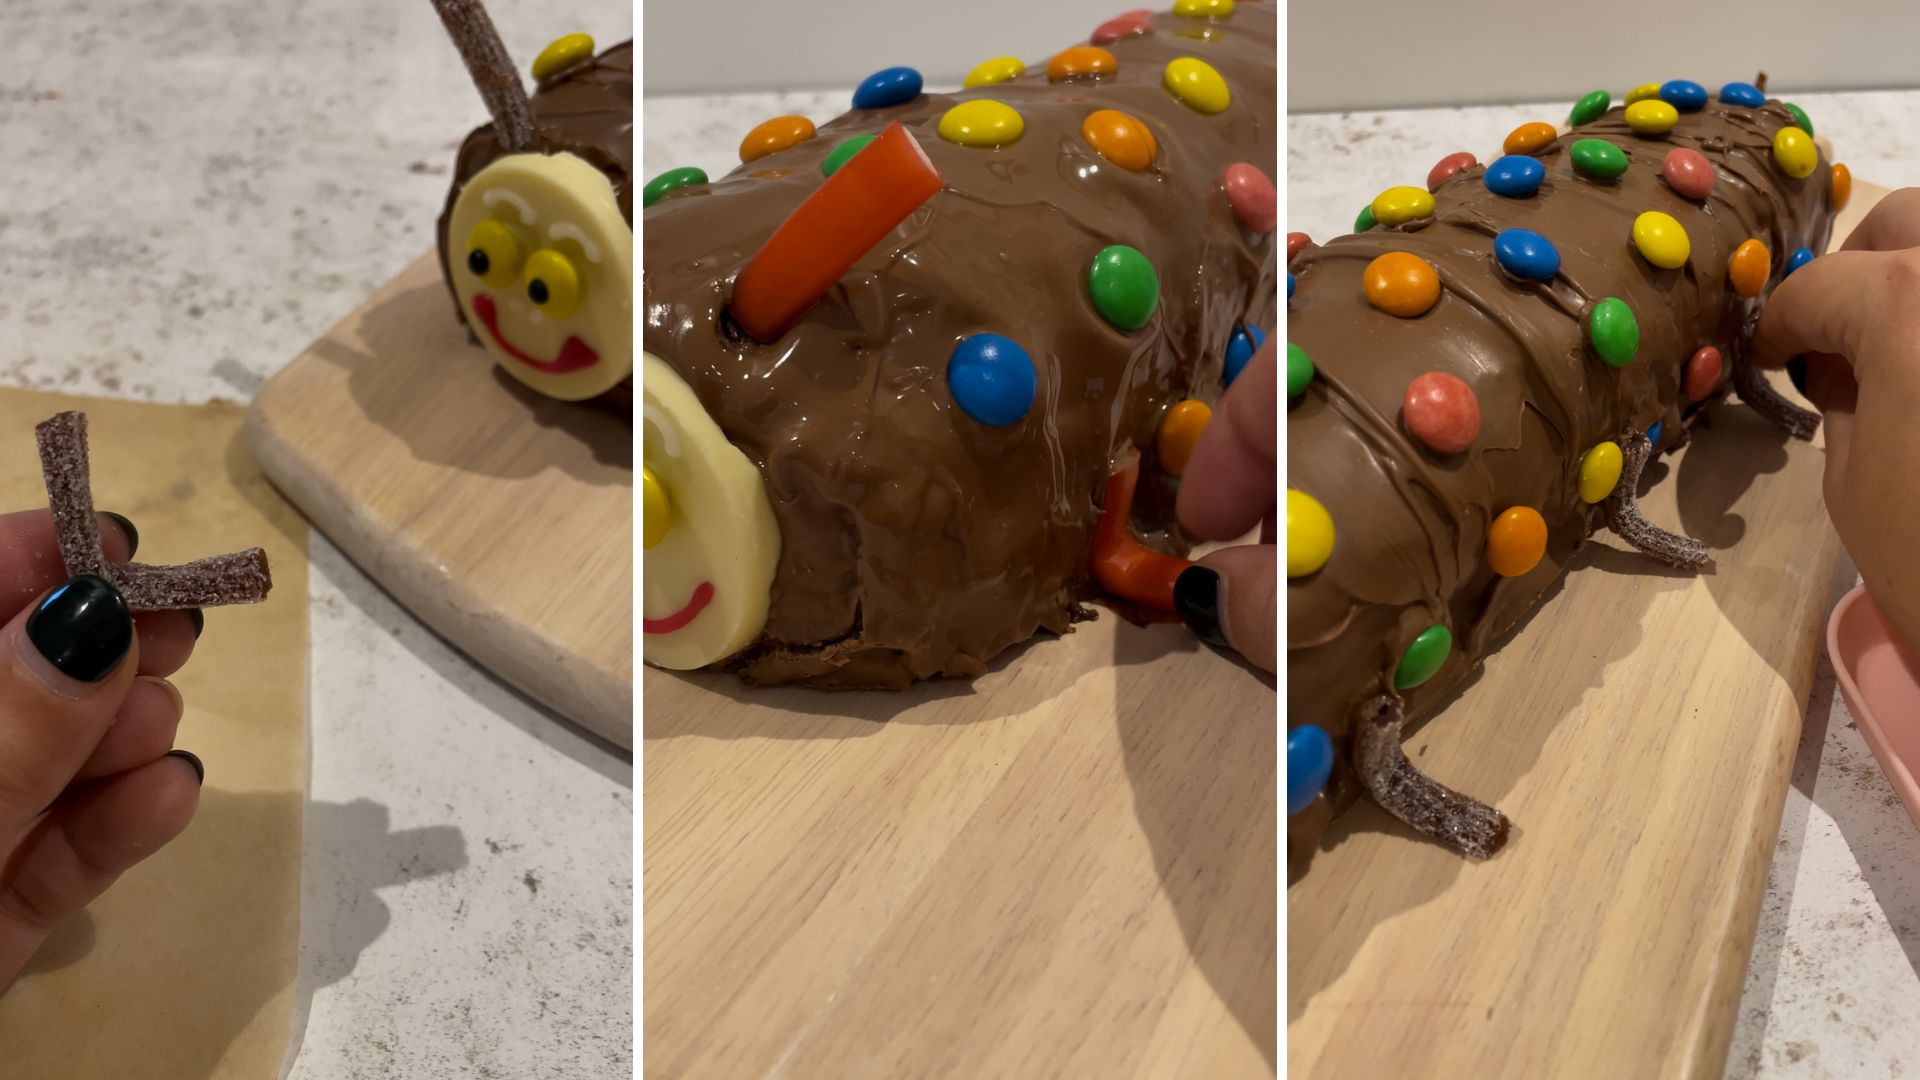
Carefully transfer the cake to your serving board or plate. Bend the leg pieces into an L-shape and stick three on each side.
Leave the cake at room temperature to set it completely. This should take around an hour. If the chocolate on the sides has already set before you stick it on the legs, you can re-melt any excess milk chocolate from step four and dap it on to attach the legs or use some of the writing icing instead.
You can set the cake quicker by putting it in the fridge but this will cause the sponge of the cake to dry out.
How much does it cost to make a caterpillar cake?
My caterpillar cake costs £8.53 to make based on the whole ingredients you need to purchase. However, I've also calculated the cost based on the quantity of ingredients used and the total is just £5.81.
This was based on a quarter of the total price for the icing pens and a third of the price for the M&Ms and strawberry pencils or fizzy cola lances. That is 31.6 percent cheaper compared to the original Colin the Caterpillar cake from Marks & Spencer which costs £8.50.
If you make the caterpillar cake without the chocolate icing layer and only cover the cake in melted chocolate, the cake is even cheaper. The total ingredient cost is £7.59 and the portioned total is £4.87. This is 42.7 percent cheaper than Colin.
I bought the ingredients for this cake from Lidl and the prices are accurate at the time of writing. The cost will vary depending on the supermarket you shop at.
Is there any other way to decorate a caterpillar cake other than melted chocolate?
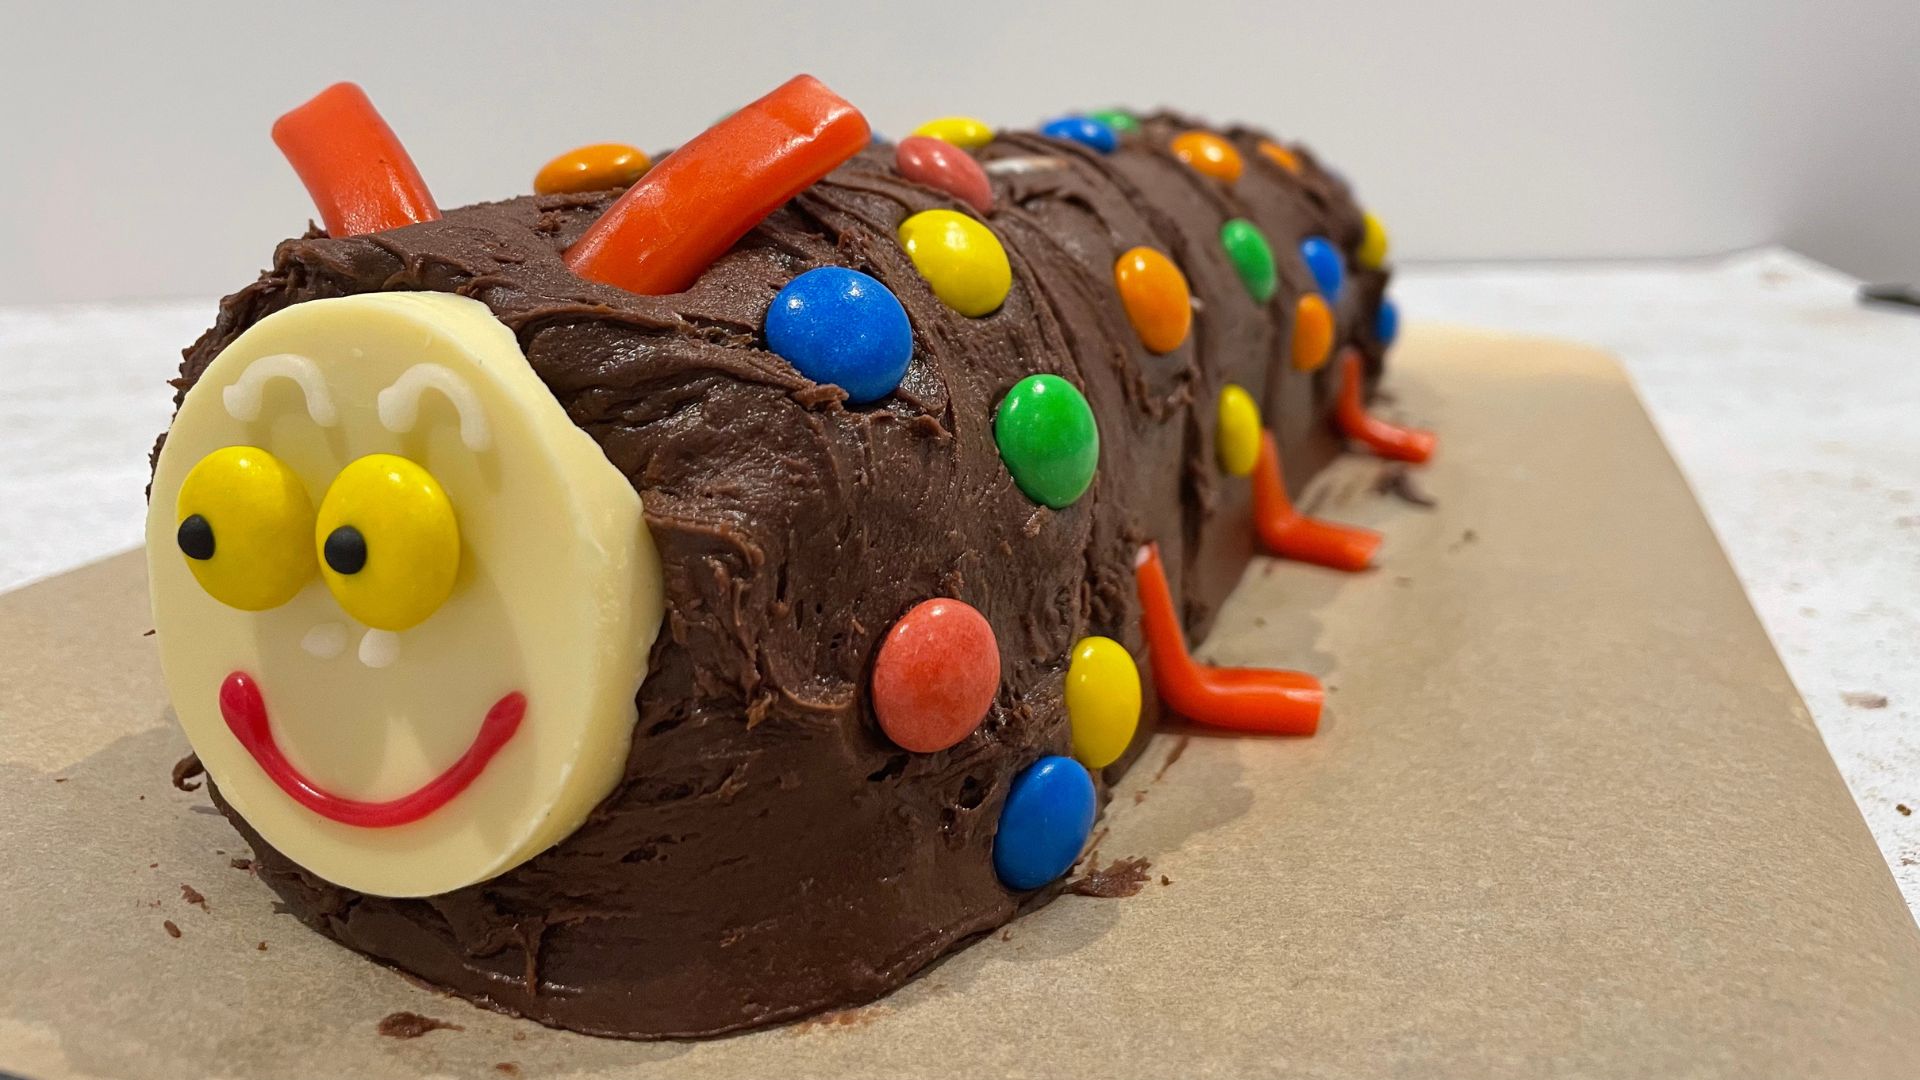
Instead of melted chocolate, simply spread chocolate icing over the Swiss roll and then press in your M&Ms or Smarties. Take a look at our example below for reference.
You could also use sweets to decorate the cake instead. Dolly mixture or Jelly Beans would look very attractive and mini marshmallows are an affordable choice too.
Do I need any special equipment for making a caterpillar cake?
If you are baking the Swiss roll for your caterpillar cake you will need a suitable baking tray.
If you are simply assembling shop-bought ingredients, a palette knife is useful for spreading the melted chocolate and lifting the cake from the rack to a board or plate, but it is not essential.
To make the white chocolate face for my caterpillar cake, I used a 2-inch metal round cookie cutter. Read my tip in step one if you don't have a metal cutter.
How could I adapt this recipe to make a dairy-free caterpillar cake?
To make this dairy-free you would need to buy a suitable Swiss roll from the free-from section of the supermarket.
You can also buy dairy-free chocolate, candy-coated chocolates and icing. The Strawberry pencils and Cola Fizzy Lances we used from Lidl are both vegan and are therefore dairy-free.
What's the best way to cut a caterpillar cake?
I used a large, sharp chef's knife to cut my caterpillar cake. If the melted chocolate layer is particularly thick, you might want to warm the knife under some hot water first. Dry it then use it to slice the cake and it will glide through the chocolate more easily.
To keep the layers of your Swiss roll neat, it's best to wipe your knife clean after each cut.
Where to buy a caterpillar cake - if you don't fancy making your own
For more easy birthday baking, try our chocolate cake recipe. You might also like our list of Frozen birthday cake ideas or your children might prefer these Bluey birthday cake ideas.
We've also got plenty of first birthday party ideas for those of you thinking of celebrating your little ones' big day, not to mention kids' party games everyone will love, as well as 13th birthday party ideas for your pre-teen.


