Love them or loathe them, logframes – the logical framework matrix – are a vital part of the aid worker’s skill set. Many humanitarians swear by them for project planning, and increasingly many donors ask for a logframe as part of a funding application.
So, what is a logframe?
Logframes originated from a planning approach used by the US military (maybe this is why they’re seen as a bit rigid) and was later adopted by USAid in the 1960s for development projects. It has since become a standard approach required by donors for any grant applications.
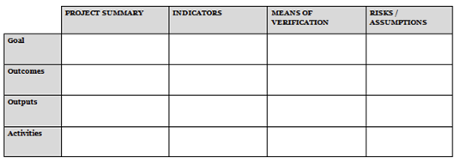
The simplest form of a logframe is a 4x4 table with 16 cells, although this isn’t a strict format. In the table you note down what you want to achieve and how you’ll get there. In theory, writing a logframe should make it easier to plan and manage a project as you can see the sequence in which the actions lead to your overall goal.
Planning
Putting together a logframe is just one part of a project-planning process for development, but many criticise its fixed approach and see it as a top-down imposition from donors. Josiah Kaplan, a researcher from Oxford University, suggests you need to write the logframe with everyone who might be involved in the project. He says: “Greater inclusivity leads to better and more nuanced project planning. It can be a good opportunity to bring different actors around the table – within a single organisation, and with external partners and stakeholders – to communicate and develop shared objectives.”
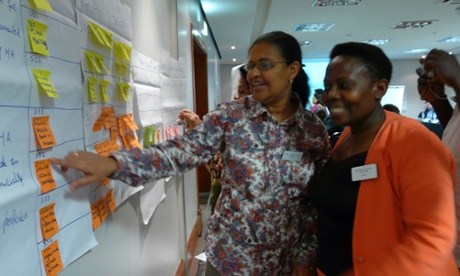
Before you start, get a load of stationery together – ideally a big sheet of paper with a lot of Post-it notes. Then, work out what your project actually is: Who are the key people involved and how might they be affected by the problem? You can do this with a problem tree analysis – in the middle of your page write down the problem your project will tackle, and then “branch off” possible causes of the problem until you’re satisfied that you’ve found an overall cause and effect narrative. Hopefully at this point your notes will look a bit like a tree.
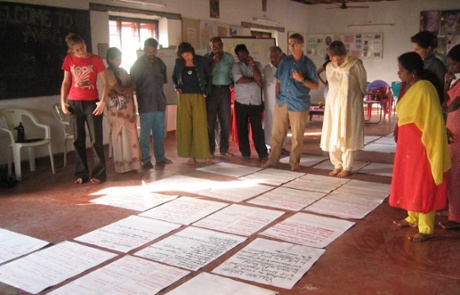
Then change the wording into positive terms. For example, “lack of sufficient water” would then become an aim to “improve water supply”. Once you’ve done that you’ll have an objective tree, and you’ll be able to transfer those notes into the logframe.
Now you should have gathered answers to the following questions and be ready to write the logframe: What is the project is going to achieve? What activities will be carried out? What resources, people, equipment will you need? What potential problems might you come across? And how will the progress and ultimate success of the project be measured?
The structure of a logframe
A standard logframe is divided into four rows, which are your long- to short-term objectives ranging from top to bottom:
- Goal (overall aim).
- Outcome/Purpose (what will be achieved, who will benefit, and by when).
- Outputs (specific results the project will generate).
- Activities (what tasks need to be done in order for the output to be achieved).
These are achieved and measured by the headings from left to right:
- Project summary (explaining the objectives).
- Objectively verifiable indicators (how you’ll measure the achievements).
- Means of verification (how you’ll collect the information for the indicators).
- Risks and assumptions (external conditions needed to get results).
Writing a logframe
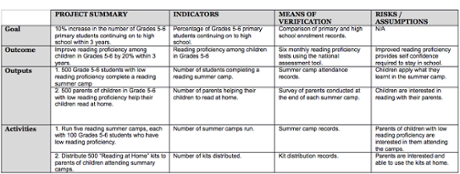
There’s no set way to complete the table but here’s how you might think about filling it in.
Start by writing your overall goal in the top left hand box of the table (between Goal and Project summary). Ask yourself: What do we intend to do? How does this sit with the country development strategy, and are they compatible?
A guide from Bond (pdf) suggests you start filling in the table from the top with your objectives and then work down. But while you’re doing this think “upwards”, as development consultant Greta Jensen suggests (try not to get too dizzy).
Jensen says the logframe is about setting your goals first and then getting into the grassroots – what you actually need to do. You have to look at all the boxes in the table as a sequence using an “if and then” logic.
As an example (pdf), if our goal is to create a community of happy children and adults in a village the “if and then” logic would be like this:
If we establish a community committee (activity) and people are enthusiastic (assumption) then we’ll have the capacity to build and manage a playground (output). If we have a playground (output) and it’s easy to maintain (assumption) then children will have fun (purpose). If children are having fun (purpose) and families continue to grow in the village (assumption) then we’ll reach the goal of a happy community.
When outlining your activities ask yourself: What can we actually do? What have we already got that we can use to reach the overall goal? Then, what are we missing and what might we need?
Remember to think about what work you’re going to do with each of the target groups. For example, what work will need to be done with local leaders as part of the project.
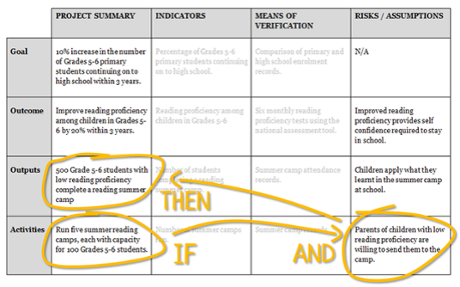
Once you’ve got your all objectives down on the table think laterally: how can you measure the progress of the project against the aims you’ve set out? (You write these in the “Objectively verifiable indicators” and “Means of verification” boxes.) Choose indicators that will let you measure whether the different levels in your project have been achieved. Keep these at a reasonable cost and give them a deadline. Set out the information required for the indicators in the “Means of verification” column. These could be sourced from documents, field surveys, training reports, among others.
The fourth column is called “Assumptions” – which essentially means a risk analysis. This is about being prepared for external circumstances and how you’ll reduce the severity of those risks, so you must budget for that.
Jensen recommends understanding assumptions in three stages: risk analysis + mitigation = assumptions. She gives the following example: If the risk is hurricanes, what can the project do to reduce the severity of this risk? One option is to ensure staff are trained in emergency procedures. So in the assumption cell you put: “staff training and disaster management to minimise the impact of hurricanes”.
But remember, a logframe doesn’t mean the plans are set in stone (or wood). See this tool as flexible to the project’s needs, and responsive to everyone involved. As Jensen says, it has to be adaptable to reflect any changes on the ground.
For further resources on project planning and the logical framework approach, see Greta Jensen’s blog who offers in-house training and mentoring, advice from DfID, Tools4dev, and the blog BetterEvaluation.
Join our community of development professionals and humanitarians. Follow @GuardianGDP on Twitter.


