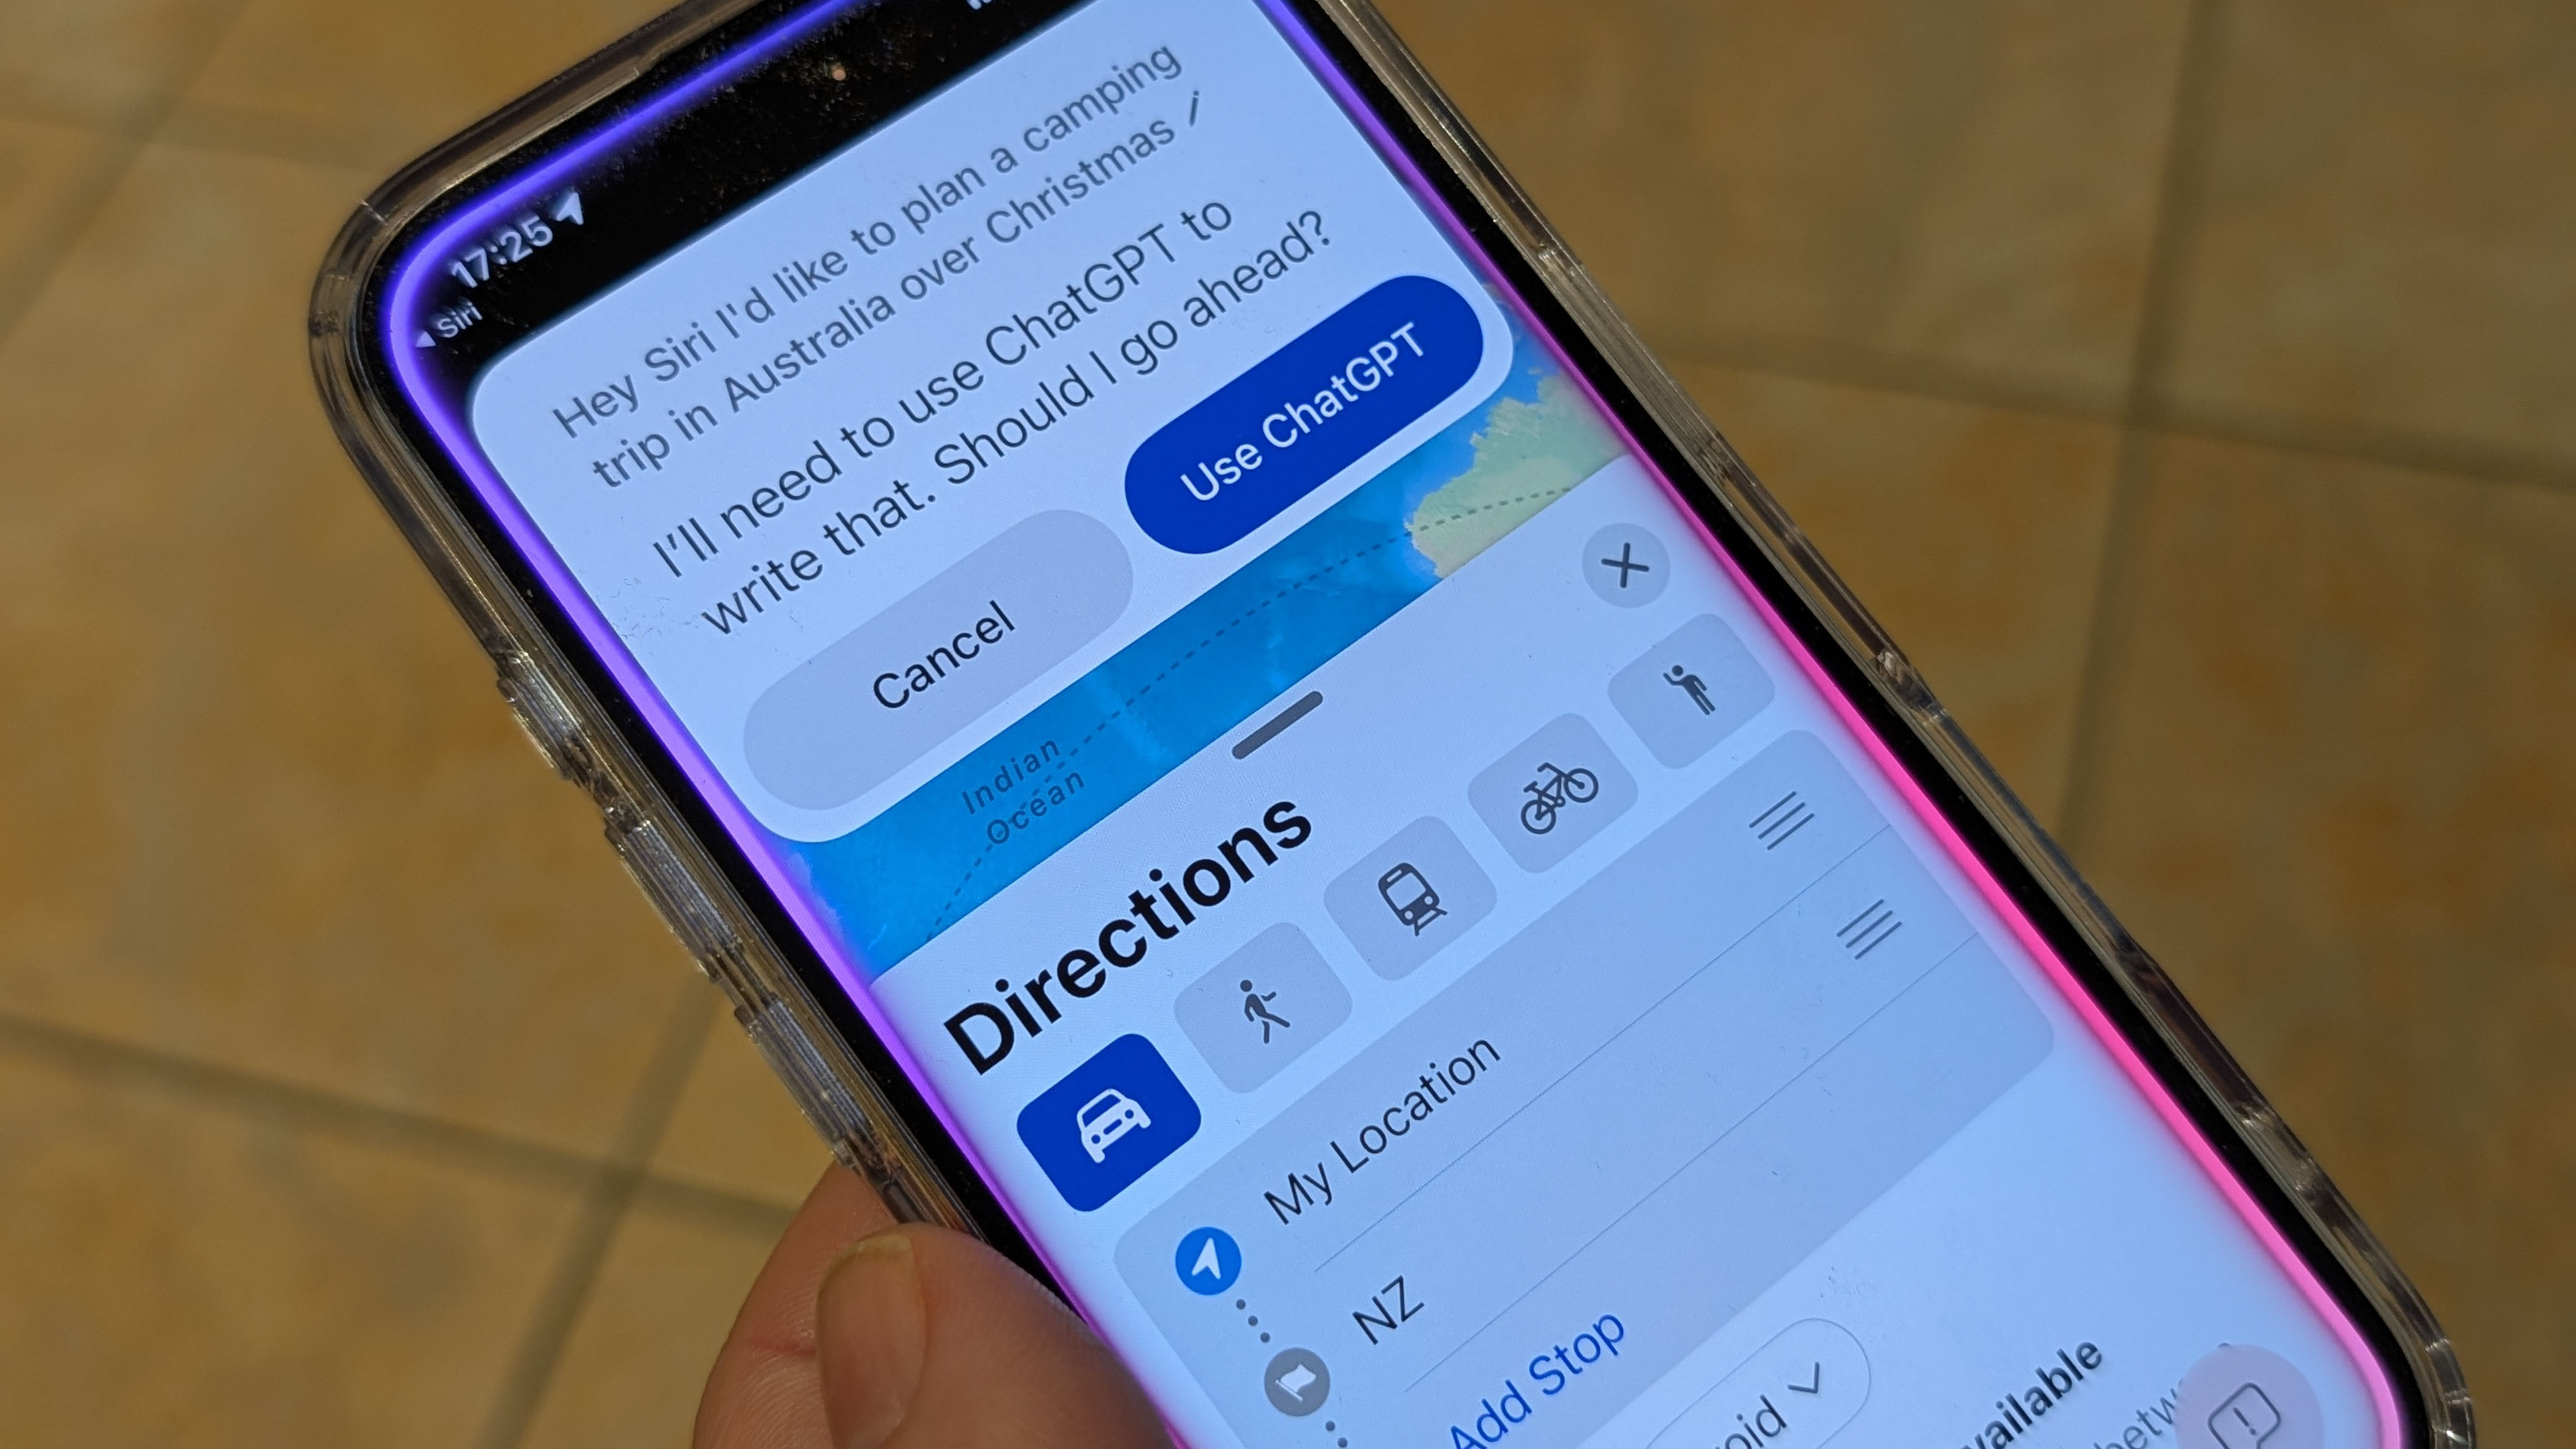
One of the most welcome additions to iOS 18.2, iPadOS 18.2, and macOS Sequoia 15.2, is the ability to connect Siri to ChatGPT, so that you can finally get proper answers to more complex questions without it just defaulting to performing a web search.
Thanks to Apple Intelligence, Siri has access to the full power of ChatGPT, so it can answer just about anything you throw at it. In this guide, we’ll show you how to connect Siri to ChatGPT on your iPhone and how to use it to its fullest potential in iOS 18.2.
The evolution of Siri
One of the first questions most people ask about Siri once they install iOS 18.2 is why does Siri not respond to complex answers now that it has Apple Intelligence?
The answer is that the Apple Intelligence launch is staggered, and we’re still waiting for the full all-singing, all-dancing Siri with all the bells and whistles that we were initially promised by Apple when it unveiled the AI tools in June 2024. That version of Siri will be something to behold, but what we’ve got now isn’t half bad either.
Siri got a completely new look in iOS 18.1, with glowing purple lights around the edge of the whole screen when it's summoned by a “Hey Siri” voice command. It also became more forgiving of your commands, allowing you to stumble when querying it, and became more of an expert on your iPhone problems. On an iPhone or iPad, you can also access Siri with typed commands for the first time, by double-tapping the bottom of your screen to open a keyboard using a feature called ‘Type-to-Siri’.
Now in iOS 18.2, Siri has finally got the ChatGPT integration we were promised. So, for answers to more complex questions, Siri will now default to OpenAI’s chatbot instead of searching the web. Here’s how it works:
Compatibility
Apple Intelligence is required for ChatGPT integration into Siri, and has quite specific hardware requirements. To run it you need to have one of the following devices:
- iPhone 15 Pro or 15 Pro Max
- Any iPhone 16
- Any M-series MacBook
- Any M-series iPad
- iPad mini 7 with A17 Pro
Quick Steps
- Get Apple Intelligence
- Upgrade to iOS 18.2/iPadOS 18.2/macOS Sequoia 15.2
- Change language (if outside the US)
- Enable ChatGPT in Settings
How to connect Siri to ChatGPT in iOS 18.2
Here we'll show you how to set up and use ChatGPT with Siri in iOS 18.2. The steps are exactly the same for iPadOS 18.2 and for macOS Sequoia 15.2, but we've added screenshots for macOS Sequoia 15.2 further down the page.
Step 1: Upgrade to iOS 18.2
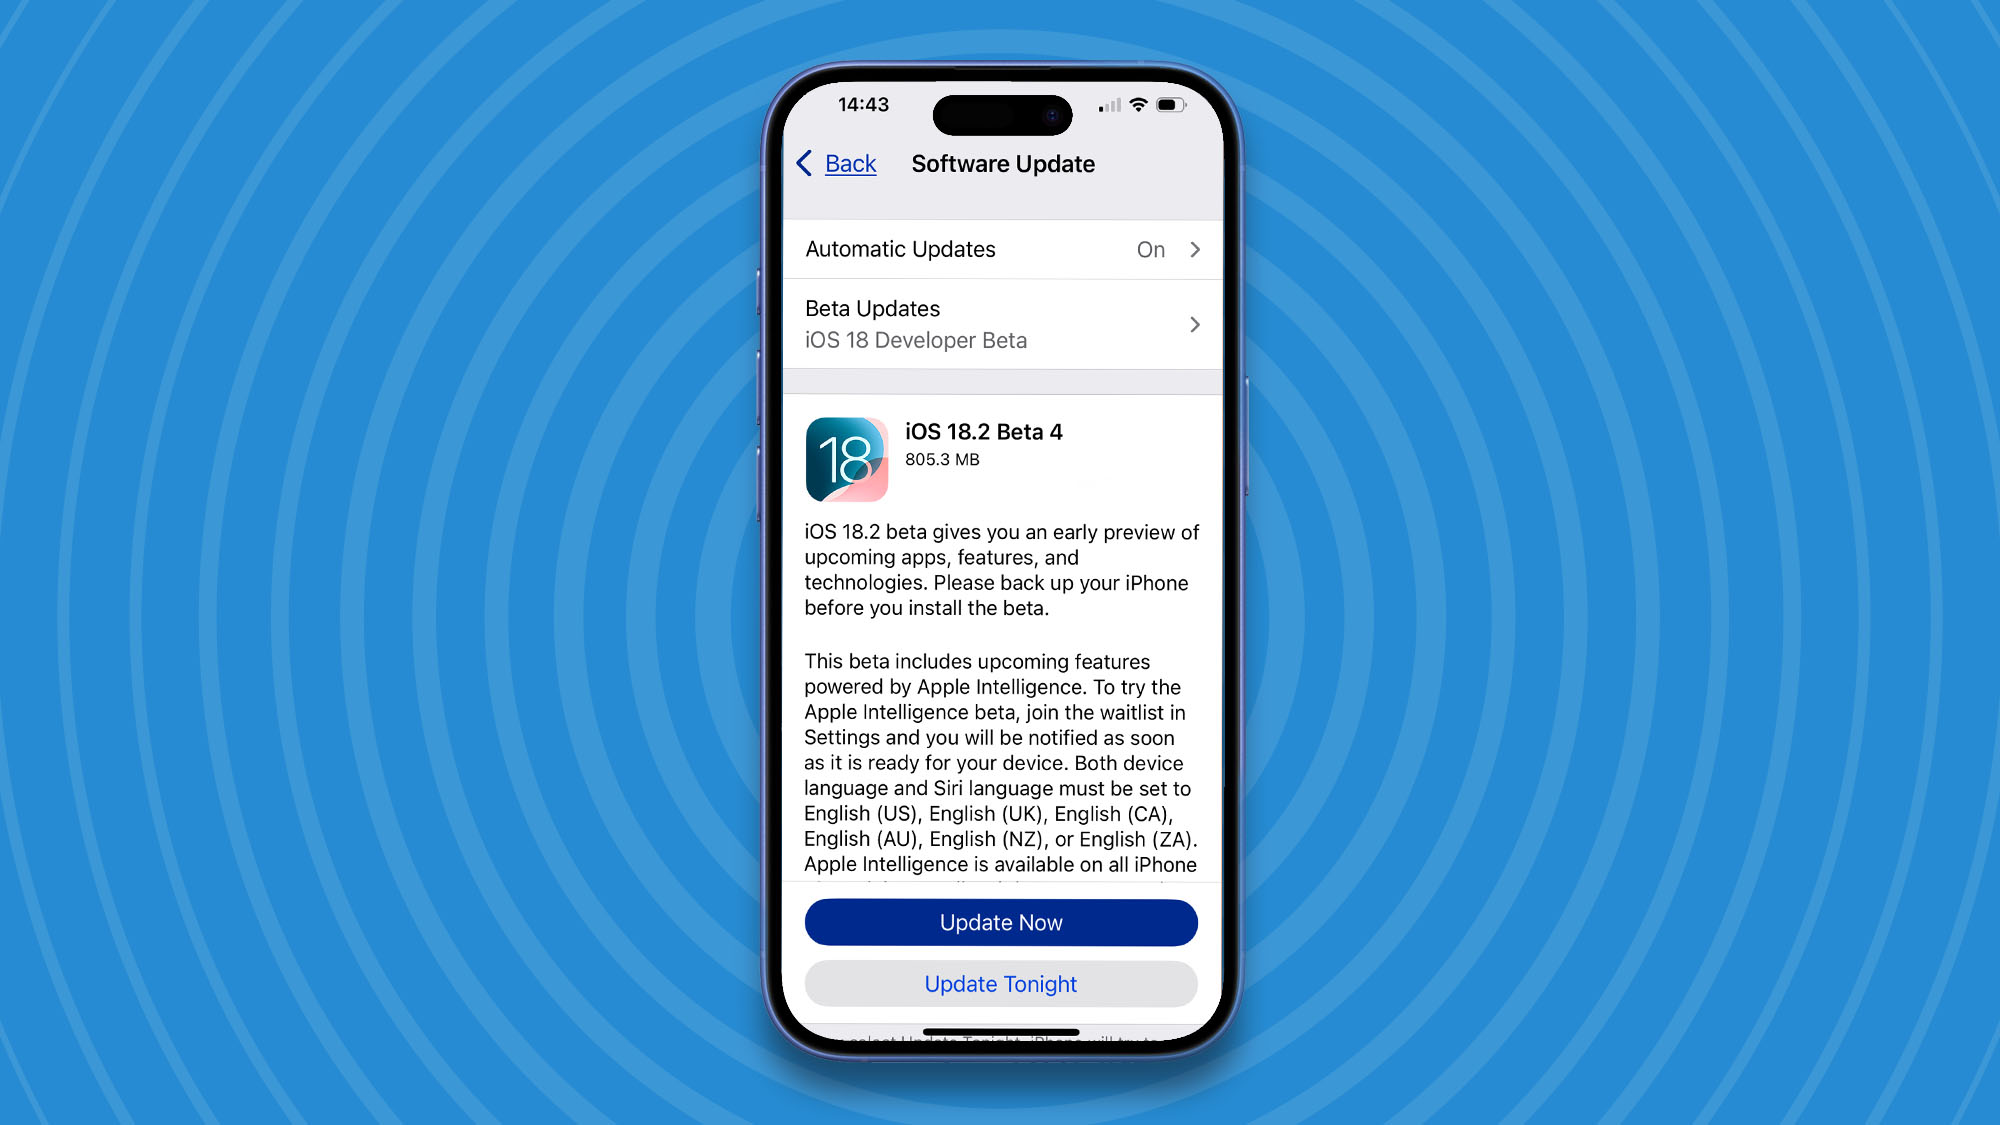
You need to be using iOS 18.2, or later to use ChatGPT with Siri. You’ll need to install the iOS 18.2 update on your iPhone first. Go to Settings>General>Software Update and select the iOS 18.2 (or later) update by clicking on the blue Update Now button. It’s good practice to have your iPhone connected to its power source while doing an update, but not necessary.
Step 2: Change language
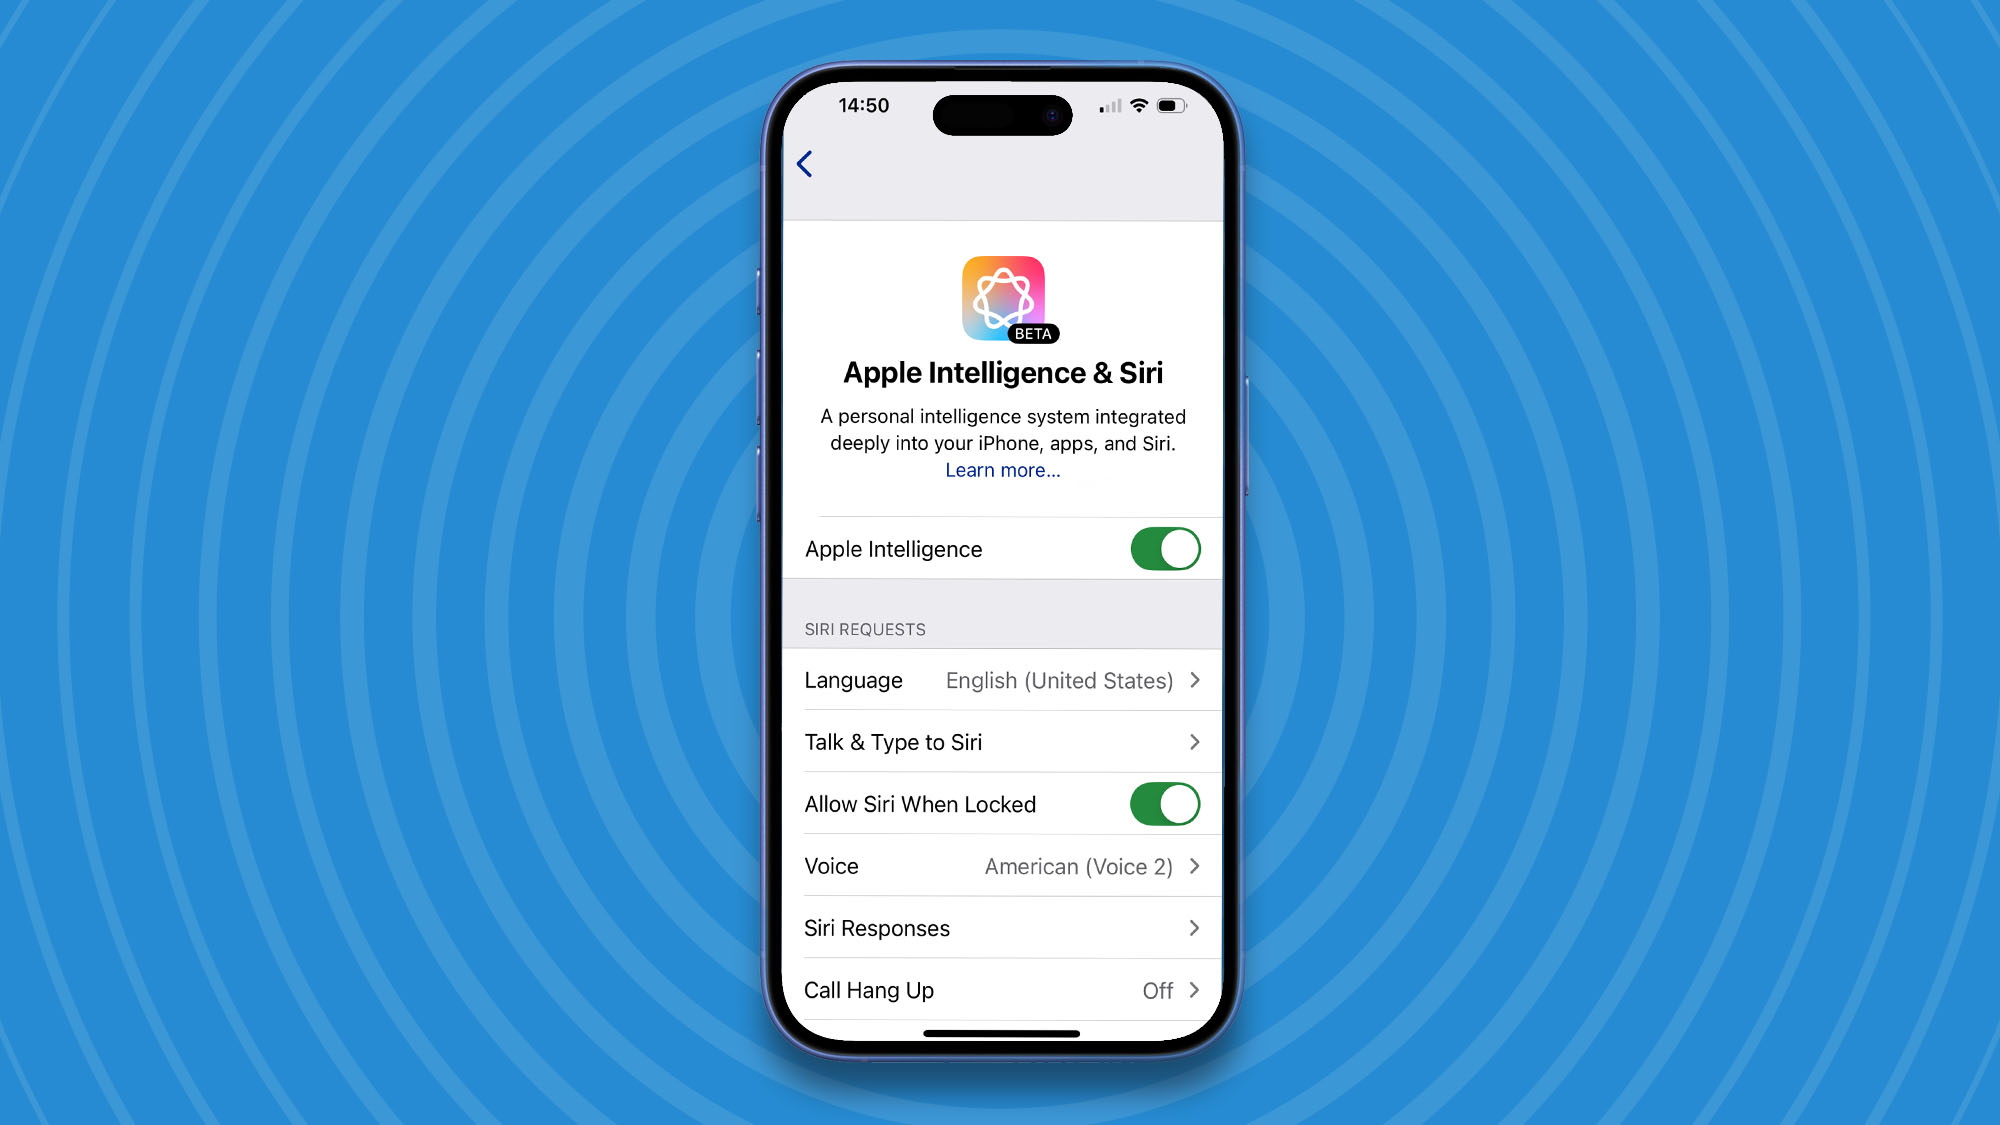
Before you start, a quick note for people outside the US. Siri and ChatGPT integration is still a US-only feature at this moment, however, you can easily circumvent this by changing the Siri language to English (United States). You’ll find this setting in Settings>Apple Intelligence & Siri.
Step 3: Set up ChatGPT
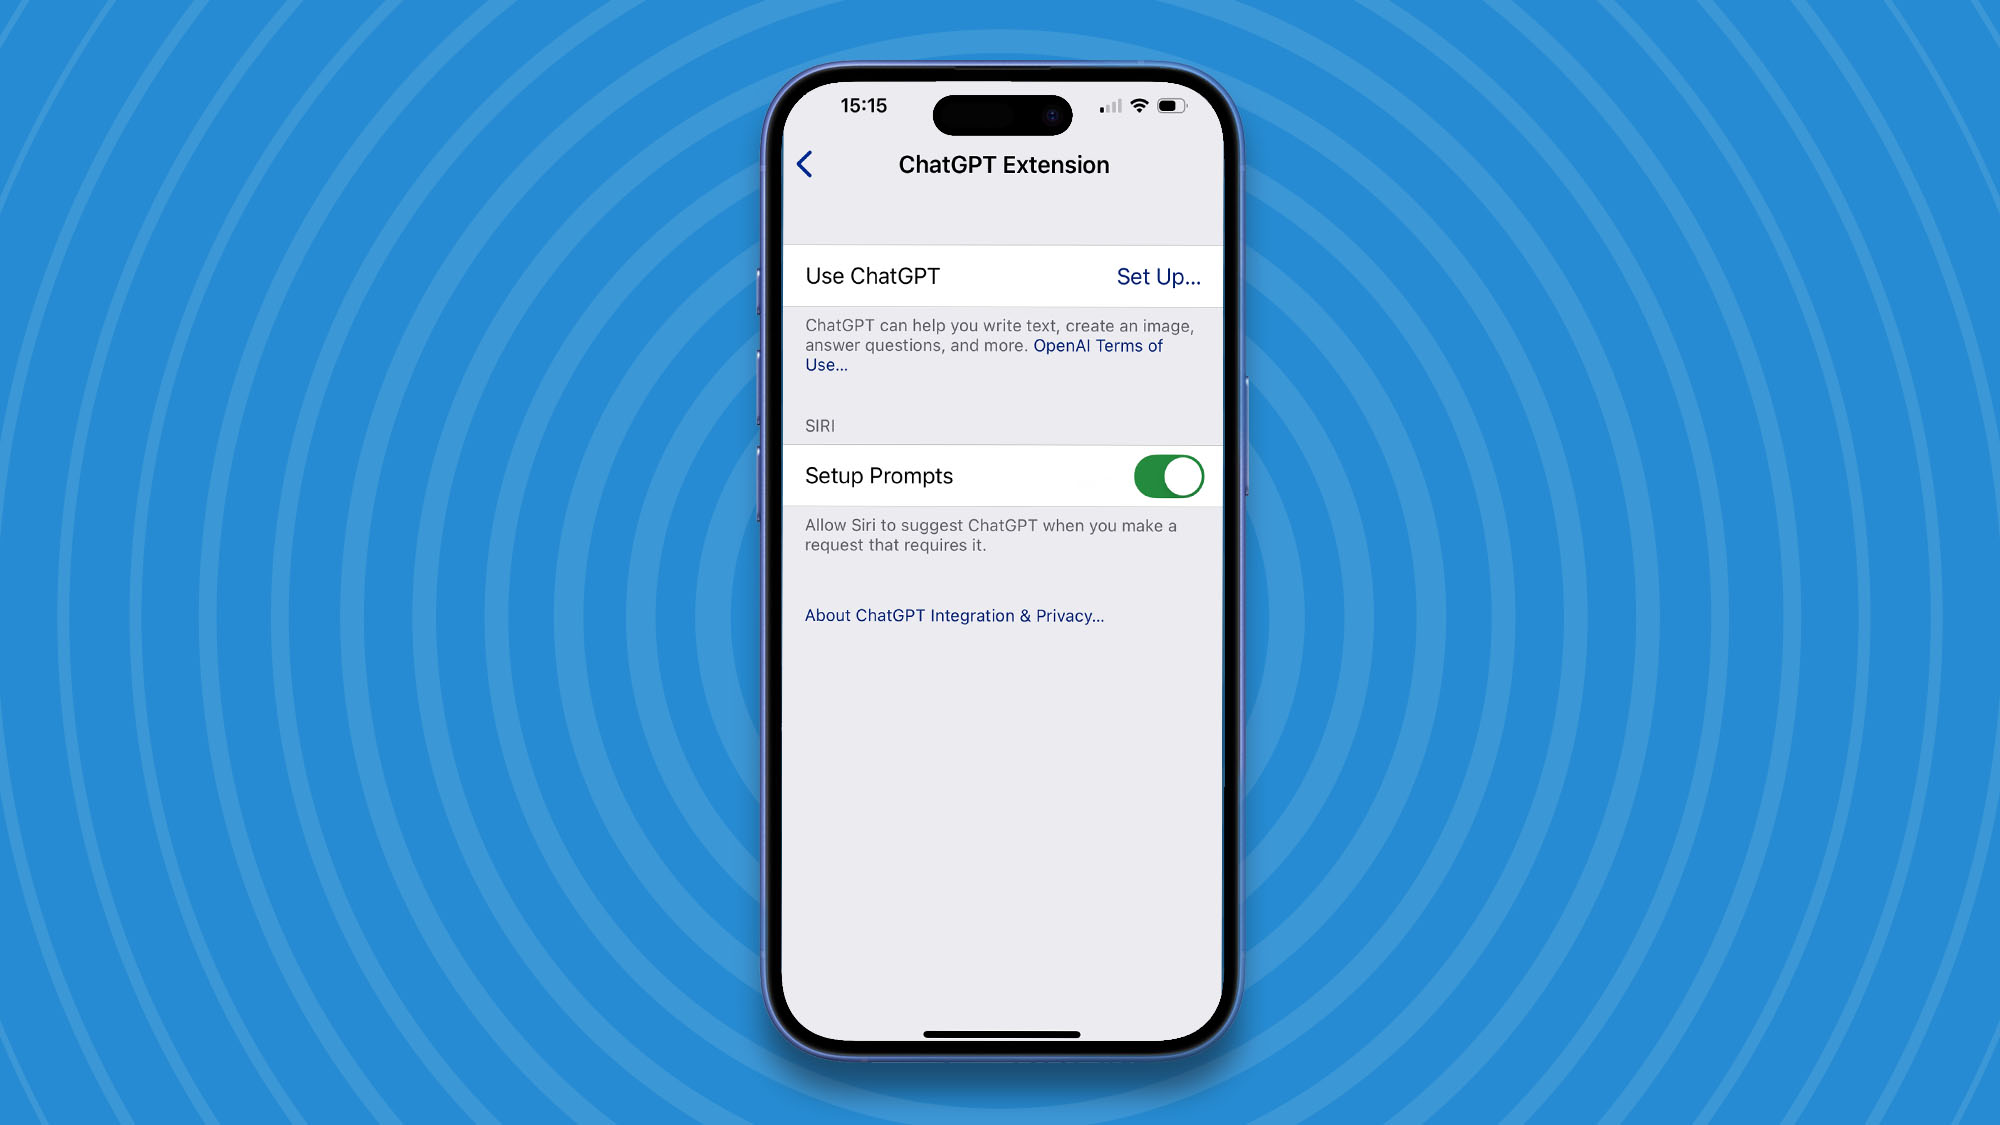
Open the Settings app and look for Apple Intelligence & Siri. Scroll down to the Extensions section and you’ll see an entry for ChatGPT, tap this and turn on ‘Set Up…’ next to ‘Use ChatGPT’. Tap this.
Step 4: Click Next
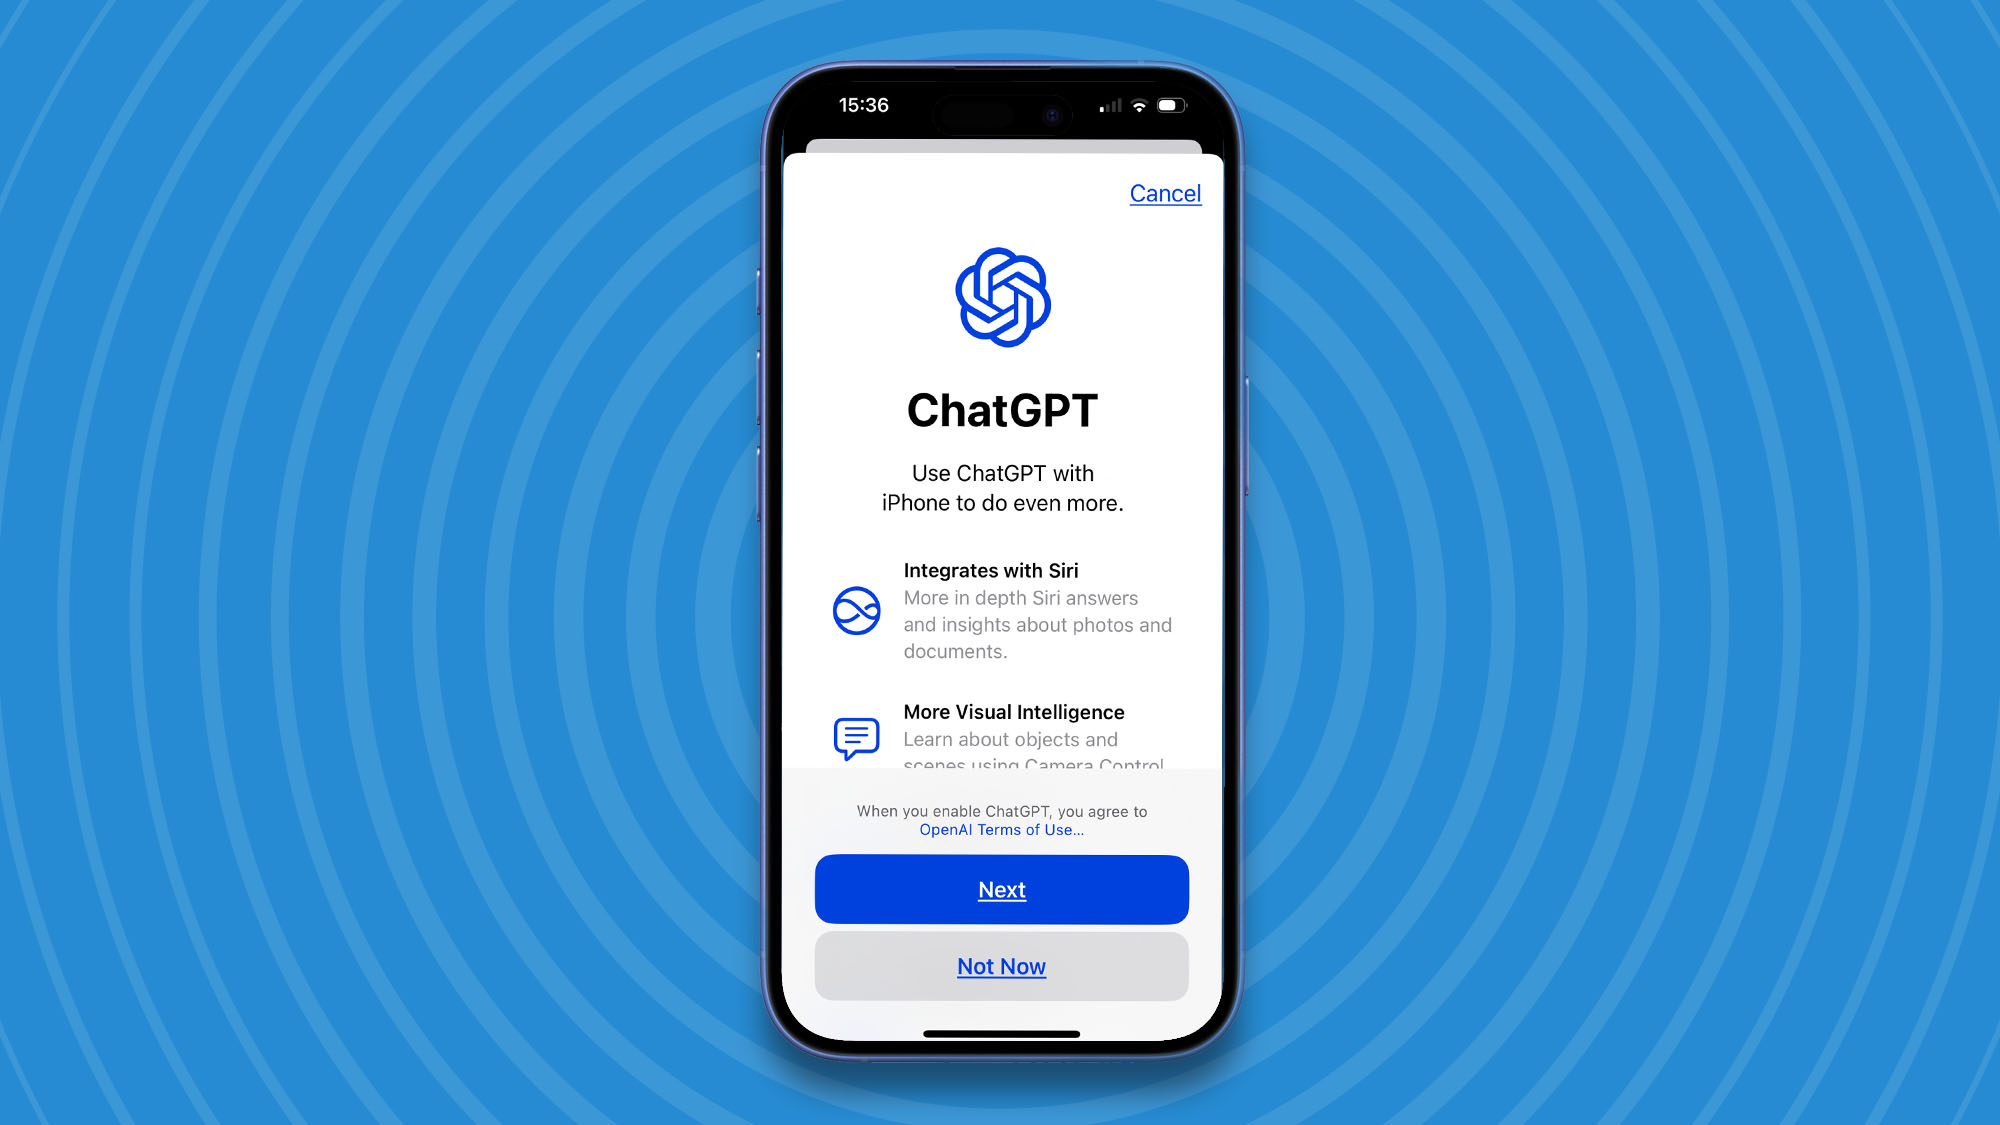
You’ll see a page of information about ChatGPT. Read the information then click Next.
Step 5: Click Enable ChatGPT
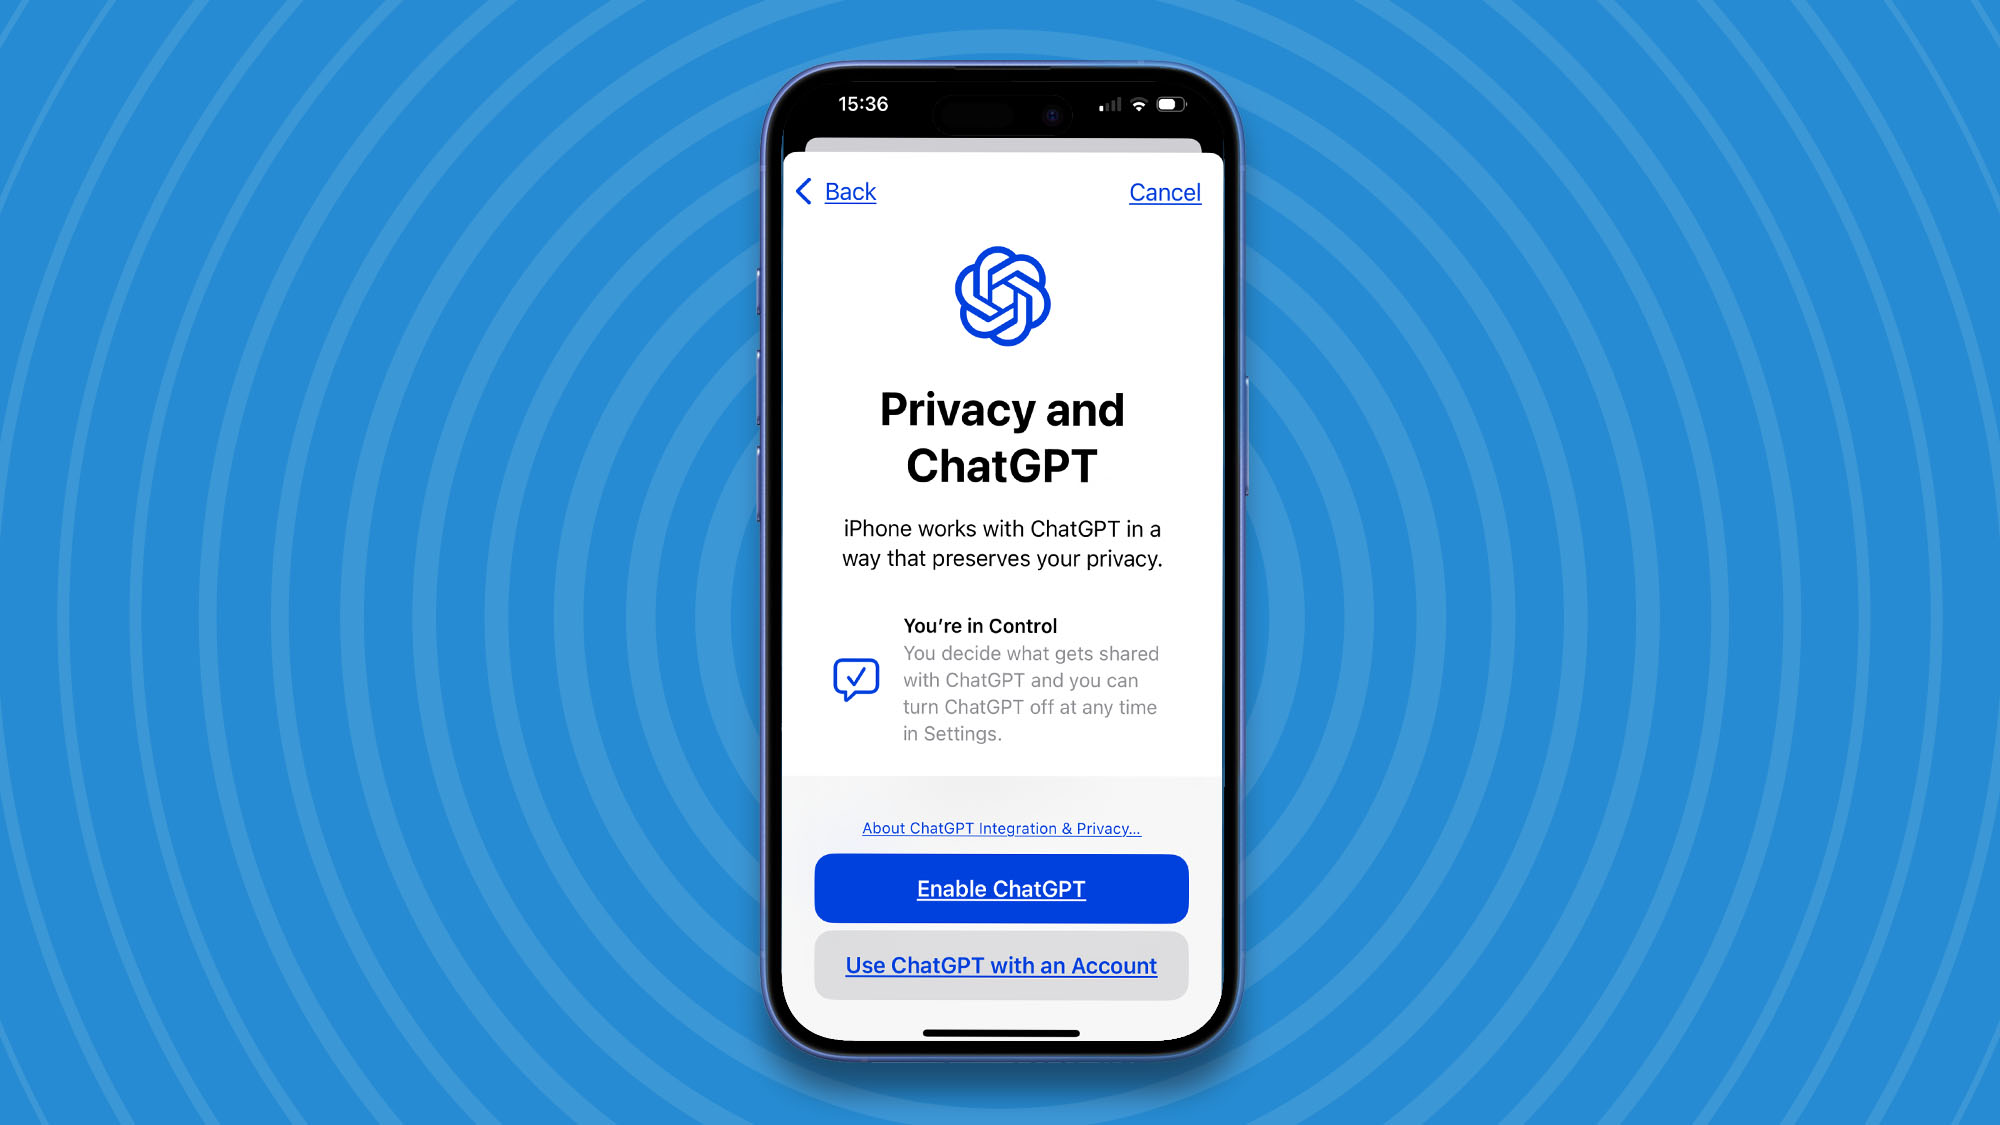
Now you’ll see a page about Privacy and ChatGPT. Read the information and if you are happy click on the ‘Enable ChatGPT’ button. Or, if you already have a ChatGPT account click on ‘Use ChatGPT with an Account’ and sign in.
Step 6: Sign in
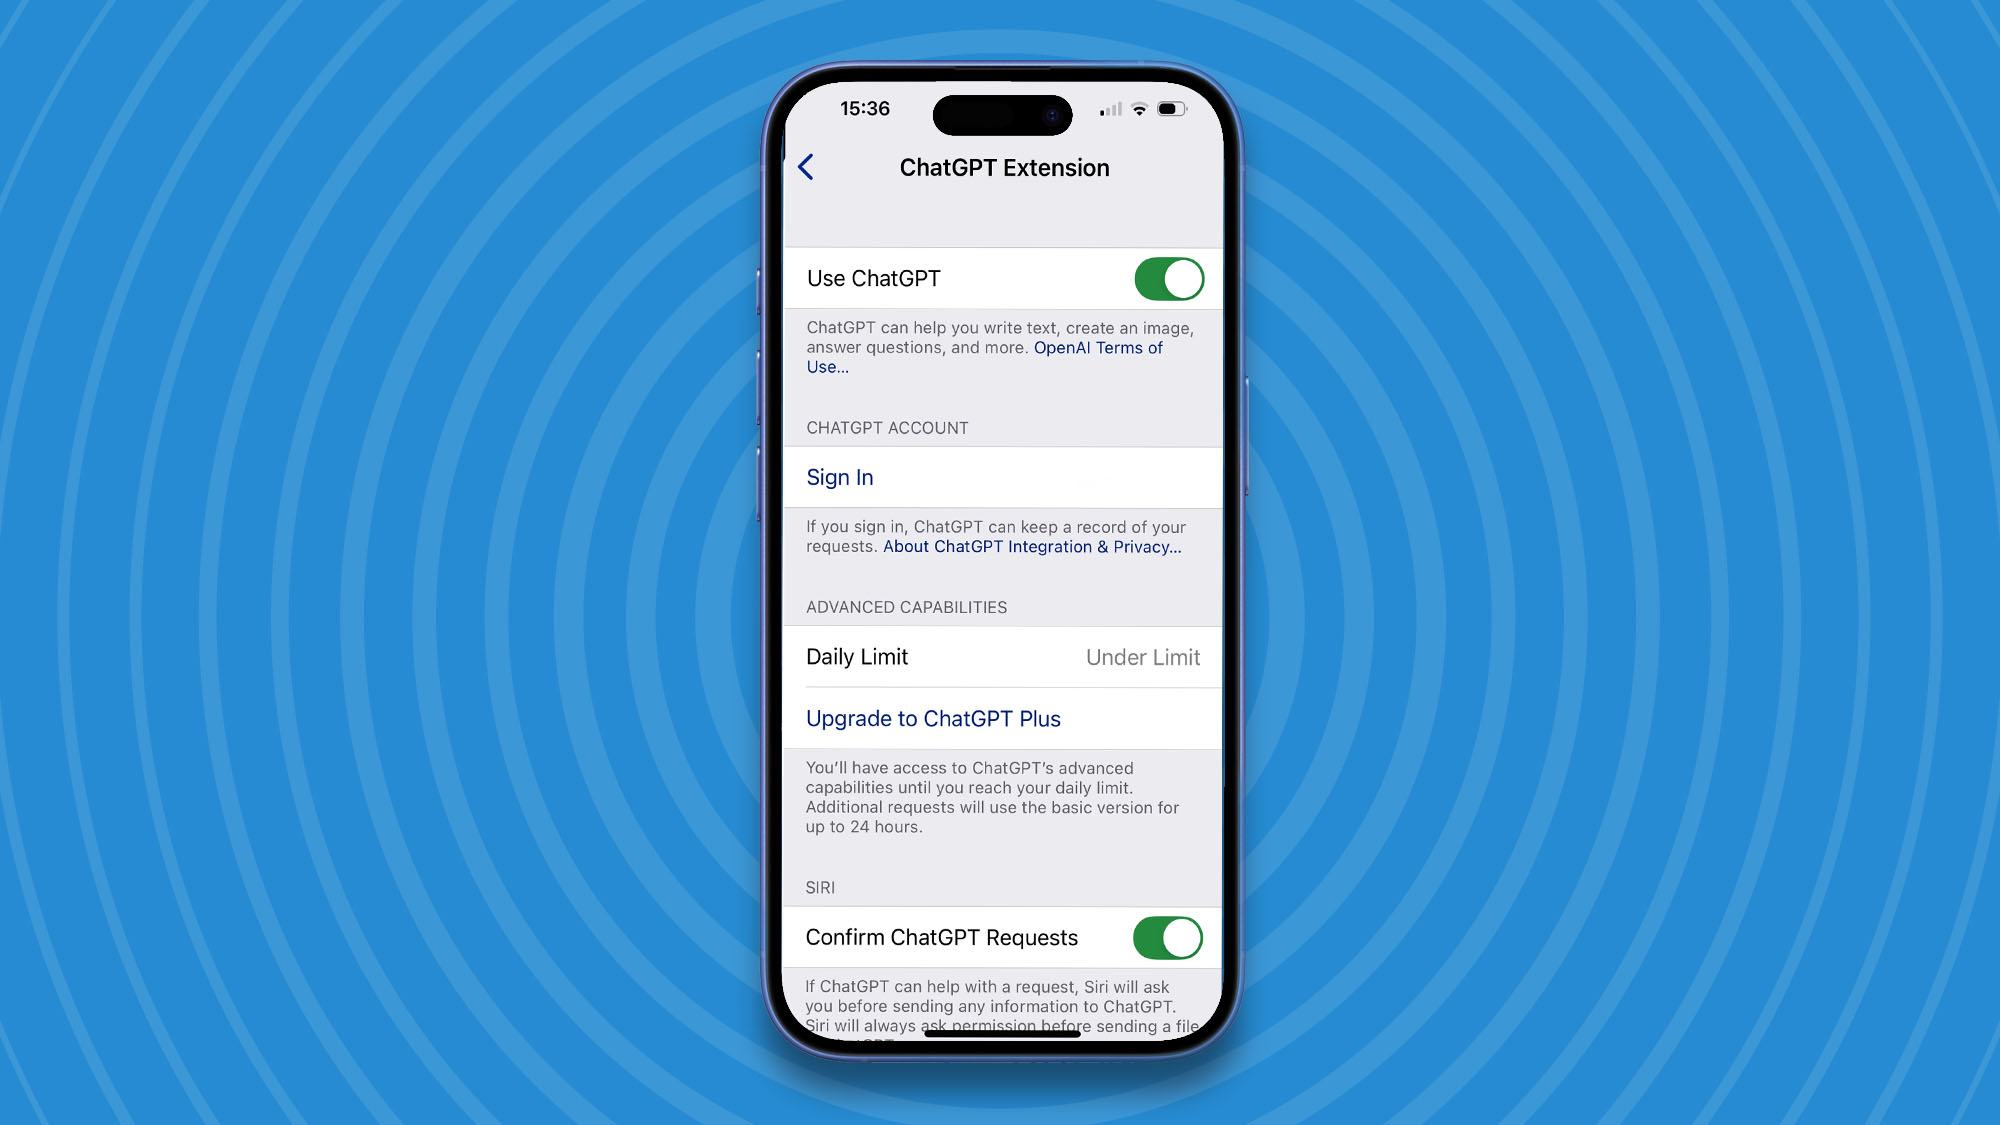
Once ChatGPT is enabled, at any time you have the option in the ChatGPT settings to sign in with your ChatGPT login details. If you sign in then ChatGPT can keep a record of what you’ve asked it.
Step 7: ChatGPT daily limit

In Settings>Apple Intelligence & Sir>ChatGPT you’ll notice that there’s a display of your daily limit. All is good if it says ‘Under limit’. You’ll have access to ChatGPT’s advanced capabilities until you hit your daily limit (which isn’t disclosed, since it presumably depends on how busy the servers are that day). After that you get bumped down to the basic ChatGPT for up to 24 hours.
Step 8: Upgrade to ChatGPT Plus
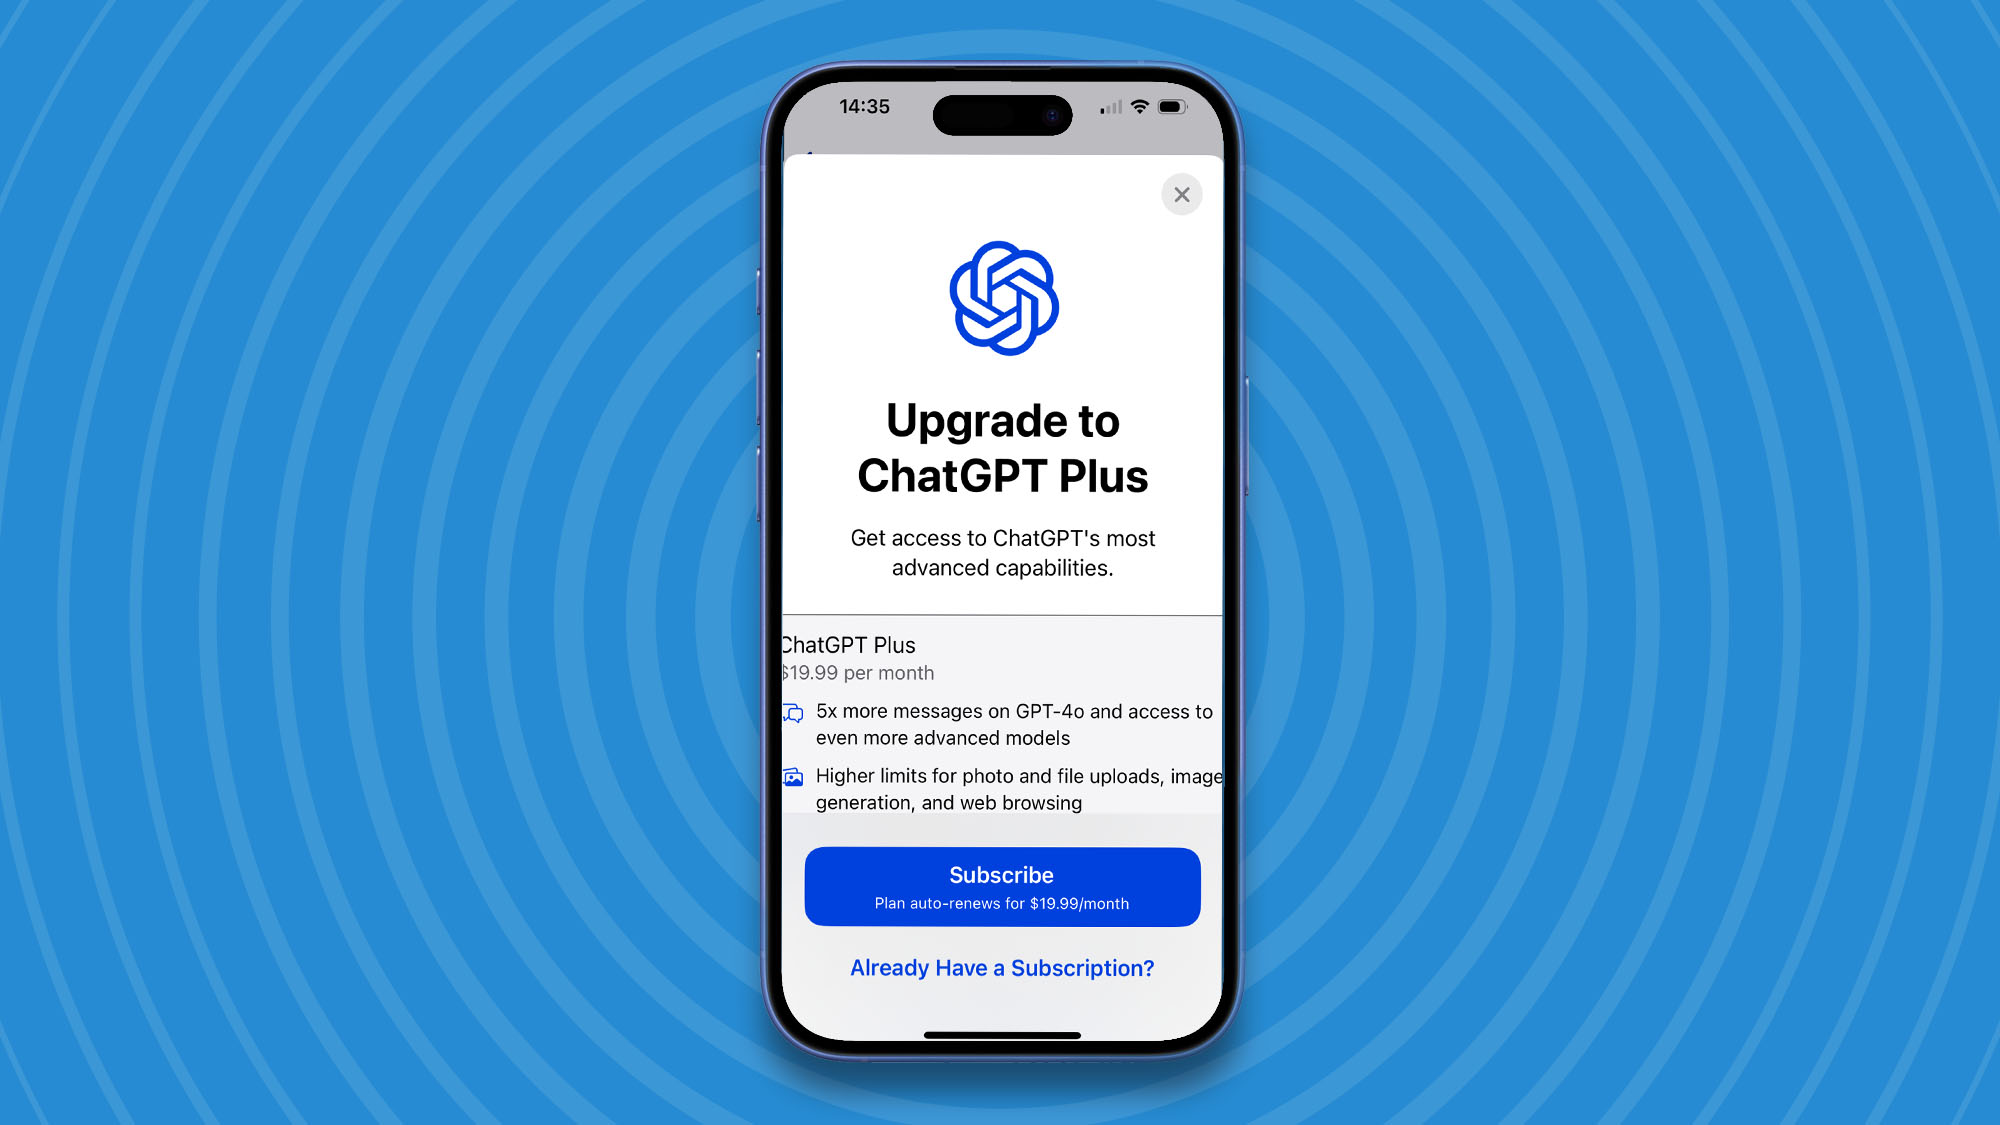
If you want to always have access to the best features of ChatGPT and never get bumped down to the basic version, then you can upgrade to ChatGPT Plus for $20 a month (£16/AU$30), and you can do that from the Settings here.
Step 9: Confirm requests?

The final option in the ChatGPT settings is ‘Confirm ChatGPT Requests’ - this is the setting that controls if you are asked by Siri before your requests get sent to OpenAI's ChatGPT servers. If you turn this off then Siri won’t ask you before sending data to ChatGPT and will just do it straight away, which saves time.
Using Siri with ChatGPT
When it comes to using Siri with ChatGPT, it’s simplicity itself. Fire up Siri with the “Hey Siri” voice command or by holding the sleep/wake button, then when Siri is ready ask it something complicated that would be beyond its normal repertoire, for example, “I’d like to plan a camping trip to Australia, please”.
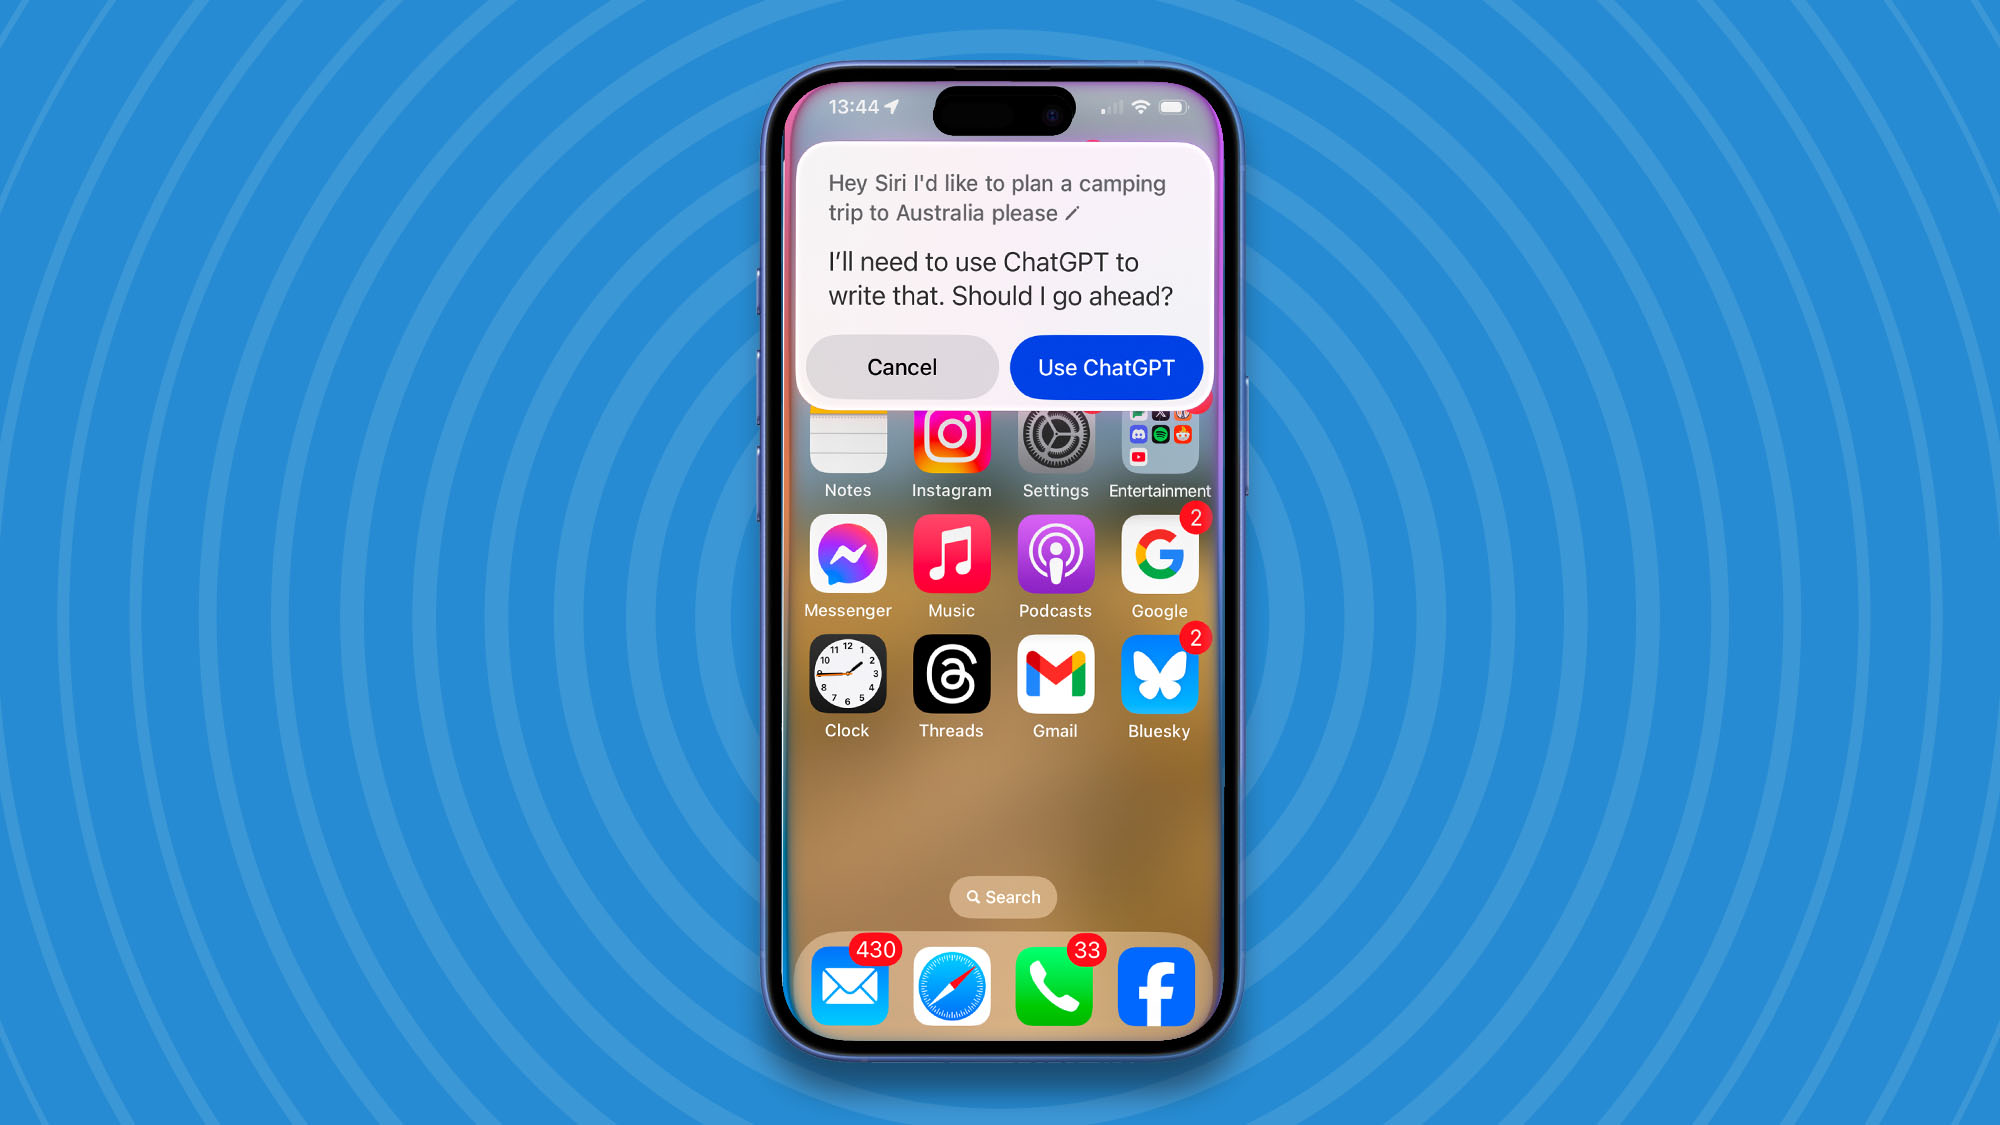
If you kept the ‘Confirm ChatGPT Requests’ option ticked in Step 9 above, then Siri will ask if it can launch ChatGPT. You can tap on the blue 'Use ChatGPT' button here.
Next, you’ll hear “Here’s an answer from ChatGPT” with the text of the reply from ChatGPT visible. You can tap the copy icon to make a copy of the text, which can be useful if you want to keep a record of it. ChatGPT doesn’t currently speak its answers, but we’d like to hope this feature will be available in a future version of iOS.
How to connect Siri to ChatGPT in macOS Sequoia 15.2
You can also connect Siri to ChatGPT in macOS Sequoia 15.2. The steps are very much the same as the ones outlined above for iOS 18.2. If you're outside the US then you'll need to change your language setting in Apple Intelligence & Siri to English (United States) to use Siri right now.
1. Set up ChatGPT
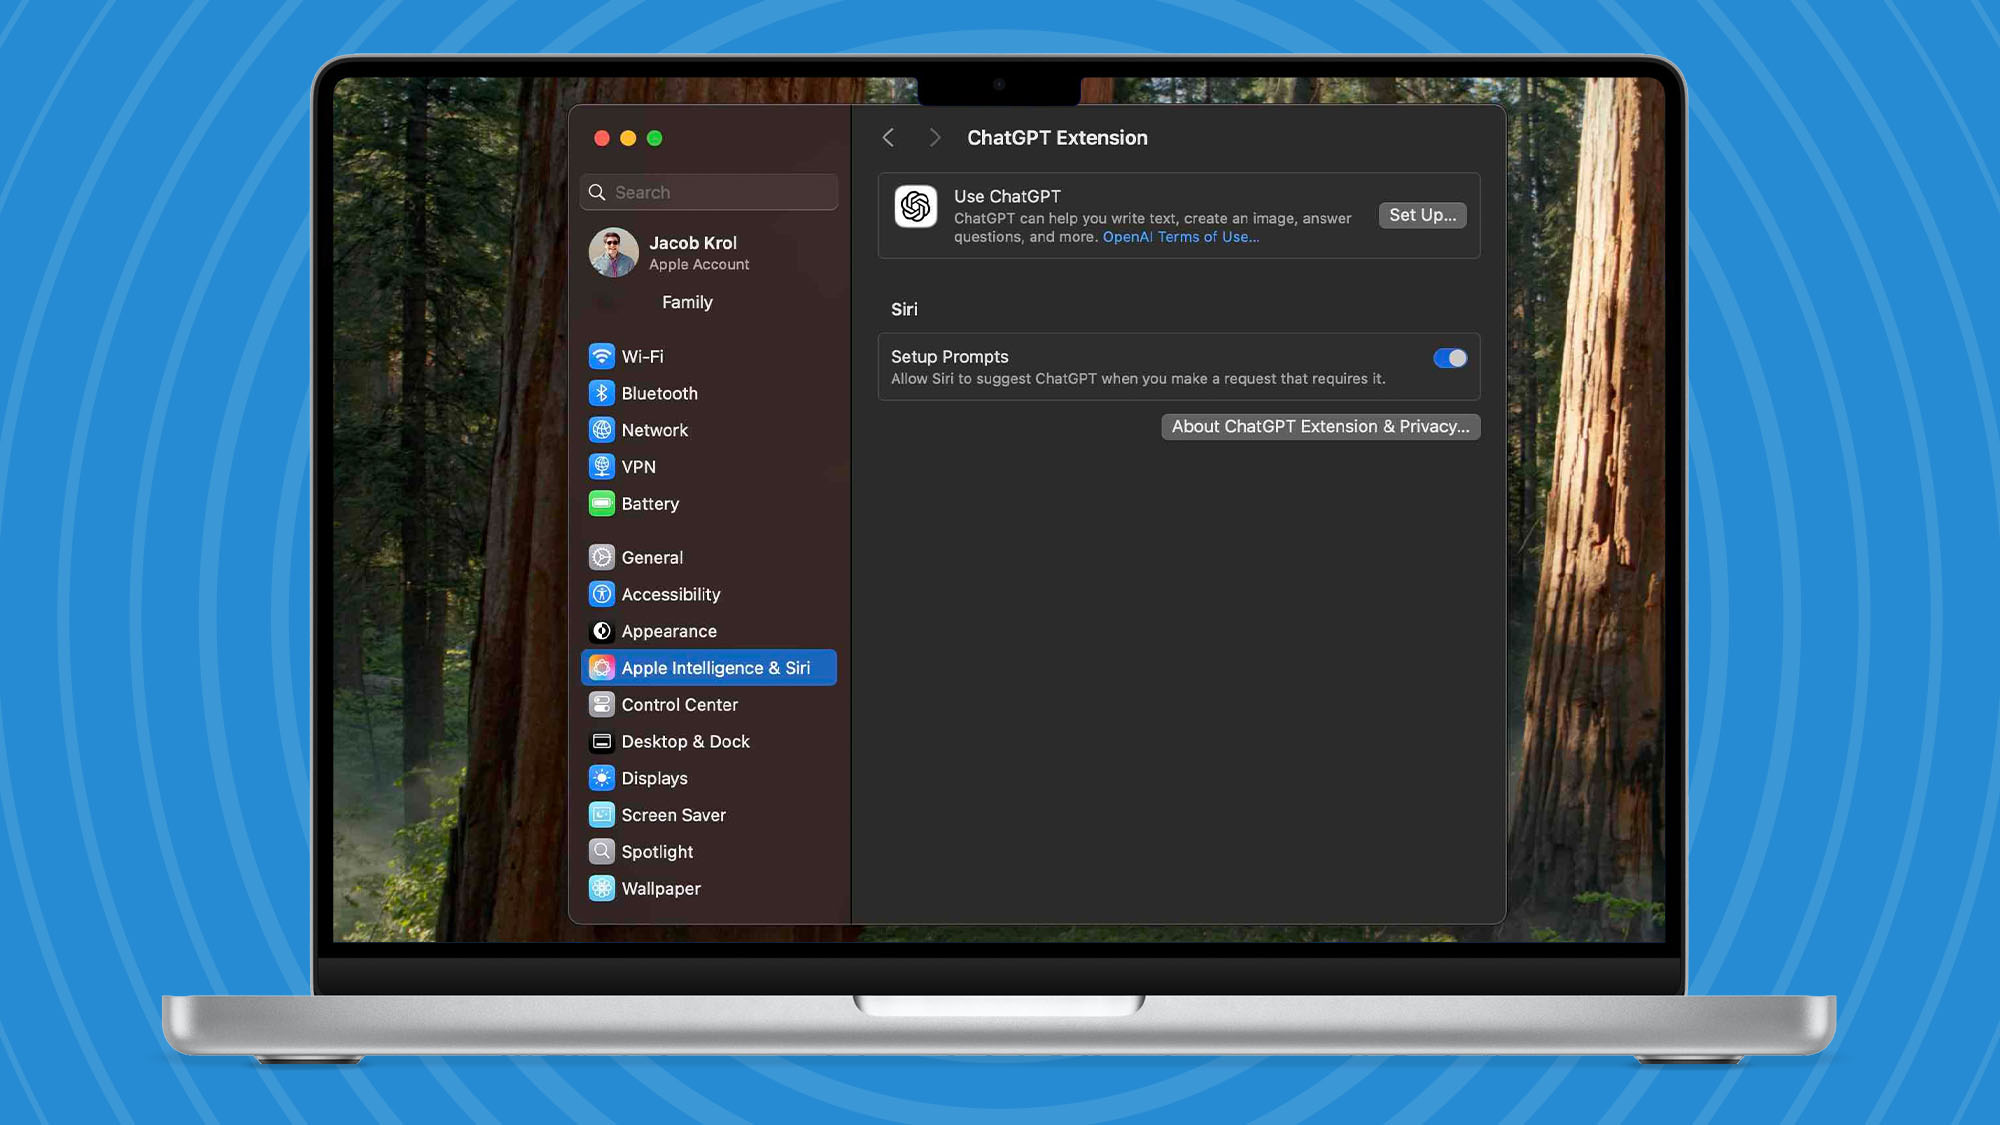
Open the Settings app in macOS Sequoia and look for the Apple Intelligence & Siri option. In here click on ChatGPT and then click on the 'Set up...' button to activate ChatGPT.
2. ChatGPT options
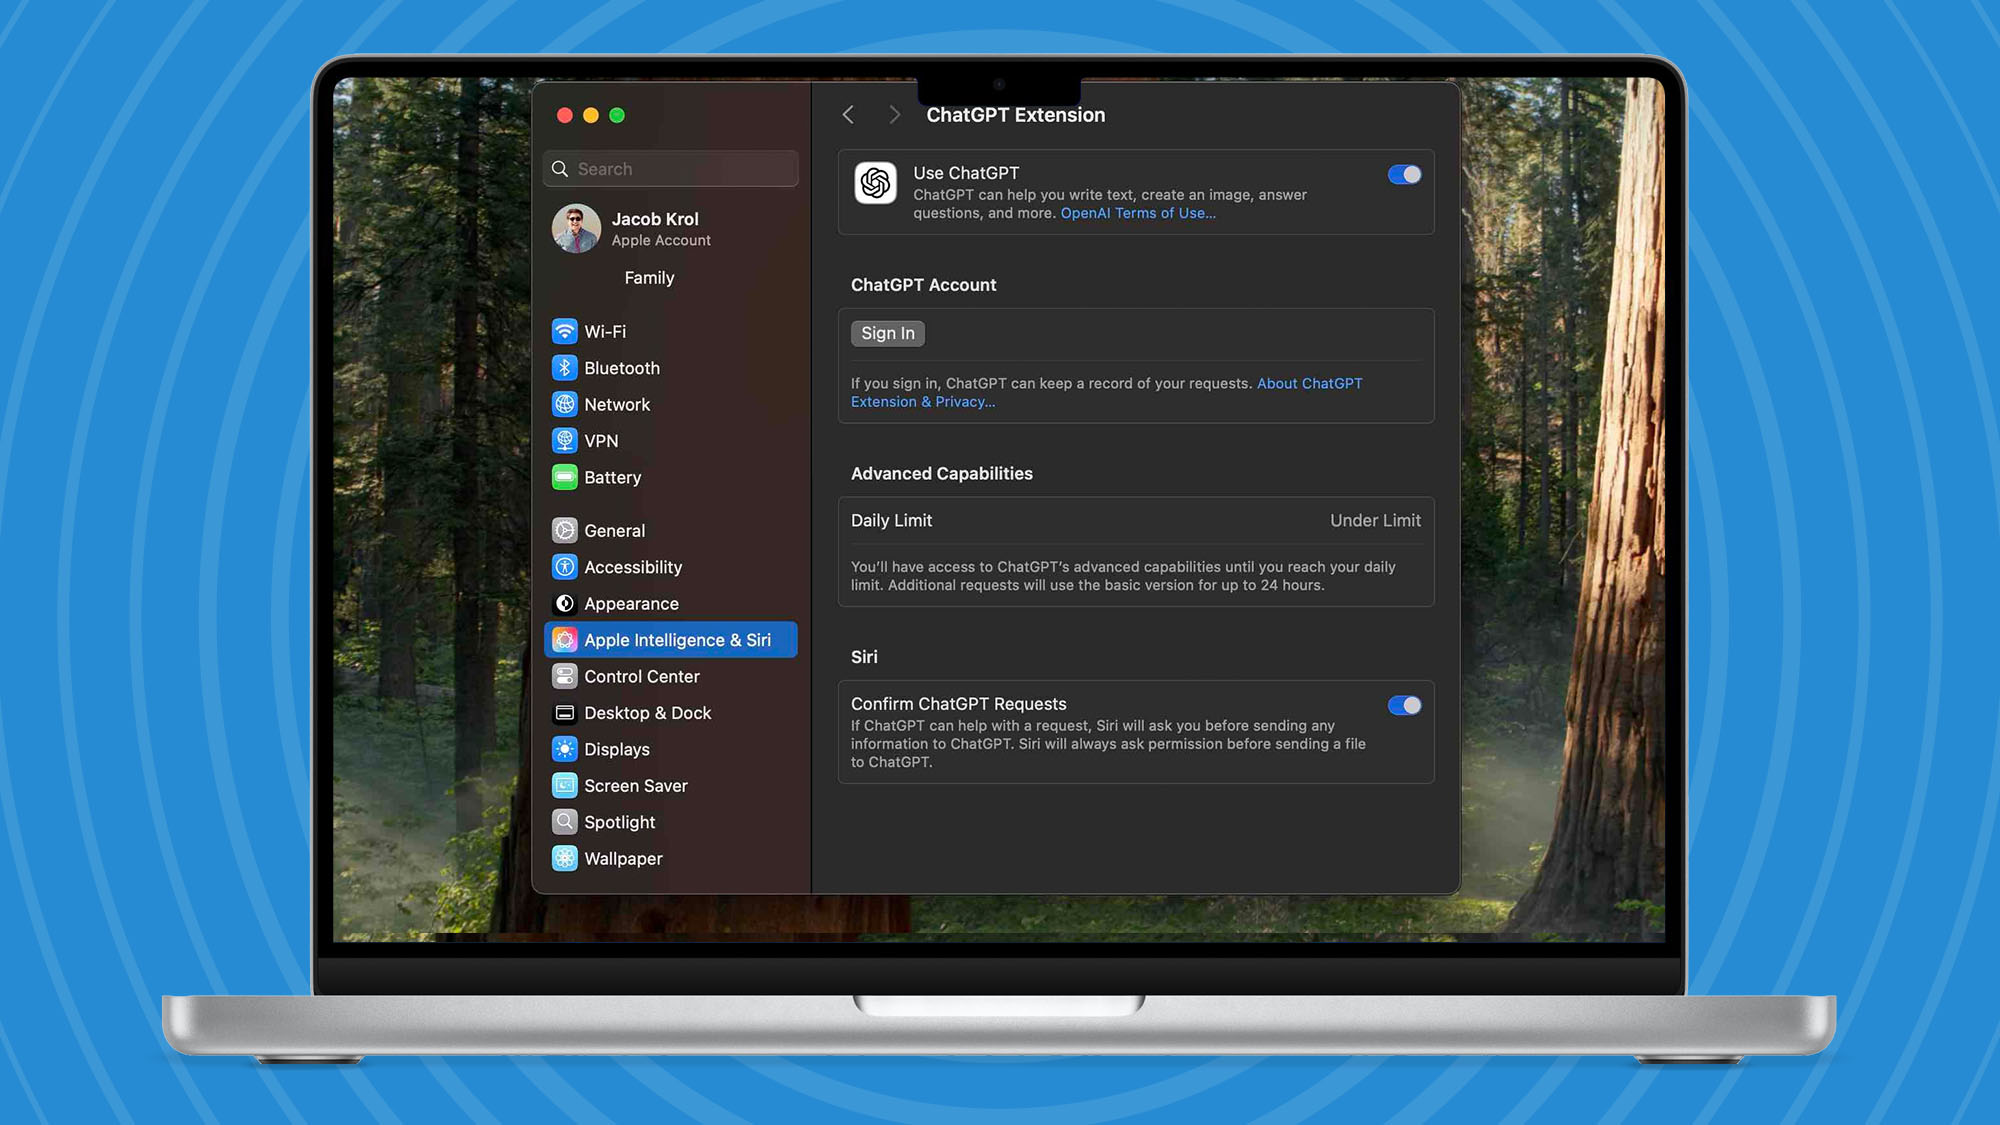
Once ChatGPT is set up in macOS Sequoia 15.2 you have exactly the same options that you have on iOS 18.2. You can check your daily limit and upgrade to ChatGPT Plus here.


