Take better photos with the camera in your pocket. iMore's iPhone Photography Basics is filled with great content that will take your iPhone camera-snapping ability to the next level.
When the majority of iPhone users say filter, they’re probably referring to the digital effects baked into social media apps like Instagram and TikTok, which instantly alter the appearance of an image or video. But filters have been used in photography for decades. Physical filters – typically made from glass or resin – are placed over the camera’s lens to alter images.
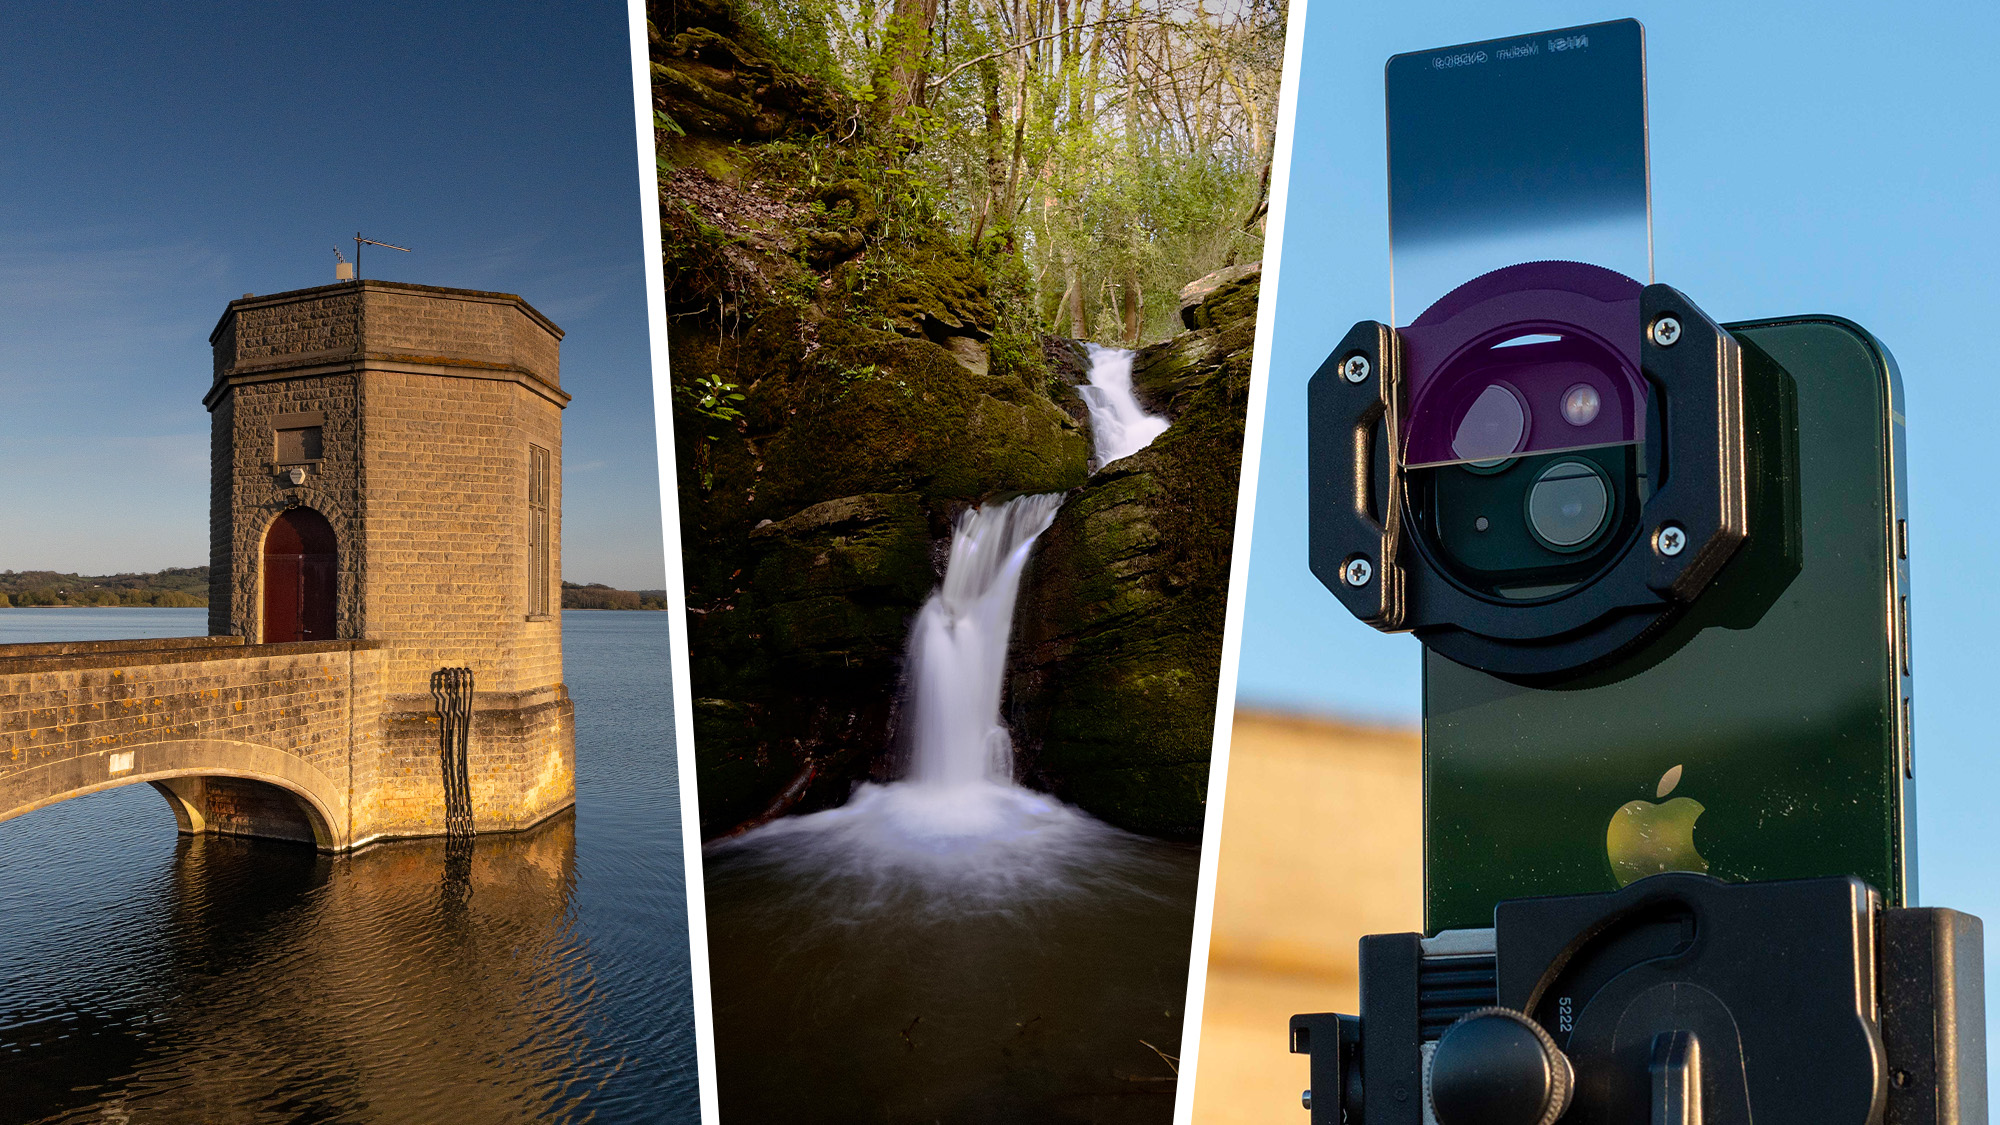
While physical filters are admittedly unable to turn your face into a dog or cat, a huge variety of physical filters exist, from IR filters that block infrared light to mist filters, which create soft, dreamy photos. But by far the most popular, and indeed useful, filters are polarizing, ND and ND grad filters, which is what I’ll be using alongside my iPhone 13 in this article.
The best iPhones are full of computational tech, which can mitigate physical filter uses, but fortunately, there are plenty of workarounds. You’ll find various iPhone-compatible filters out there, but I was sent the NiSi IP-A Landscape Kit for iPhone for use in this article. NiSi is a dedicated filter manufacturer and I’ve used their larger filters on my professional camera setup for several years. They certainly know how to make a quality filter. However, no matter what iPhone-compatible filter system you invest in, be aware that iPhones aren't designed with filters in mind. Don’t expect a totally seamless pairing.
The biggest benefit of using physical filters is that they allow you to work ‘in-camera’. Watching the image you’ve been dreaming of capturing coming together in front of your very eyes is hugely gratifying. Here’s how to use physical ND filters and polarizing filters on your iPhone camera.
Set up on a tripod
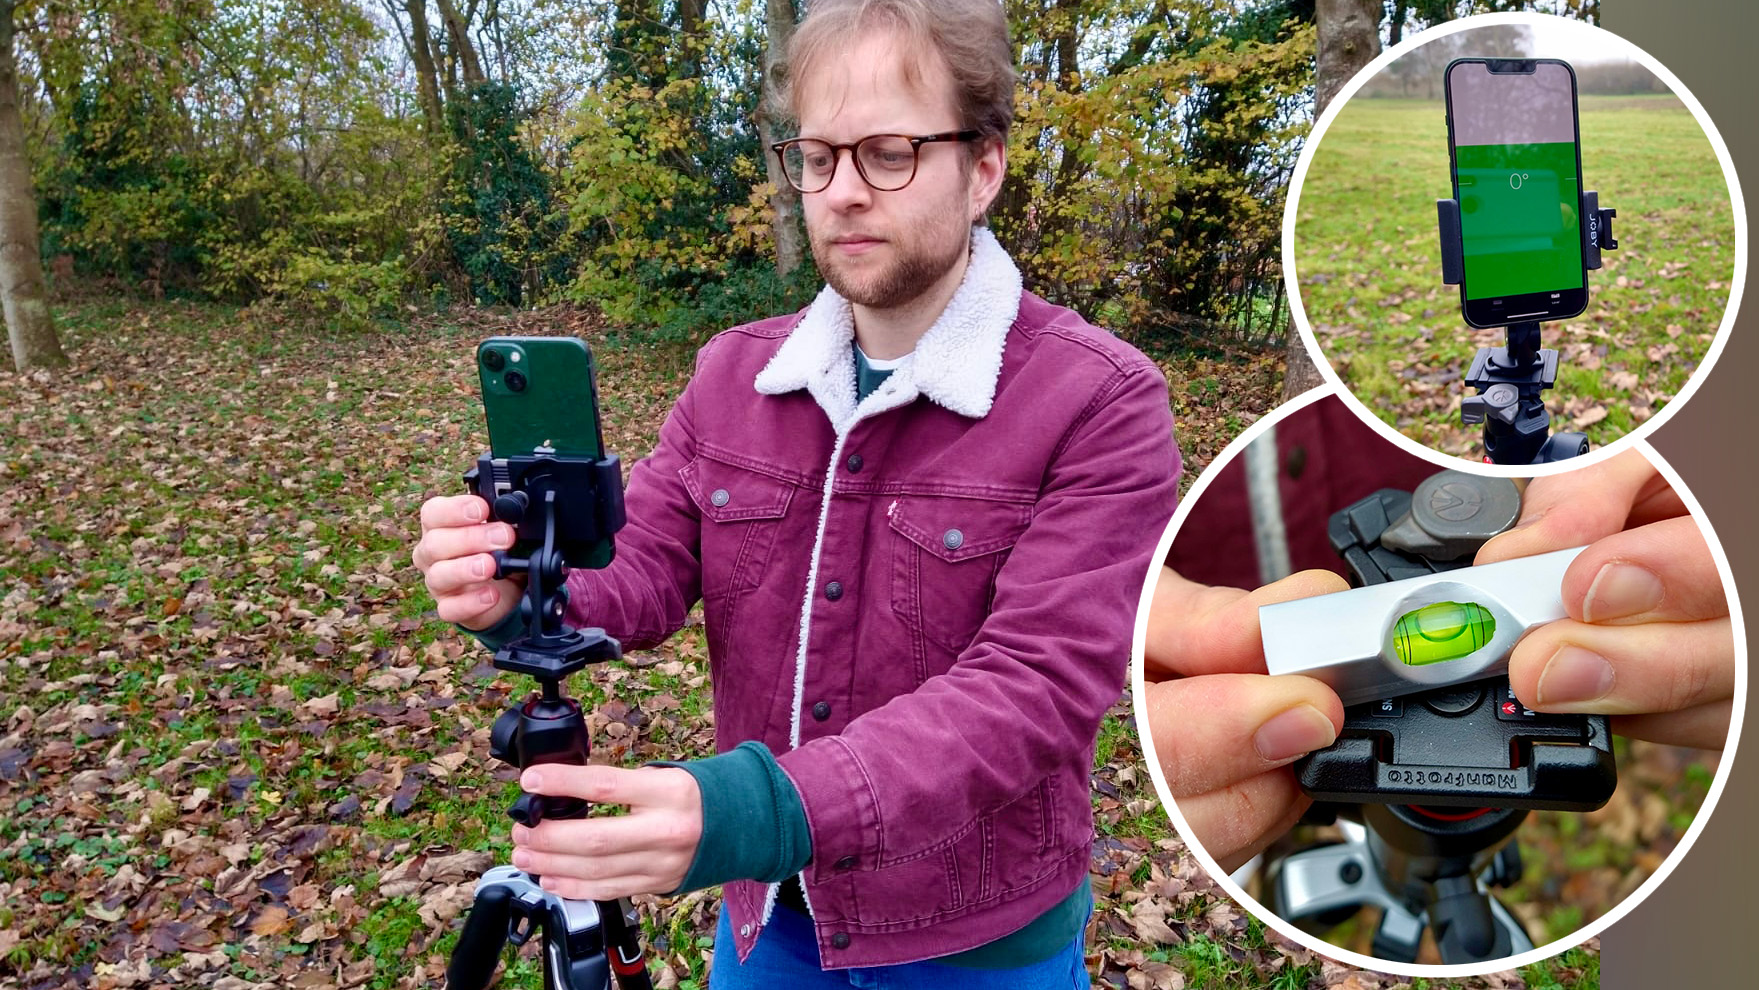
A tripod is an essential accessory when using filters. For starters, filter systems can be a little fiddly. The last thing you want to do is risk scratching the surface of a filter by dropping it. With your iPhone locked onto a tripod, your hands are free to attach the filter holder and filters, making the whole process much easier. A tripod also allows you to precisely refine and then maintain your composition while you add your filters.
Finally, some filters reduce the amount of light that enters the camera. In order to gather enough light to properly expose the image, the length of time in which the sensor is exposed is increased and in some cases, multiple images are captured to form a low-light HDR image. A byproduct of these ‘long exposures’ is motion blur, where moving elements – like a waterfall – are blurred. Handhold your iPhone during a long exposure and you’ll likely move it enough to blur the entire image, a phenomenon known as camera shake. The way around this is to lock your iPhone onto a tripod, so it stays perfectly still.
You can find a wide variety of iPhone-compatible tripods and heads – like my Joby GripTight PRO 2 Mount – which is a tripod head that can simply be screwed onto most tripods, even those intended for DSLR and mirrorless cameras. You can even pick up MagSafe tripods such as the Joby GripTight Mount for MagSafe, too.
Attach the filter holder
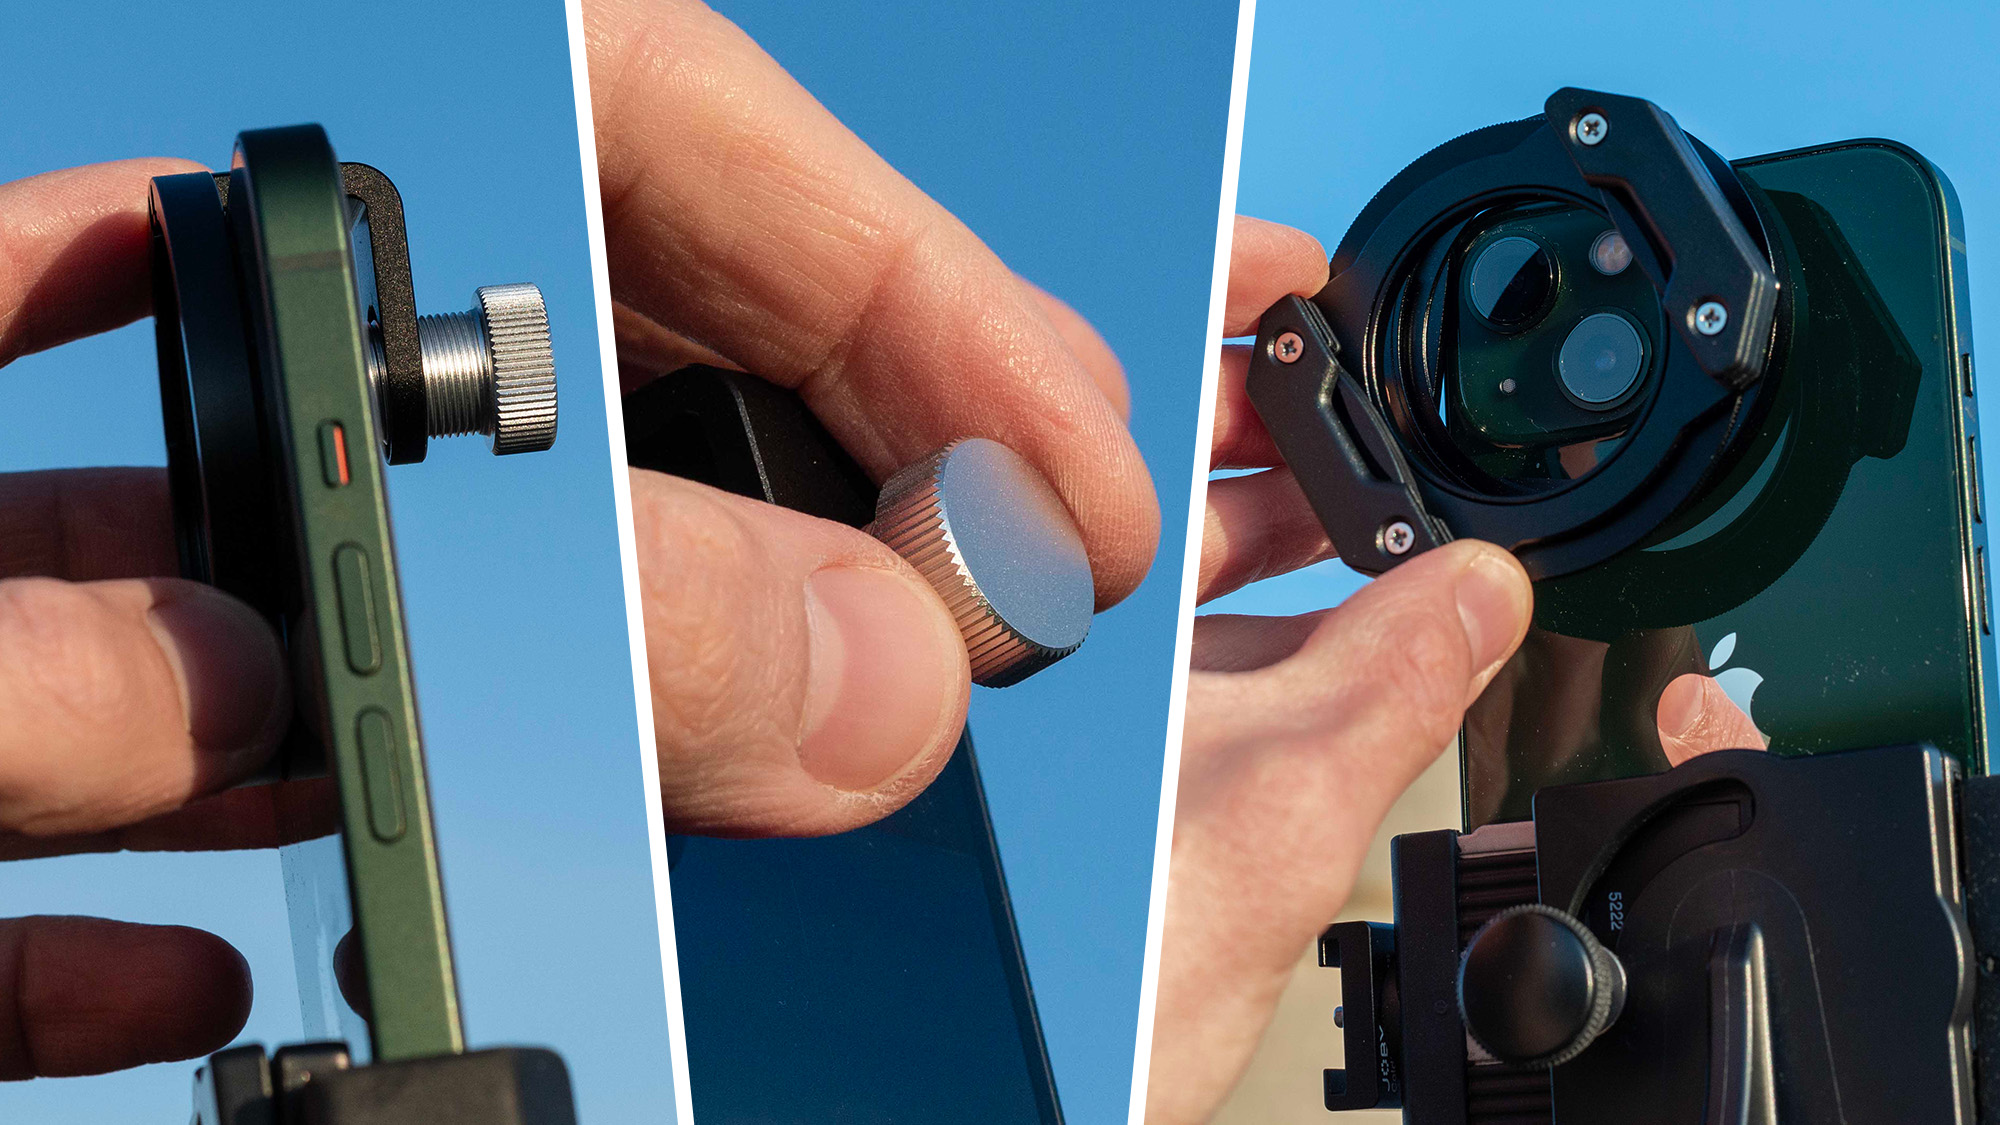
Now you’ve set your iPhone up on a tripod you can attach the filter holder. It’s best practice to attach the holder first, then set your exposure settings before attaching the filter. However, some iPhone filters are fixed to the holder. If this is the case, skip to the next step and attach your filter afterward. The NiSi IP-A Filter Holder I used comes in two sections.
The first section clamps onto your iPhone via a screw (avoid over-tightening to protect your screen) and the second section screws onto the first via a bayonet mount. When fixed in the secure position suggested by NiSi, I found that the filter holder was visible in the frame when using the Ultra Wide Camera module (I shot with my iPhone 13’s Main Camera throughout). Very careful repositioning can eliminate this problem, but the Ultra Wide Camera’s proximity to the edge of the iPhone doesn’t make it easy.
The rubber end used to clamp the screw against the iPhone screen can obscure important touch buttons in some apps and may also require repositioning. It can also register as a finger on the touch screen. Ultimately, iPhones aren’t built with filter systems in mind, but with a little patience, you can still end up with fantastic results.
- Position the holder over your iPhone’s Camera Modules, taking care not to obstruct your chosen lens
- Screw the holder in place
- Attach the secondary part of your filter holder (if there is one)
- Open the Camera App and check that the holder doesn’t obscure any part of your frame
Use a manual camera app
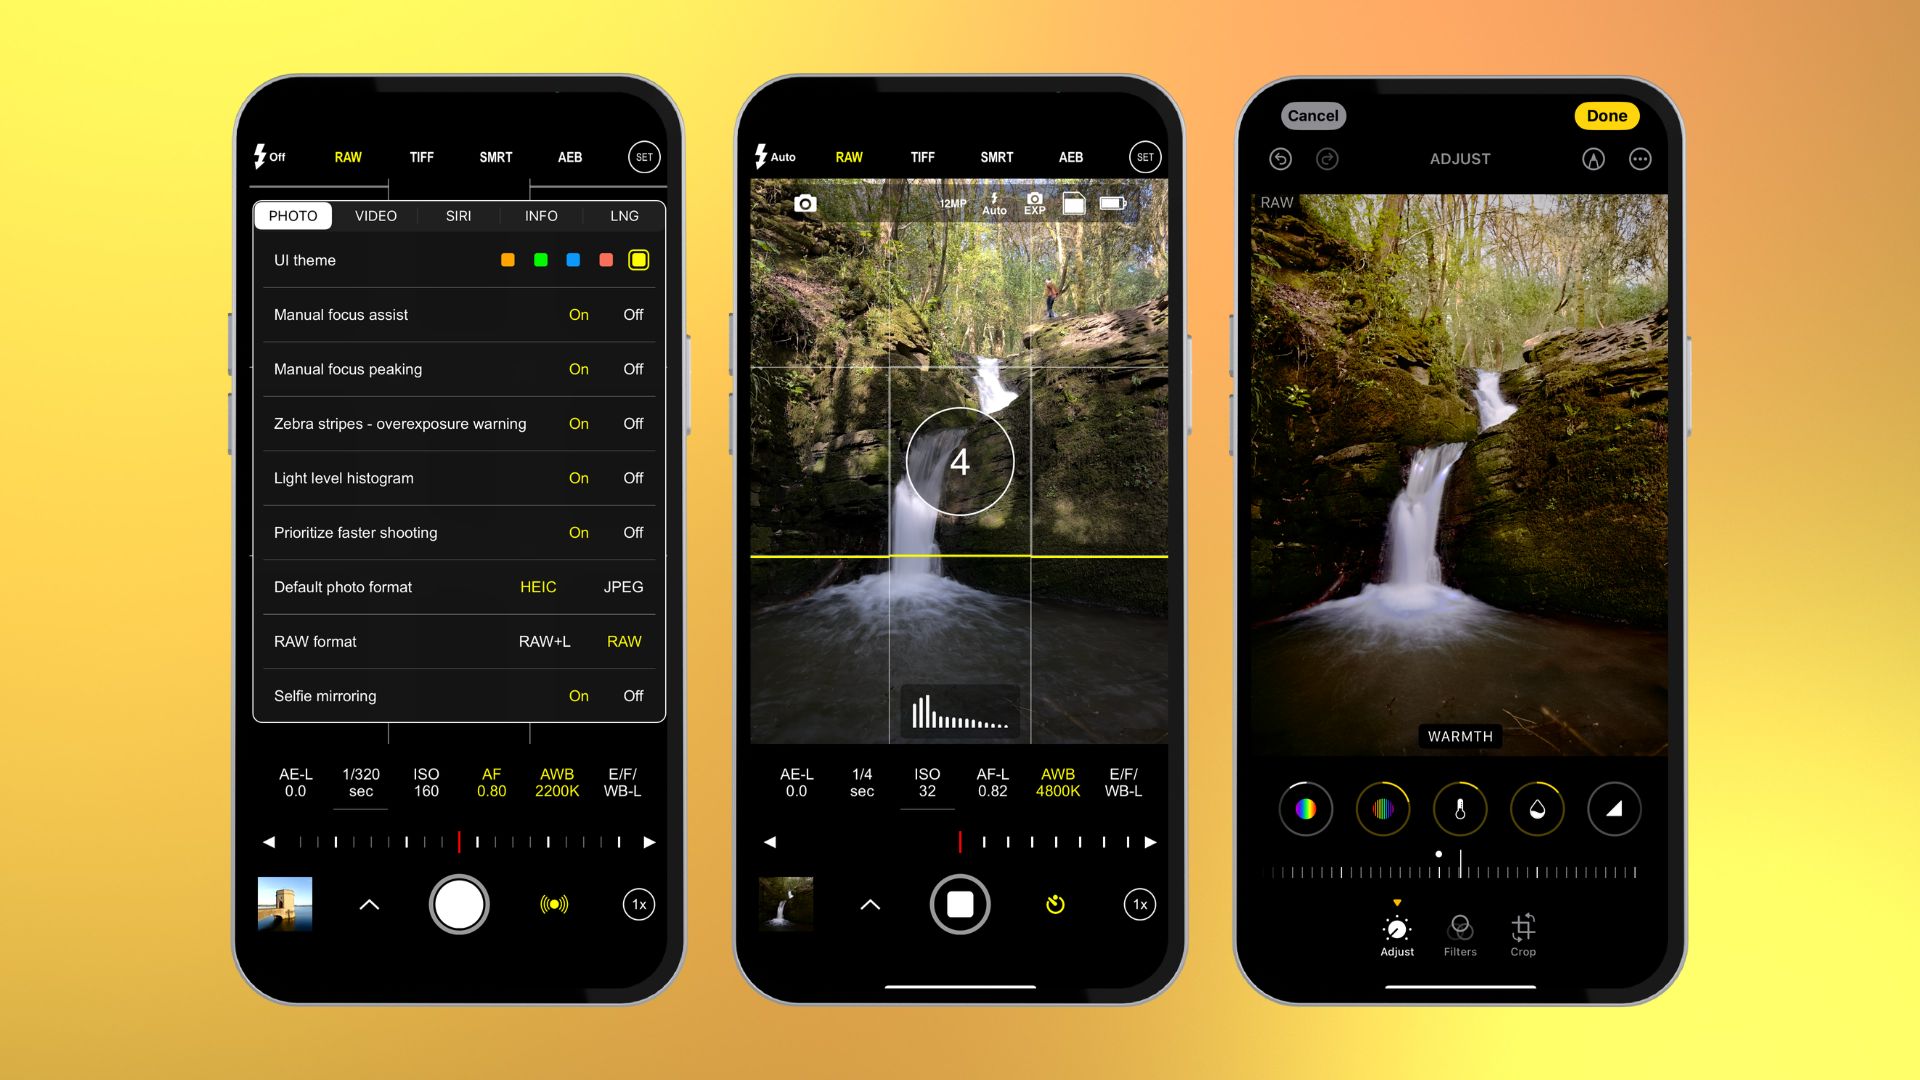
Using a filter system isn’t as simple as using your iPhone's Camera app, because you need direct control over the exposure. The Camera app is simply too clever and will use a mixture of exposure settings and computational photography to mitigate the effects of a filter, if possible. For example, the role of an ND grad is to darken only the top portion of an image to balance a bright sky with the darker ground below. But when I used the NiSi ND grad with the Camera app, it tried to compensate for the darker patch and in some instances appeared to remove it entirely.
The solution is to download a manual camera app. Several exist, but I plumped for ProCam 8. A dedicated manual camera – like a DSLR or mirrorless – has its exposure controlled using aperture, shutter speed, and ISO. An iPhone’s aperture is fixed, so this cannot be changed. Shutter speed refers to how long the camera’s sensor is exposed to light – the longer it’s exposed the more light it can gather – and ISO refers to how sensitive the camera’s sensor is to light – the higher the ISO the higher the sensitivity.
In reality, the app may well be creating a ‘long-exposure look’ by using computational photography to blend together multiple images of varying exposures (essentially an HDR image). But the results look mighty convincing, regardless.
ProCam features plenty of useful features, including a self-timer to help eliminate camera shake when shooting long exposures. Crucially, it also allows you to lock your exposure, so it doesn’t compensate when you darken the image by slotting in your chosen filter. Finally, it allows you to set your file format to Raw. And while my iPhone 13 doesn’t have the ability to capture Raw images, ‘Raw’ appears to be ProCam’s way of dialing down AI edits, producing a flatter image that’s more akin to a Raw file. And if you’re using a Raw-capable iPhone like the iPhone 15, I always recommend shooting in Raw when capturing your very best iPhone images, anyway.
Slot in your filter
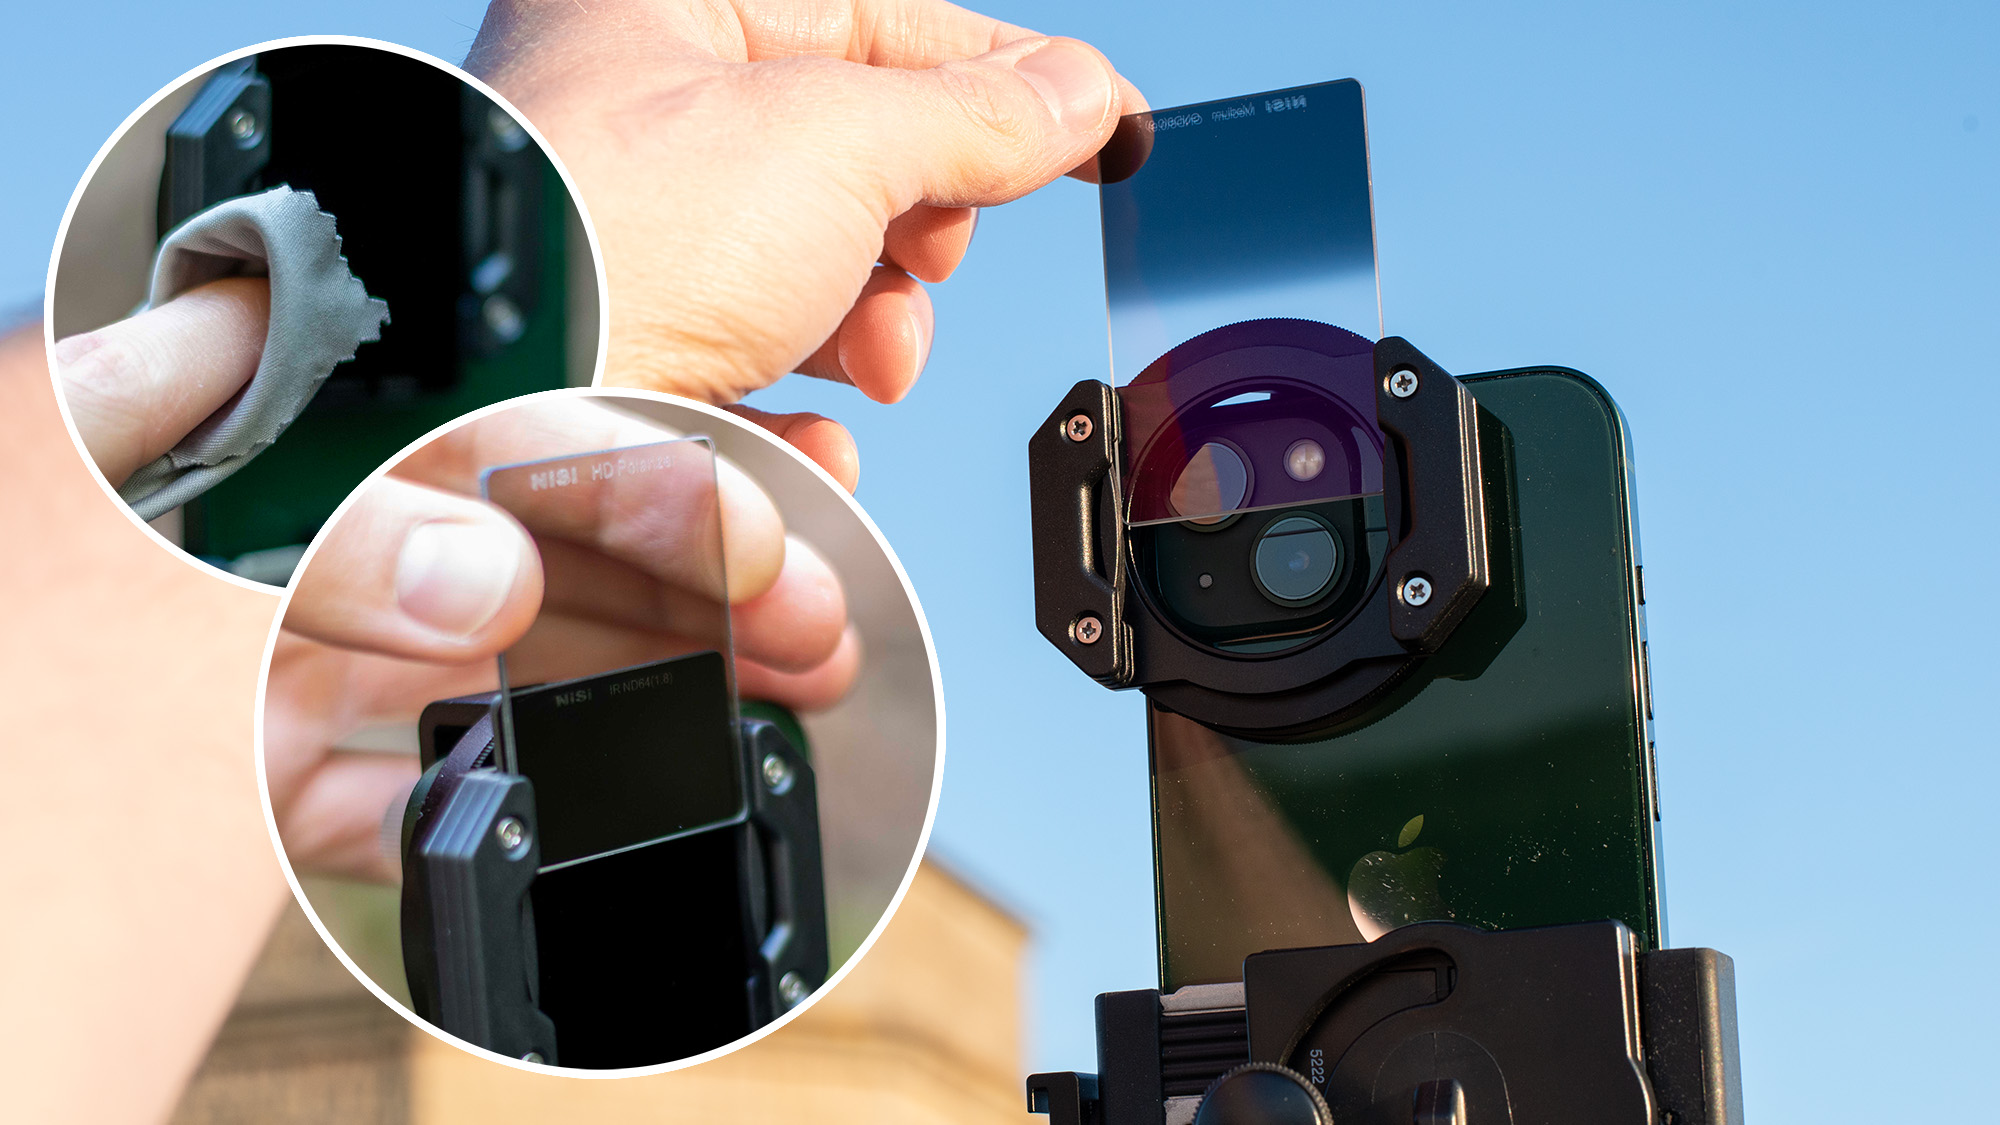
The NiSi IP-A Filter Holder has two slots. If you’re only using one filter, make sure you place it in the one that’s closest to your iPhone’s lenses. You can stack filters to increase their strength or combine effects, but if you’re using an ND filter, it takes precedence and should always be placed closest to the lenses. Hold your filters at the edges to avoid getting oily fingerprints on them and use a lens cloth to buff them (front and back) before slotting them into the holder.
Technically, some filters can interfere with a camera’s ability to focus. It’s best practice to focus and then use ProCam’s AF lock function to lock focus before slotting in the filter. However, such advice originated during the DSLR era and modern AF systems have come a long way. My iPhone seemed to have no problem focusing through filters, so feel free to make your own choice, here.
- Focus on your subject and lock focus
- Hold your chosen filter via its edges
- Use a lens cloth to clean both the front and back of your filter
- Carefully slot it into the slot that's closest to your iPhone's lenses
How and when to use an ND filter
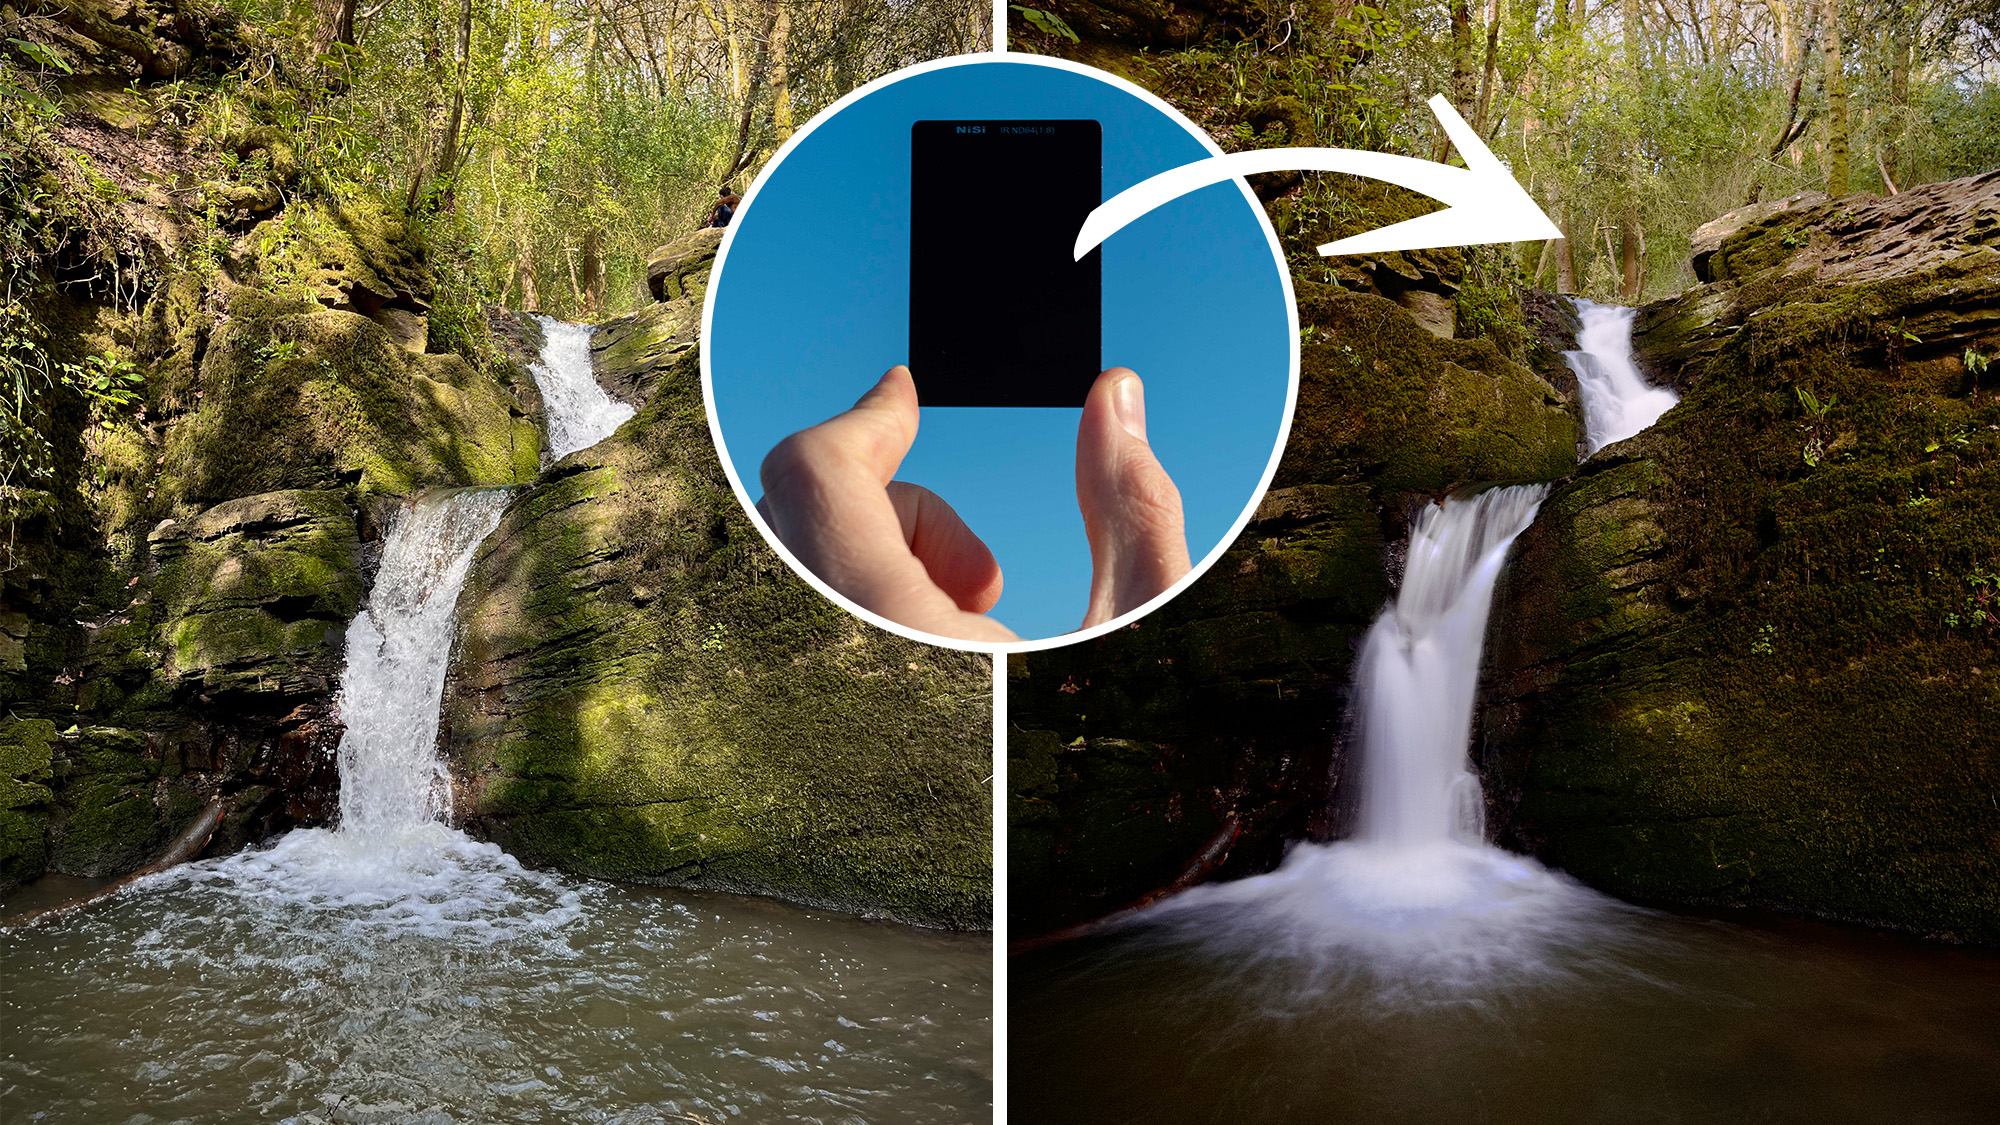
Think of an ND filter as a pair of sunglasses for your iPhone. These tinted filters are used to block the amount of light that enters the camera, allowing you to shoot long exposures that blur moving objects within the frame like fast-moving clouds and waterfalls. If you didn’t use an ND filter during daylight, on a dedicated camera, the slow shutter speeds required would simply flood the camera with too much light and overexpose the image.
ND filters therefore allow you to achieve seconds-long exposures while correctly exposing your image. ND filters are available in a variety of strengths, measured in stops of light (one-stop doubles or halves the amount of light that reaches the camera’s sensor). The higher the number of stops, the stronger the filter’s effect.
- Set your iPhone on a tripod and attach your filter holder
- Frame your scene using a manual camera app such as ProCam 8
- Set your point of focus, lock it in place and set a self-timer of several seconds
- Carefully slide your ND filter into the slot closest to the Camera Modules
- Set your exposure by changing the shutter speed and ISO, and then lock your exposure
- Capture the image
How and when to use an ND grad filter
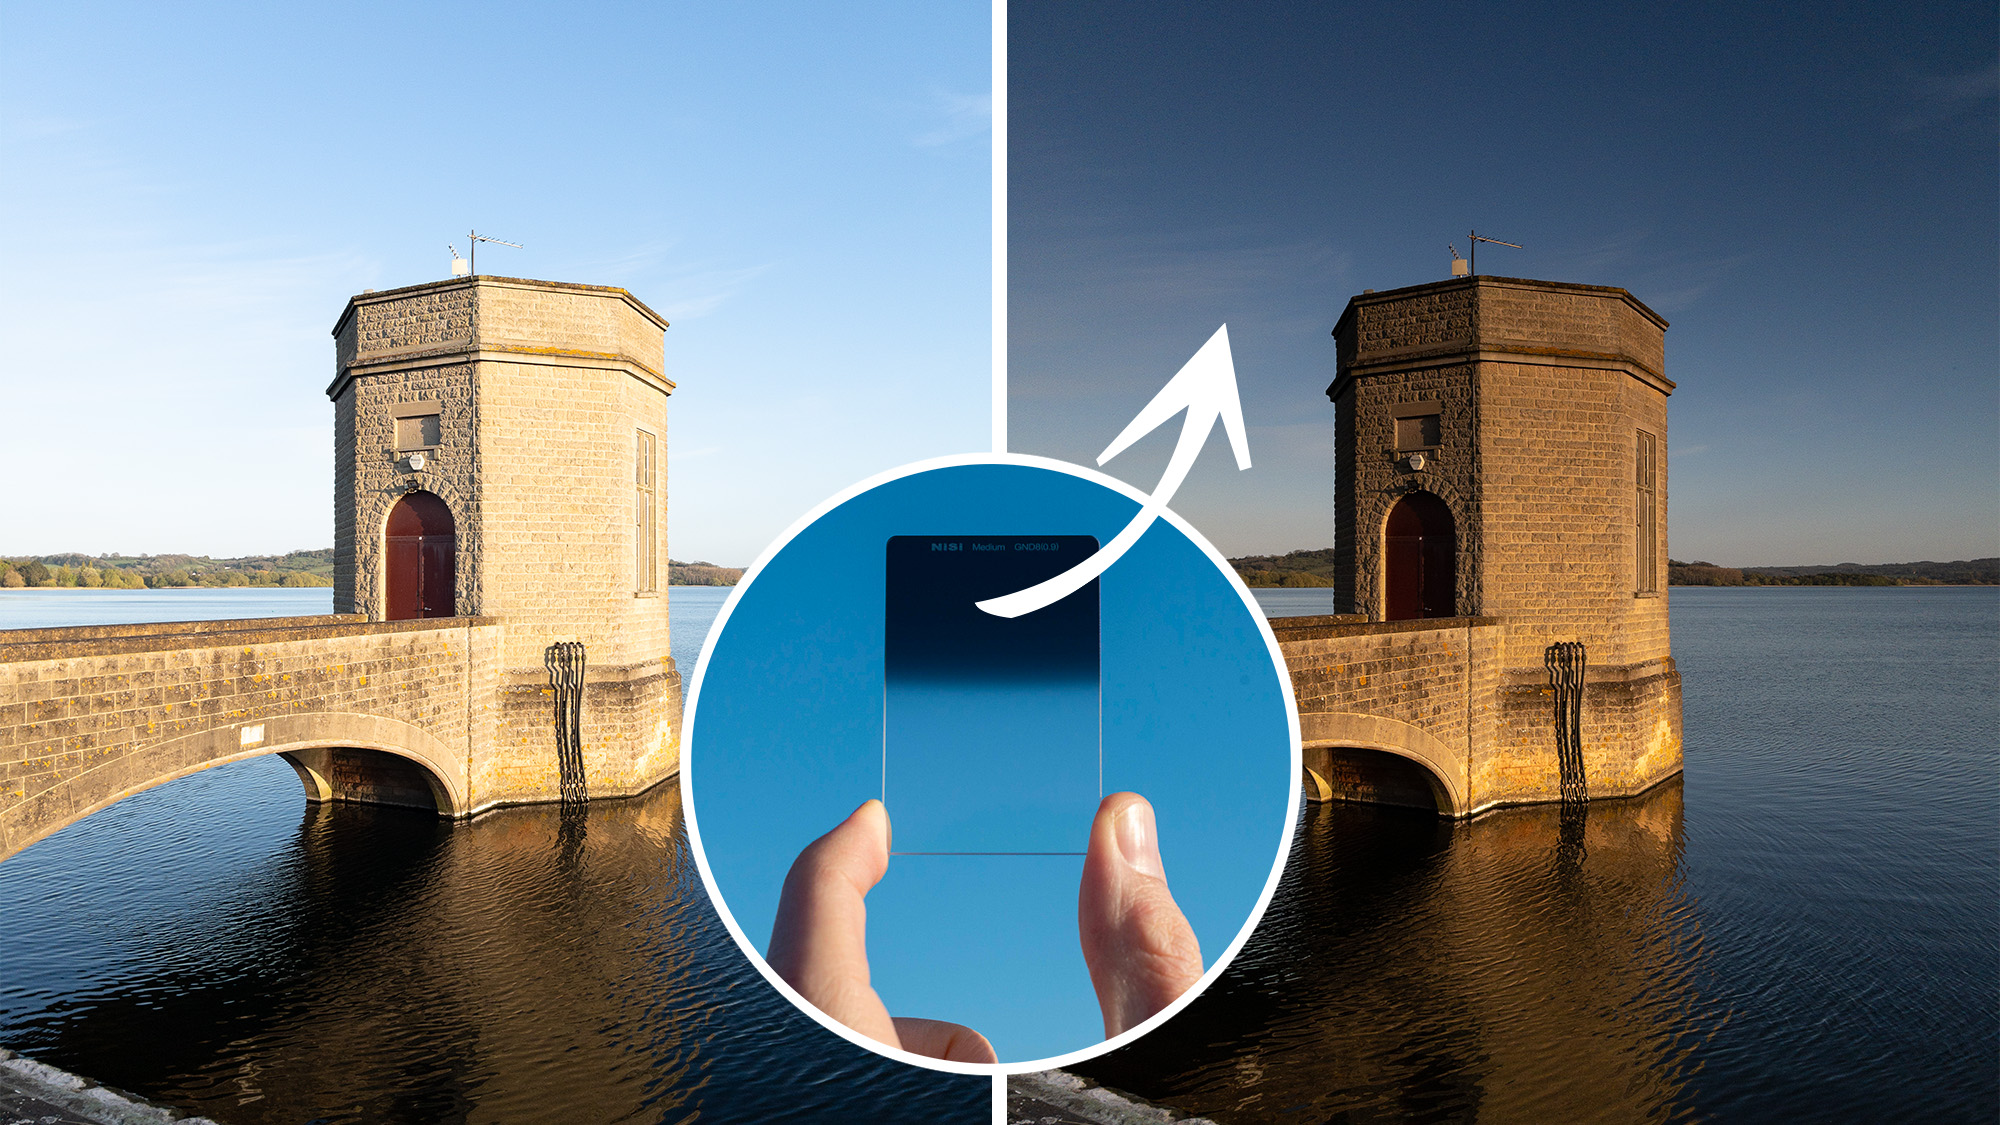
ND grad stands for graduated neutral-density filter. This is because the ND effect is strongest (normally) from the top of the filter and gets progressively weaker towards the center until it is completely transparent and has no effect on the image at all. This ‘graduated’ tint allows photographers to balance the exposure of a scene with a very bright sky. The camera exposes the darker ground while the ND grad darkens the sky. Like standard ND filters, grads come in various stops of light to indicate strength. The NiSi ND grad is a 3-stop filter, but it’s also labeled as being medium.
Whether an ND grad is hard, medium, or soft refers to the intensity of the graduation. Hard provides a more sudden transition and is best used for flat horizons, soft provides a much more gradual transition making it better suited to photographs with poorly defined horizon lines such as a protruding mountainscape. Medium provides a middle ground, making it a great choice if you’re only going to carry one ND grad.
- Lock your iPhone on a tripod and attach the filter holder
- Compose your image using a manual camera app like ProCam 8
- Focus and then lock AF before setting a self-timer
- Set and then lock your exposure
- Carefully slide your ND grad into the slot closest to the Camera Modules
- Keep sliding the ND grad down until the tinted portion darkens the sky
How and when to use a polarizing filter
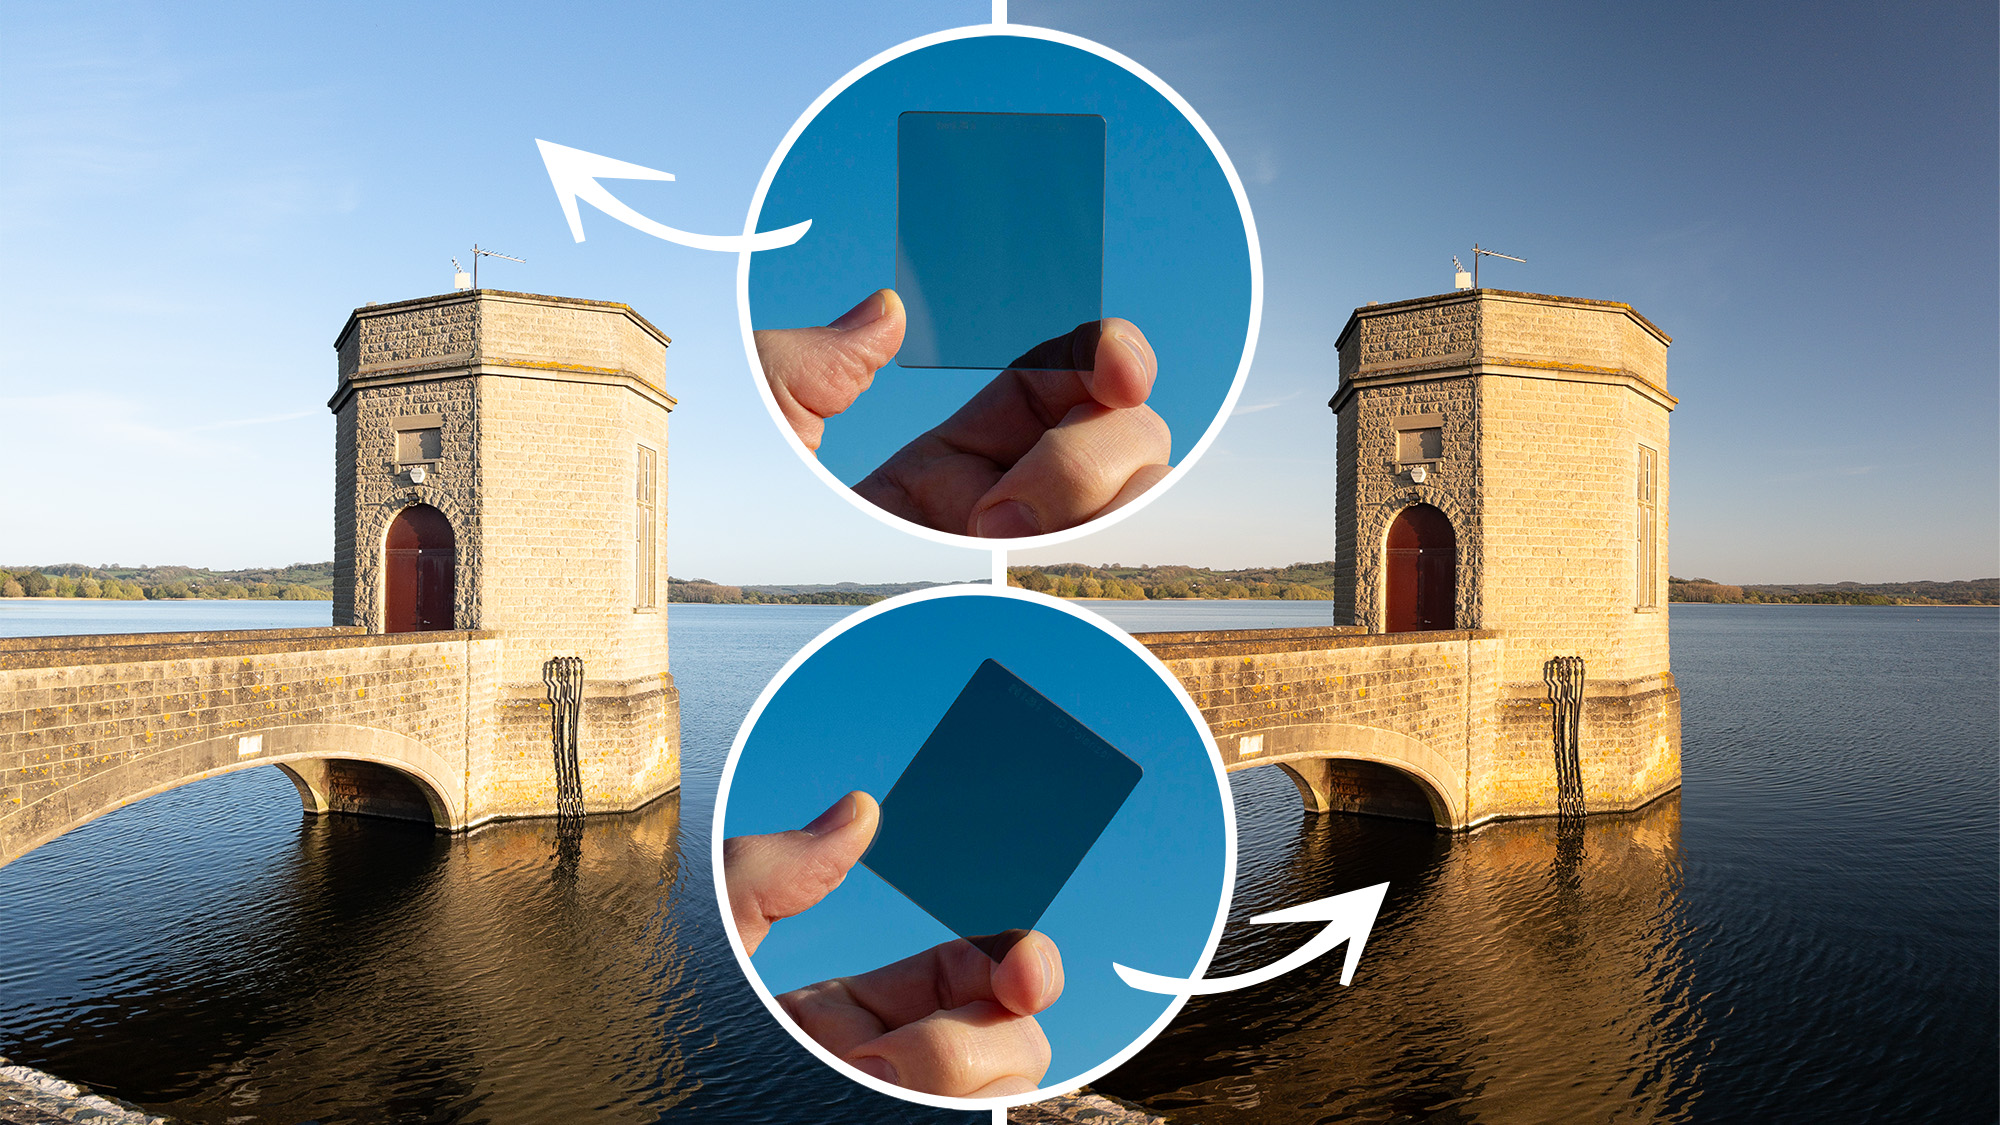
Polarized light causes glare, which is why polarized sunglasses are so effective. A ‘polarizer’ filters out polarized light, while letting other light waves pass through. The result prevents glare, cuts through reflections, and bolsters saturation (particularly blue skies). Polarizing filters work best when positioned at a 90-degree angle to the sun and for that reason, a wide-angle lens’s sprawling field of view can exhibit a notable drop-off of saturation across the sky.
As you can see from the image above, the polarizing filter (right) has reduced glare on the water’s surface, providing a punchier blue sky and increased saturation. You can increase or decrease the amount of polarized light that’s blocked by rotating your polarizing filter. The NiSi IP-A Filter Holder spins, making it very easy to do this.
- Fix your iPhone on your tripod (ideally at a 90-degree angle from the sun)
- Attach your filter holder
- Compose your image using a manual camera app like ProCam 8
- Focus and lock AF. Set a self-timer
- Set and lock your exposure
- Carefully slide your polarizing filter into the slot closest to the Camera Modules
- Rotate the filter until you're happy with the intensity of the effect
Can I get similar results without iPhone filters?
The ability of Apple’s computational photography tech never fails to surprise me. Nor does the huge variety of innovative photography apps available on the App Store. For these reasons – in most cases – you can capture similar results without touching a physical filter. Long exposures can be captured without an ND filter by turning Live Photos into long exposures or using a long-exposure app like Slow Shutter. And the computational tech in the best iPhones is so adept at balancing the exposure of tricky scenes that an ND grad, more often than not, isn’t a necessity.
But, that’s not to say you won’t get better results when using a set of physical filters. I still prefer the results of using an ND filter and ND grad. And while it’s much more hassle wrestling with a device that was never built to accommodate a filter holder, it’s also an awful lot of fun. If you’re dedicated to capturing the best iPhone photographs you can, I’d recommend picking up a filter system at some point.
And finally, the polarizing filter is where physical filters still triumph. As it stands, you simply cannot cut glare and reflections as well as a physical polarizer using digital tech. If that’s what you’re trying to achieve, a polarizer is a must.


