The goal with my Nature project was to achieve photorealism while also crafting a compelling narrative and an immersive experience for its viewers. To accomplish this, I decided to create three distinct environment sets: Arctic, Iceland and Mesa. These diverse environments each posed unique challenges and demanded a wide variety of different techniques.
Here we’ll take a look at all of the challenges I faced in the creation of these environments, and my not-so-conventional workflow. I used a range of software to achieve my vision, including Unreal Engine 5, Gaea and NukeX, as well as video editing software for the final stages.
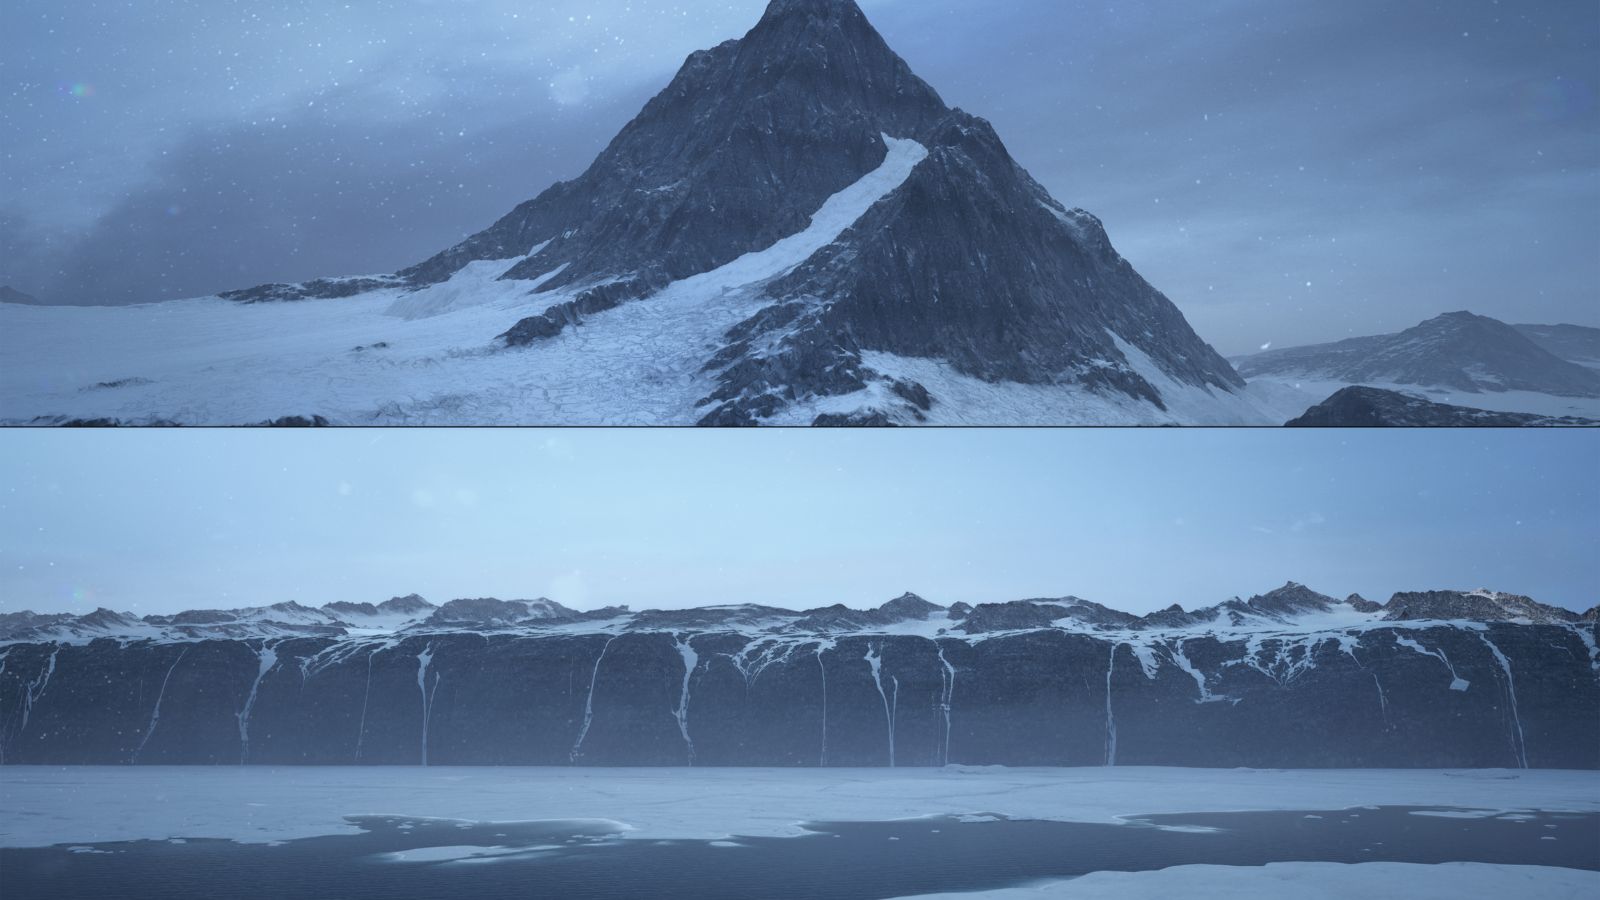
When I set out to create the environments, I knew I was in for a real adventure. The goal was to make them as realistic as possible, but that meant tackling some unusual hurdles. For the Arctic setting, that included the lighting and the water system, while using precise colour correction that emphasised the coldness of the setting. Compositing was a nice challenge too, as I needed to add snow and a cold breeze, and different layers that we’ll see together, all to transform a render into a realistic scene.
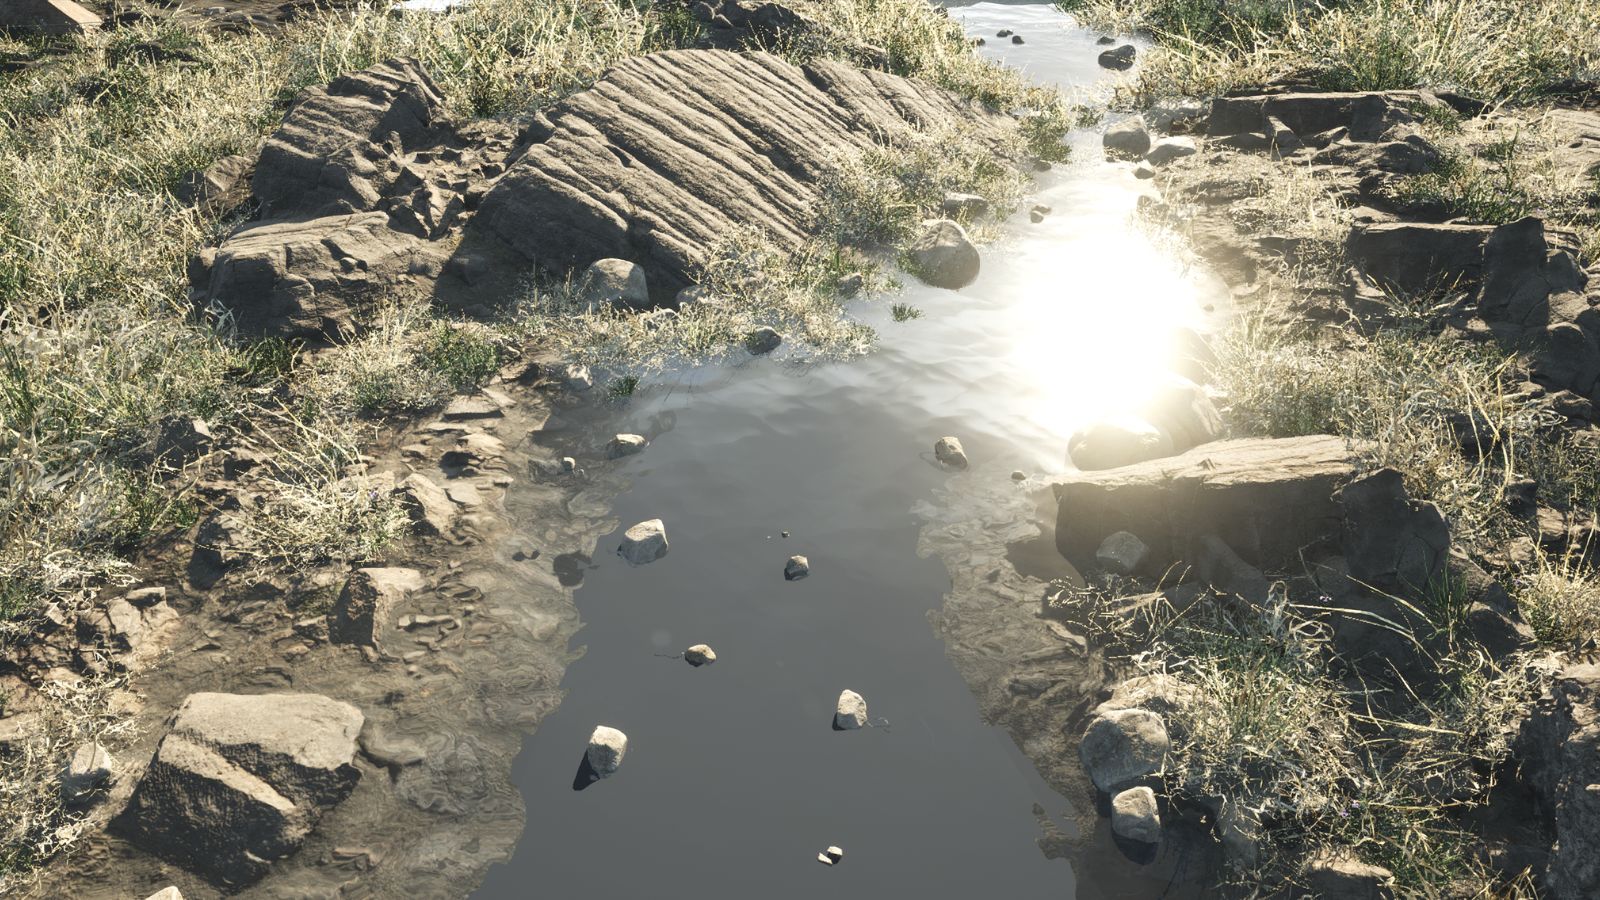
The fascinating Mesa landscape required a precise lighting setup alongside the realistic materials and foliage
I’ve always been captivated by Iceland’s landscapes as well, and there I wanted to do justice to their beauty with believable foliage an essential element, plus fog to simulate humidity. Finally, the fascinating Mesa landscape required a precise lighting setup alongside the realistic materials and foliage.
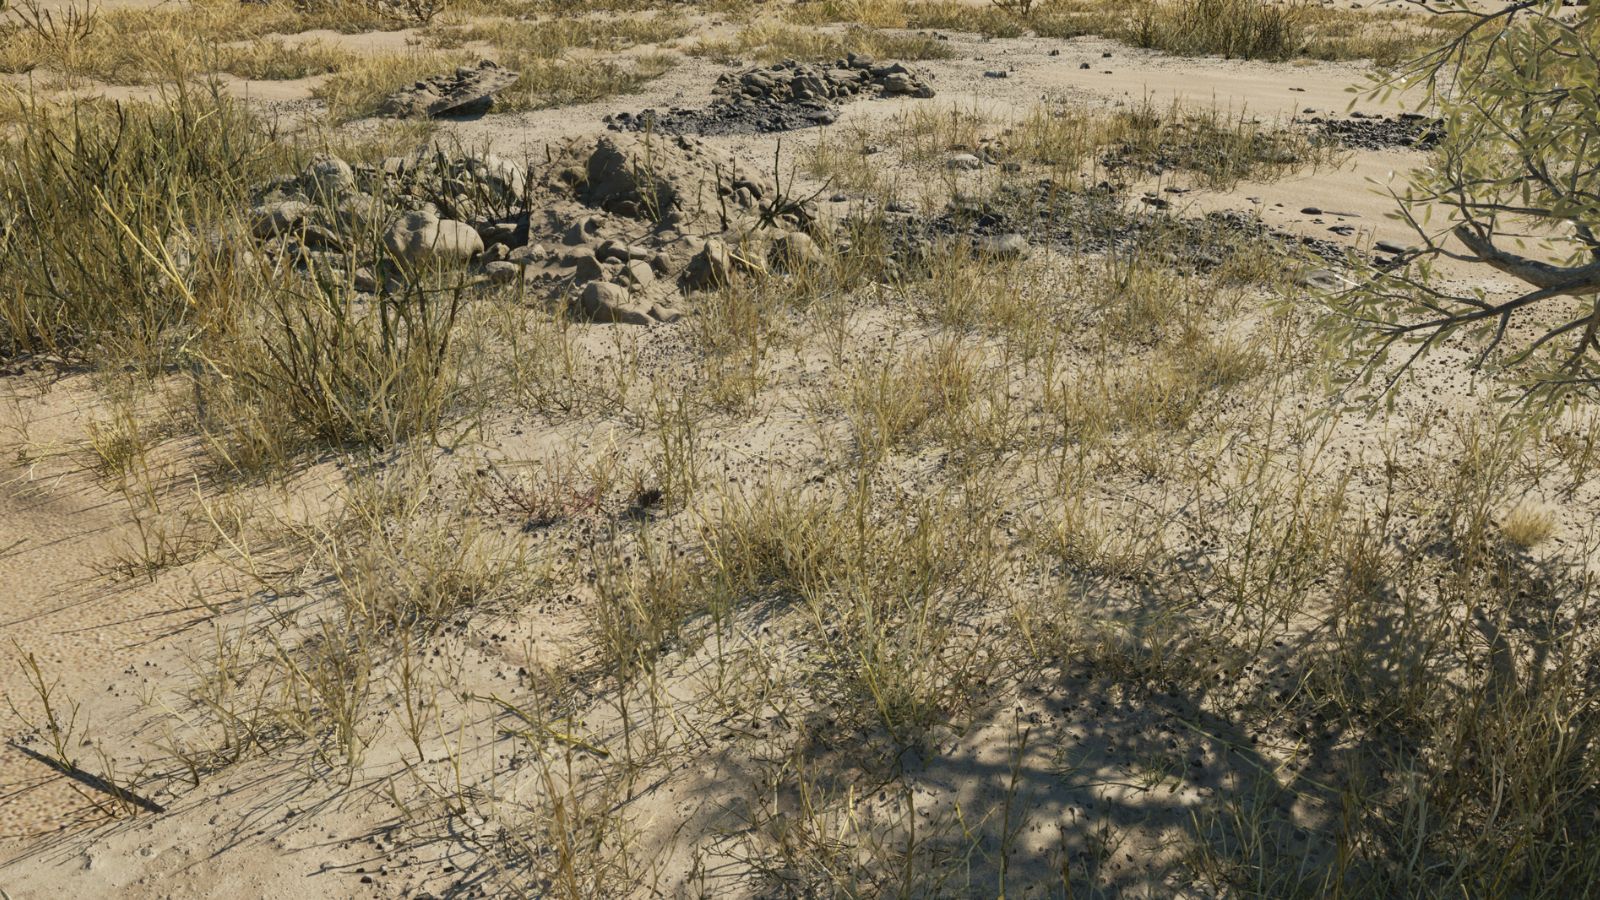
To further immerse viewers in that environment, I introduced extra touches such as sand clouds and birds. Lastly, I want to underline the importance of using reference images, which played a pivotal role throughout the project, helping me to understand the intricate details of each setting. Crafting the three environments within Nature was a labour of love for me, driven by the quest for photorealism and a deep admiration for these varied and breathtaking landscapes.
How to create photorealistic landscapes in 3D
I hope you find this step-by-step guide to be useful. If you'd like to follow along, you can download the relevant assets here.
01. Cameras and layout
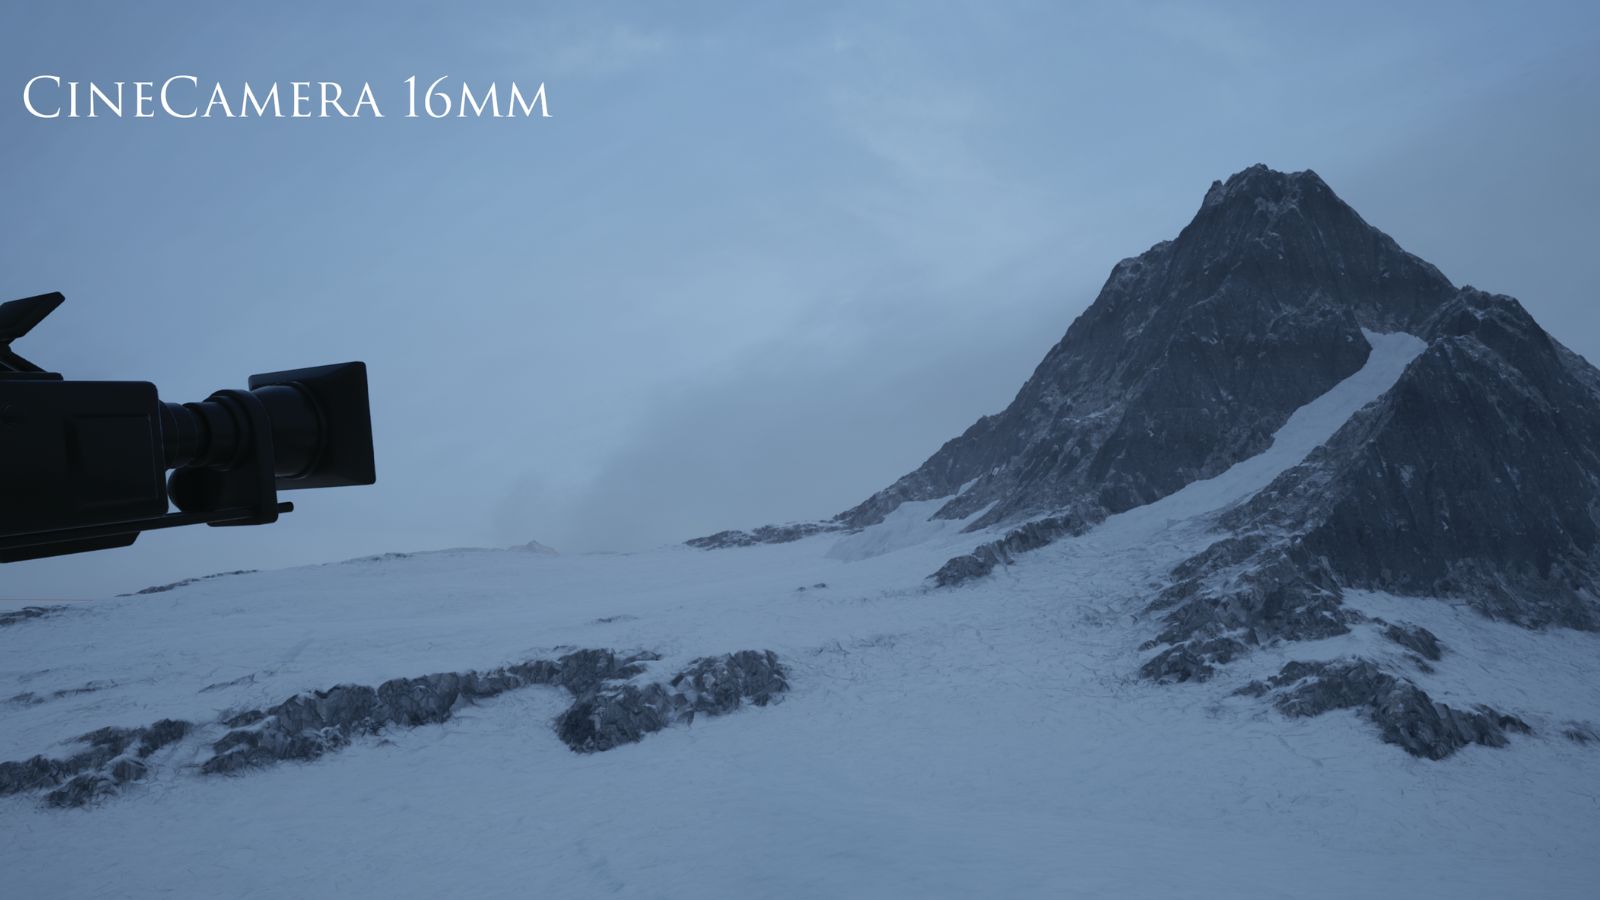
The first step was to blockout the environments, creating eye-catching compositions and setting up camera animations to establish the direction. This approach helped to ensure I didn’t waste time adding unnecessary details that wouldn’t be visible on camera.
To increase the perceived depth and to have a broader landscape view I used wide-angle lenses typically found in landscape photography, while the camera animations were slow to give a sense of calmness and peace.
To improve my compositions, I used grid overlays directly inside Unreal Engine. To enable them, open the Cinematic viewer and look for the grid overlays in the top-right corner.
02. Form the terrain
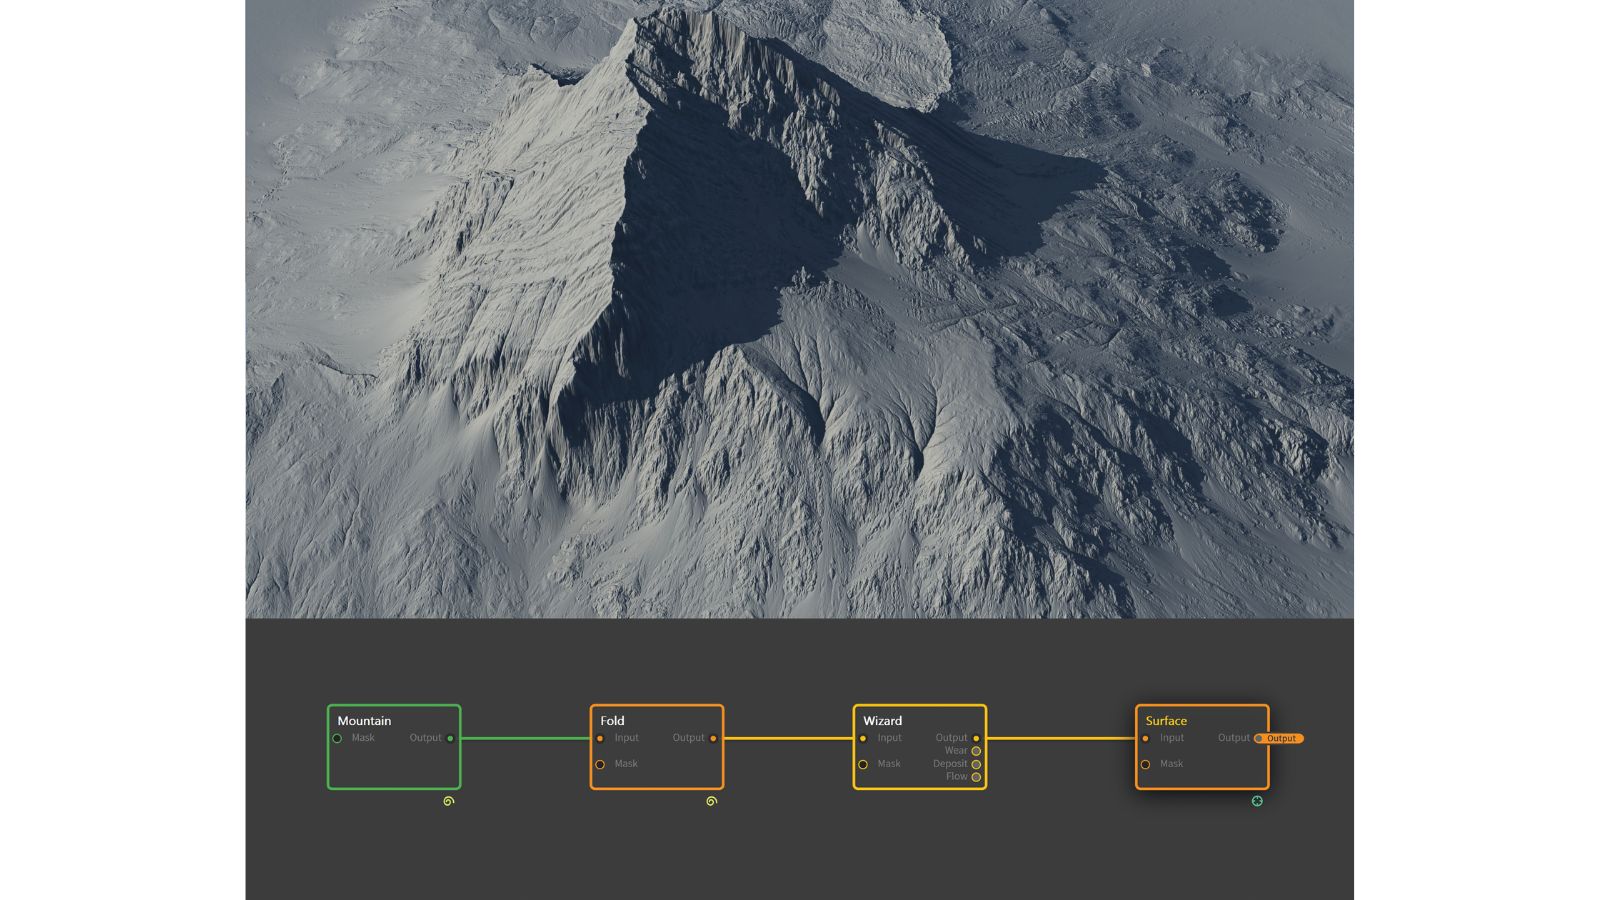
In the process of replacing my blockout with proper assets, I started developing terrains in Gaea. I always like to start from the bigger features of a landscape to gain a broader understanding of composition.
Our planet offers a huge variety of terrains, all influenced by environmental factors such as water, wind, and so on. For example, the Arctic scene needed sharp mountains eroded by the wind and huge cliffs with snow deposits and fluvial erosion created by melted ice, so I went into Gaea and experimented until I had something suitable.
I decided to import the terrains in Unreal as meshes instead of using the Landscape feature so that my project was better optimised.
03. Arctic additions
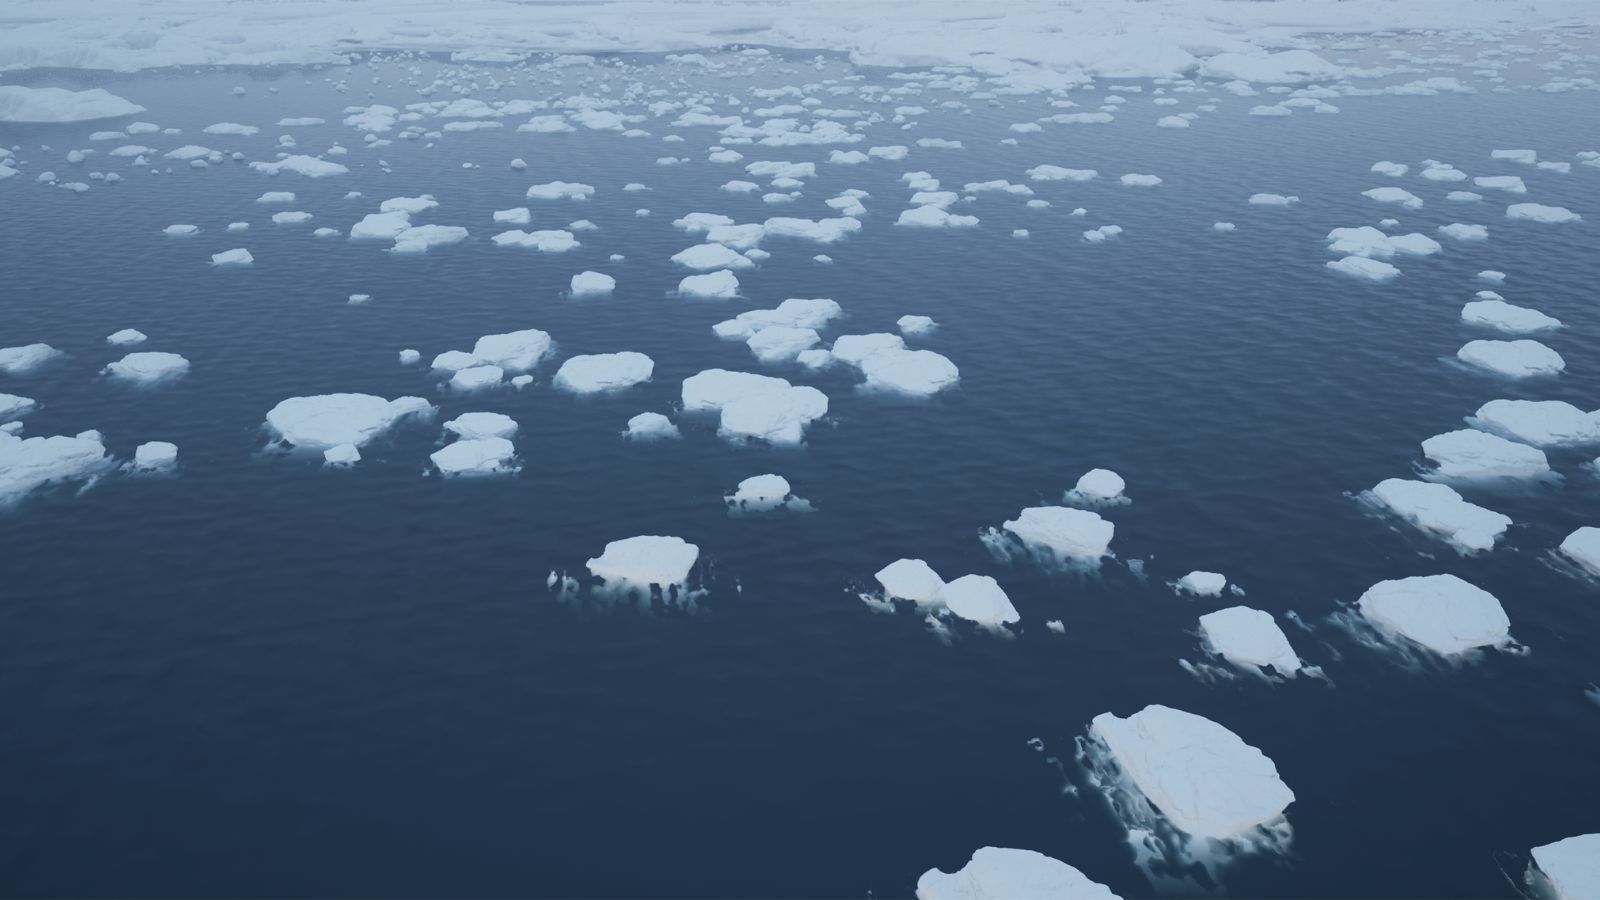
After importing my Arctic terrains I had a base for my water system. When you first create a water system in Unreal it won’t look at all realistic, and to create something that looks good is a real challenge.
The Normal strength, Absorption and Water Shading options are particularly important for this. My little tip is to play with the Absorption alpha to create a see-through effect. The ice was created with a different approach.
I found rocks on Quixel Megascans that had soft features and replaced the material with a snow one. If I liked a certain shape but the rock features weren’t soft enough, I used the modelling tools and simply smoothed them out until I was happy.
04. Quixel patches
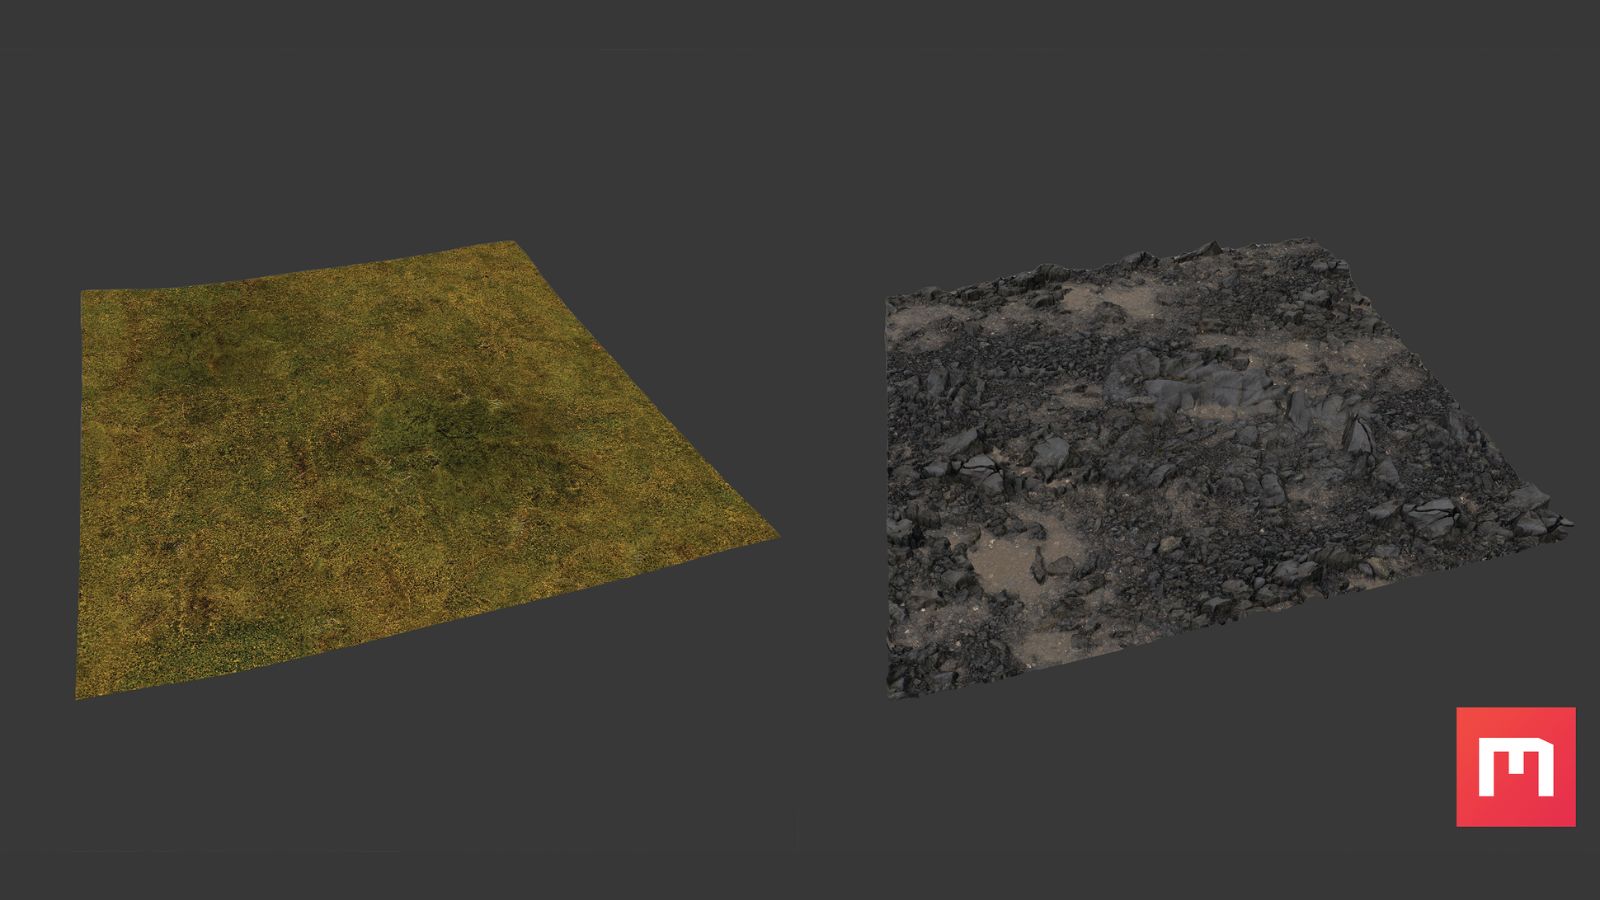
Throughout developing my environments, I also made use of patches from Quixel Megascans and Mixer. Some diversity in colour and shapes was required, so I started with the ground. I created different patches in Quixel Mixer, combining different Megascans materials like grass and rocks for Iceland, with rocks and sand for my desert mesa. I also played with height levels, making sure to reduce the tiling visibility to avoid repetition for a more natural look.
By default, Unreal 5.1 doesn’t support tessellation within the Material editor, so instead I had to create a plane and add a material with all the maps plugged in other than the Displacement. Next I switched over to Unreal’s Modelling tools, chose Displace, and after selecting 2D Texture, I plugged in my Displacement map. After that, I began to scatter the patches.
05. Foliage hierarchies
After I achieved the first level of diversity with the ground in the Iceland scene, I started to manually add foliage, mainly from the Megascans library. I spent time finding what I liked most and began experimenting with placement.
While doing this I was respecting a hierarchy; bigger rocks in the centre, medium-sized rocks around them, and smaller rocks around those, just as you should follow with grass. This was done because natural scattering works this way, and in my experience if you don’t follow this pattern to some extent, it’s hard to create a realistic scattering system.
To increase the Mesa scene’s realism I added colour variations to the grass in particular, slightly shifting the hues to make some greens colder and others warmer. Trees were also required, which I created using SpeedTree.
06. Lighting and sky

To create a realistic lighting system I used a plugin from the Unreal Engine Marketplace (where you can find the best Unreal Engine plugins) called Ultra Dynamic Sky. For the Arctic setting I needed flat lighting from an overcast sky, so I increased the Cloud Coverage parameter in the plugin and was almost there.
For a finer level of control I used planes in the sky as light blockers. From my experience with lighting it’s easy to get a decent result, but you’ll want to tweak each parameter to find what you’re looking for, so take your time as this will change the overall appearance of the scene.
07. Render to Nuke
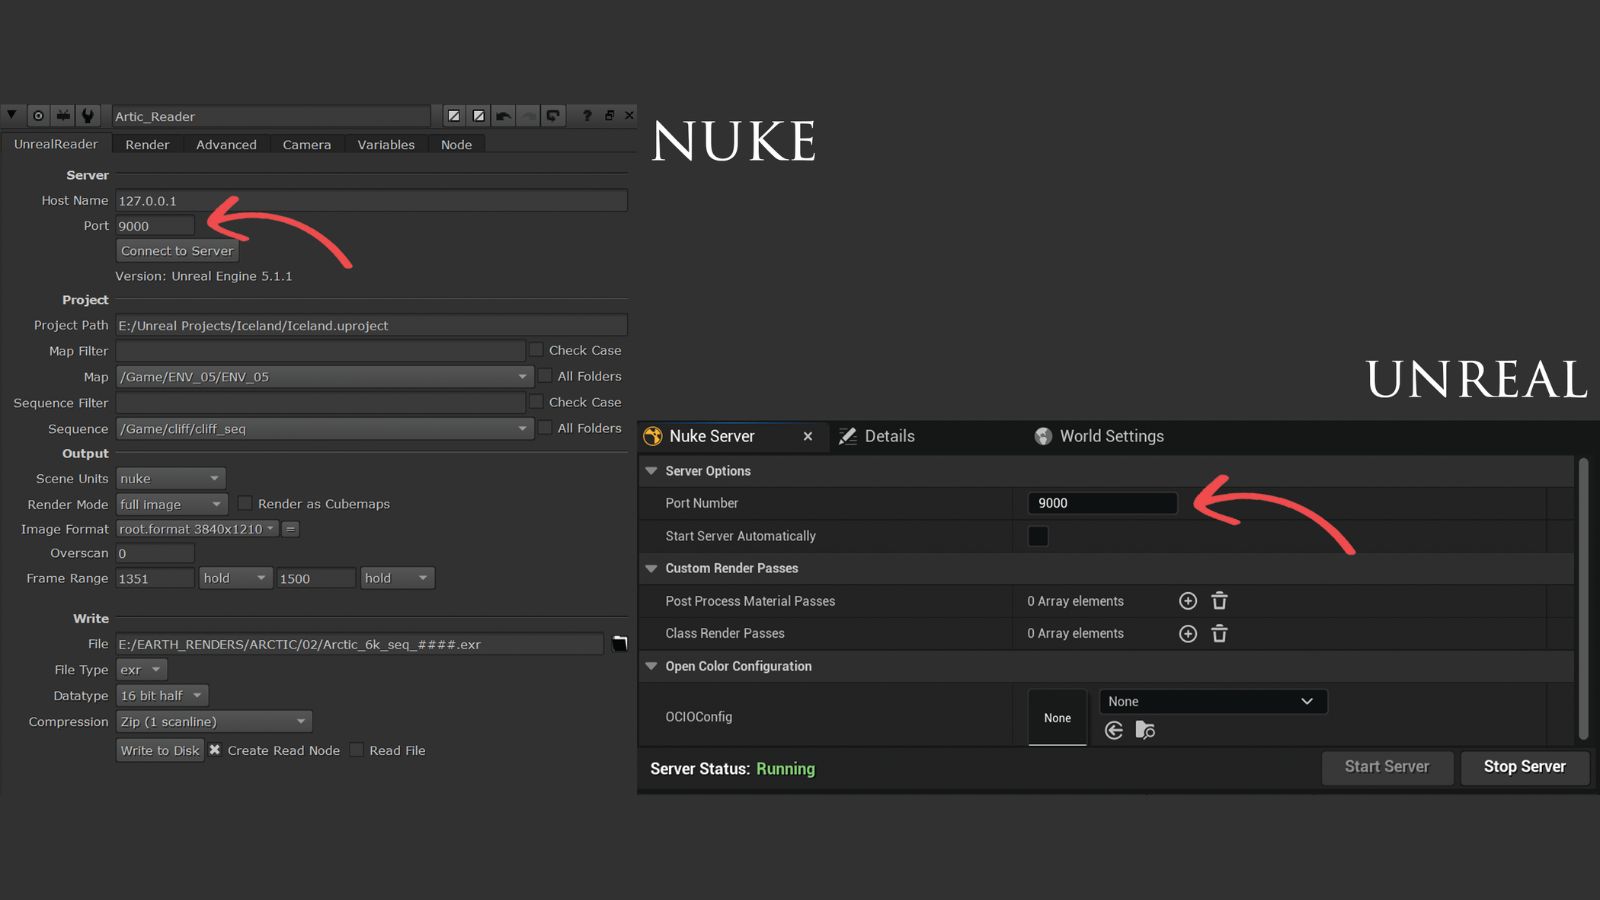
For rendering, I adopted an unconventional approach by using NukeX’s UnrealReader node to live connect and render scenes from Unreal Engine to NukeX. This enabled me to generate numerous render passes as well as seamlessly integrate my camera for digital matte paintings.
Note that before compositing, I rendered everything to disk and read it back with a Read node in Nuke. I defined a saving path and added Unreal console variables to ensure higher quality; ‘r.ForceLOD 0’ and ‘foliage.ForceLOD 0’ makes for the highest asset quality, while ‘foliage.LODDistanceScale 10’ avoids Lumen artifacts on distant foliage. I then pressed ‘Write to Disk’, and reimported the frames sequences back in Nuke.
08. Compositing process
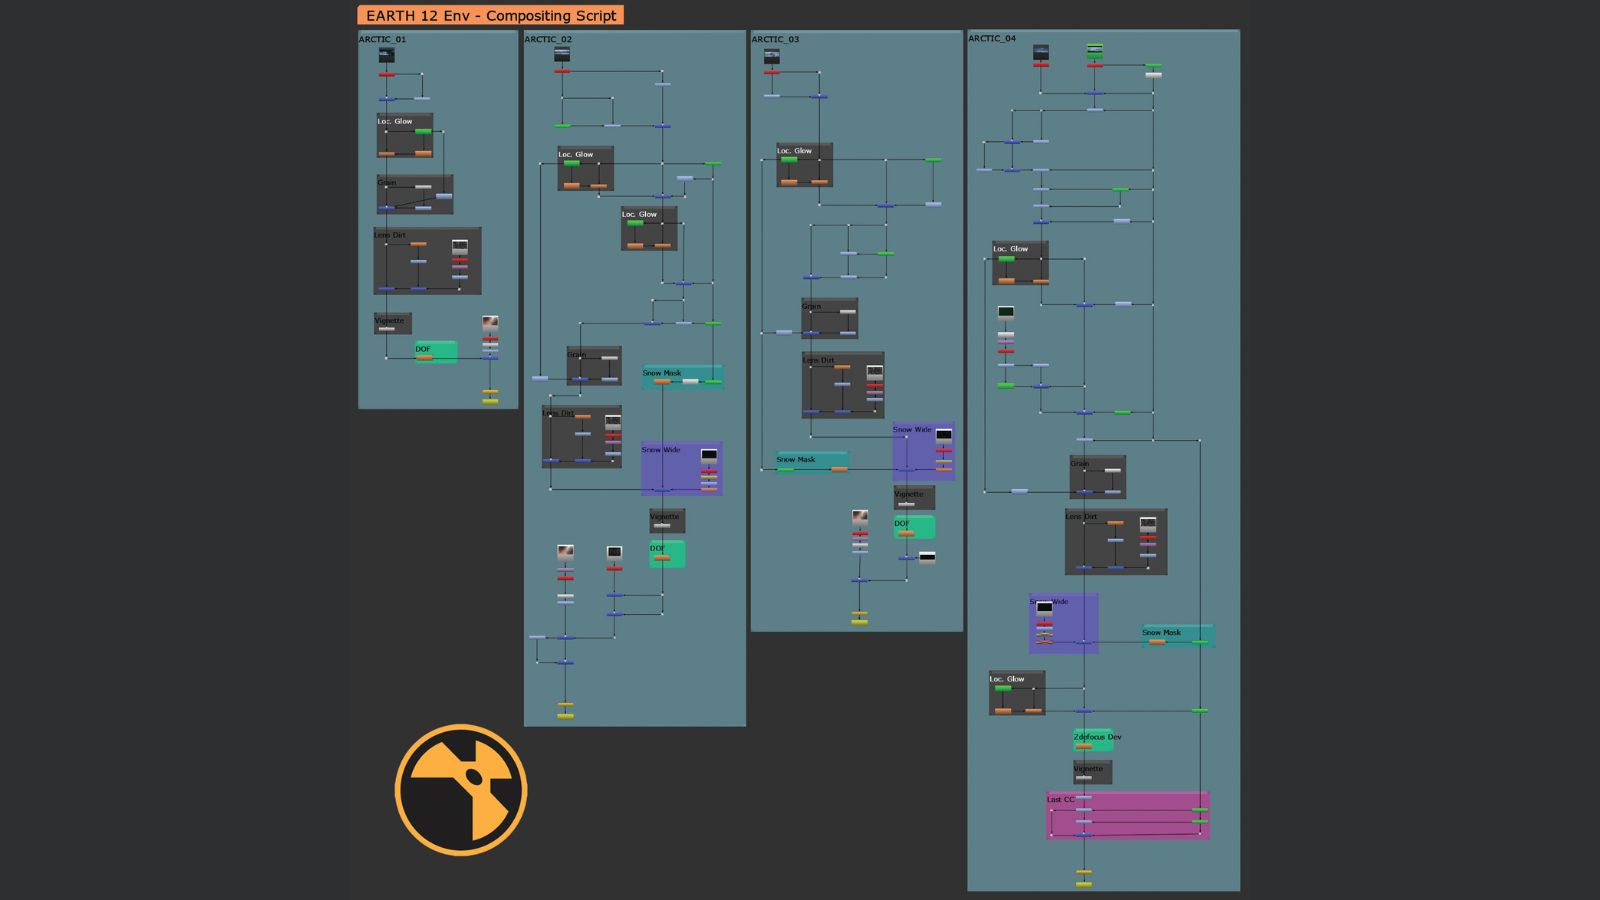
Finally we have everything in Nuke. I began here knowing the importance of keeping a tidy node graph, which considerably speeds up the process. The first step was to apply colour corrections such as emphasising the coldness in the Arctic scene, and more vibrance and warmth in the Mesa setting.
This was followed by chromatic aberration created by isolating the RGB channels with different Shuffle nodes and then merging them back with a Merge node. I also decided to add in lens dirt and motion blur, while making sure to maintain the colour consistency between matching environments.
For the Mesa scene, I also made use of the Cryptomatte render pass to isolate specific ground patches created in Quixel Mixer, allowing me to add variations in the values and colours. To enhance the scene further, I exported my camera from Unreal Engine, enabling the creation of multiple matte paintings. These brought the composition to life with elements like clouds and fl ying birds, making the final render more dynamic and immersive.
09. Depth of field
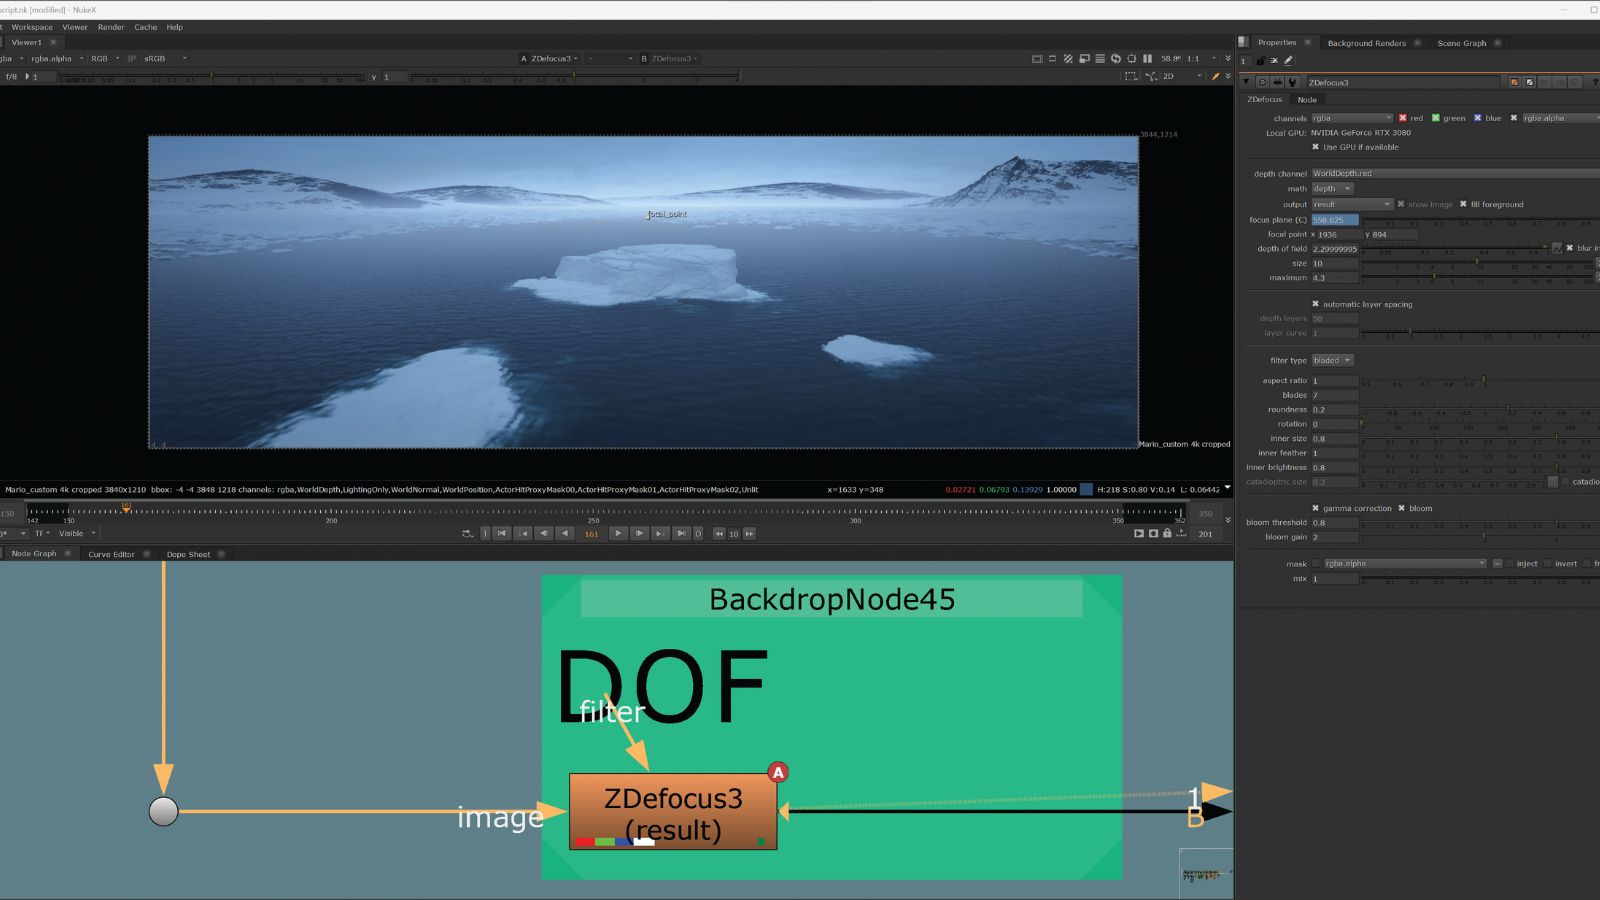
In Unreal Engine you have the option to add ‘Depth of Field’ (DOF) into your camera and bake it into the renders. I decided against this and to render with everything in focus at the same time, particularly essential as I wanted precise control over the DOF later in Nuke.
Upon moving over to Nuke, I then fed my Depth pass into a ZDefocus node and set it to Depth mode. Doing this gave me complete control over my focus point, which I animated simply by placing the keyframes on the Focus Plane option.
10. Create renders
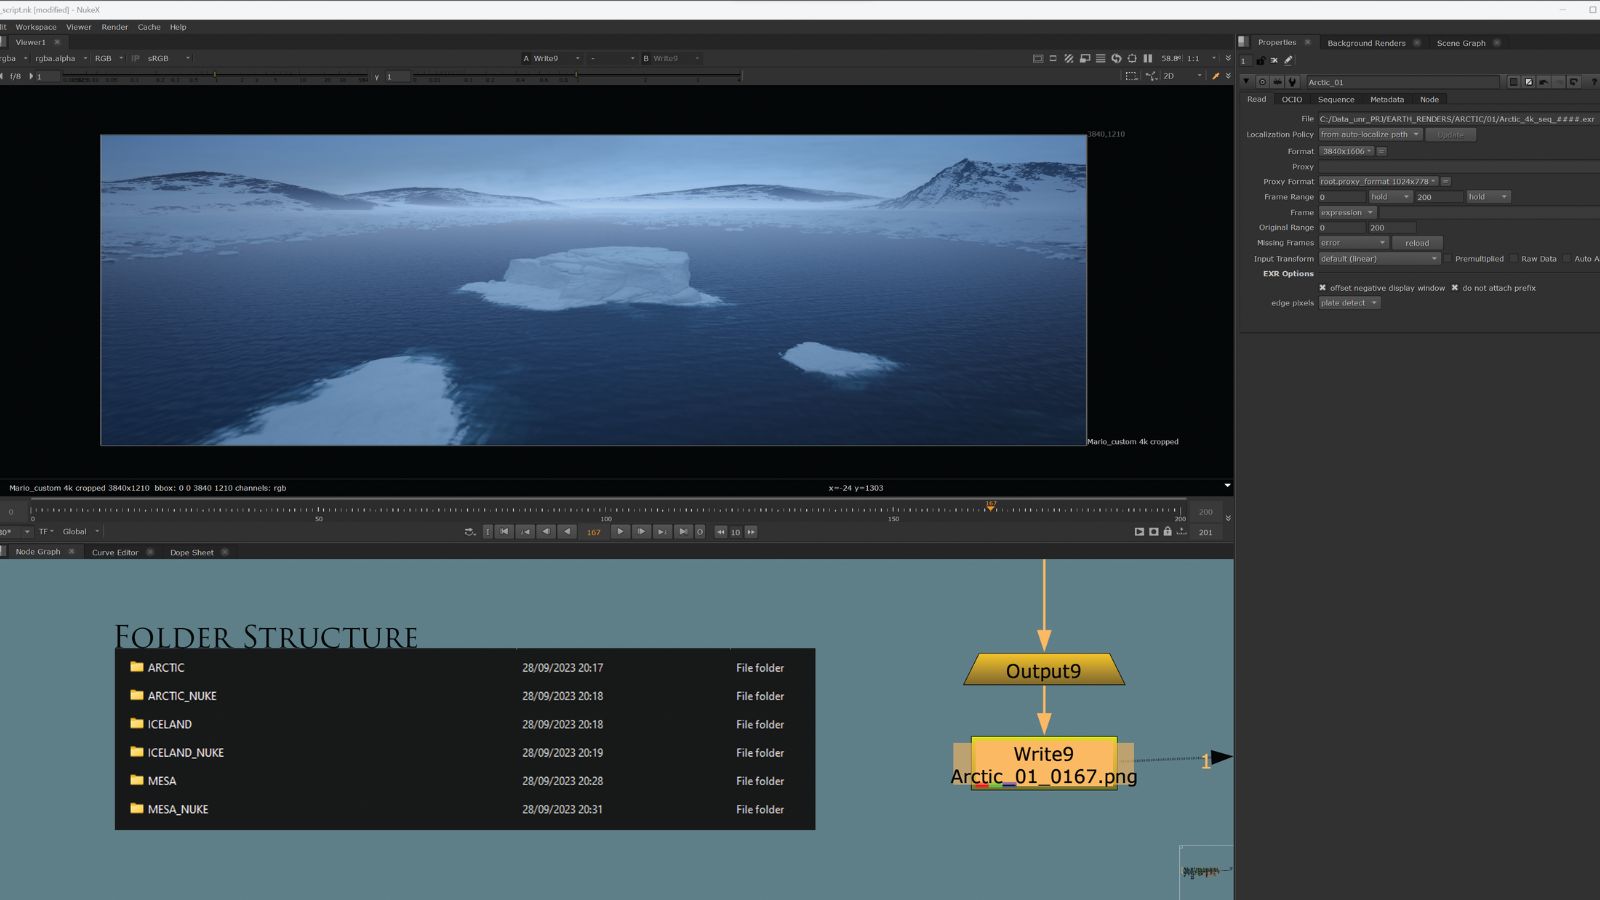
After finishing up with the compositing, I made some fi nal checks to ensure everything was ready to export. I then created a Write node, defined a file path and rendered the final frames as PNGs.
Managing a substantial number of sequences and frames was not an easy task. To tackle this challenge, I put a strong emphasis on creating a meticulously structured folder system. With that in place, it was just a matter of waiting for all of my frames to be exported.
Managing complex projects like this often involves a hefty amount of planning. One important aspect is keeping track of the many elements involved, which is why having a structured folder system can be a real time-saver. So even though it might take some extra effort to set up initially, it pays off in the end.
11. Edit the video
The final step was working on the video editing. For this I decided to work in Adobe’s Premiere Pro as I’m familiar with it, but you can use any video-editing software you like at this point; DaVinci Resolve is a powerful free alternative, for example.
I created a new sequence and imported all my frames as sequences, then found a music track that was well suited to the mood of the project to add to the timeline. After adjusting some cuts to synchronise them to the beats of the music, I added title and end screens to wrap up the video edit.
Creating photorealistic environments: quick tips
Here are a few more quick tips for following this process:
UnrealReader node set-up
My workflow uses the UnrealReader node to make the connection between Unreal Engine and Nuke seamless. To do this, install the UnrealReader plugin, enable it from Unreal’s Plugins menu and start a Nuke Server. Open NukeX and add an UnrealReader node, which will ask you to fill out the Server Port Number from Unreal. Hit ‘Connect to Server’ and you should see your frames in Nuke.
SpeedTree
For a finer level of control over my trees I used SpeedTree, which procedurally models all kinds of plants. I began with references and created the base trunk, defined the height and section radius, and added a range of branches. Why not play with variations? You could set the length of big branches to 0.7 with a +/-0.1 variation, which gives you lengths from 0.6-0.8. Doing this with each parameter can be effective.
Get more software tutorials in 3D World
This content originally appeared in 3D World magazine, the world's leading CG art magazine. 3D World is on sale in the UK, Europe, United States, Canada, Australia and more. Limited numbers of 3D World print editions are available for delivery from our online store (the shipping costs are included in all prices). Subscribe to 3D World at Magazines Direct.