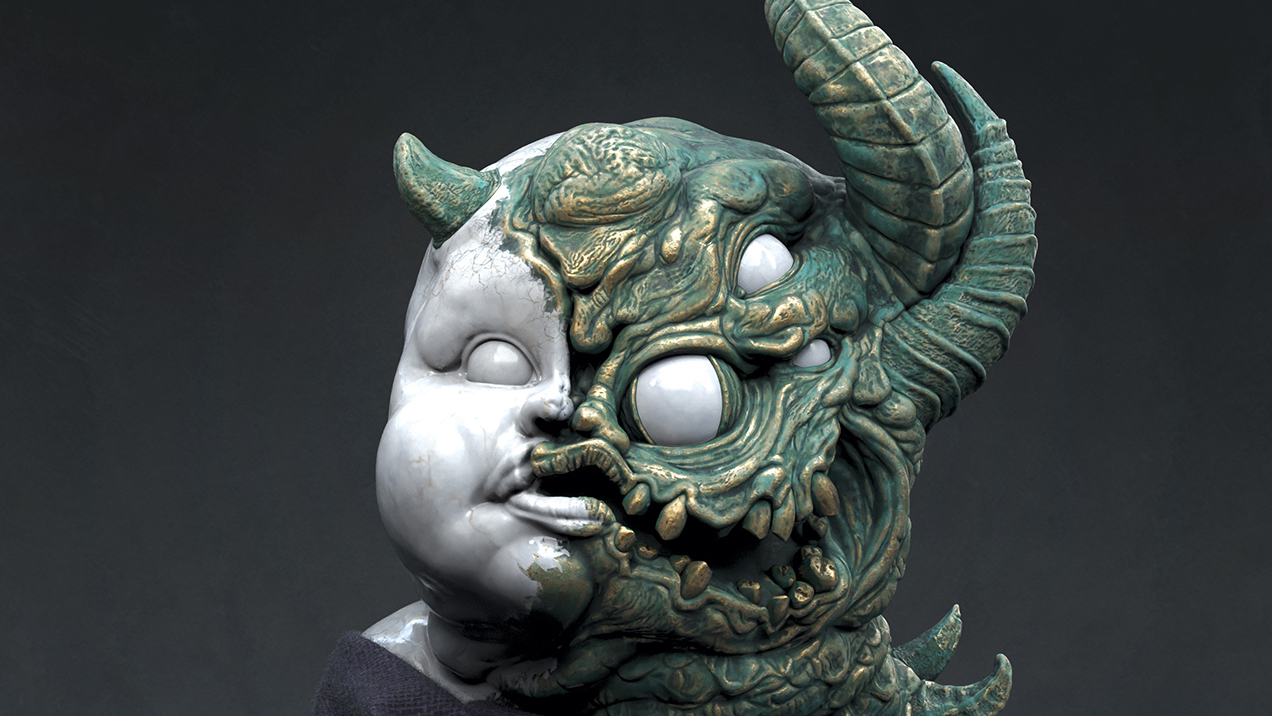
As artists, we have the fantastic ability to create everything that we can imagine from thin air. Thanks to modern tools such as ZBrush, it’s even more fun to sculpt bizarre monsters and creatures. Bringing our artworks to life with stunning textures and photoreal lighting is the cherry on top of the creepy cake. During this tutorial, I’ll show you a simple but effective workflow to jump-start your own sinister sculpting.
If you like this workshop then read more ZBrush tutorials on Creative Bloq, and explore other apps in the guide to the best 3D modelling software. Read up on the best laptops for 3D modelling, too. If tablets are your thing, then remember Maxon also has ZBrush for iPad and Creative Bloq has a beginner tutorial, 'ZBrush for iPad: 10 beginner tips to get you started' that's worth a read.
01. Concept the idea
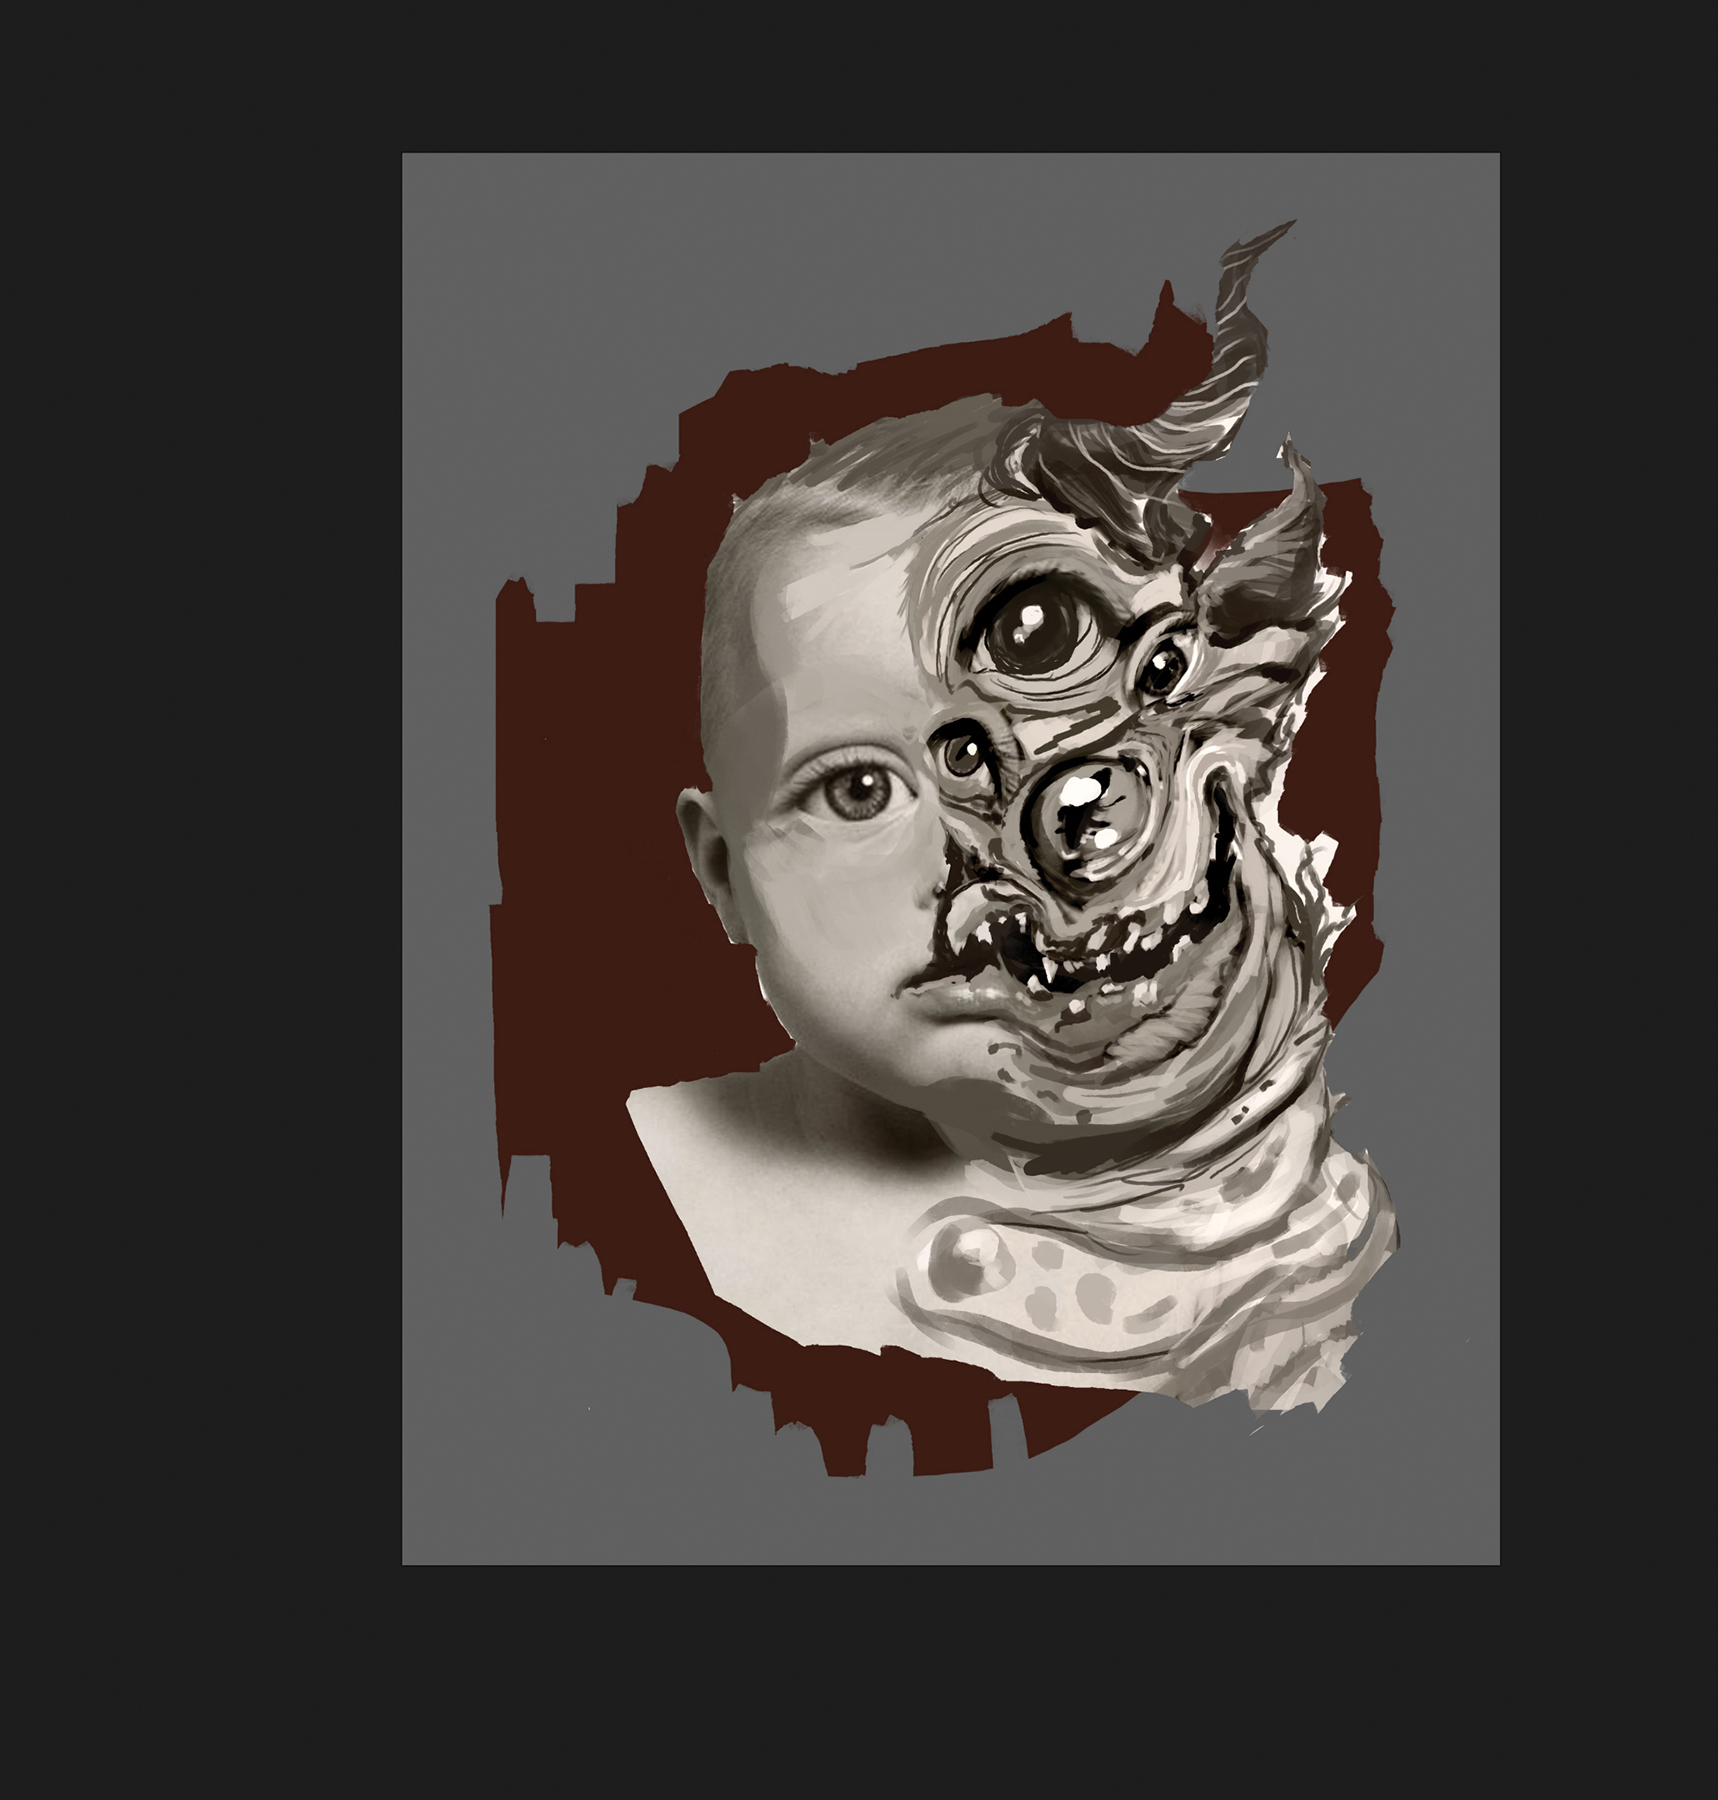
Every sculpture starts with an idea. That can be achieved by making a few scribbles, 3D models, kitbashing, or concept artwork. My piece is based on German folklore, so I did my research on the creature and created an initial concept.
02. Blocking out the base shapes
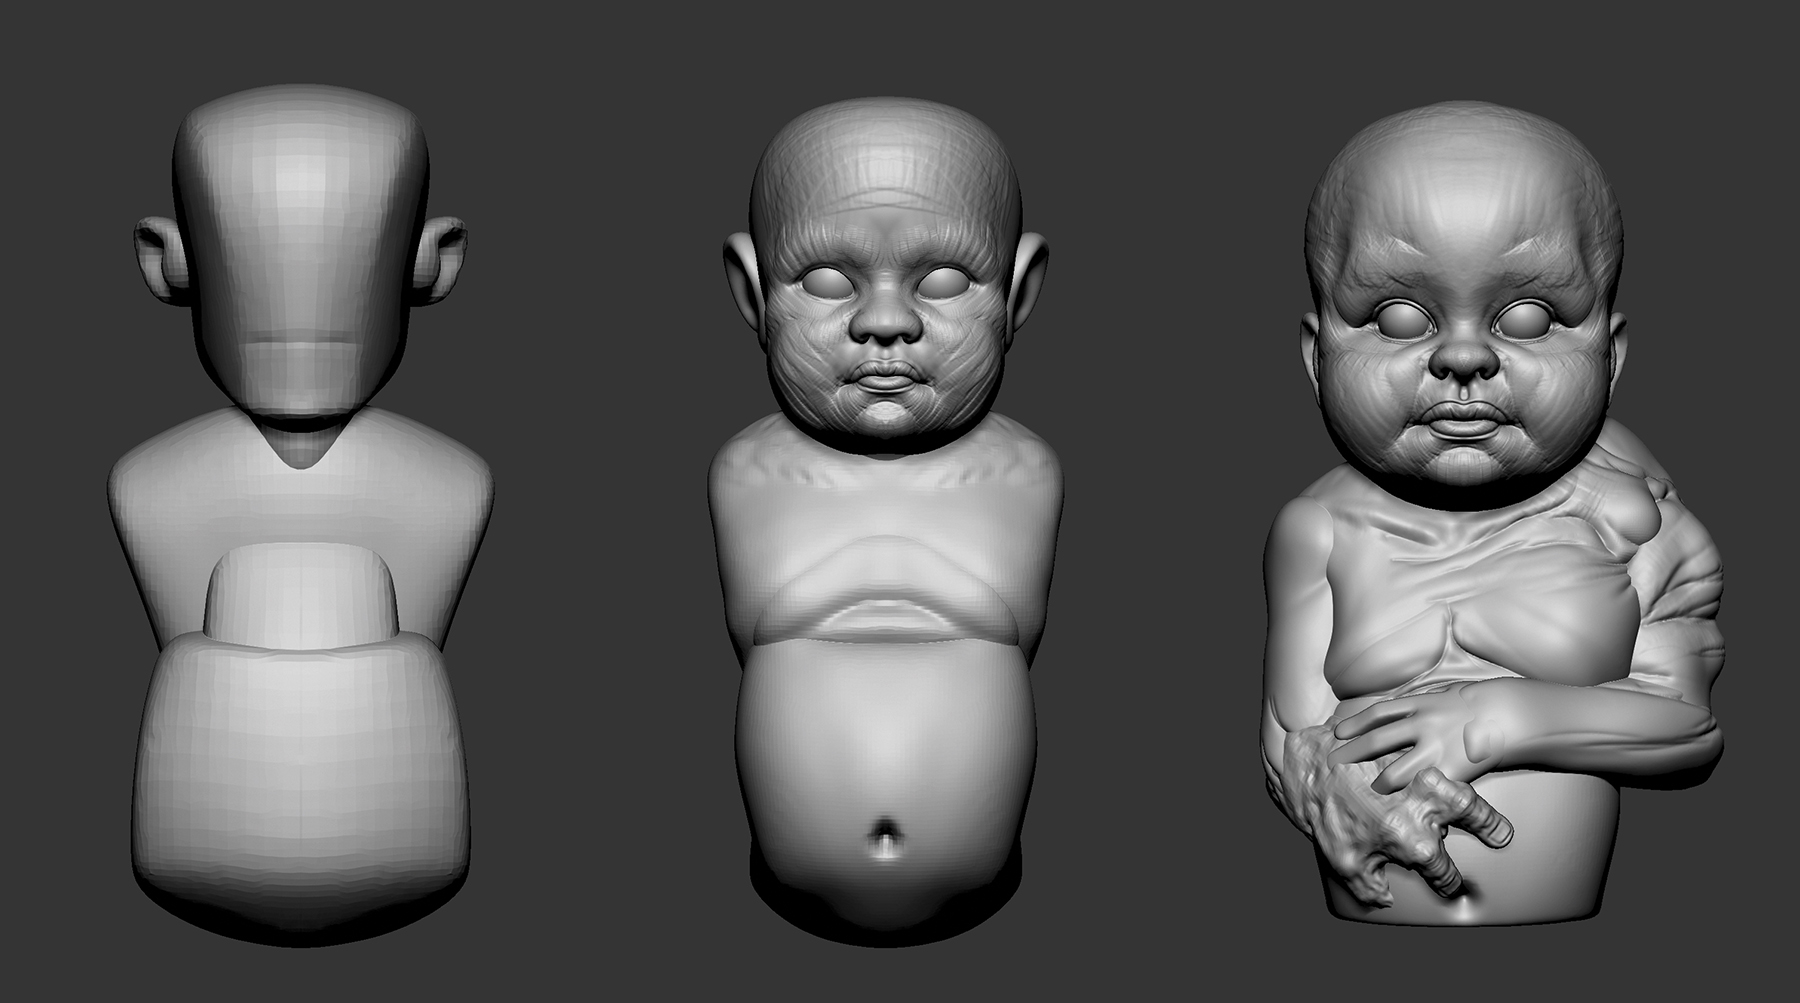
Get going with simple shapes like cylinders, spheres and so on to create the base proportions as quickly as possible. That will help you keep the big picture in mind without losing yourself in the details. If you have a clear idea of your sculpt, always double-check your proportions against your main references.
As it’s so easy to work digitally with symmetrical meshes, break the symmetry of your sculpt as soon as possible to avoid boring shapes and create a stronger shape language.
03. Refining the proportions
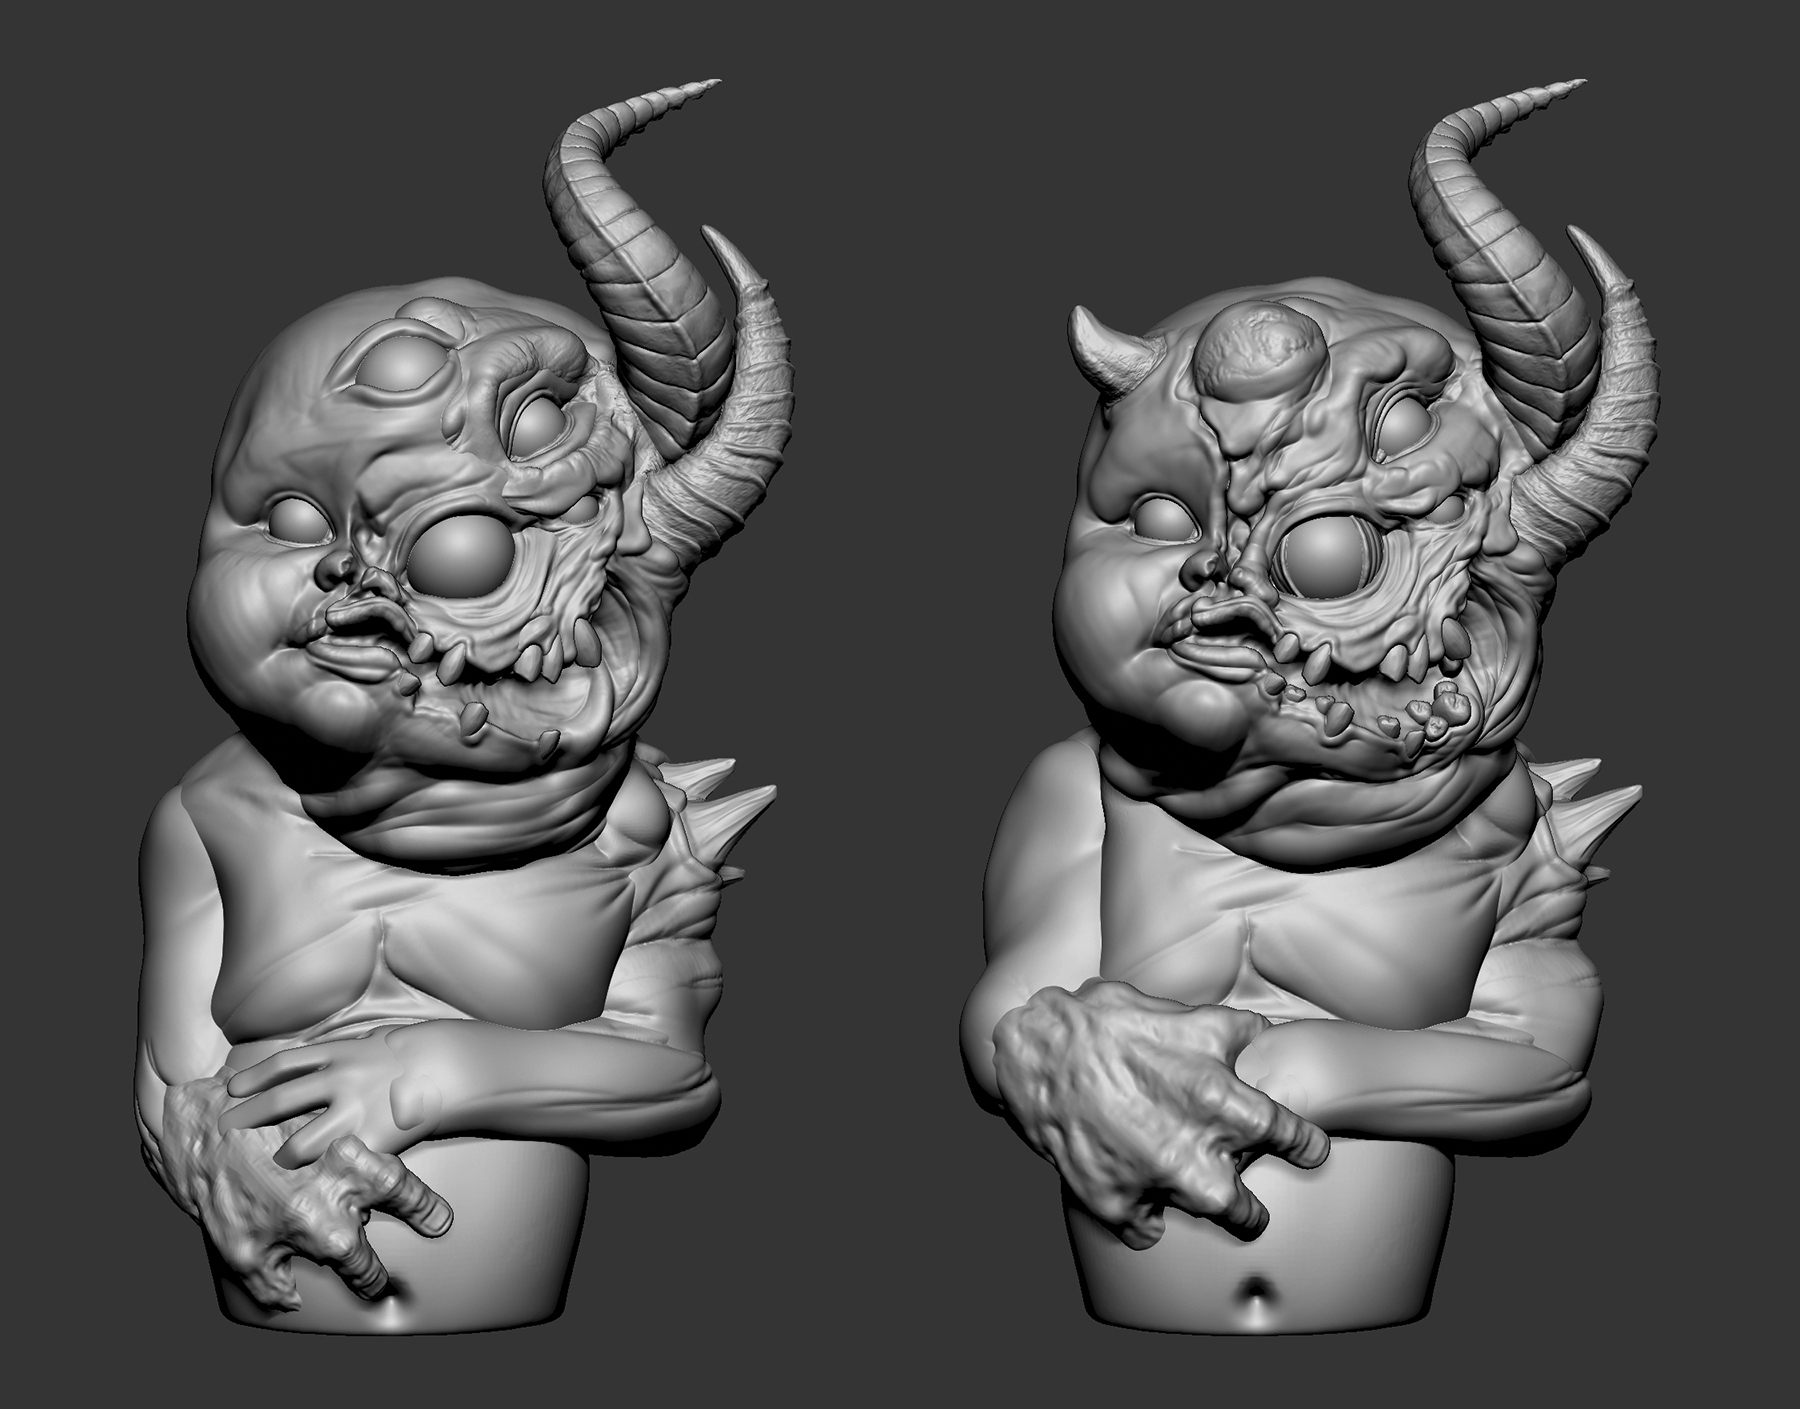
When you’re satisfied that the base sculpt has enough details to describe the silhouette, you can begin working on refinements by adding extra pieces such as horns, deformations, and any other eye-catching touches.
04. Adding the extra pieces
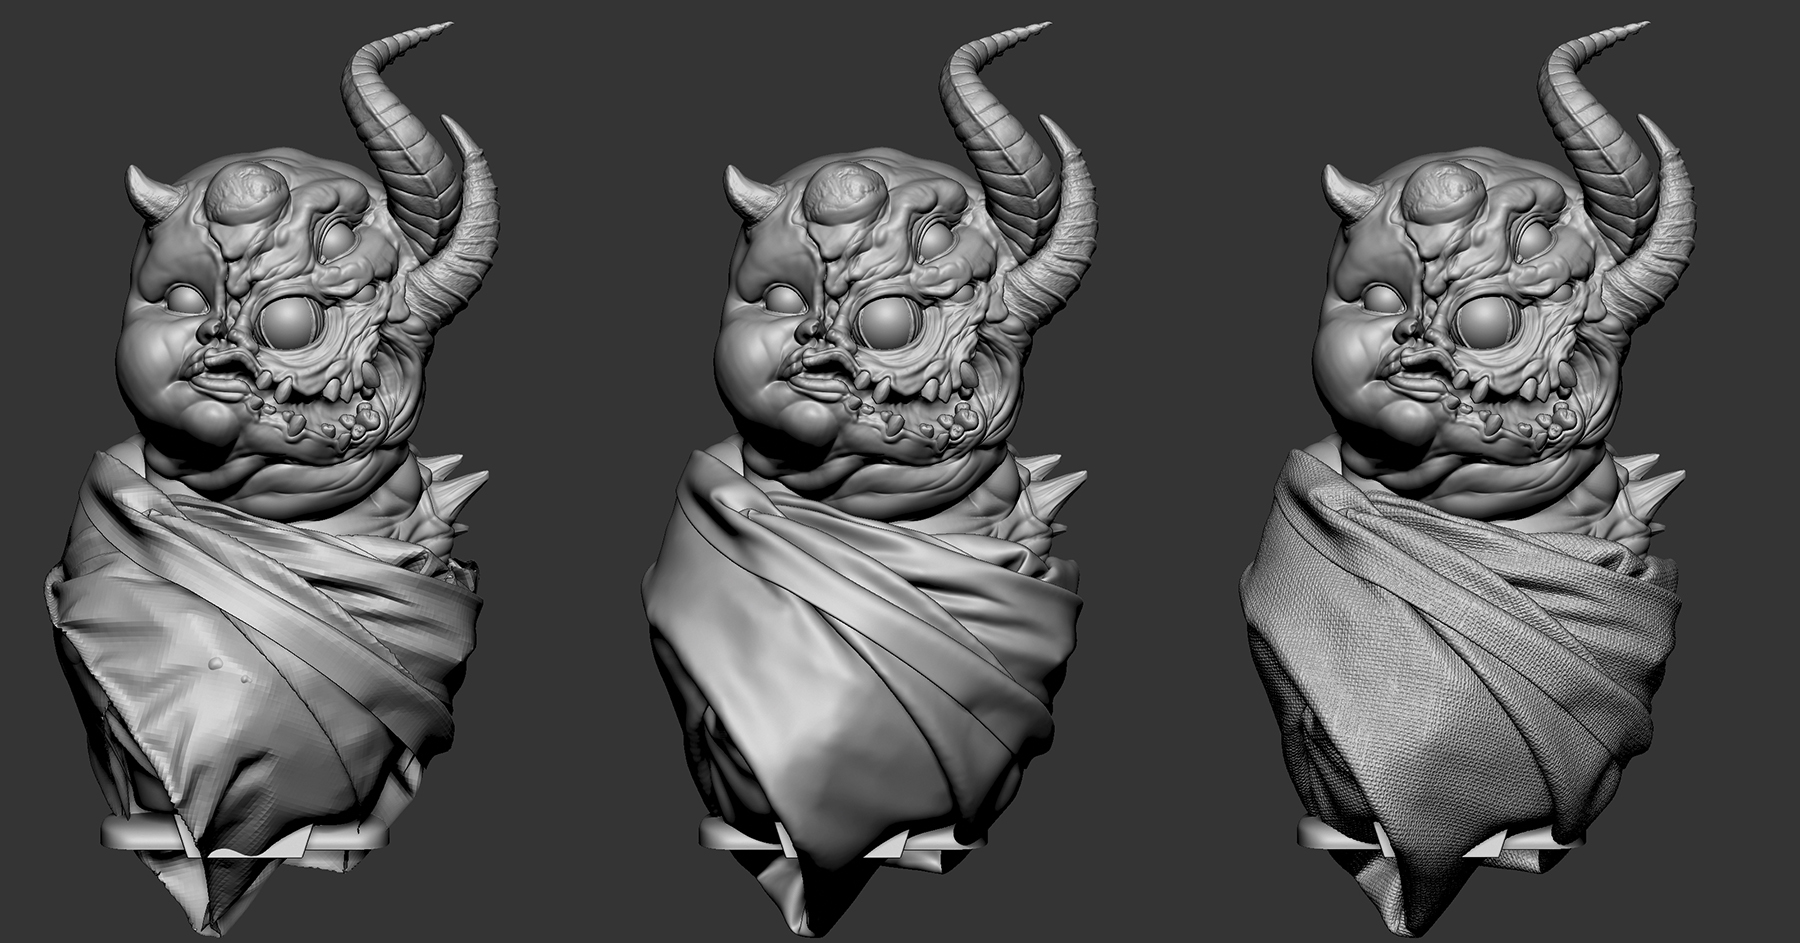
For more visual interest and to stand as a counterpoint to the organic shapes, add extra non-organic pieces like drapery to your sculpture to make it feel believable in the world.
05. Blending and detailing your model
For a believable sculpt, start out by adding details to blend everything together. That will describe the volumes and help you to create a readable flow within your sculpture. Gather any additional references as needed and take a look at other materials to find inspiration for the shapes and volumes.
Digitally, we can get close to our sculpt, but that can cause issues of flow, readability, or over-sculpted areas. Always rotate around your model while sculpting and zoom out to see all shapes and details under the same conditions. Also, use different MatCaps to see your work with a fresh pair of eyes.
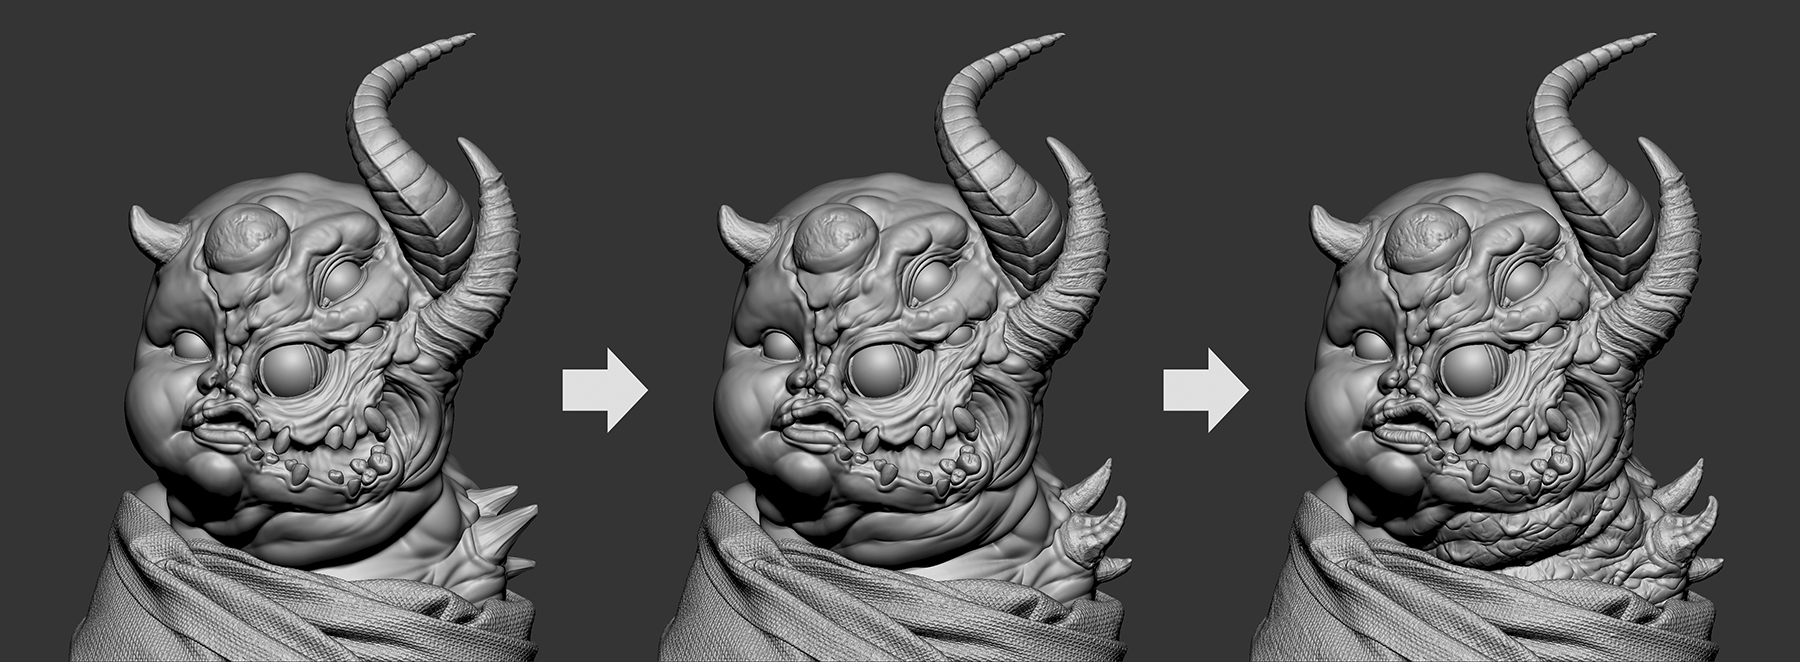
06. Beginning rich detailing
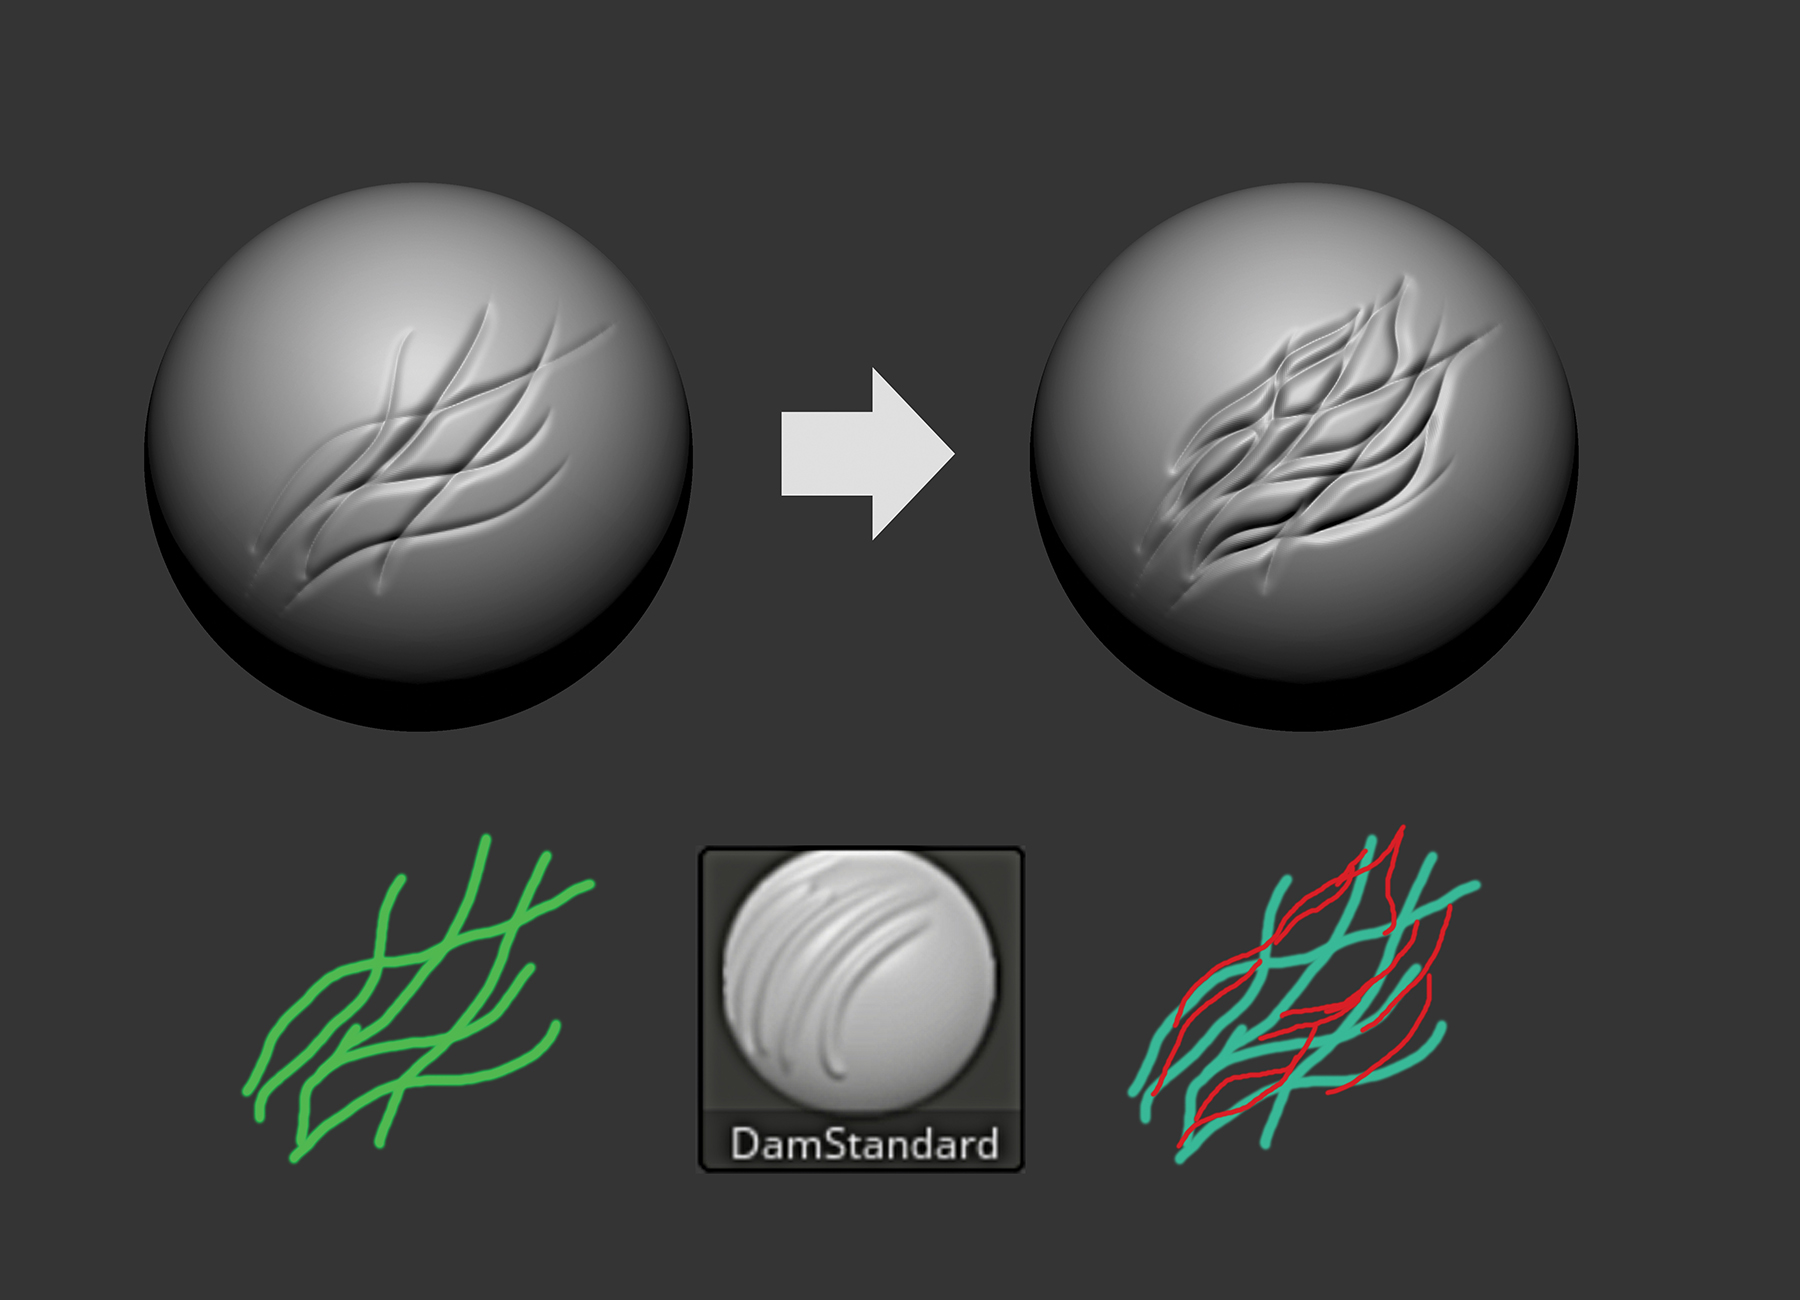
For specific areas such as skin wrinkles or other overlapping forms, begin with the base detail lines and use the DamStandard brush to create a crisscrossing pattern. Refine your pattern with more lines to break up the existing shapes.
07. Working close-up
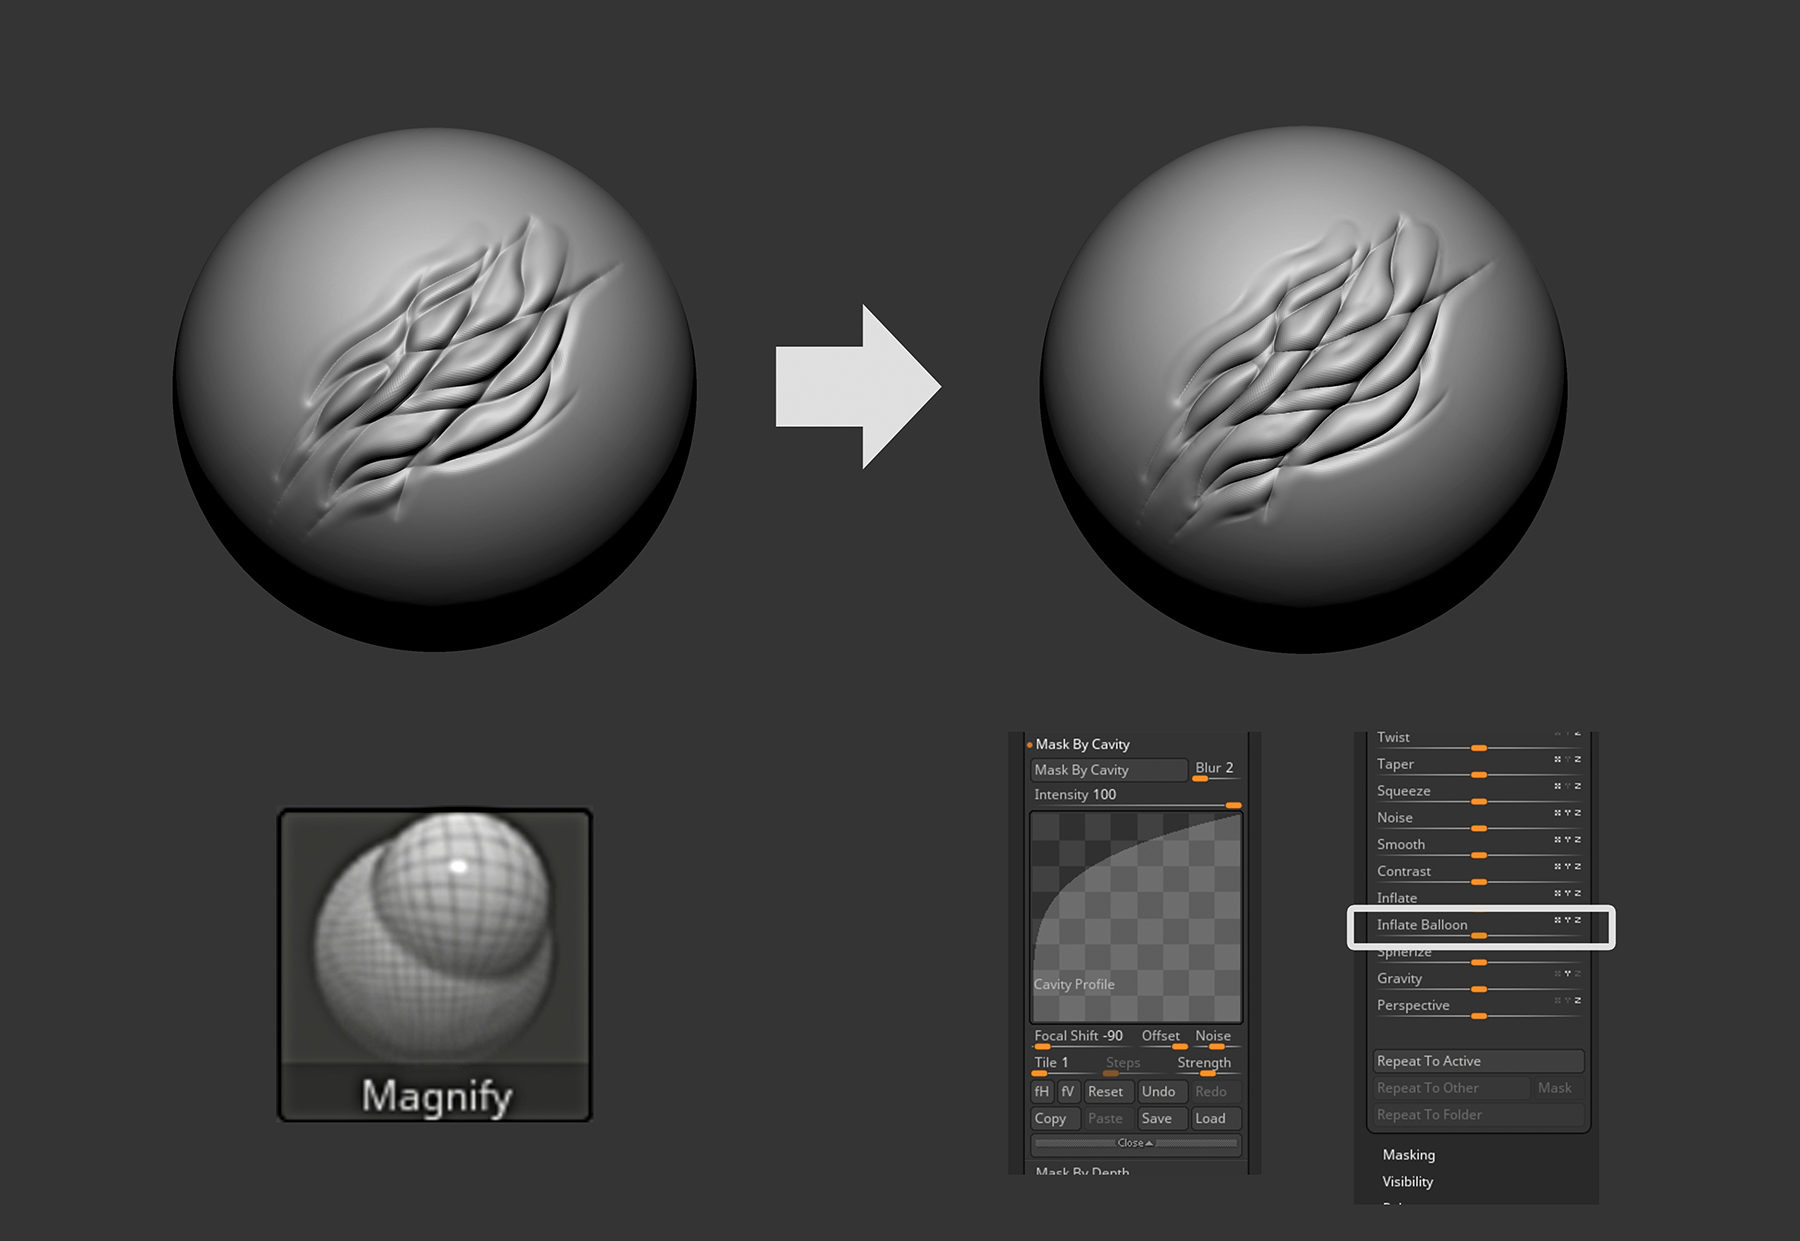
Use the Magnify brush to accentuate a few different areas of the pattern. The brush will help you create organic overlaps. Next, Mask by Cavity with the curve shown to gain more contrast out of the mask. After creating the mask, blur it once and then use the Inflate Balloon option under the Deformation tab, which will make an even more fleshy appearance on your pattern.
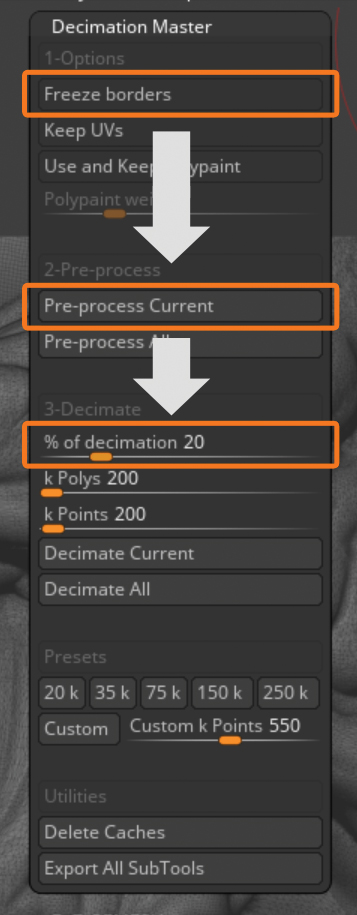
08. Decimate your SubTools
Because the sculpt will just be a render, we don’t have to worry about getting clean topology. However, you should keep in mind the need for a decent point count to get better unwrapping. Either use the Decimation Master tool within ZBrush to decimate every single SubTool separately, or merge them all together and then decimate. By keeping the Freeze Borders option active, you can create a shape that’s even better decimated.
09. Exporting and unwrapping
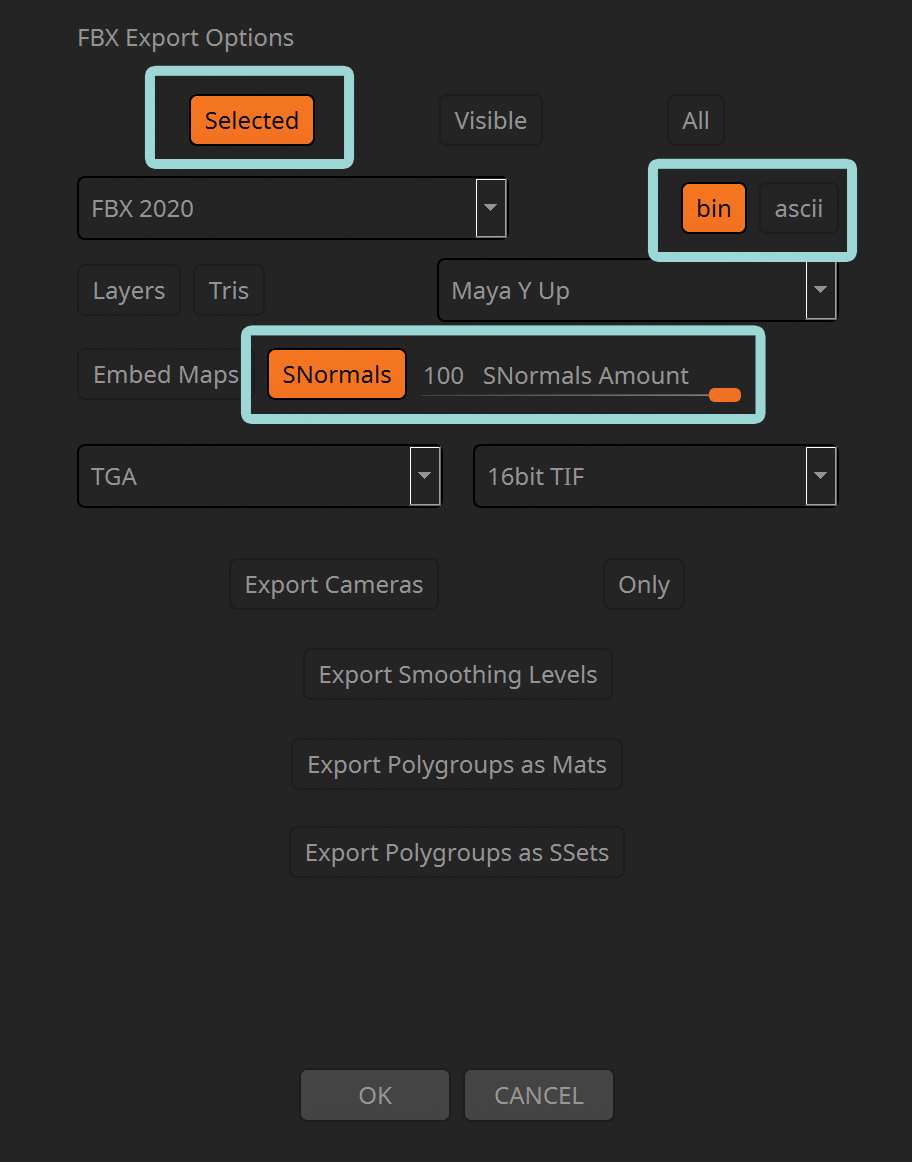
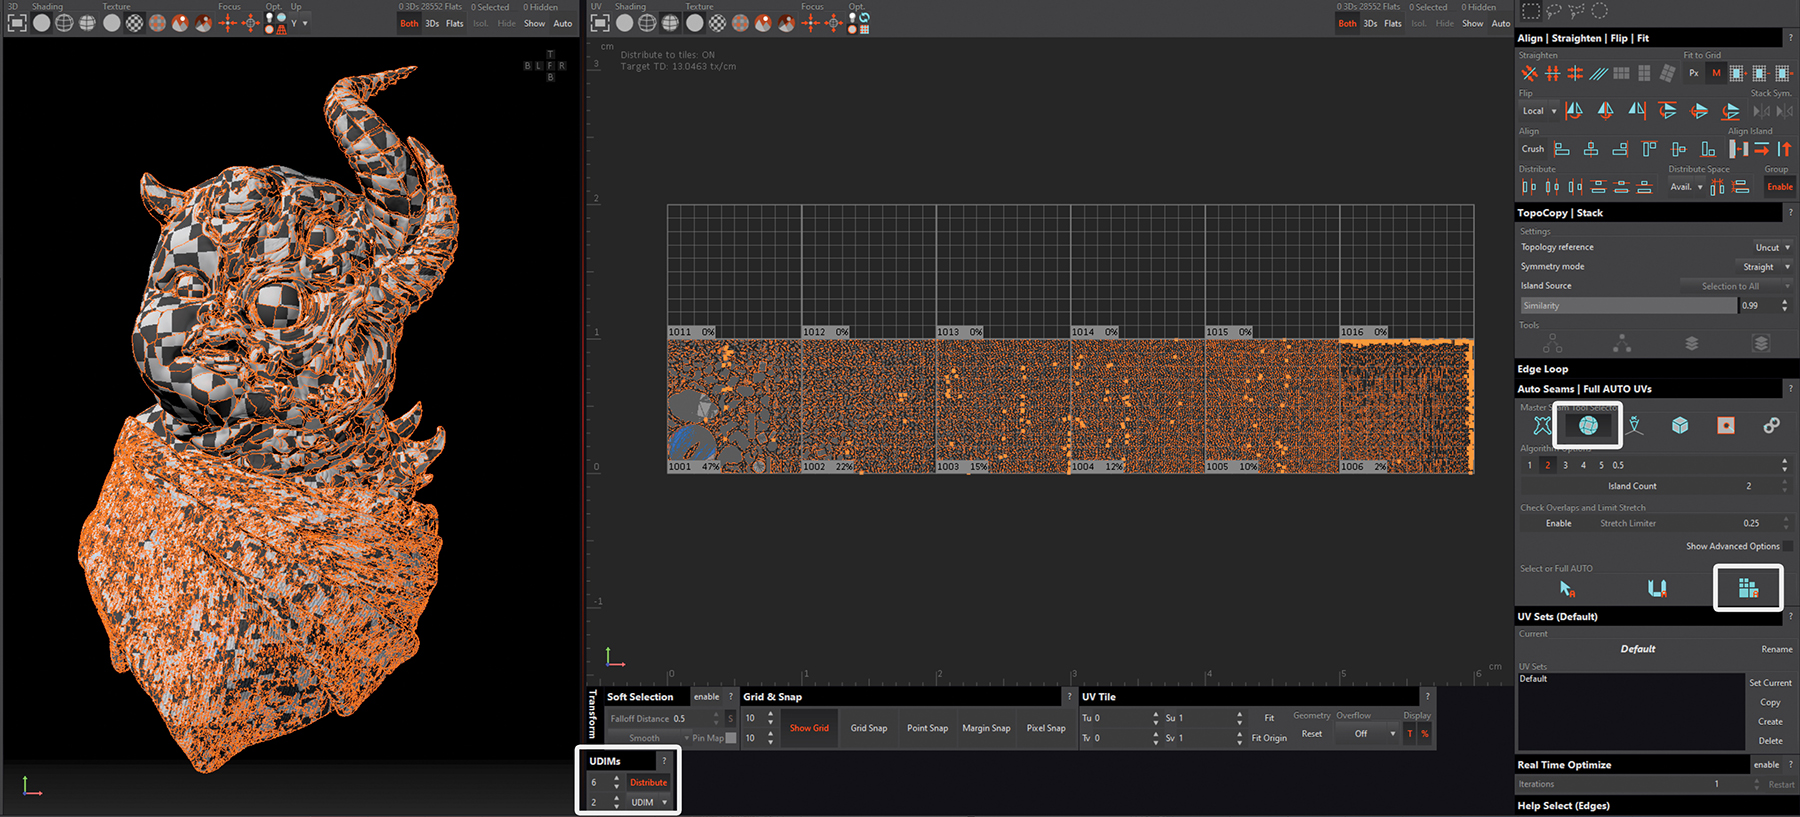
Once the decimation process is complete, export your mesh as an FBX file – which will reduce the overall file size and keep smooth normals – into your desired tool for unwrapping. For this tutorial I’ll be working with RizomUV to complete this job.
Import your model and set up your UDIM count. Next, look under the Auto Seams section and use Mosaic, which should be the second icon. To finish up here, click on Cut, Unwrap, and Pack. Depending on the power of your RAM and CPU, this process could take a while to complete. After everything is finished, you can export your model as another FBX file under a different name.
10. Preparing Substance 3D Painter
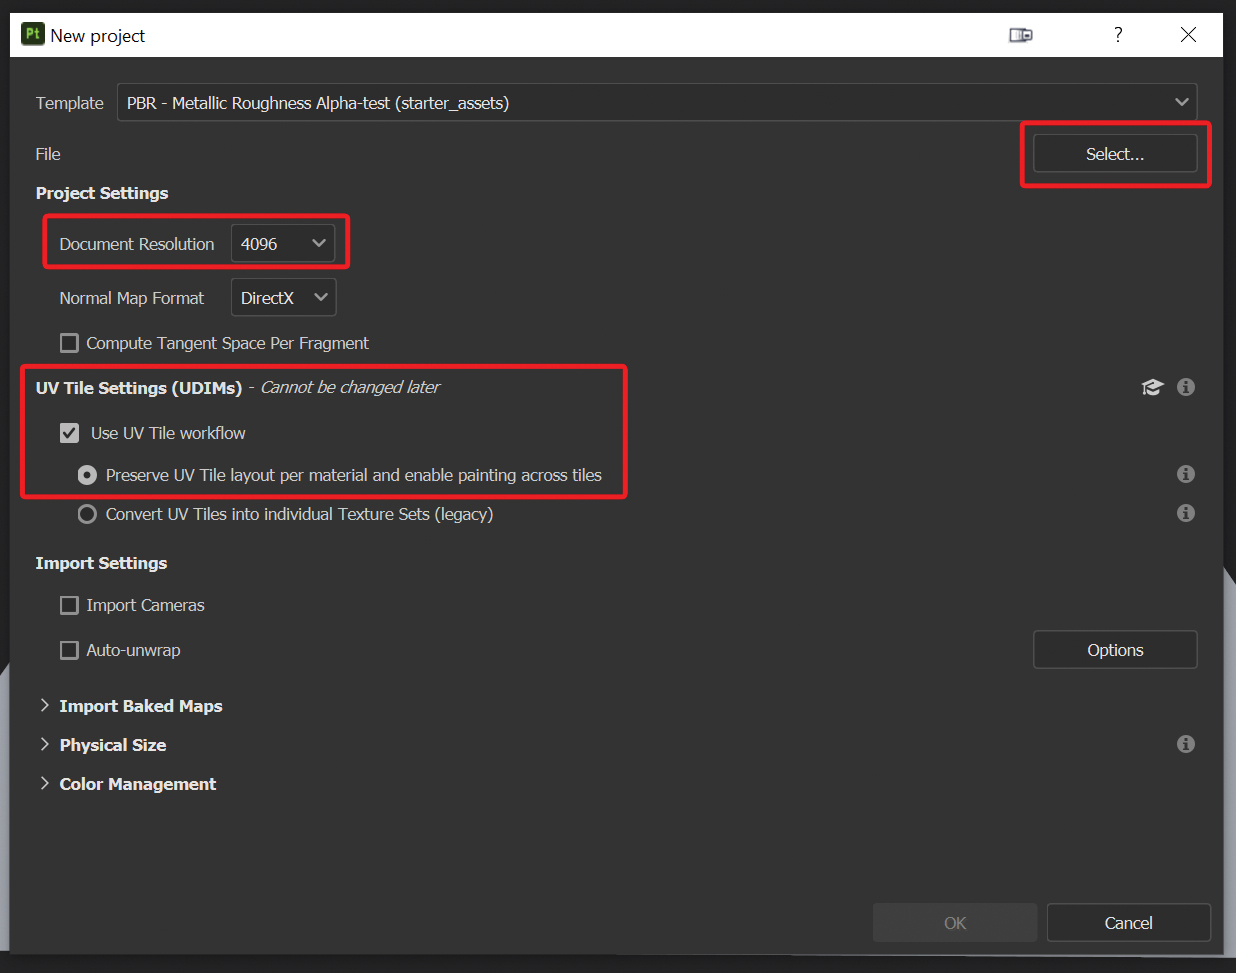
Create a new Substance 3D Painter project using the ‘PBR – Metallic Roughness Alpha-test’ template and set the Document Resolution to 4096. Import your mesh by clicking Select in the right corner. Now we’ll activate UV Tile Settings (UDIMs) so you can paint seamlessly over the UV borders. You can deactivate Auto-unwrap if needed, because our model already has a clean UV.
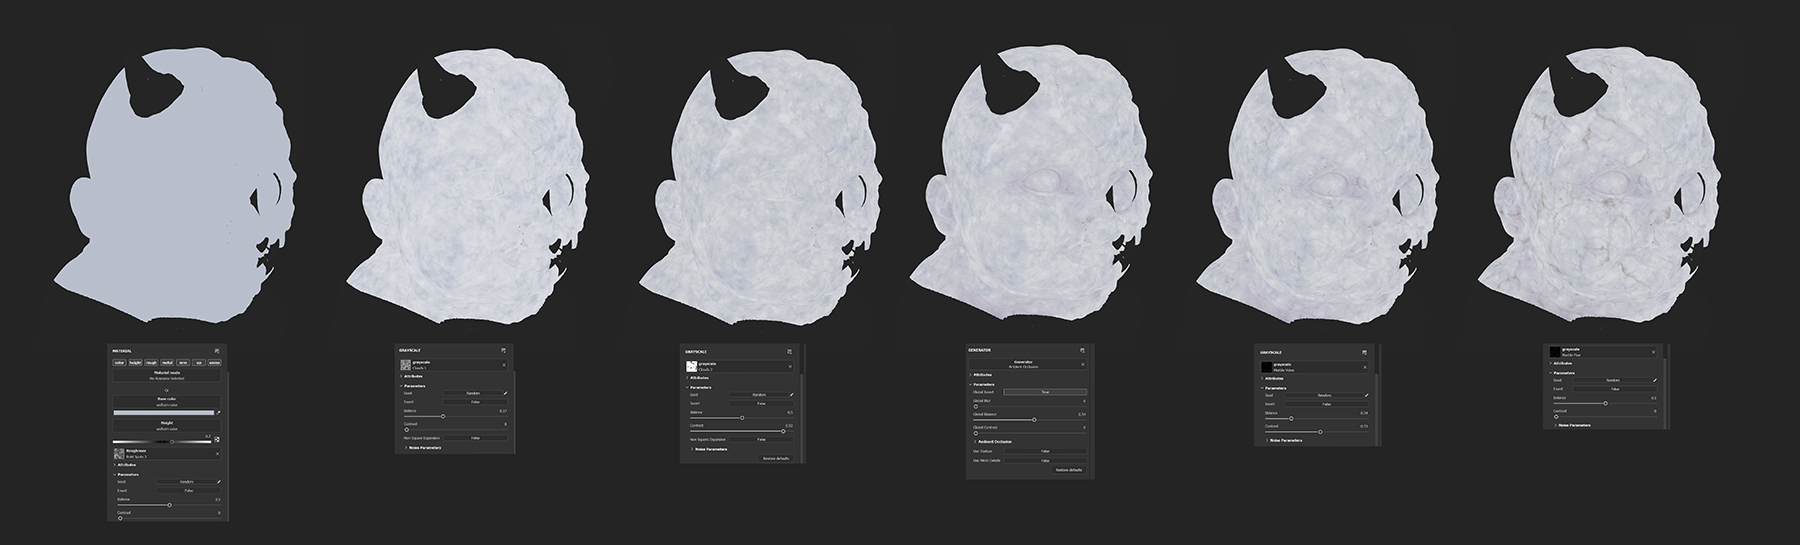
11. The initial bake settings
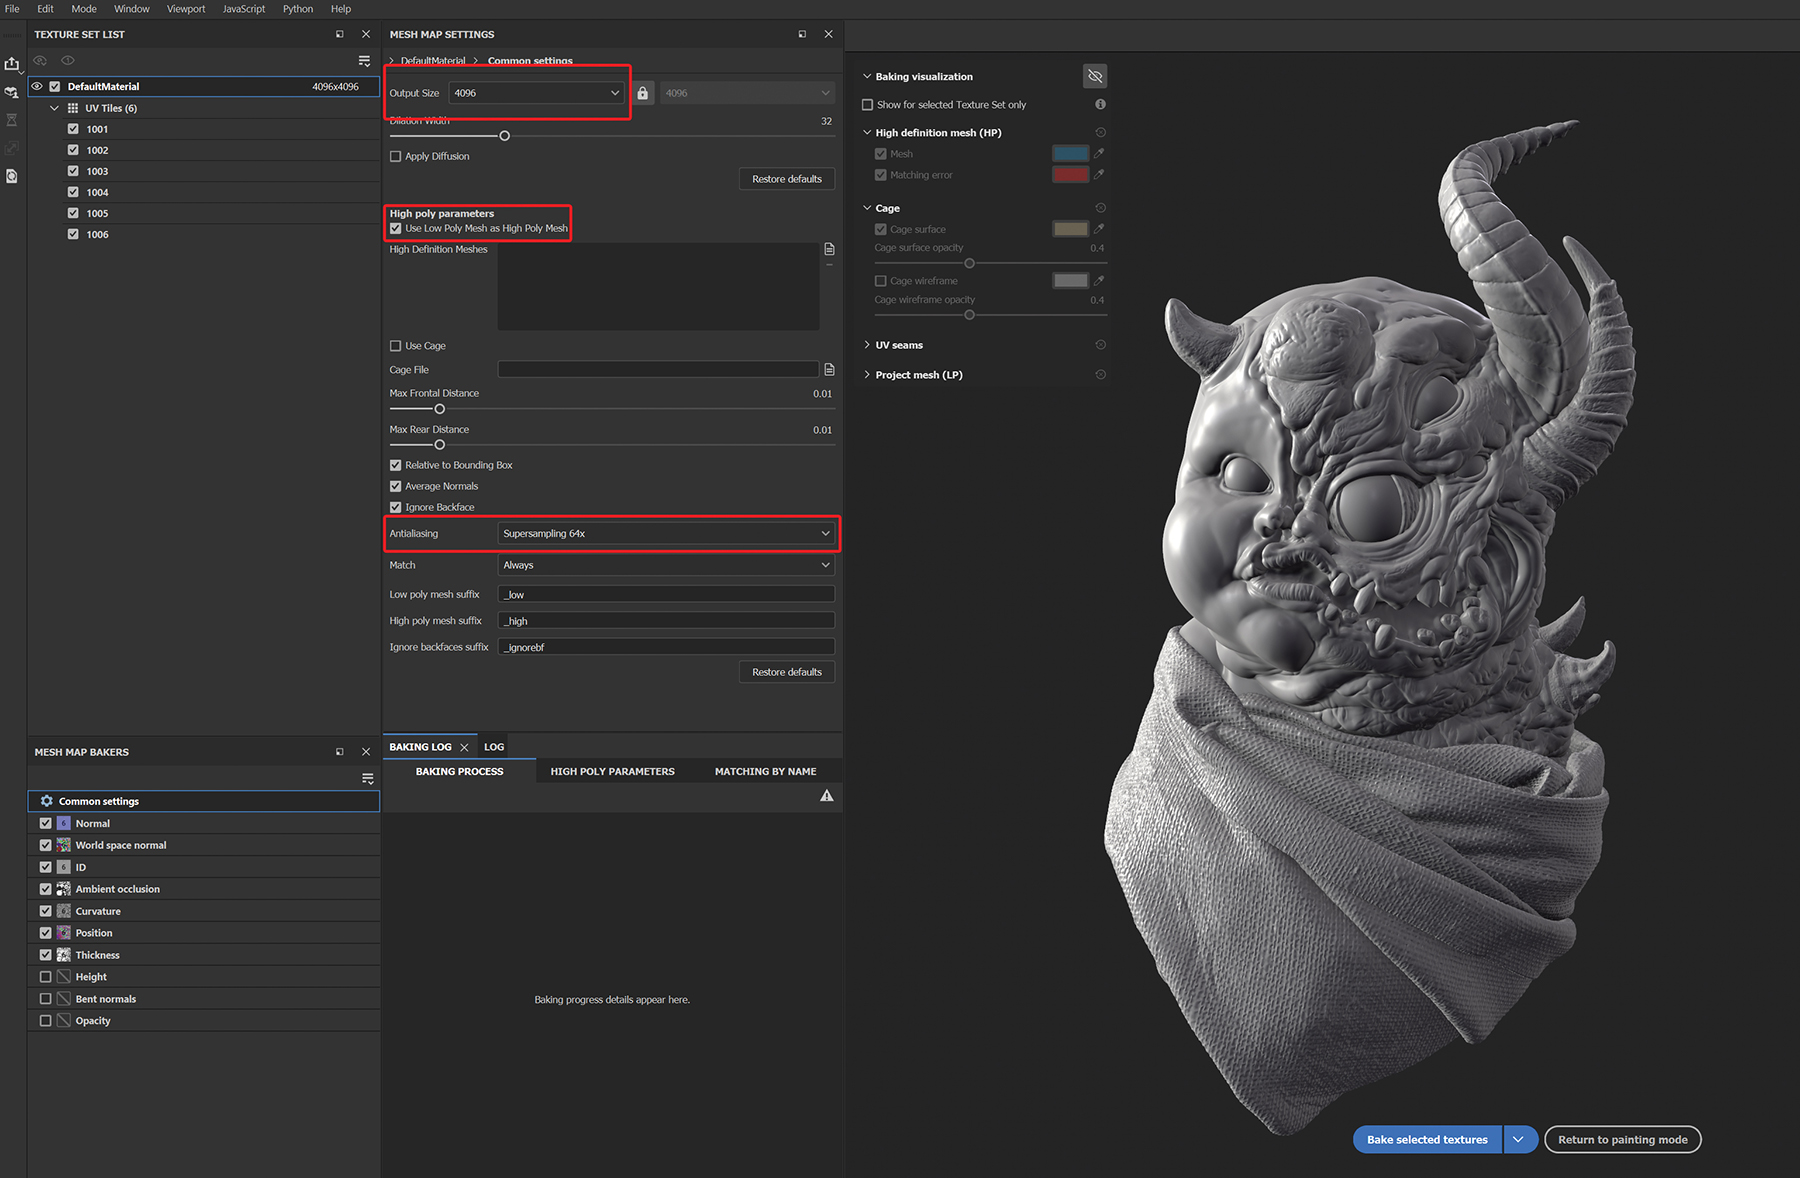
To use the full potential of Substance 3D Painter, you have to bake your model to create all the textures for the generators, such as Ambient Occlusion and Curvature. Go to the Mesh Map baker, found in the right corner of the viewport, and set your output size to 4096 to match up with the Document Resolution, then activate Antialiasing for smoother pixel lines. Under High Poly Parameters, activate ‘Use Low Poly Mesh as High Poly Mesh’. Because we’re baking the model by itself, we don’t have to apply an extra high-poly model.
12. Refining the bake

Under Common Settings, set the Secondary Rays for AO/Curvature and Thickness to 128; this will create a much smoother gradient and resolution for the textures. If you work with separated meshes, look under the ID section and set the Color Source to ‘Mesh ID / Polygroup’. With this, Painter will find the separated pieces within the model and bake a Color ID map.
To get the most out of your work, use a neutral HDRI in Substance 3D Painter. That will help you see colours and values as neutral as possible without false colours caused by the HDRI. Studio Tomoco is a great HDRI choice.
13. Texturing the sculpture
Based on your design and ideas, you can now start to texture your model. Before you get going, gather any additional references needed. For my bust, I was using extra images for the porcelain. Begin with the base colours, then add more layers on top and use different blend modes such as Multiply or Soft Overlay to create a fitting but interesting pattern. Export all your textures with your Document Resolution.
14. Creating lighting with KeyShot

Even if you have the prettiest 3D model and beautiful textures, without good lighting they’ll just look boring and flat. In other words, you paint with light and create more visual impact. Import your model and assign a grey material. Use a Backplate model to create a real background, like a photo studio, for your model. An HDRI with low intensity can also help to fill the overall image, while you can add a strong key light for the main shadows.
After this is done, use a small Point Light or Spotlight to highlight a specific area; in my example, I wanted to highlight the face. The final light is a Rim Light to create a subtle silhouette against the background.
15. Setting up the material

When you’re happy with the light and mood of your scene, go into the material of your sculpture and assign your textures. In the Material Editor, choose a Tiled UV node to import your UDIMs into KeyShot. You can use a Color Adjust node to push the contrast of the textures to match better with the lighting in the scene. For better control of the nodes, you can right-click on them to preview specific areas like the colour.
16. Final touches and render settings
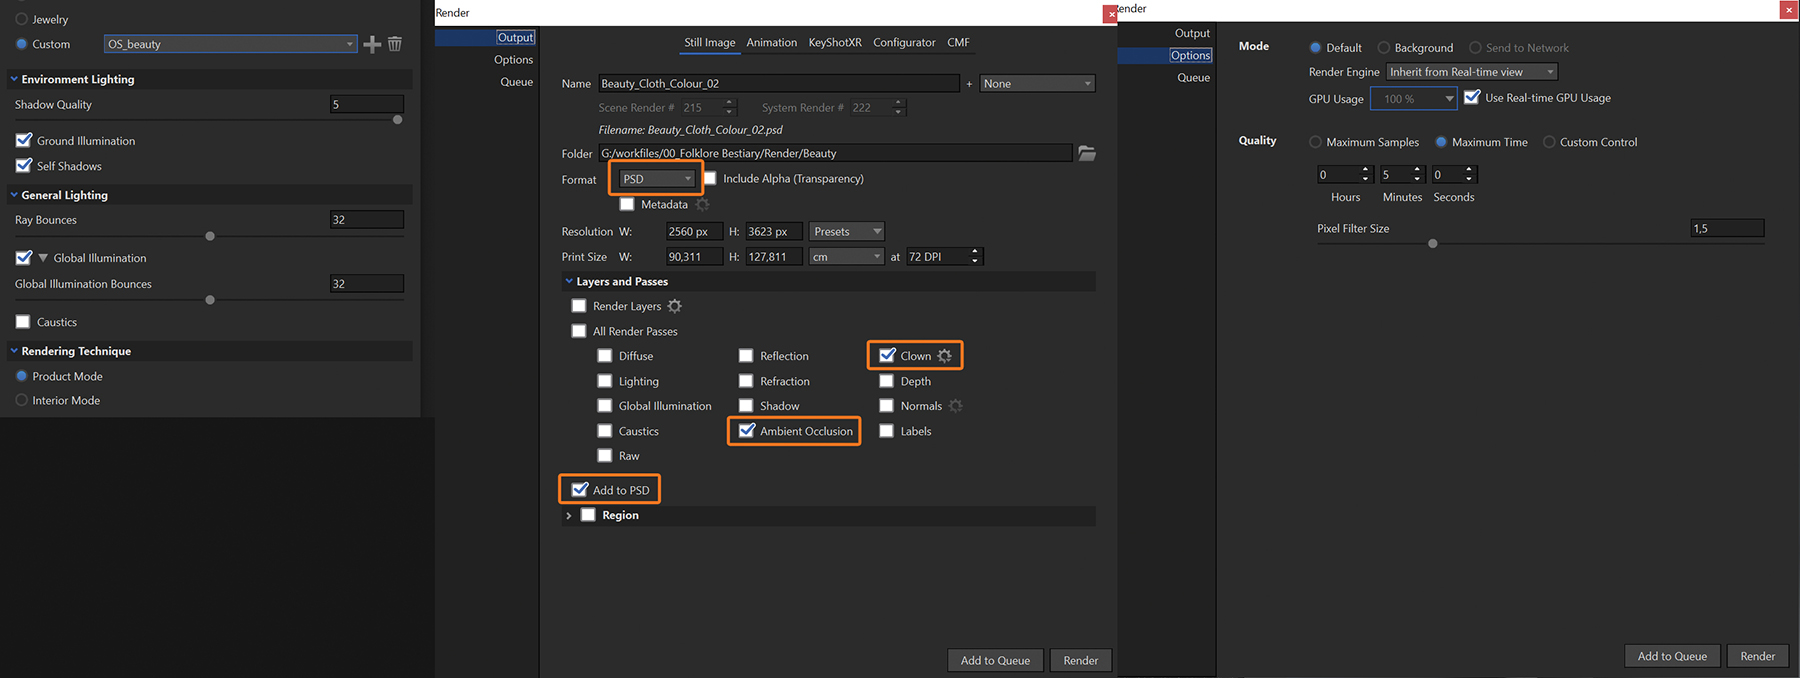
If everything is in place, you can refine the scene even further. Go to the Project Lighting tab and set the Shadow Quality to 5, and activate Ground Illumination and Self Shadows. Global Illumination should also be activated, with the Ray Bounces and Rays both set to 32.
Because KeyShot is CPU-intensive, you should activate GPU rendering instead, as the scene will run much smoother courtesy of the beefier modern graphics cards. Finally, to render your scene, go into the Render section, set up the channels you want to capture, saving them all to a single PSD file, and get the process running.
If you set the render time to a specific time, the process will be much faster and the quality won’t suffer either. I mostly render beauty shots in 15 minutes, and work-in-progress shots in no more than five minutes.
17. Refining the post-processing
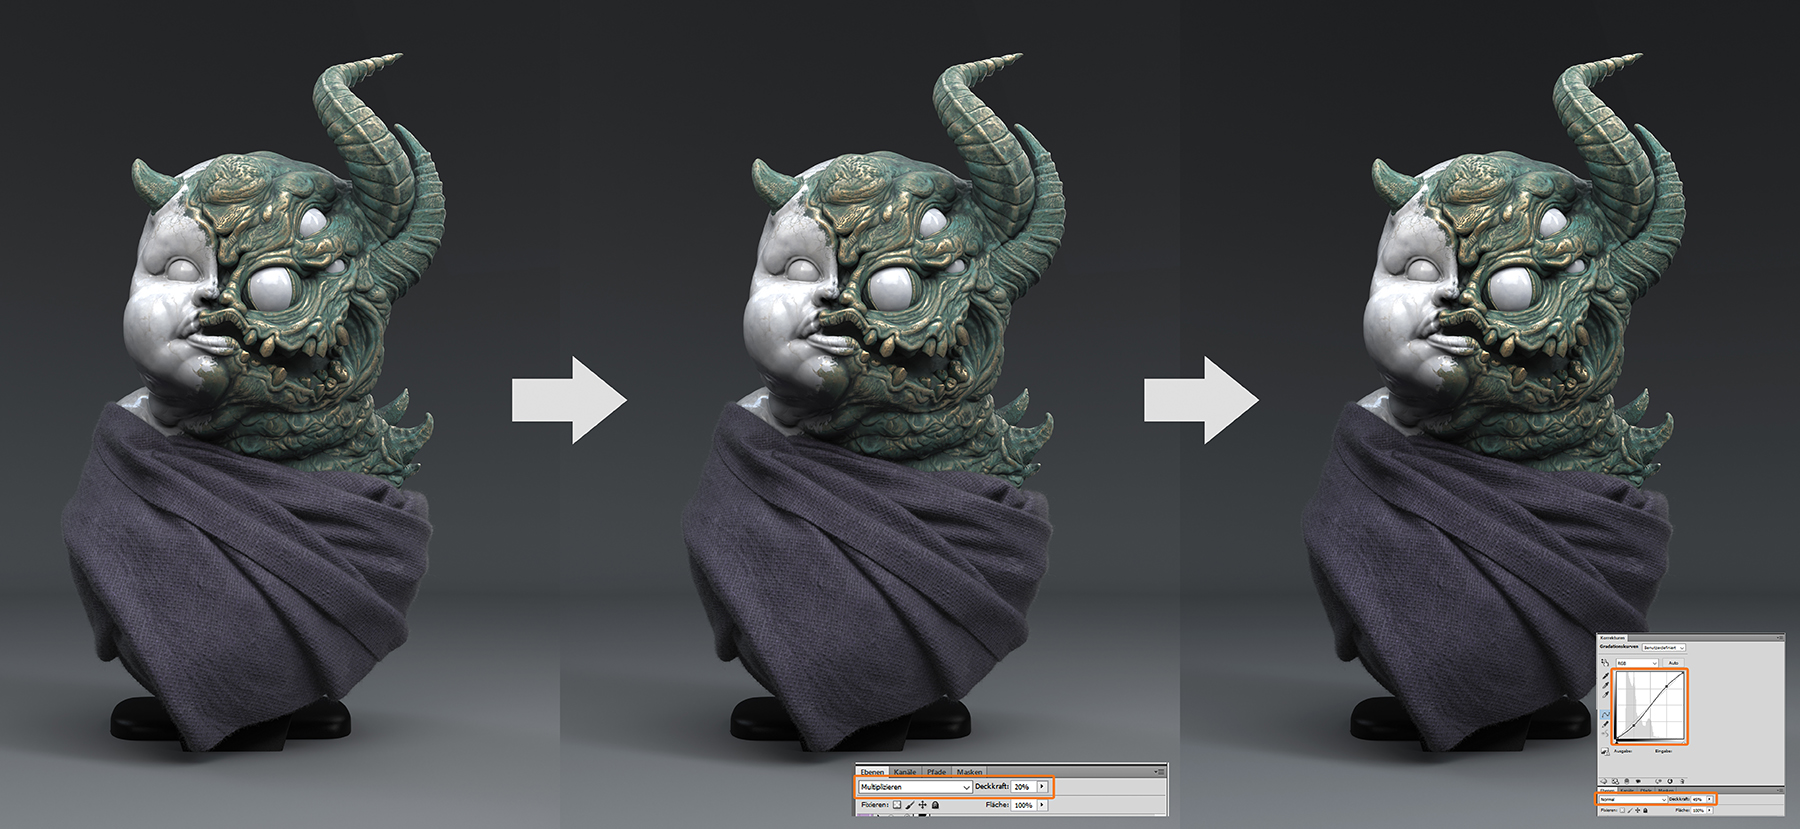
Post-processing is one of the most important parts of completing a successful project, and I used Photoshop for mine. First, use your base RAW image from KeyShot and multiply the Ambient Occlusion image on top with a low Opacity to avoid overshooting the darker areas. Next up, you can use a Curve layer to start working on the lighter and darker areas of your composition.
If you use a black-and-white layer on top of your layer stack, you have more control over your contrast values. Always check if your image looks too flat.
18. Making corrections and adjustments
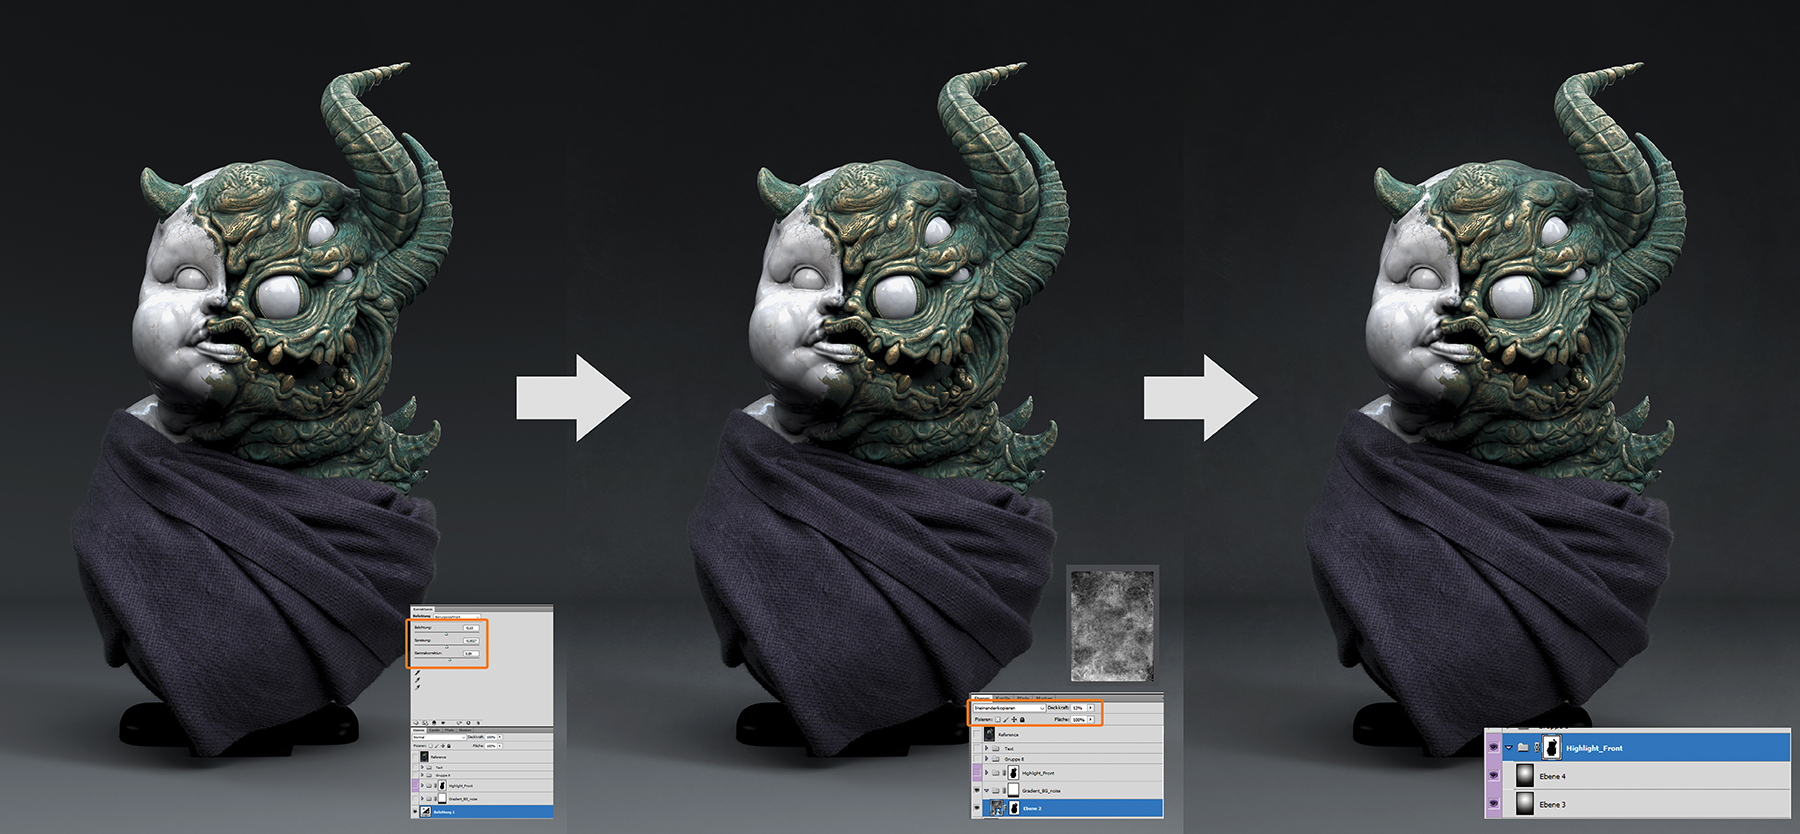
Use the Exposure settings to create even more contrast within your piece. Another great trick is to take a noise image and a mask to cut out your render, set the noise image’s layer to Screen, and tweak the Opacity values until you’re happy. That layer will help create extra visual interest compared to a clean surface, and bring more realism to your image.
After this, add a Radial Gradient and use the same mask you used for the noise. Set the gradient layer to Screen to create a small, highlighted area behind your sculpture to make it pop out from the background. You can add as many gradients and tweak any settings as you need.