Before work even begins on building an extension, there are lots of decisions and details that you will need to pin down. Starting an extension project off on the right foot will only help pave the way for a successful build.
You are, after all, wanting to transform your home with an extension idea within your budget, so you will want to get it right rather than risk mismanaging and having to overspend.
That all sounds reasonable, but if you’ve never taken on an extension before, where do you start? We’ve pulled together a helpful guide to kick-start your project before the build begins, with top tips on designing, budgeting and planning.
1. Plan what you want and need
Dreaming about building an extension is where it all starts. You want an extension to solve a problem (or two) - perhaps to create a better connection between rooms, invite more natural light into your home or add a much-needed extra bedroom. Whatever it is, embrace the dream first. This will help you think about what it is you really want, and need.
The ‘wish-list’ moment. But remember to plan the extension around your unique requirements – don’t fall into the trap of working around an idea you’ve seen on television if it doesn’t reflect your day-to-day needs. Rather use it as inspiration for your own home.
Once you’ve highlighted the key functions you want from your extension, you can start to create a first draft design brief. This will form the basis on which you can start up conversations with architects and builders about your vision, your current niggles and your needs.
As the design process develops tweaks can be made to fall in line with your budget. But at least you’ll begin to understand the areas you’d be willing to compromise on and the areas where you definitely wouldn’t.
2. Be budget savvy (and aware of hidden costs)
How much an extension costs is dependant on many things. Of course size and how many storeys it’ll be will certainly impact the bottom line. But how much glazing you choose, the materials you use to build the structure, the style of roof you pick and where you are in the country will all influence the budget.
And be aware of costs that you might not have factored into the overall budget. Items such as:
- Insurance - you’ll likely need specialist extension insurance to cover the project
- A ground survey and/or groundworks to clear the site ie removal of tress, drainage inspections
- Fees ie planning, architect, structural engineer
- Potential Party Wall Agreement
- Interior decoration
- And any ‘making good’ of the garden after works have finished.
As a guide, you should set aside between £1,500 and £2,500 per sq m for an extension, excluding VAT. It's a broad price range (and can of course cost more) because the price will be affected by a number of factors. The spec of the construction materials, the amount of glazing, the size and shape of the build, for example will all impact cost.
It’s also a sensible idea to ringfence a 15-20% contingency fund to help minimise financial pitfalls, too.
With these rough per sq m costs you can allocate an available project fund for your architect to work with. If you let them know what your key goals are – a bespoke kitchen, plenty of natural light, for example – they’ll be able to work with you to tweak other aspects of the scheme to bring it in on budget.
3. Engage with an architect
Do you need an architect for an extension? It isn’t essential to bring an architect on board - there’s no law to say you have to have one - yet a designer’s vision can be hugely beneficial.
Their insight on positioning, orientation, structural systems and building materials can help in creating a stunning addition. They can bring fresh ideas to the table, they will know what passes planning in your area or what will meet Permitted Development rules, and can offer ways to reduce the cost of the design, if this needs to happen.
There are different levels of service an architect can offer, too. They could come in and consult, provide ideas and draw up construction plans. Alternatively, you can hire an architect for a full design service, which means they will effectively project manage the design process for you. They’ll engage with other professionals the project may need before construction begins, such as bringing in a structural engineer, they can create the drawings needed for planning and liaise with the planners and council during that process.
But just how much will you pay for architects in fees? 'This always depends on how architects structure their fees,' says architect and director of Studio BAD architects, Darren Bray. 'Some use percentage to cost up and some use a capped time charge. We as a practice sell time and service which is capped. Typically if you wanted to make an allowance for architects fees, generally works to existing buildings can be more involved so budget eight to 12 % of your total construction cost.'
'There is always someone out their prepared to quote more cheaply than most, but always interview a number of architects, get references and ask about their success rate at planning and delivering to a budget. Some architects do find it challenging delivering to a budget!'
4. Find a builder
Don’t think you have to engage with trades during the later stages of the pre-build process. Start up conversations early. Seek recommendations from neighbours, friends and family and strike up engagement early doors.
Even if you are instructing an architect, you can talk to builders about your project and can gauge what they think about it. Your architect might be able to recommend a company they have worked with before.
Builders will be able to inform you about materials and construction - are certain materials in short supply or on a long delivery lead time for example? Are costs for certain materials going to blow your budget - can they suggest alternatives? The more insight you have at the planning stage, the better. Plus, you can get an idea early on of the builders you’d like to go out to tender for the work.
Darren's top tip when finding a builder is to not write off the smaller companies. "We have shifted how we deliver small domestic projects now and will generally only use a small builder, who does one project at a time.
Larger contractors have just become too expensive at the smaller scale of the market. They come with added costs on resources and site set up. Smaller builders will generally agree a fixed cost with smaller overheads and profit (OHP) around eight to 10 % whereas the larger contractors will have an OHP around 10 – 15%."
5. Call in quotes
Once you have the green light to go ahead with building an extension, you can put your project out to tender. Try to source quotes from at least three contractors.
Put together a series of documents for the tender process - this should include things like plans/drawings, an outline of the work needed at each stage, whether you'd want the main contractor to be the project manager, a list of known materials needed, and so on. This means each builder/main contractor will be basing their quotes to you on the same criteria, which then means you should get like-for-like back from each one. Although, do go through them all thoroughly to spot any anomalies as a cheaper quote might well have missed out something crucial.
Always ask to see examples of past projects or find out if you can talk to previous clients. And don't forget to ask what their timescales are. Many builders and their sub contractor teams will have work lined up for months in advance. This is a good sign, but will mean you might have to wait for you preferred builder, so bear this in mind.
6. Submit your planning application
While many extension schemes can be achieved under Permitted Development rights, anything that’s pushing the boundaries in terms of design is likely to require formal consent from your local authority; likewise if you live in a designated zone, such as a Conservation Area or Area of Outstanding Natural Beauty.
Working with an architect or professional planning consultant can increase your chances of success at this stage. They are aware of local planning policy and will be best placed to create a design based on a thorough understanding of the guidelines. It can also help to find relevant examples of similar extensions on your street, as these can serve as a precedent for your project.
7. Choose a project manager
If your budget is tight, you may decide to take on the project manager (PM) role yourself. This will certainly save you money but not time. Don't underestimate the role of PM. You'd be responsible for the site (access, safety etc), the deliveries, the running of the project, the orders and the trades. And you'll need to be on site daily.
It's no walk in the park. If you have time, patience and organisational skills on your side, then it'll be great to be so involved. If you think it'll be a monumental commitment then pass it over to a professional PM, a main contractor or architect, well-versed in this area.
Alternatively, you could split the role. A main contractor could take on PM until your extension reaches watertight stage. Then, you could take on the role, organising and overseeing the sub trades like electricians, plumbers, carpenters, and so on.
Many extension builds are project managed by the main contractor on site. It can be a positive route as they'll be employing the sub-contractors to work on the different elements, can organise the site and be central to keeping the project on track.
Whether you take on the role of PM or not, always keep the channels of communication open with the trades on site. You should know what's happening from problems to decision making, from hold-ups to no-shows from trades, so keep yourself informed.
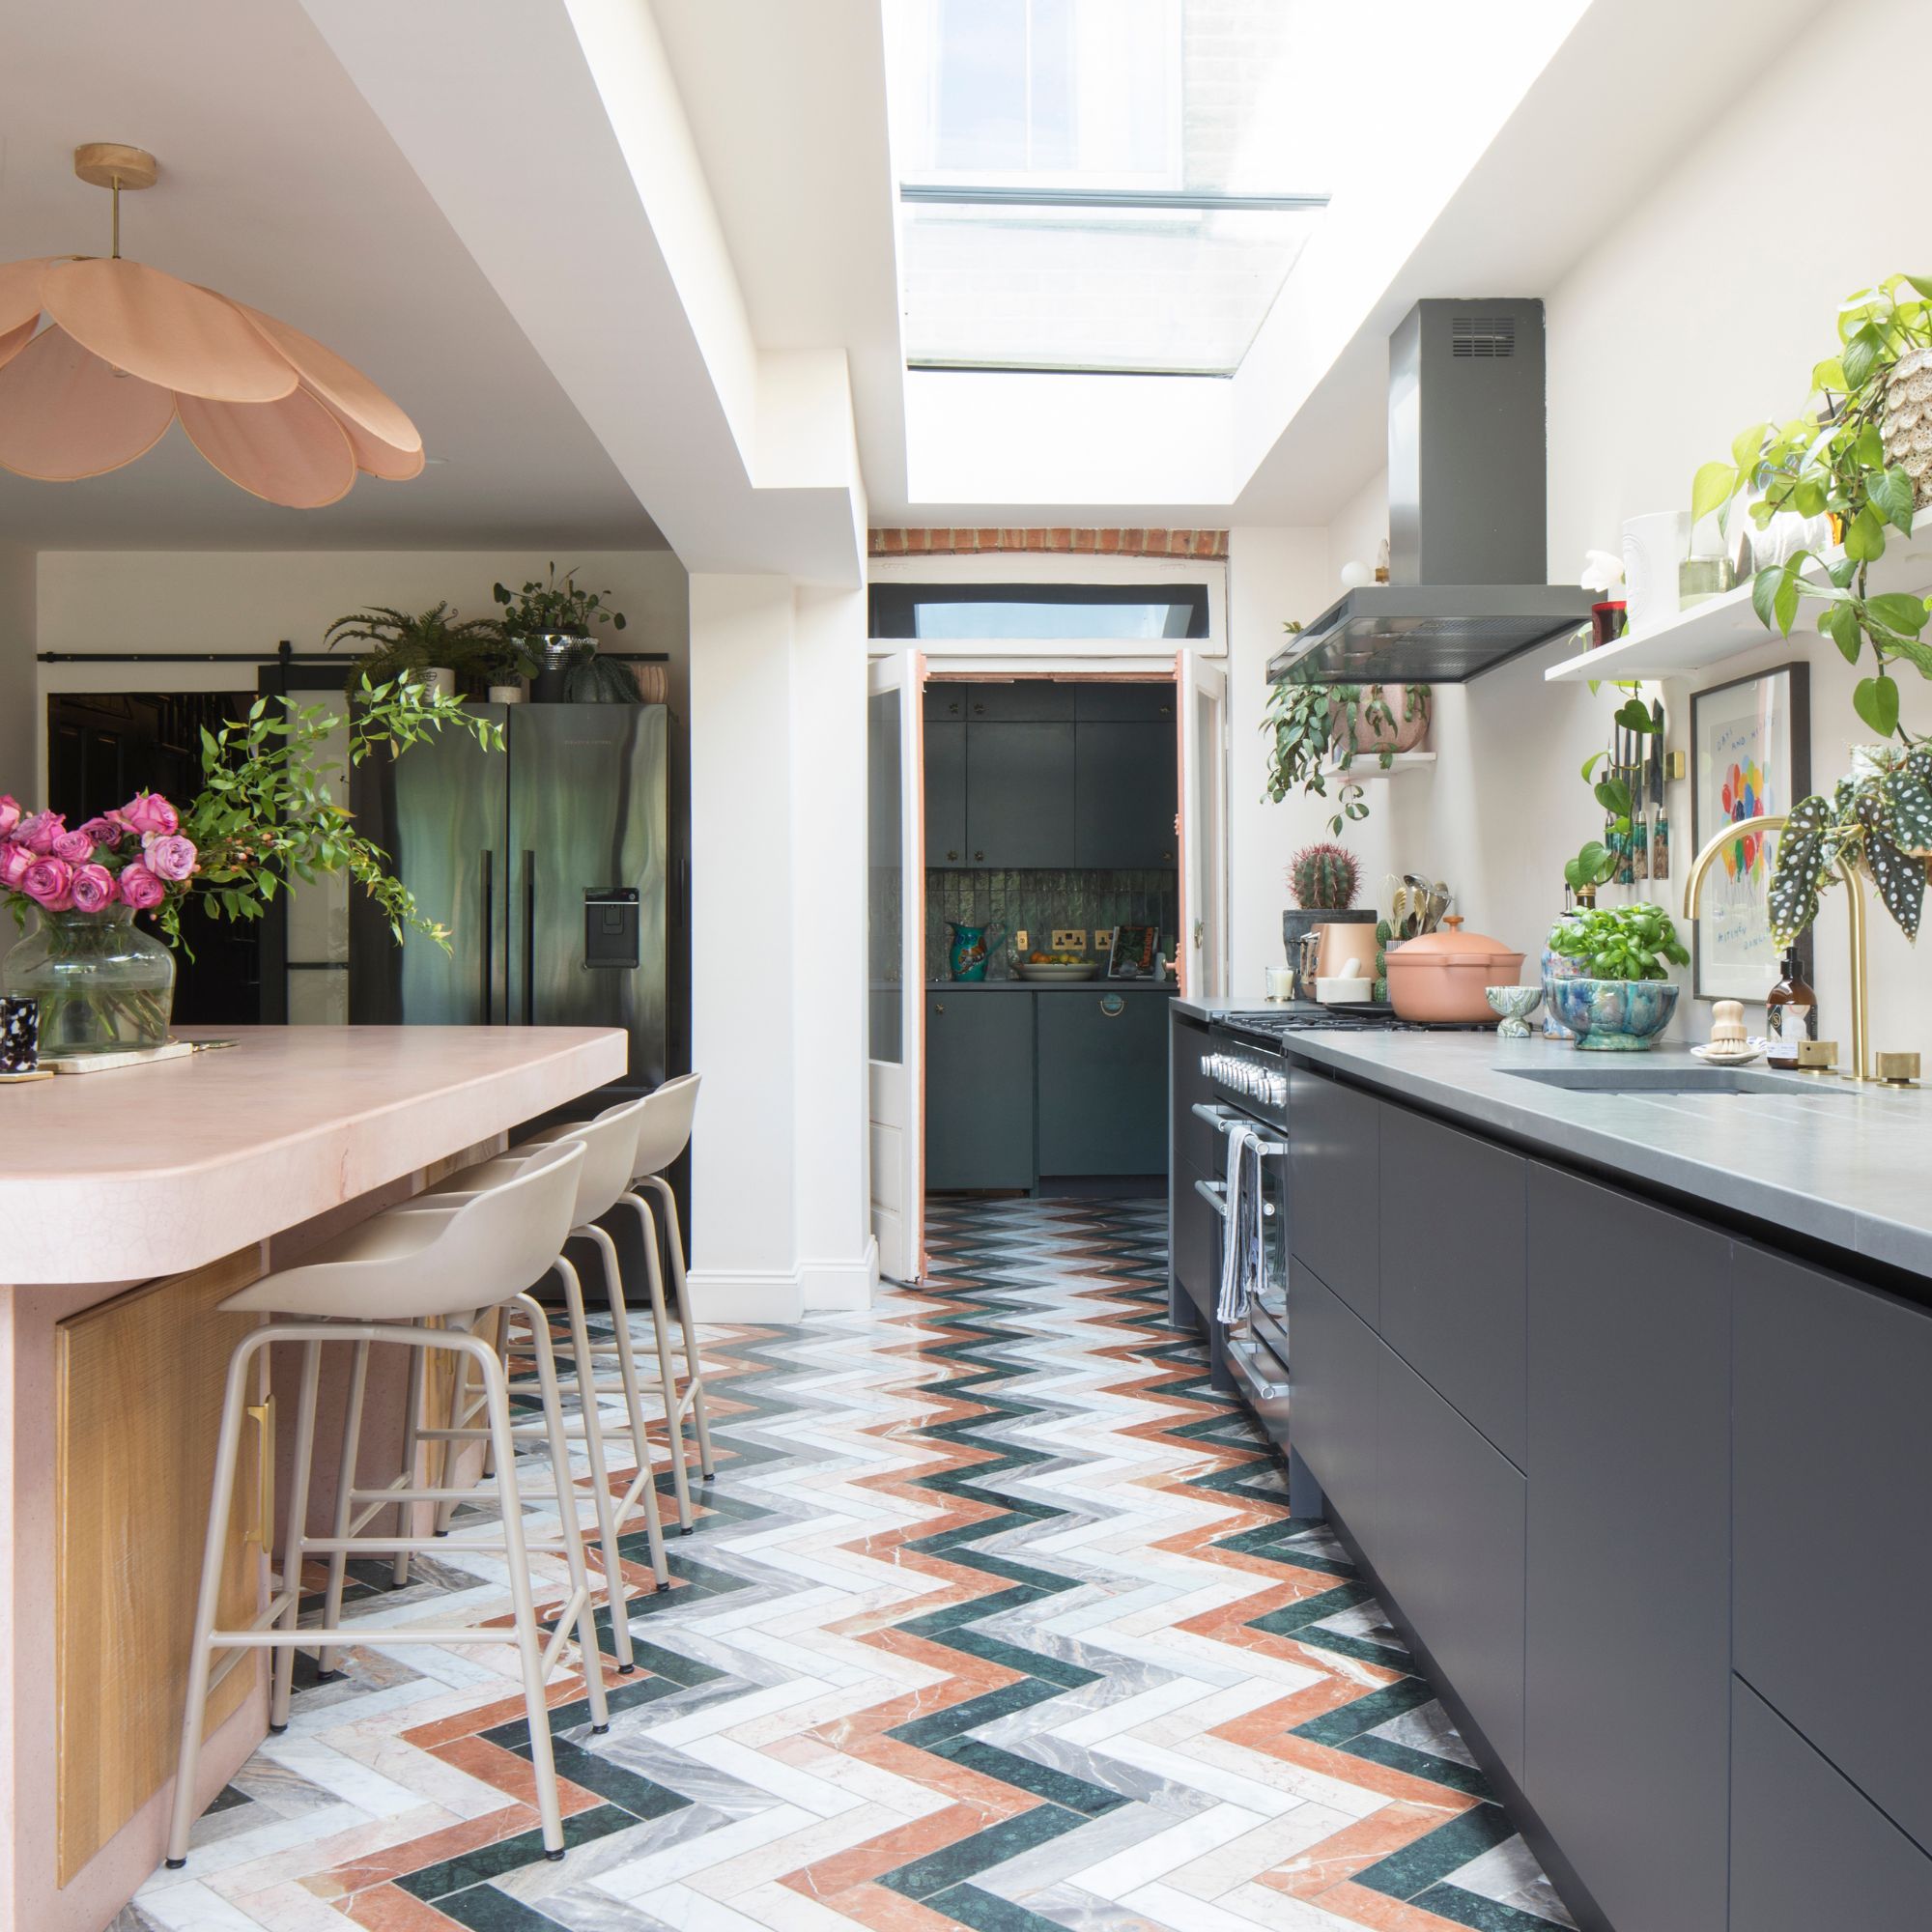
8. Look to order your shopping list items
Once your build has been scheduled and you know the start date, you can begin the exciting task of looking at the shopping list items you need to order in. But do it sooner rather than later.
Anything from the cabinets, worktops and white goods you want installed in your new kitchen extension to the sanitaryware, tiles and flooring for a new bathroom - create an itemised shopping list. Confirm with your builder when the items need to be delivered to make sure they are onsite when needed. You can add these dates and what you need to the extension schedule to identify where the delivery slots need to fit in.
Doing it this way means you'll more than likely be able to order in the items you really want. It you leave it too late you run the risk of that beautiful flooring you had your eye on being out of stock or on a long delivery lead time, which would mean it arriving too late to be fitted. You want to avoid knocking your schedule off kilter as much as possible, so get on top of your shopping!
9. Know the order of works
While every extension project is different there is an order from the ground up. Here's a brief rundown of the order of works you can expect when building an extension...
1. Prepare the area
The first stage is to start by sorting out adequate access to the site as well as clearing the area. This is the job of a groundworker. They are usually sub contracted by your main contractor.
Tasks can include dismantling or moving a greenhouse or shed, moving seating and plants, removing soil, patio slabs and waste - anything that may get in the way of the work and make the site unsafe.
At the same time, you should also protect spaces that are going to be lived in during the project, setting up alternative kitchen/bathroom arrangements if necessary. And there will be dust (and plenty of it) so it can be an idea to pack away and store items that you don't need on a daily basis in plastic boxes.
2. Lay the foundations
Once the site has been cleared and made safe, areas can be assigned for the storage of materials or topsoil. Then the foundations can be laid.
Footings will be dug and marked out. Drains will be put in. Groundworkers will then lay hardcore, sand, a damp proof membrane, insulation and concrete to form the base floor foundation.
3. Start the build
At this point, the walls can go up (usually breeze blocks with a brick outer skin, unless you’re opting for cladding or something more unusual). Window sills and lintels can be inserted as the walls rise. Upper floor joists should be fitted if there is to be more than one storey.
4. Add the roof
First, put in trusses and gable walls to form the frame. Add vents, felting and battens, then put the chosen roof covering on. Add guttering, downpipes and flashing.
5. Finish the shell
Now windows and doors can be fitted, the break through can happen, linking your existing house with your new extension.

6. Fit the interior
Now, floor insulation can be laid – along with any underfloor heating pipework, if it's required. Electrics, plumbing and plastering will be completed.
Finally, your flooring will be installed, cabinetry fitted, carpentry and appliances sorted and in, and then it's the really fun bit - decorating the space!
FAQs

How long does an extension take to build?
Depending on the complexity of the project and the size of the structure, construction will usually take between three and six months.
'Typically if you are building a modest extension approx. 25 – 50 sqm, we would expect this to be approximately six months, depending on the concept and complexity of the design and materials used,' says architect Darren Bray of Studio BAD. 'Windows are always the long lead items, typically eight to 12 weeks from placing an order.'
Use this construction time period wisely by sourcing products for the internal fit-out. Bear in mind that kitchen suites and bespoke joinery often come with a significant lead time so order earlier rather than later.
Do you need your neighbours permission for an extension?
'The simple answer is no, not at the moment, but it’s of course better to get their support if you can,' explains planning consultant Simon Rix. 'That’s because they will, in many cases, be asked for their opinion. That all said, the system is changing, so it’s worth getting professional help from an early stage.'
'One of my recent planning application wins for a client was achieved despite long objection letters from a neighbour. This is not unusual and proves that planning decisions are not currently made on the basis of some kind of local popularity contest.'
'Planning decisions are made on the basis of planning policies. Occasionally comments from neighbours are relevant to those planning policies, but this is rare. They are more often incoherent and fuelled by anger or jealousy. If so, they will be given little or no weight by the council's planning department, who usually decides on such matters. That's not to say such comments can be completely ignored by you though.'
'Even irrelevant or factually incorrect neighbour objections can sometimes have an impact on the deliberations of elected councillors. That's because part-time councillors are rarely experts in planning policies. So, if you do receive an objection to your planning application from a neighbour, no matter how off-beam it appears, you should rebut it by calmly pointing out the true facts and highlighting why your application does comply with the relevant planning policies.'
'That said, it’s always best to get the support of your neighbours if you can. Even if they can’t convince the professional planning officer of their objections, they may be able to get the support of the elected councillors to oppose your plans, and they really could put a spanner in the works.'
Can a neighbour block permitted development?
'Extensions, that are under a certain size, on many (but not all) houses count as permitted development, so no planning application would be needed,' explains planning consultant Simon. 'If this is the case neighbours won’t even be asked for their opinion by the council.'
'However, some, larger, permitted development extensions do require a kind of mini-planning application to the council, called “prior approval”. This will consider impacts on neighbours. But, as with extensions that do require normal planning applications, what counts is the council planning officer’s views on what those impacts on neighbours would be, not what the neighbours actually think of them.'
'A warning here: never just assume your extension is covered by permitted development. There are many exemptions and even the size restrictions can be interpreted in different ways. So if you are spending good money on a lovely new extension to your beloved home, use a planning consultant and always get a Certificate of Lawful Development before you start building.'
'This Certificate is a legally binding confirmation from the council that what you want to do really doesn’t need a planning application. Failure to do this could at the very least cause you problems with solicitors when you come to sell the house.'
Planning changes are coming
'It’s also worth noting that the whole planning system is changing,' advises Simon. 'A new law just passed by Parliament means that so called “street votes” could be used to decide on developments in the future. So, even if at the moment neighbours don’t have a veto on your extension, things might change from 2024 onwards.'
'So, whenever you want to extend your home, my advice would be to first talk to a professional planning consultant like me. We can help guide you through what is a fast-changing process.'
How long does a planning application take?
'A planning application should take between eight to 12 weeks, depending on the local authority and if the site is in a national park,' says architect Darren Bray. 'But almost all planning departments are suffering from a lack of resource, so our experience is every planning application now runs over. You will generally be asked to agree to an extension of time.'
'Typically, at the moment, I would allow a minimum of three months and in many cases six months. This is another good reason to employ an architect - so that they can chase the local authority for you. They may already have a relationship with the planning department, too, which is helpful.'